Finally completed my CrossFire mods

I’ve completed my mods (for the time being) on my CrossFire. Some of these might be useful to others so I’ll just highlight them here and feel free to ask questions (PM if you want gory details).

There were a number of things that were immediately apparent when I thought about putting the CrossFire in my workshop. The most obvious one was how to keep the sparks from setting my woodshop on fire! :grimacing:
While not necessarily a CrossFire mod, it ended up creating the need for some. I concluded/hoped that I could use some fiberglass welding blankets as a curtain to contain the sparks and, when I decided on the location, I decided that:

  1. The curtains should be retractable so I don’t lose access to my clamps or wood storage shelves.
  2. The Y motor and electronics enclosure needed to be moved from the normal location.
    The Y motor was easy, it easily moved to the opposite end of the Y rail and I simply flipped the polarity of the Direction pin in Mach3 configuration. The X & Y motor cables, however, needed to be extended to reach the new location of the enclosure.

This worked ok for my initial setup, but created three problems.
First, the X cable dangled behind the entire length of the Y rail when the Y axis was moved. This in itself isn’t a problem UNLESS you plan to use stock larger than 2x2. The dangling cable blocked the space between the Y rail and table so you couldn’t expand the workpiece in the X direction. This I solved by adding a drag chain to keep the X Motor cables neatly away from the table and moving mechanisms.
The second problem was that my stiff curtain prevented the Torch handle and cable from moving smoothly and would tend to turn or deflect the torch while it was moving - not good. I solved this by adding a tie point to the top of the torch mount, looped the cable back over itself to keep the torch end isolated from the tugging of the overhead bar. This also swung the handle parallel to the X Axis, giving me more room near the curtain.
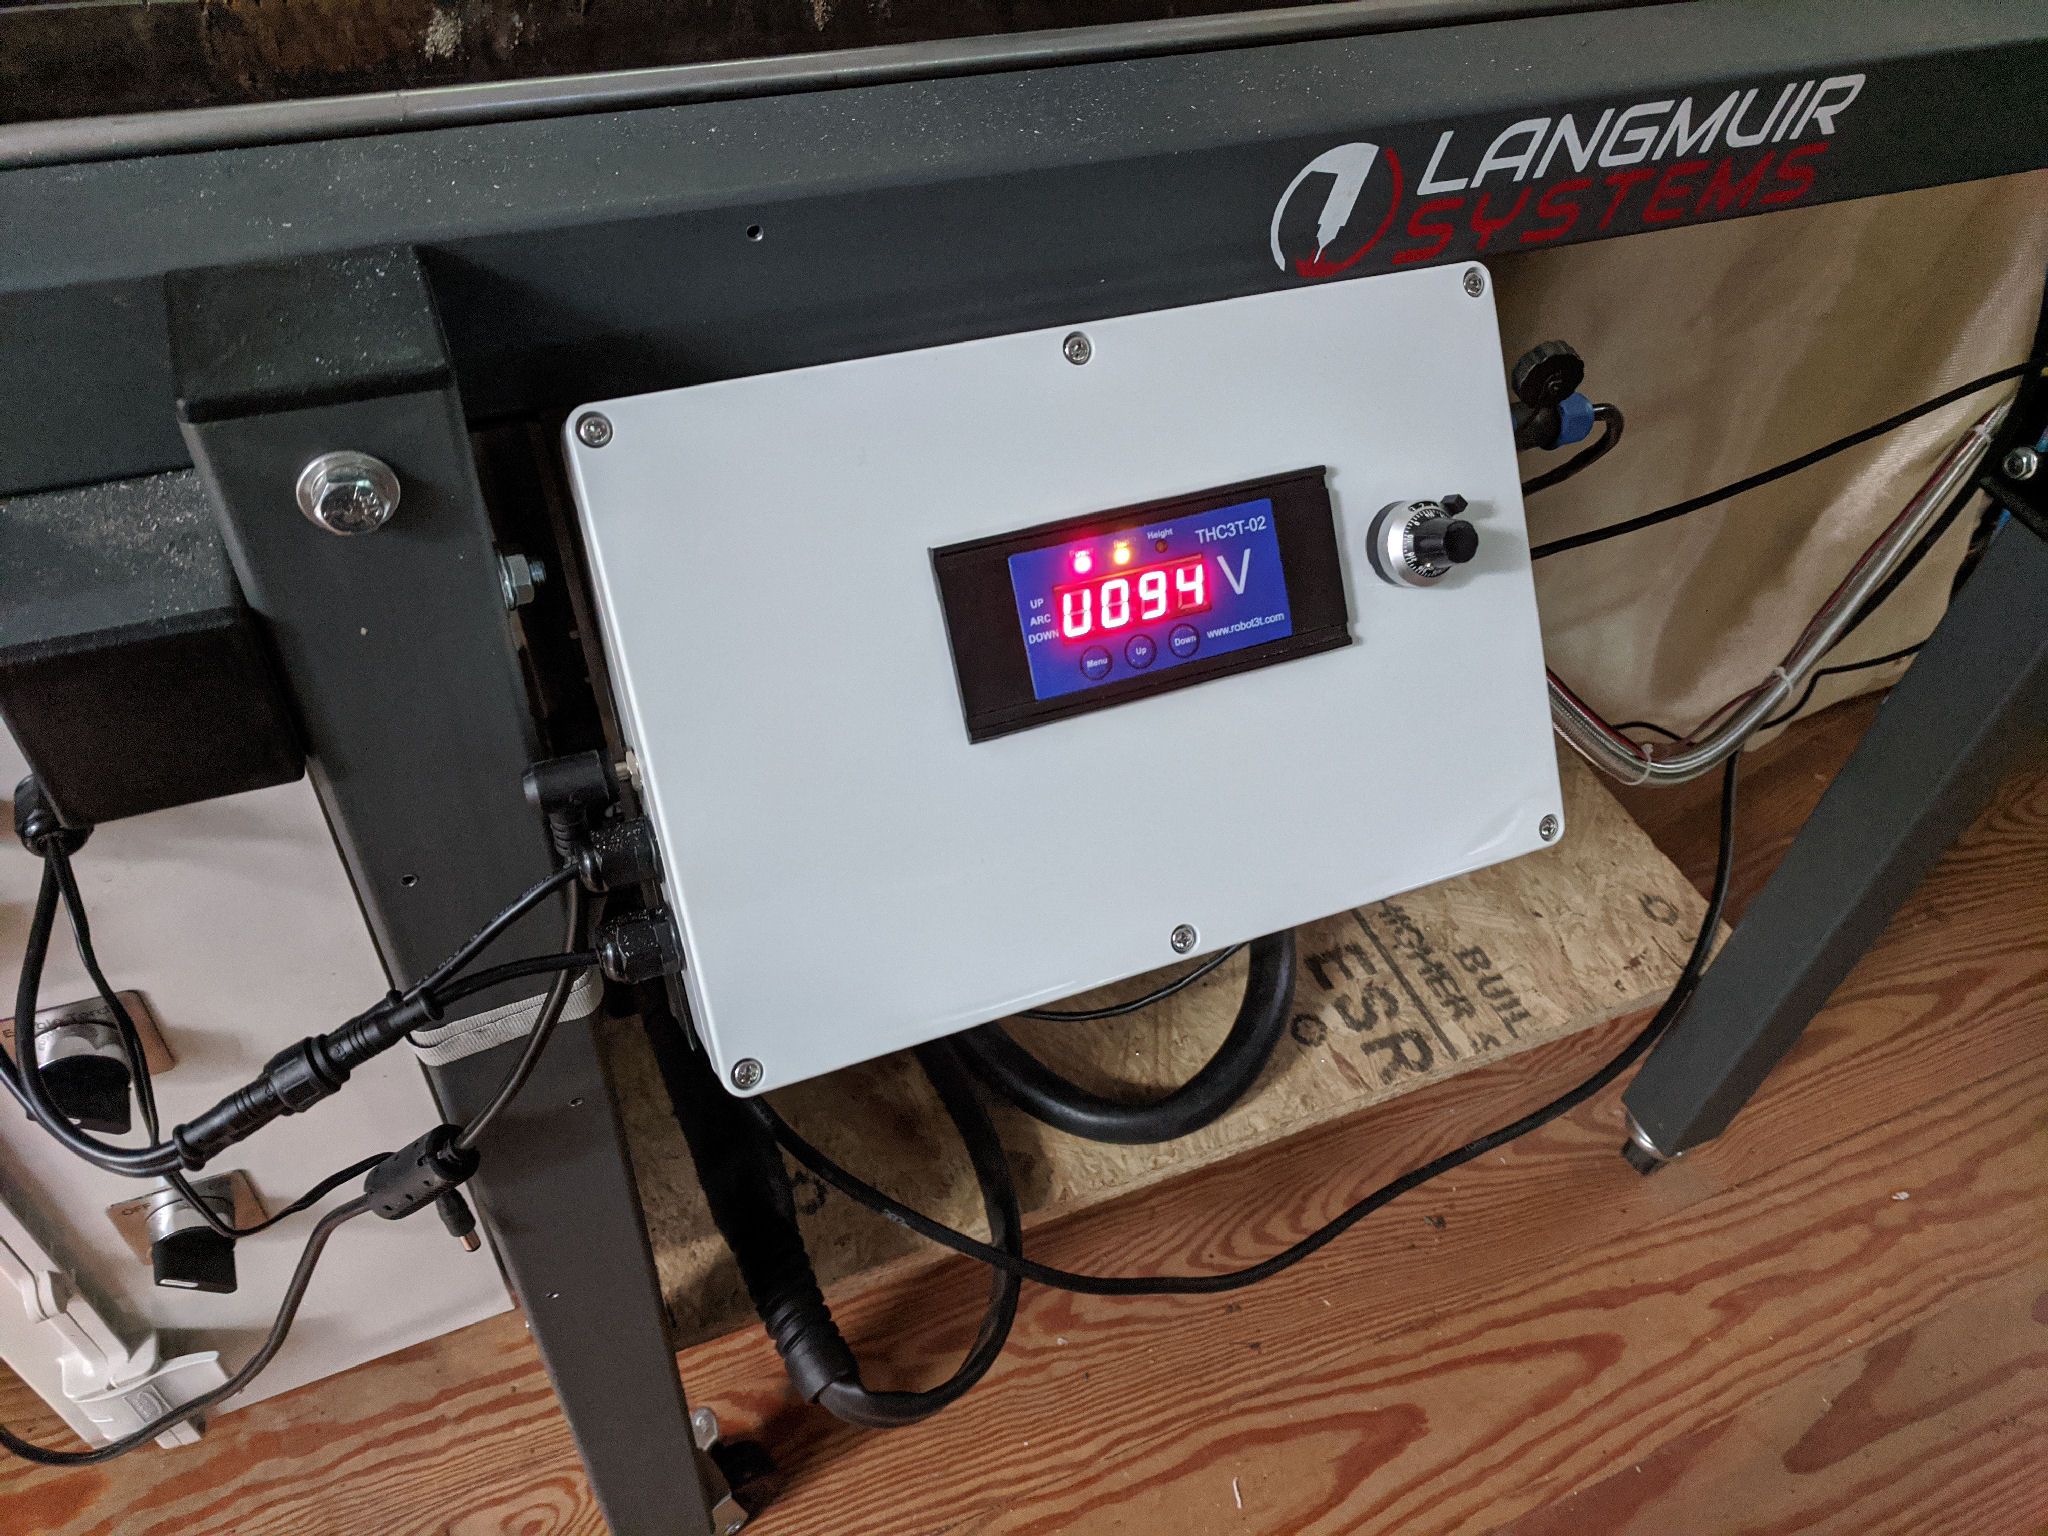
The third problem wasn’t obvious until I was cutting out by the Y0, X25 corner. The enclosure no longer had the natural ‘wind break’ of the Y rail to keep it from getting splashed and sparked. Consquently, it took very little time to convince me that I needed to replace the enclosure with a splash proof one. So… I bit the bullet and moved the electronic to a NEMA 3 enclosure.
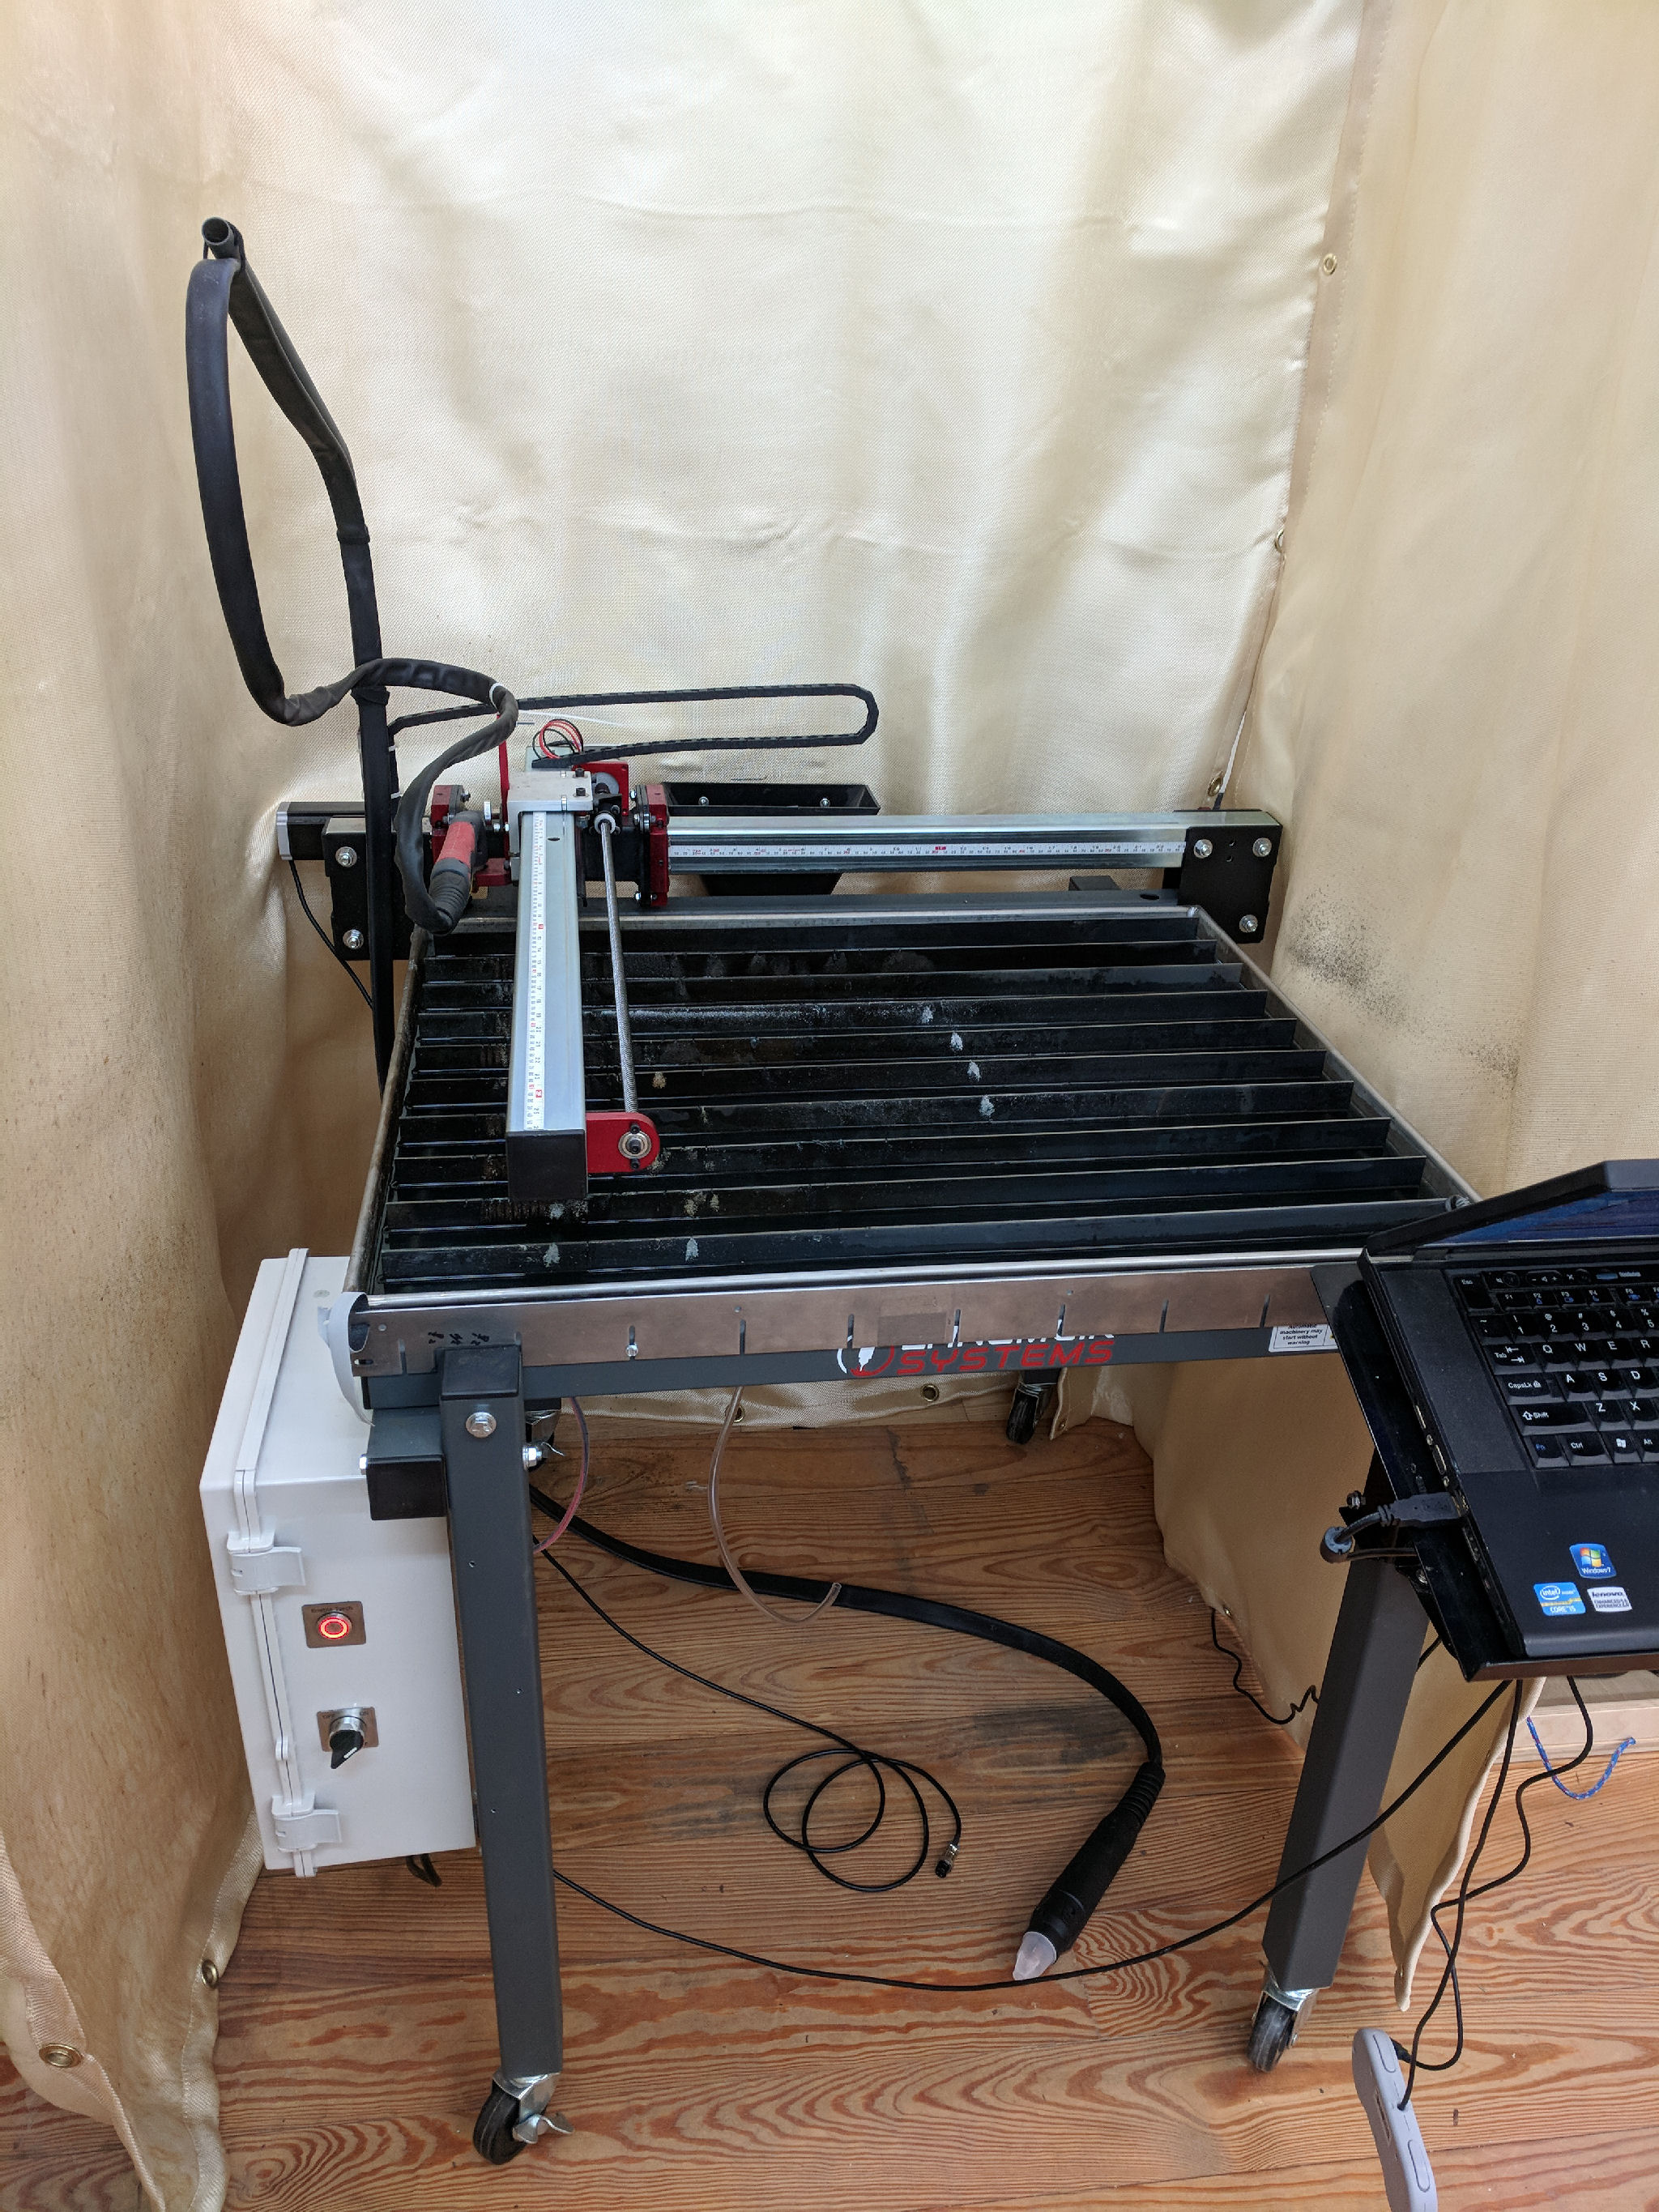
So, without making this too long winded, here are the photos:
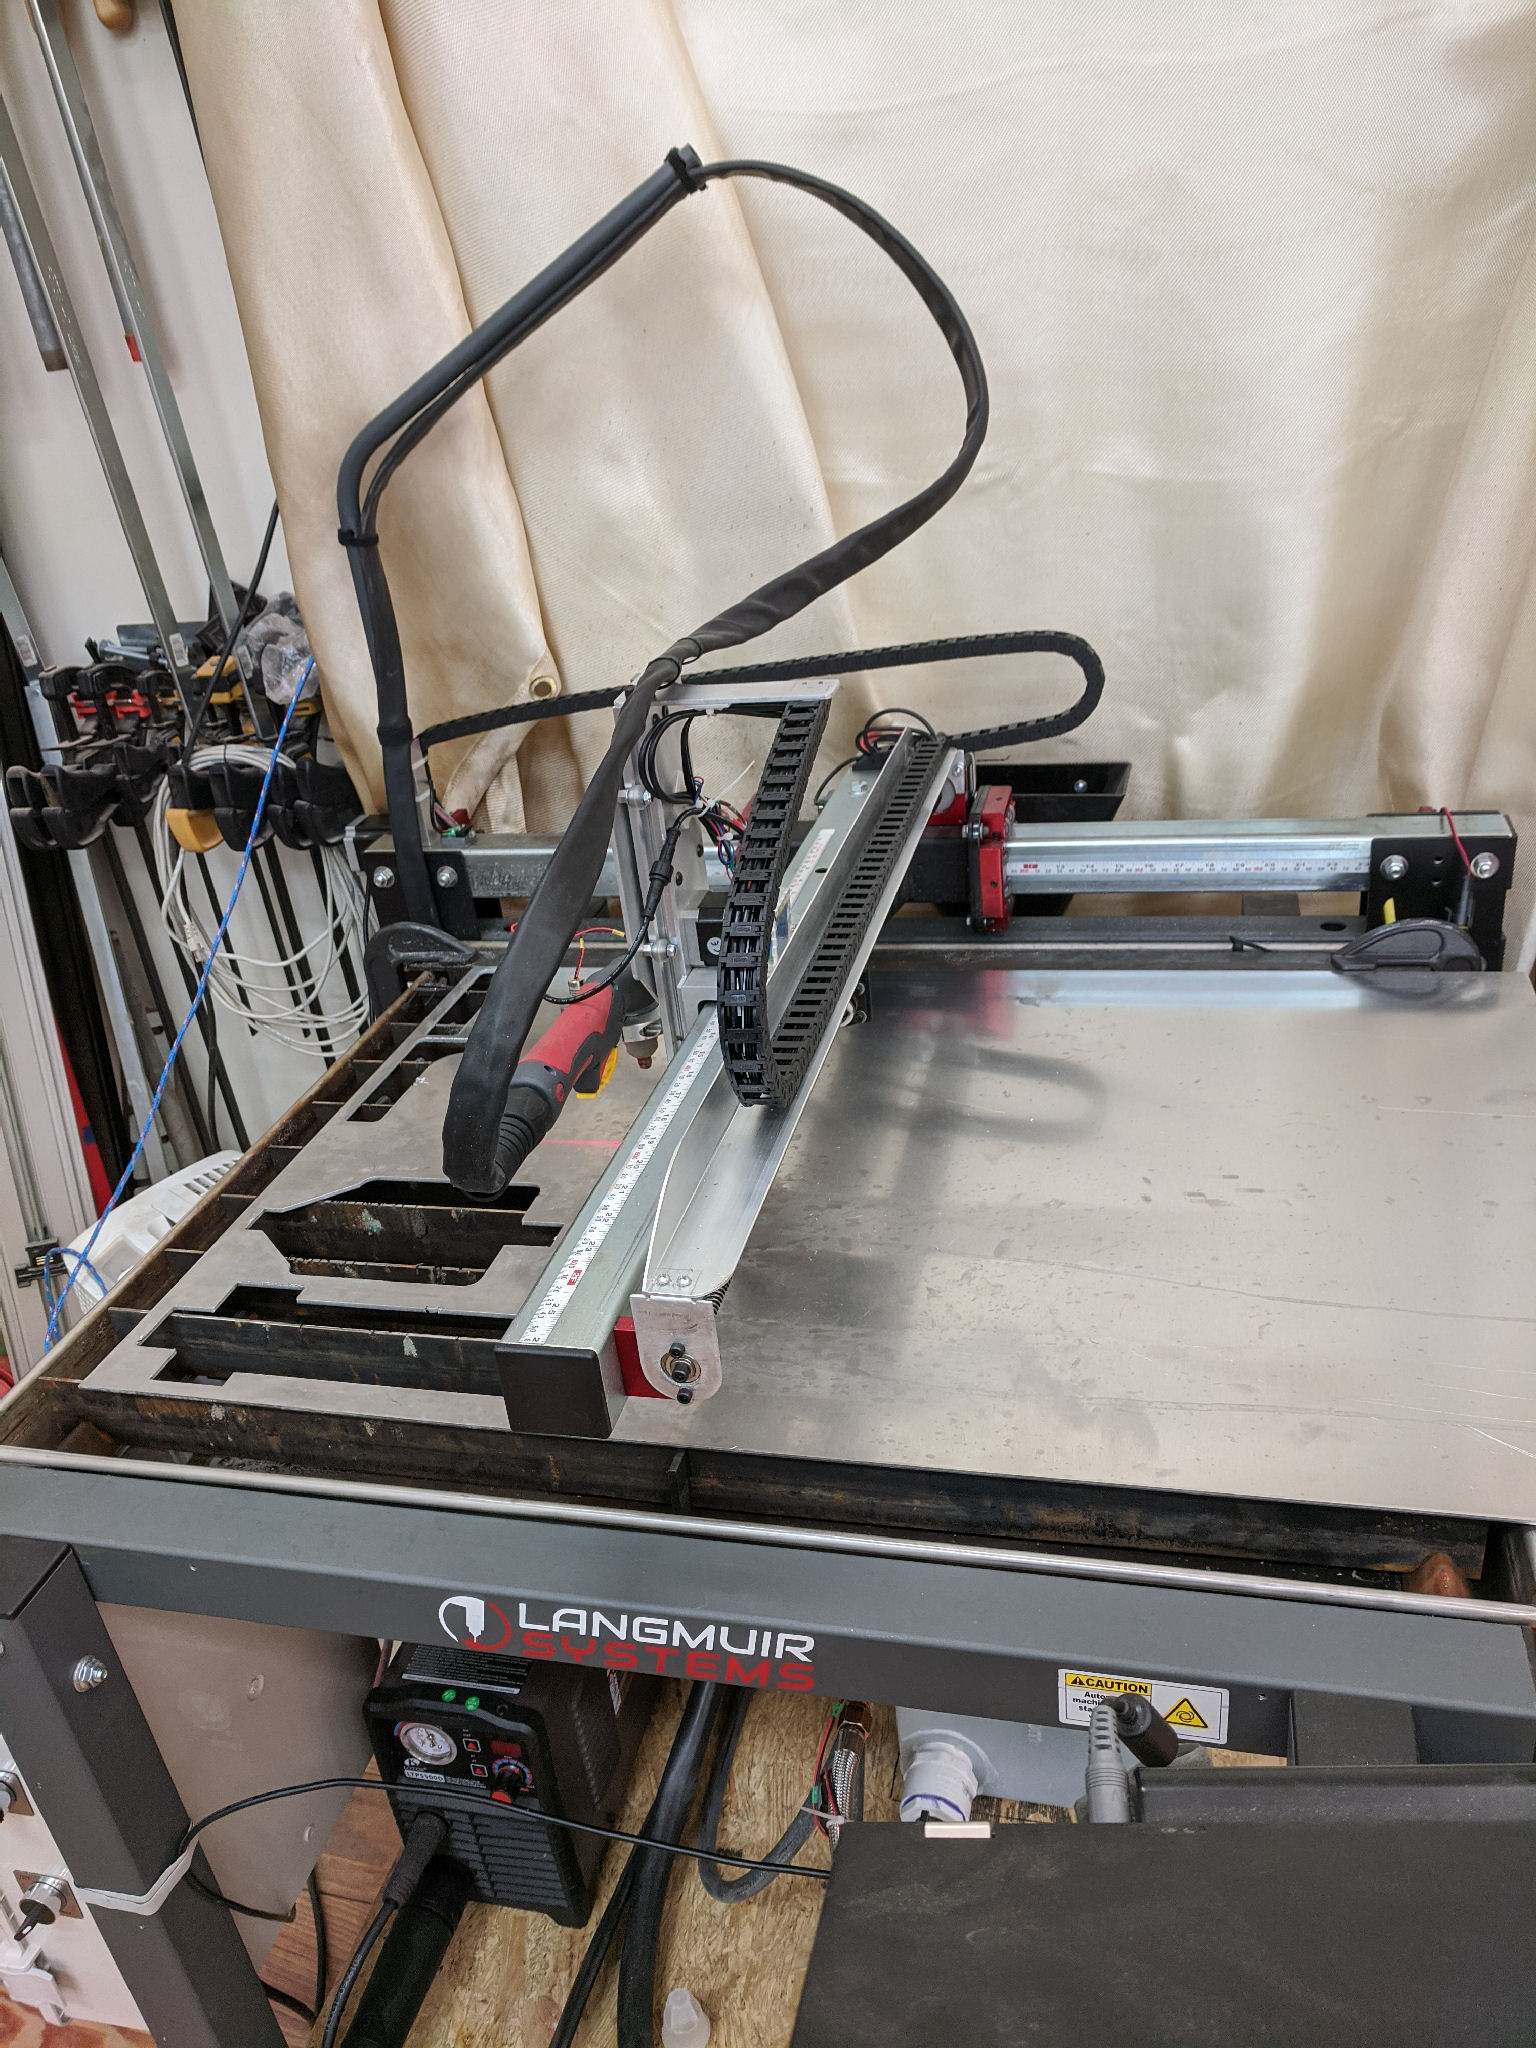
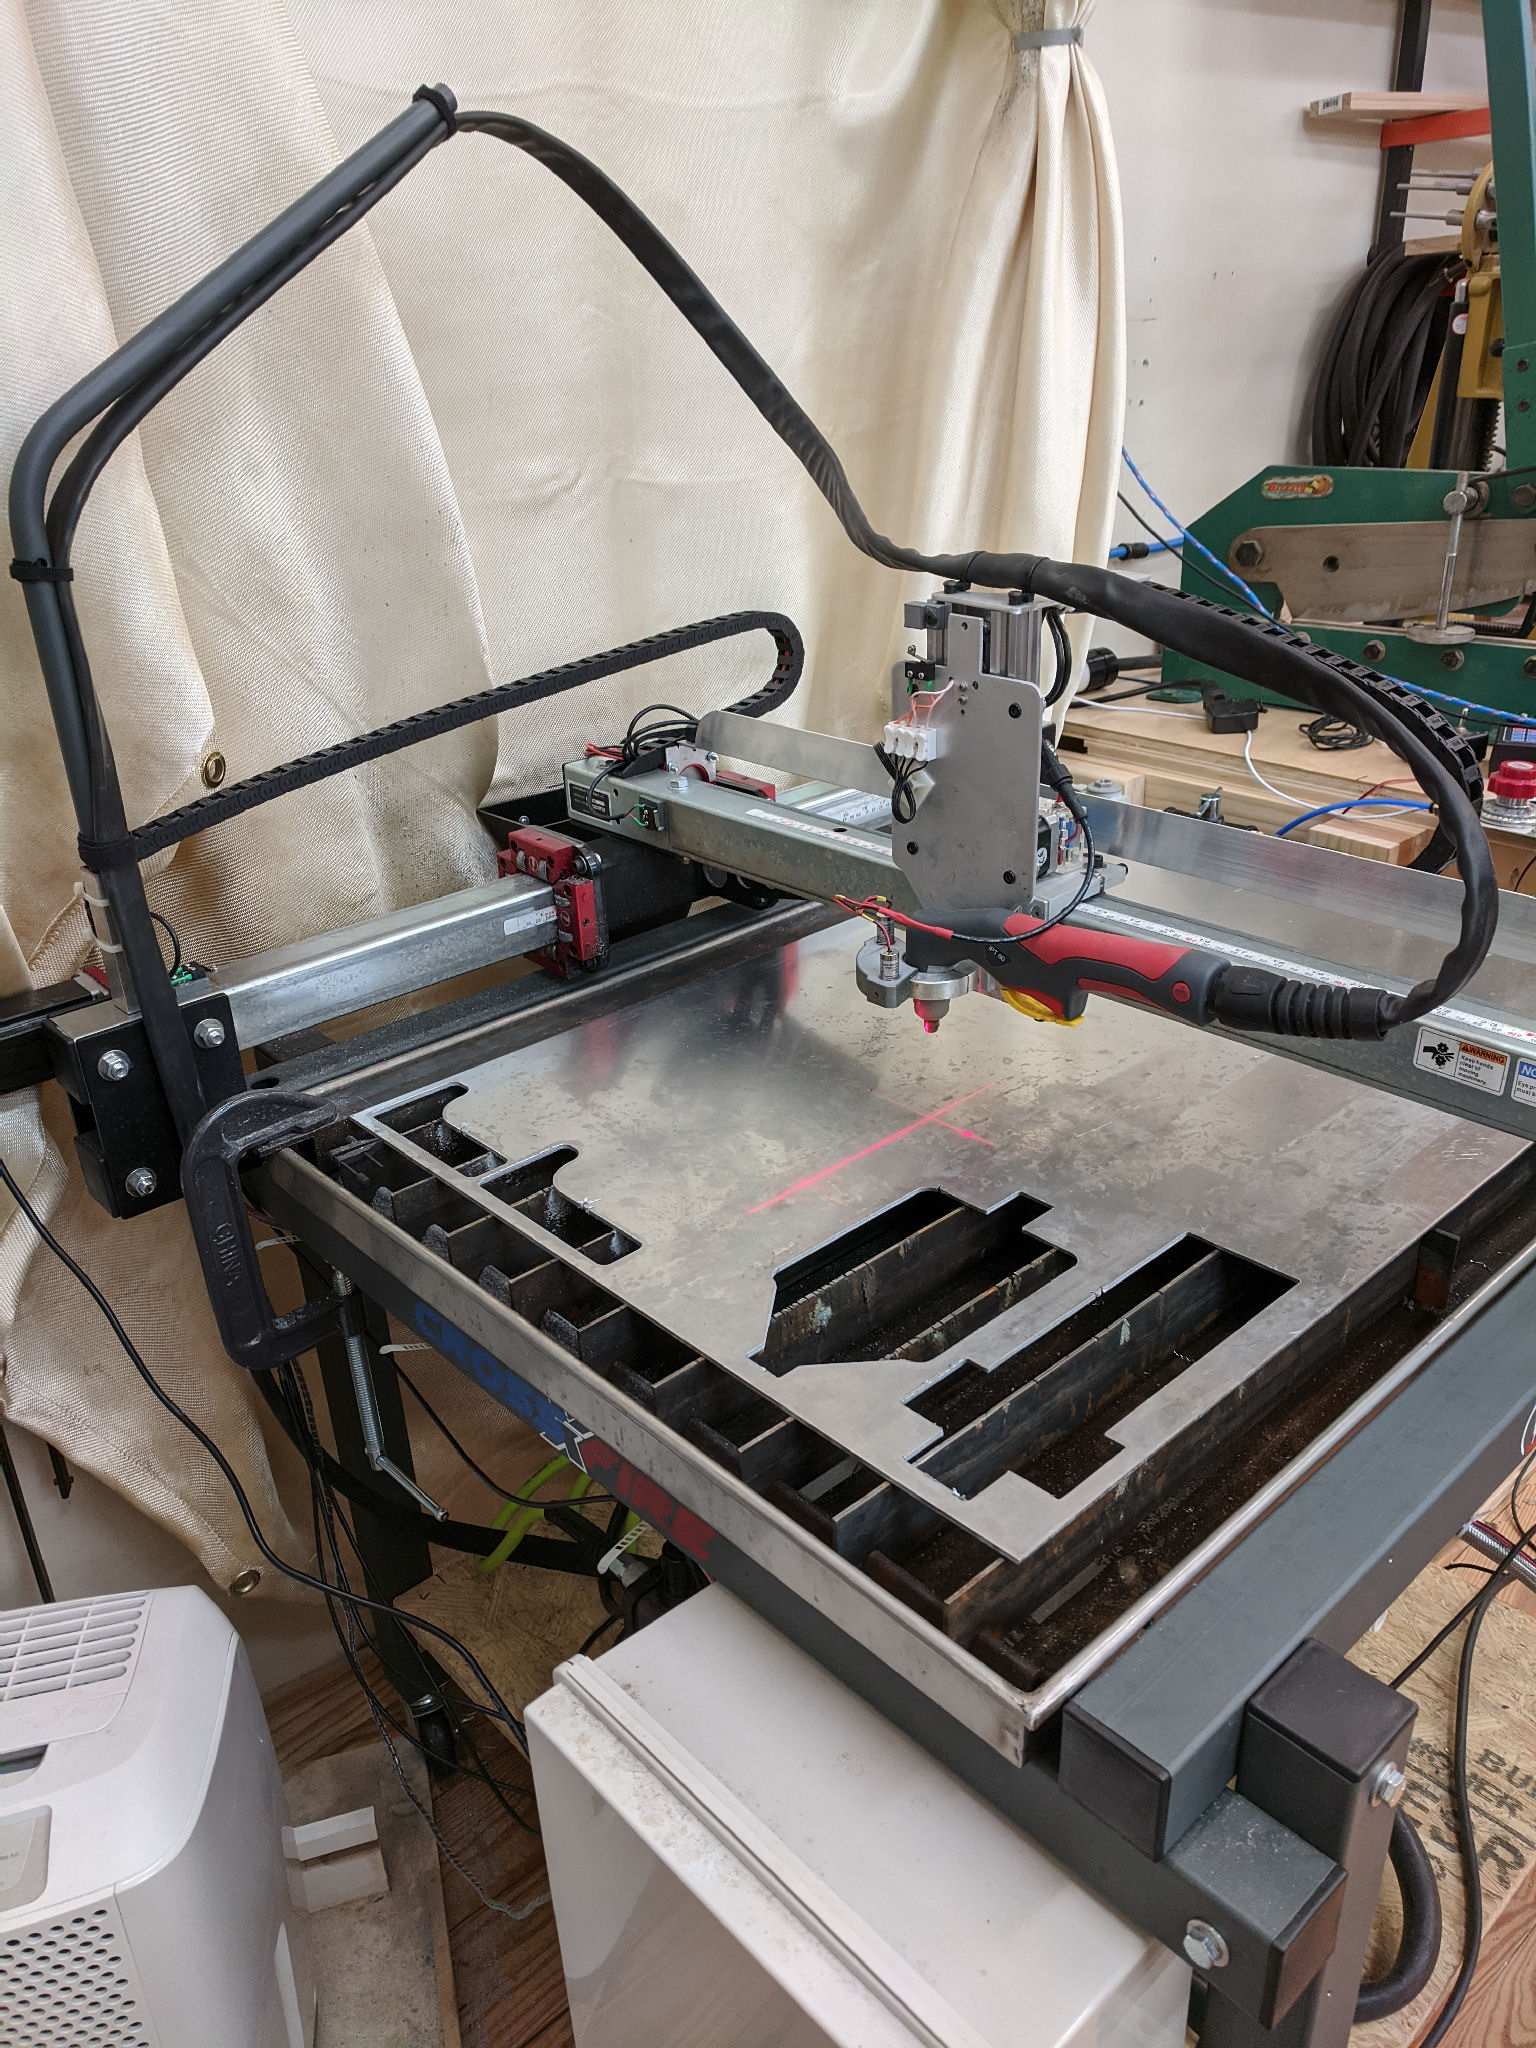
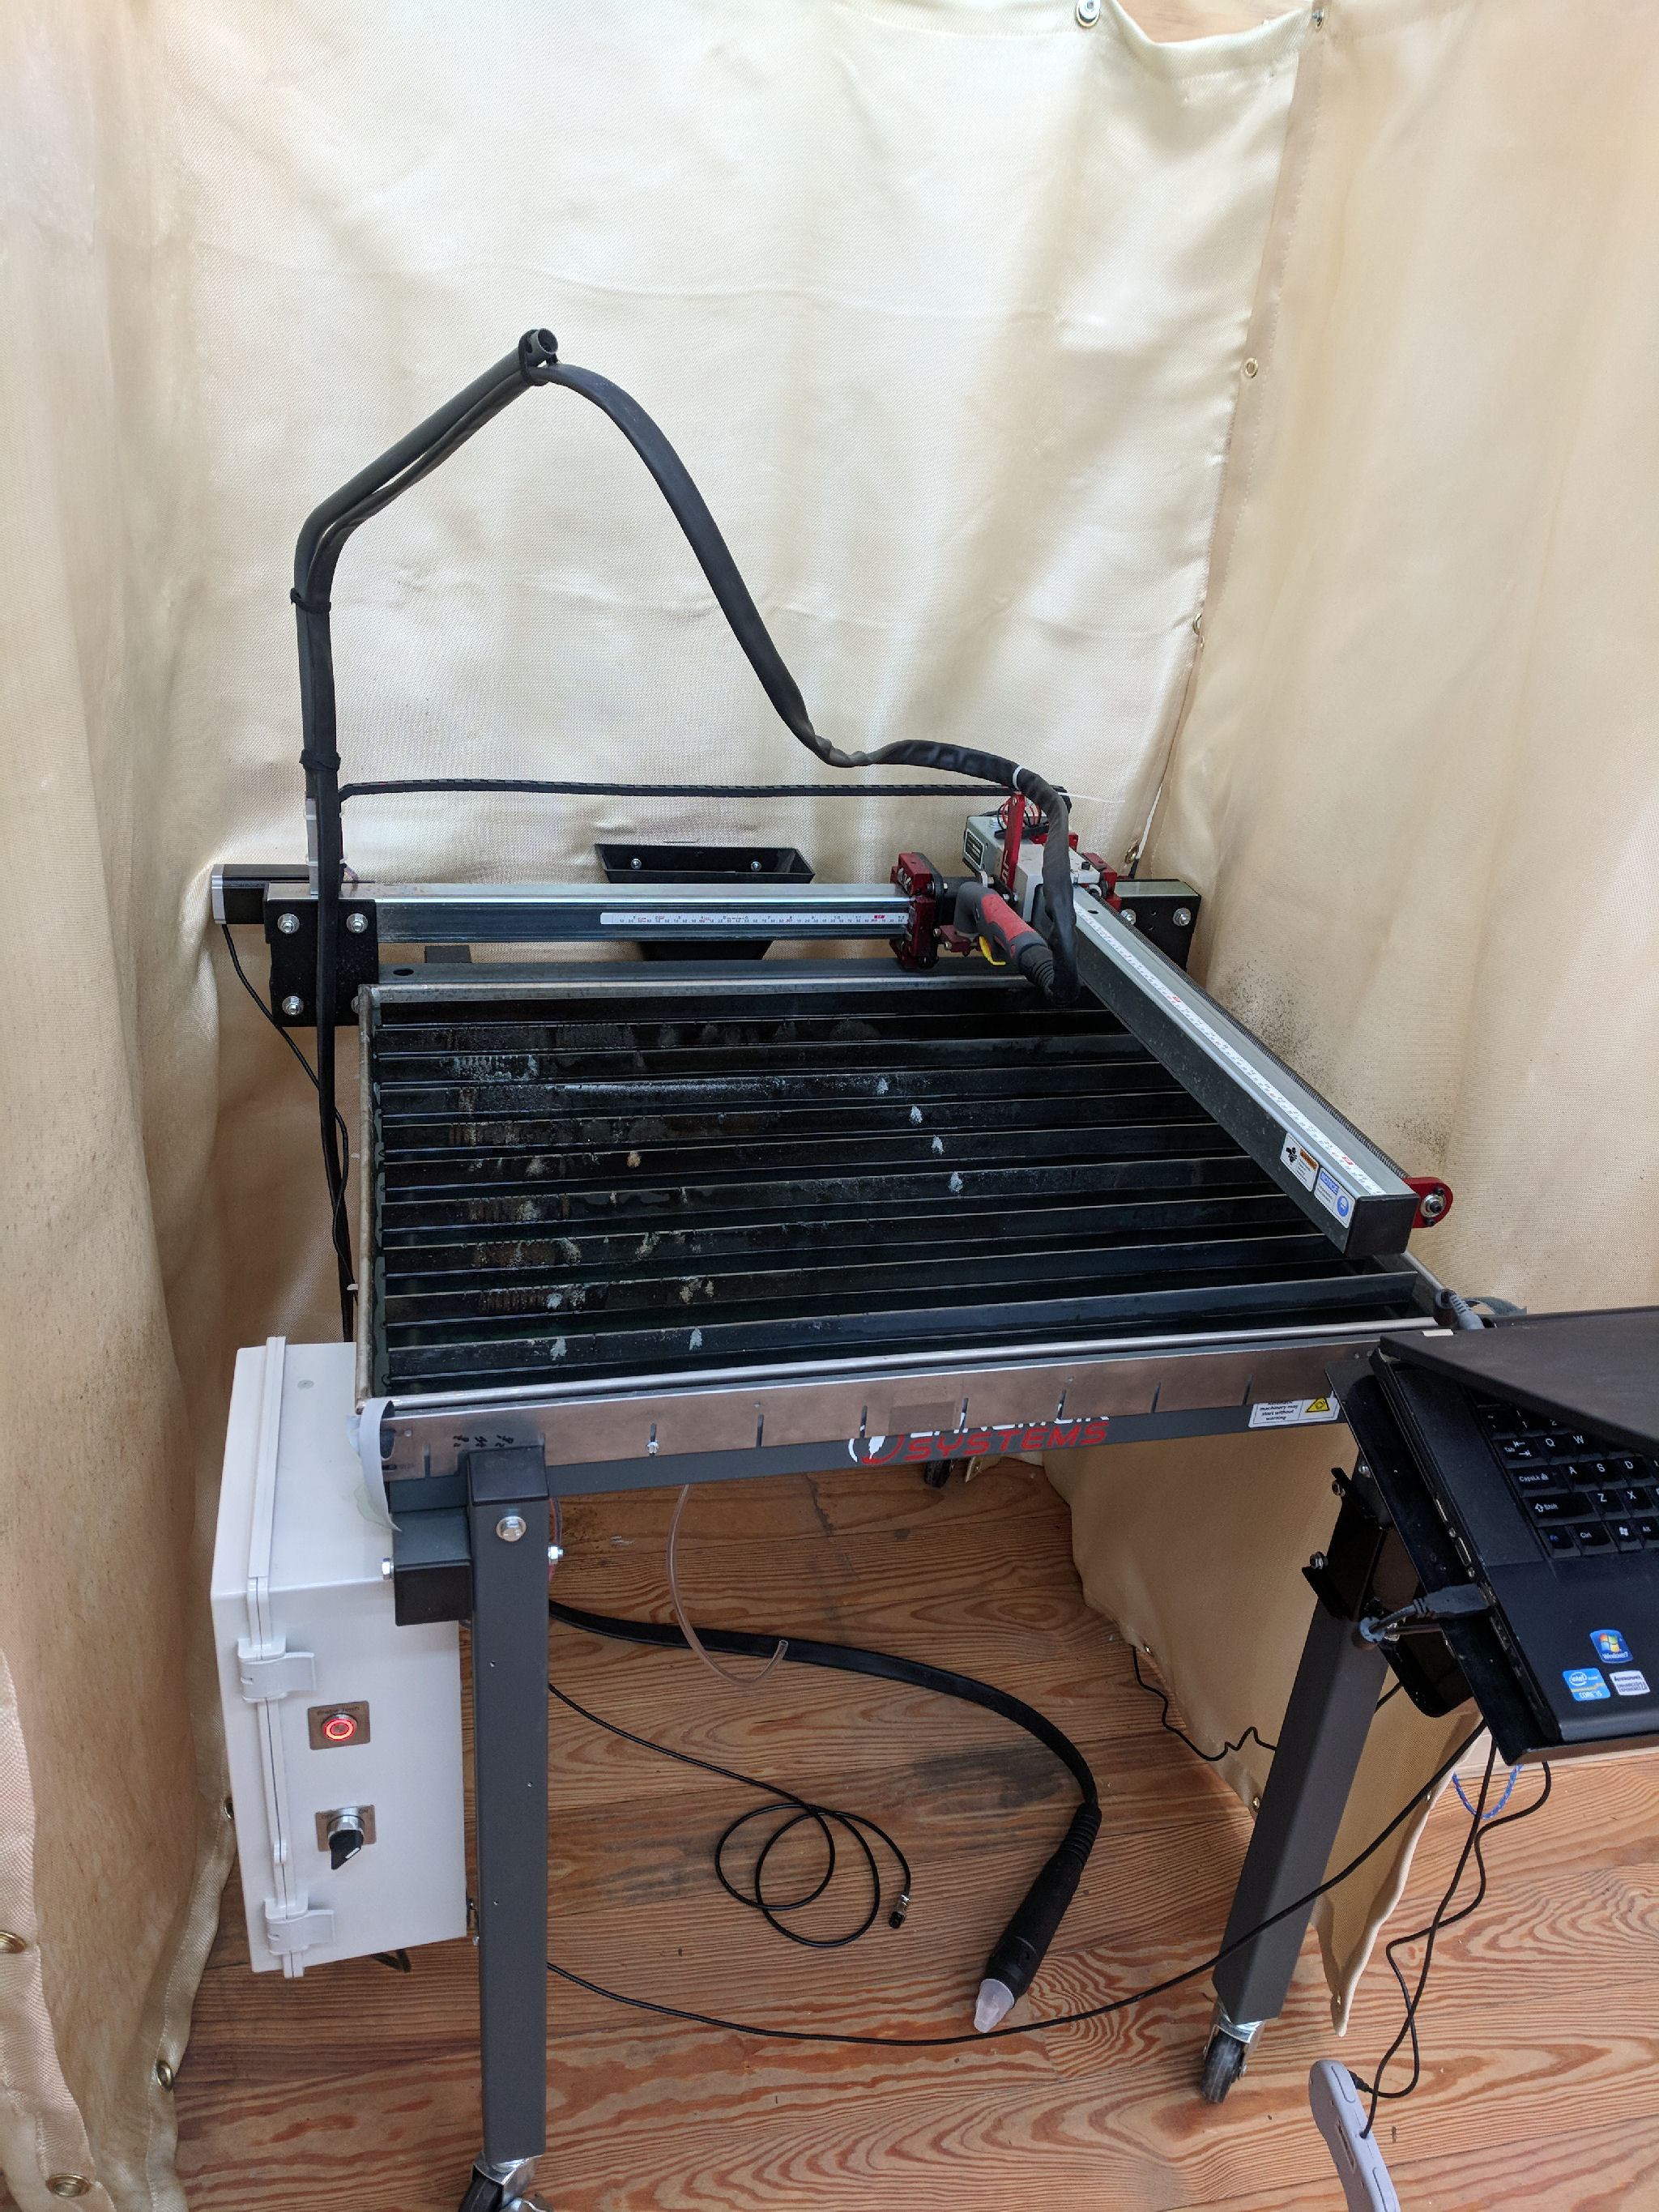
Front Views of the setup with Y at the two limits:


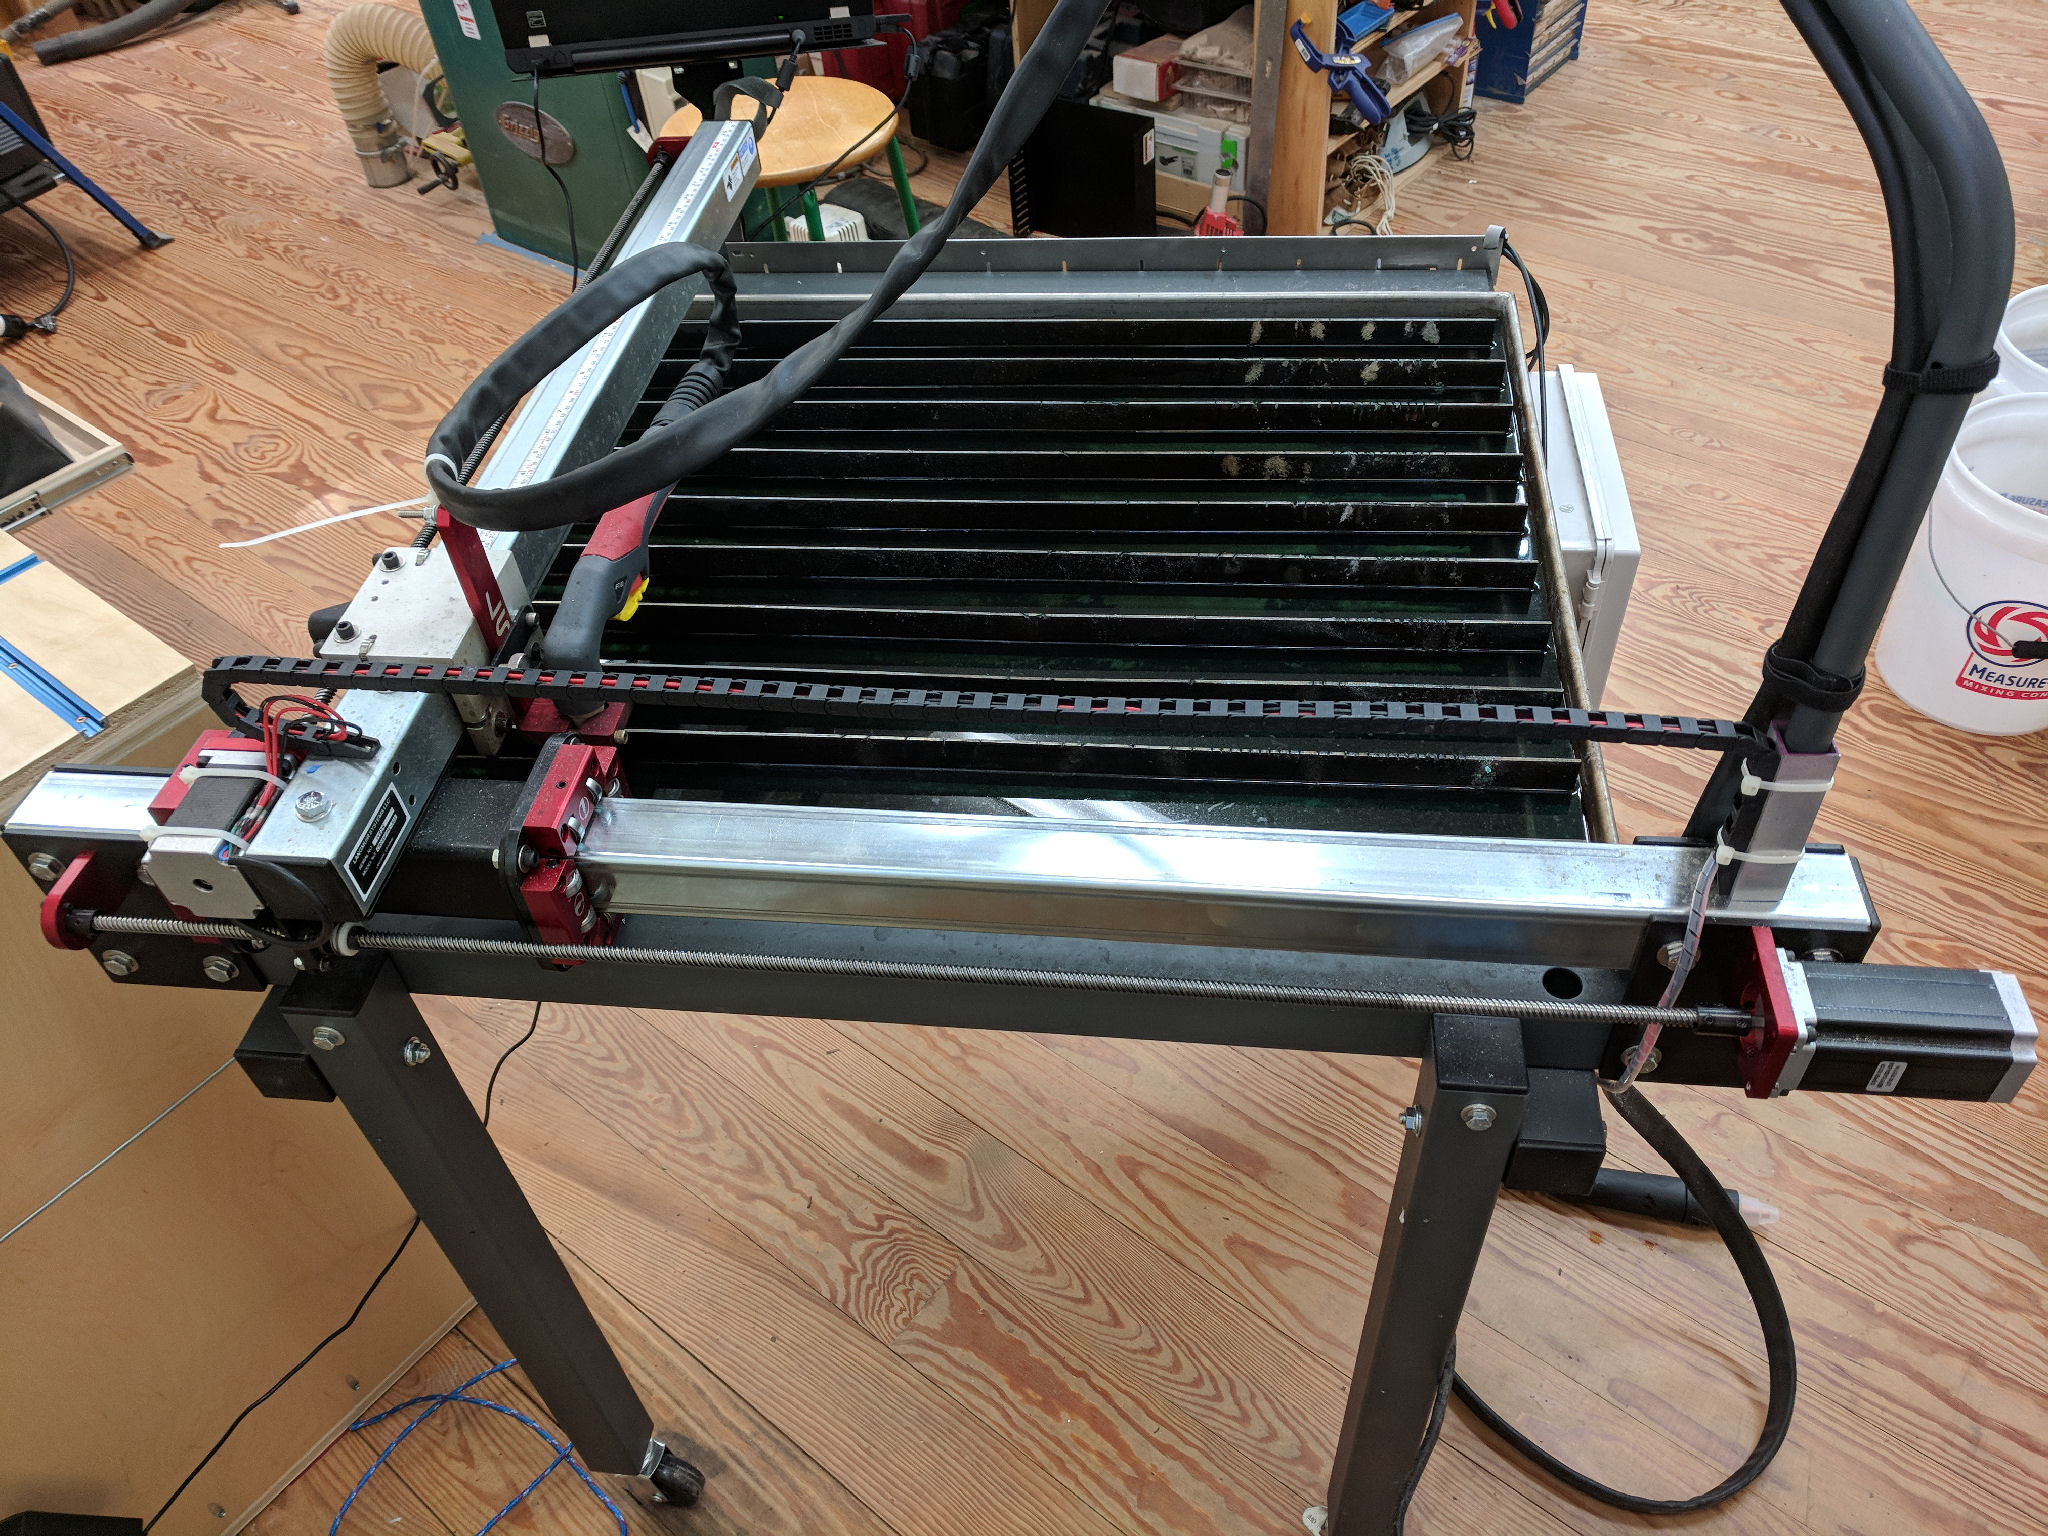
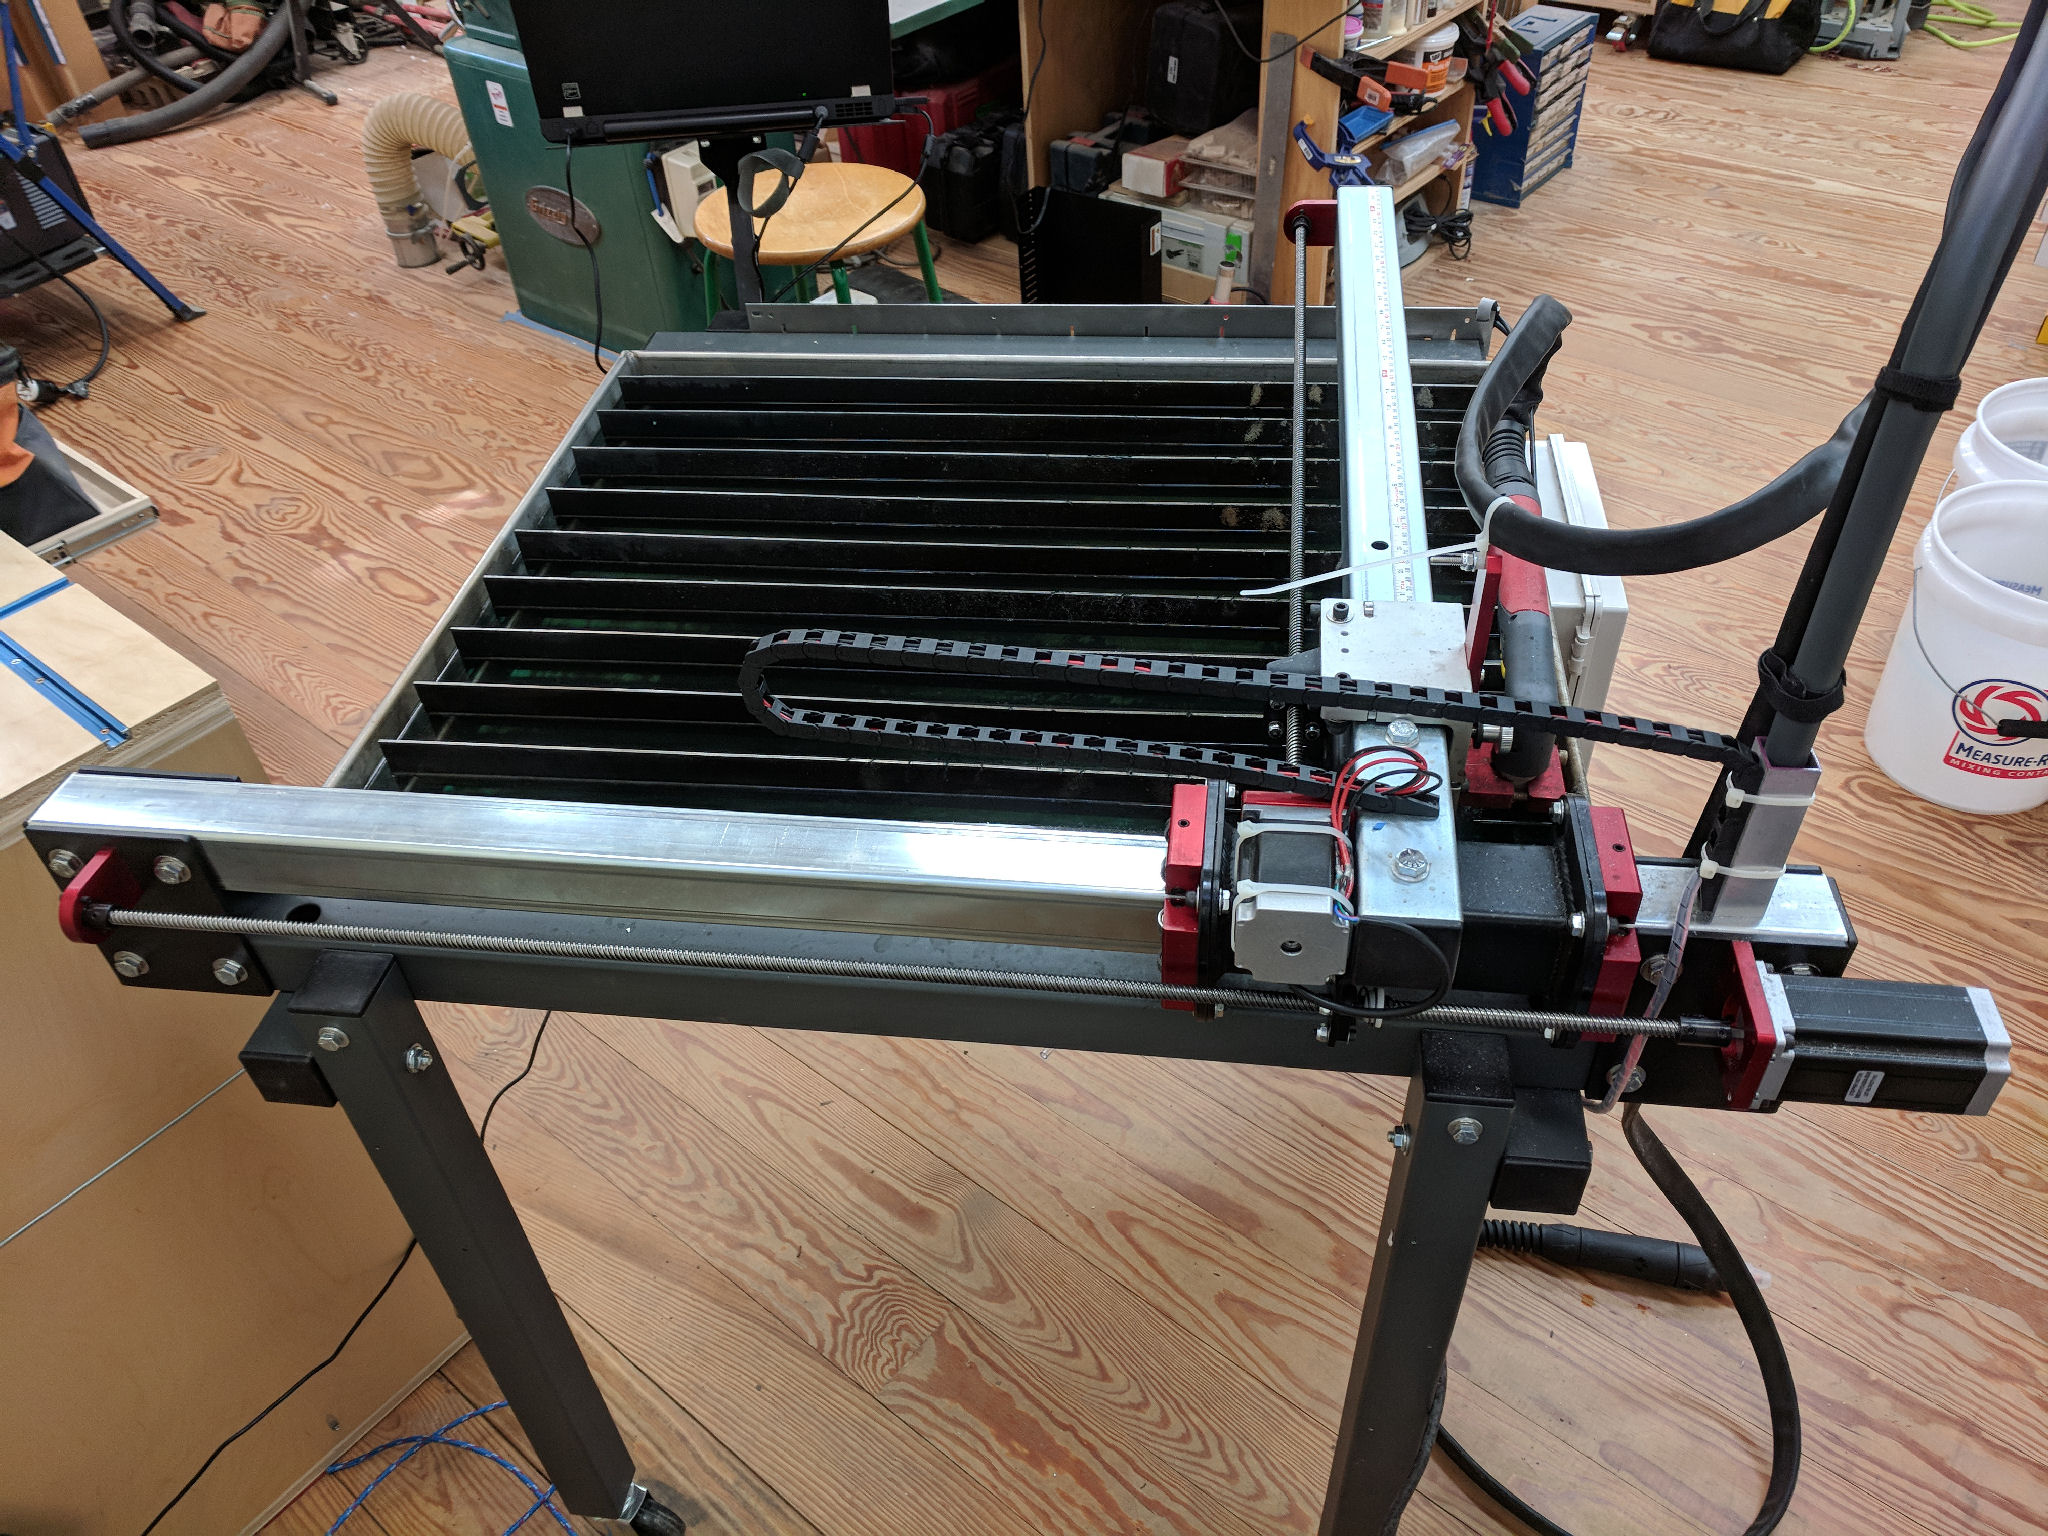
Back Views showing more of the drag chain detail:
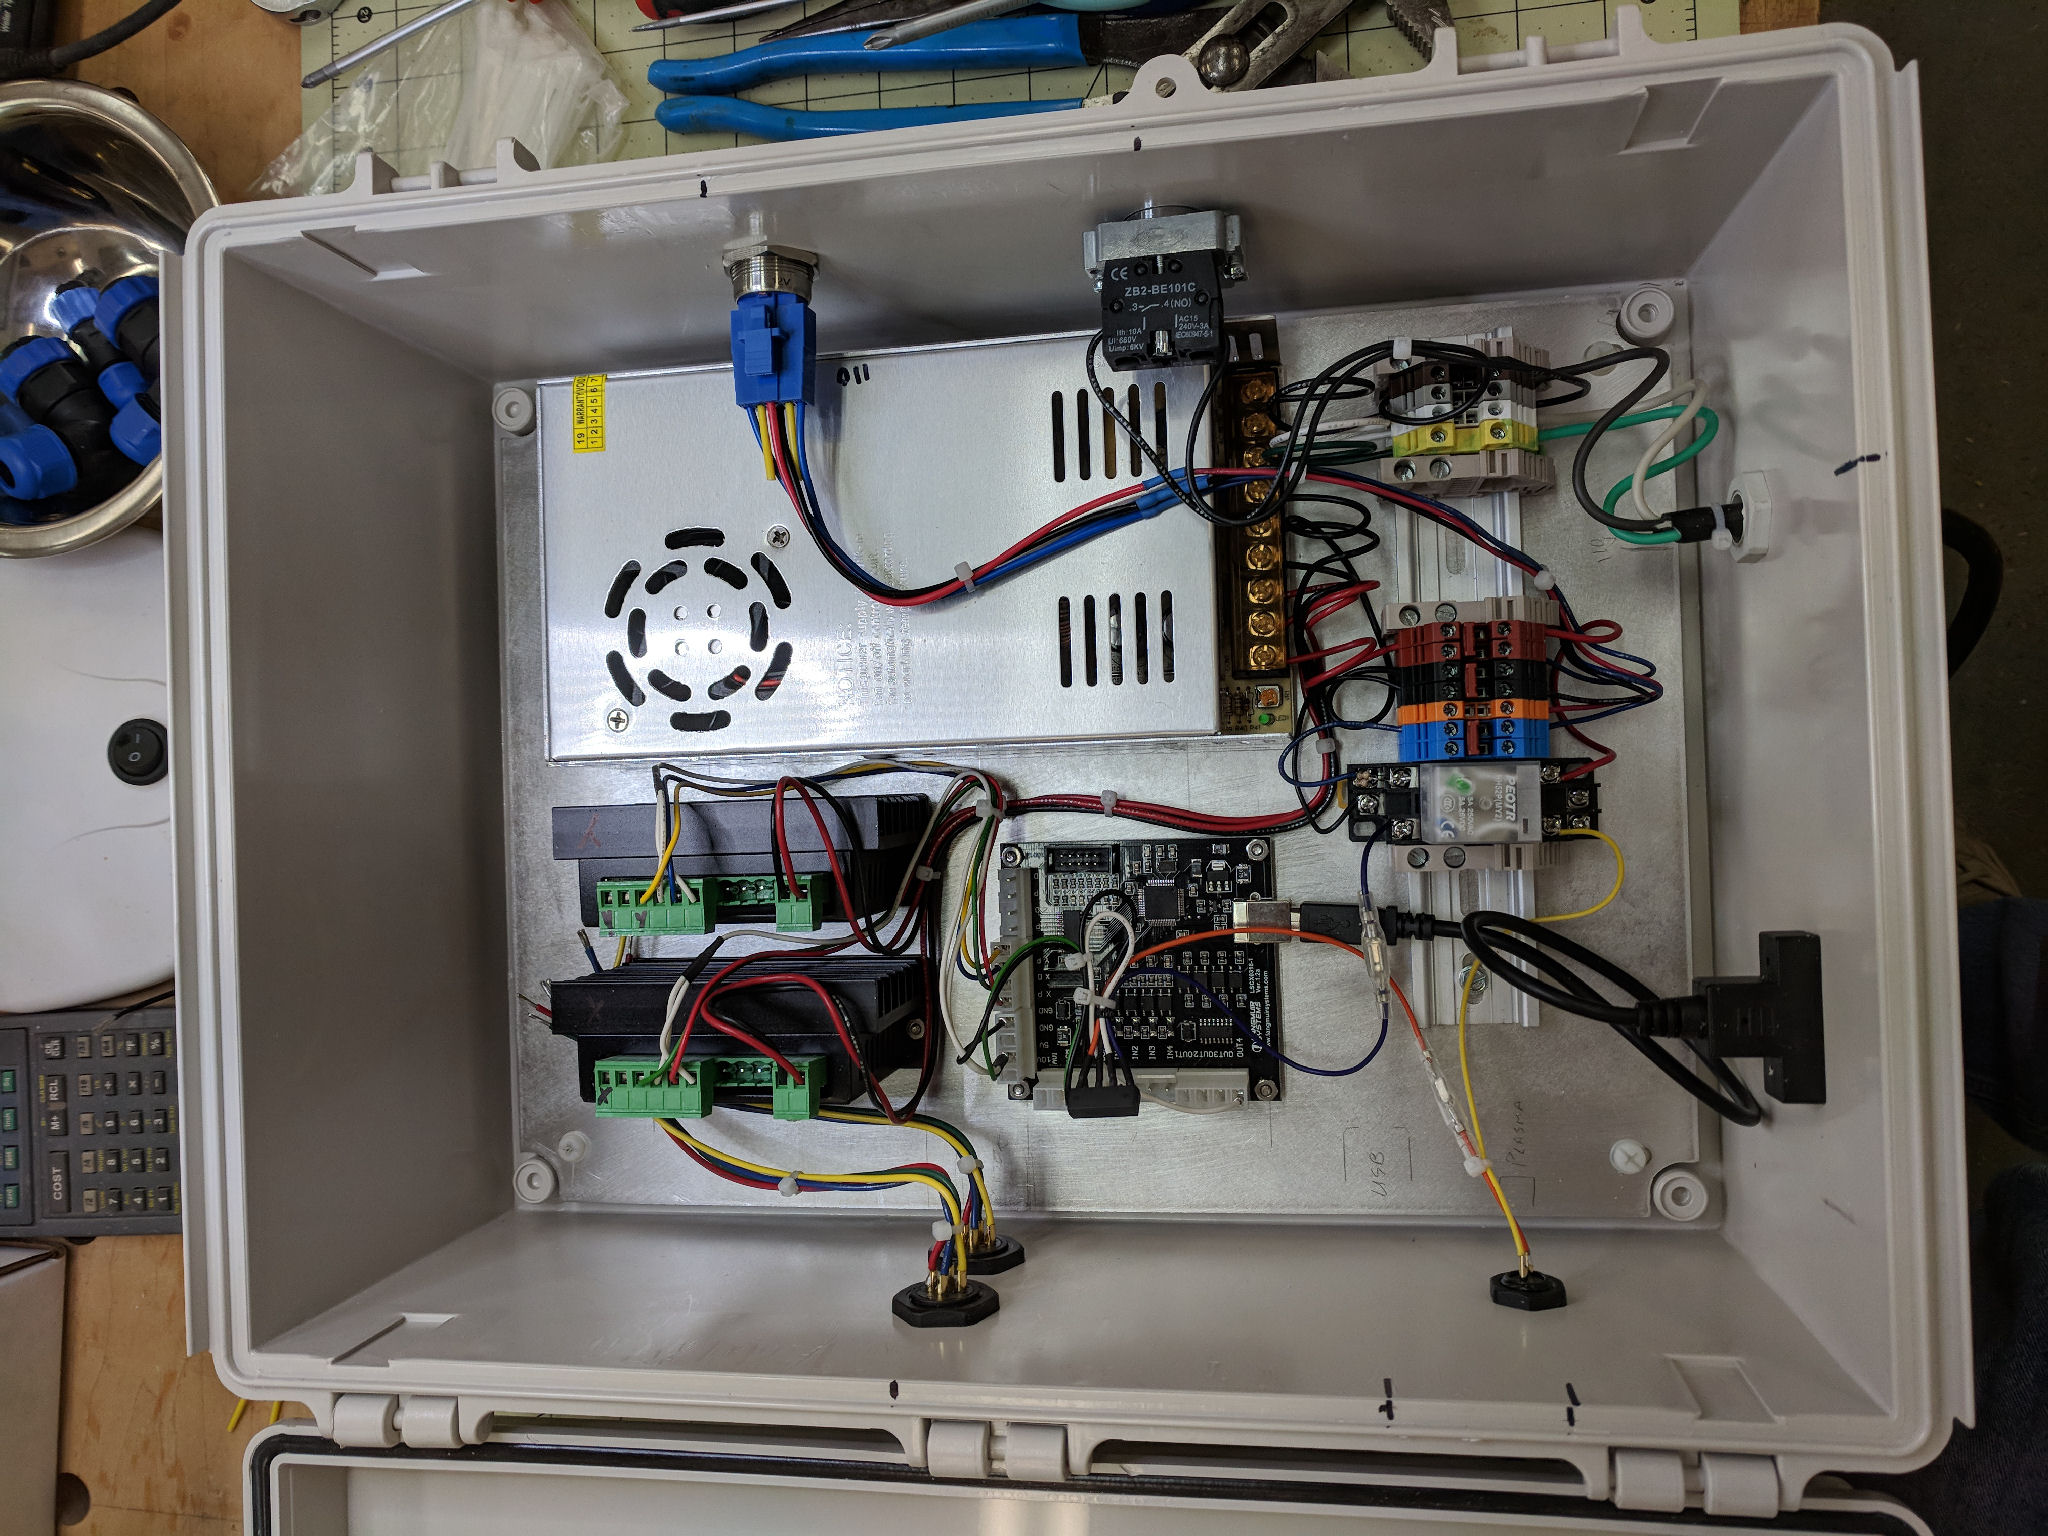
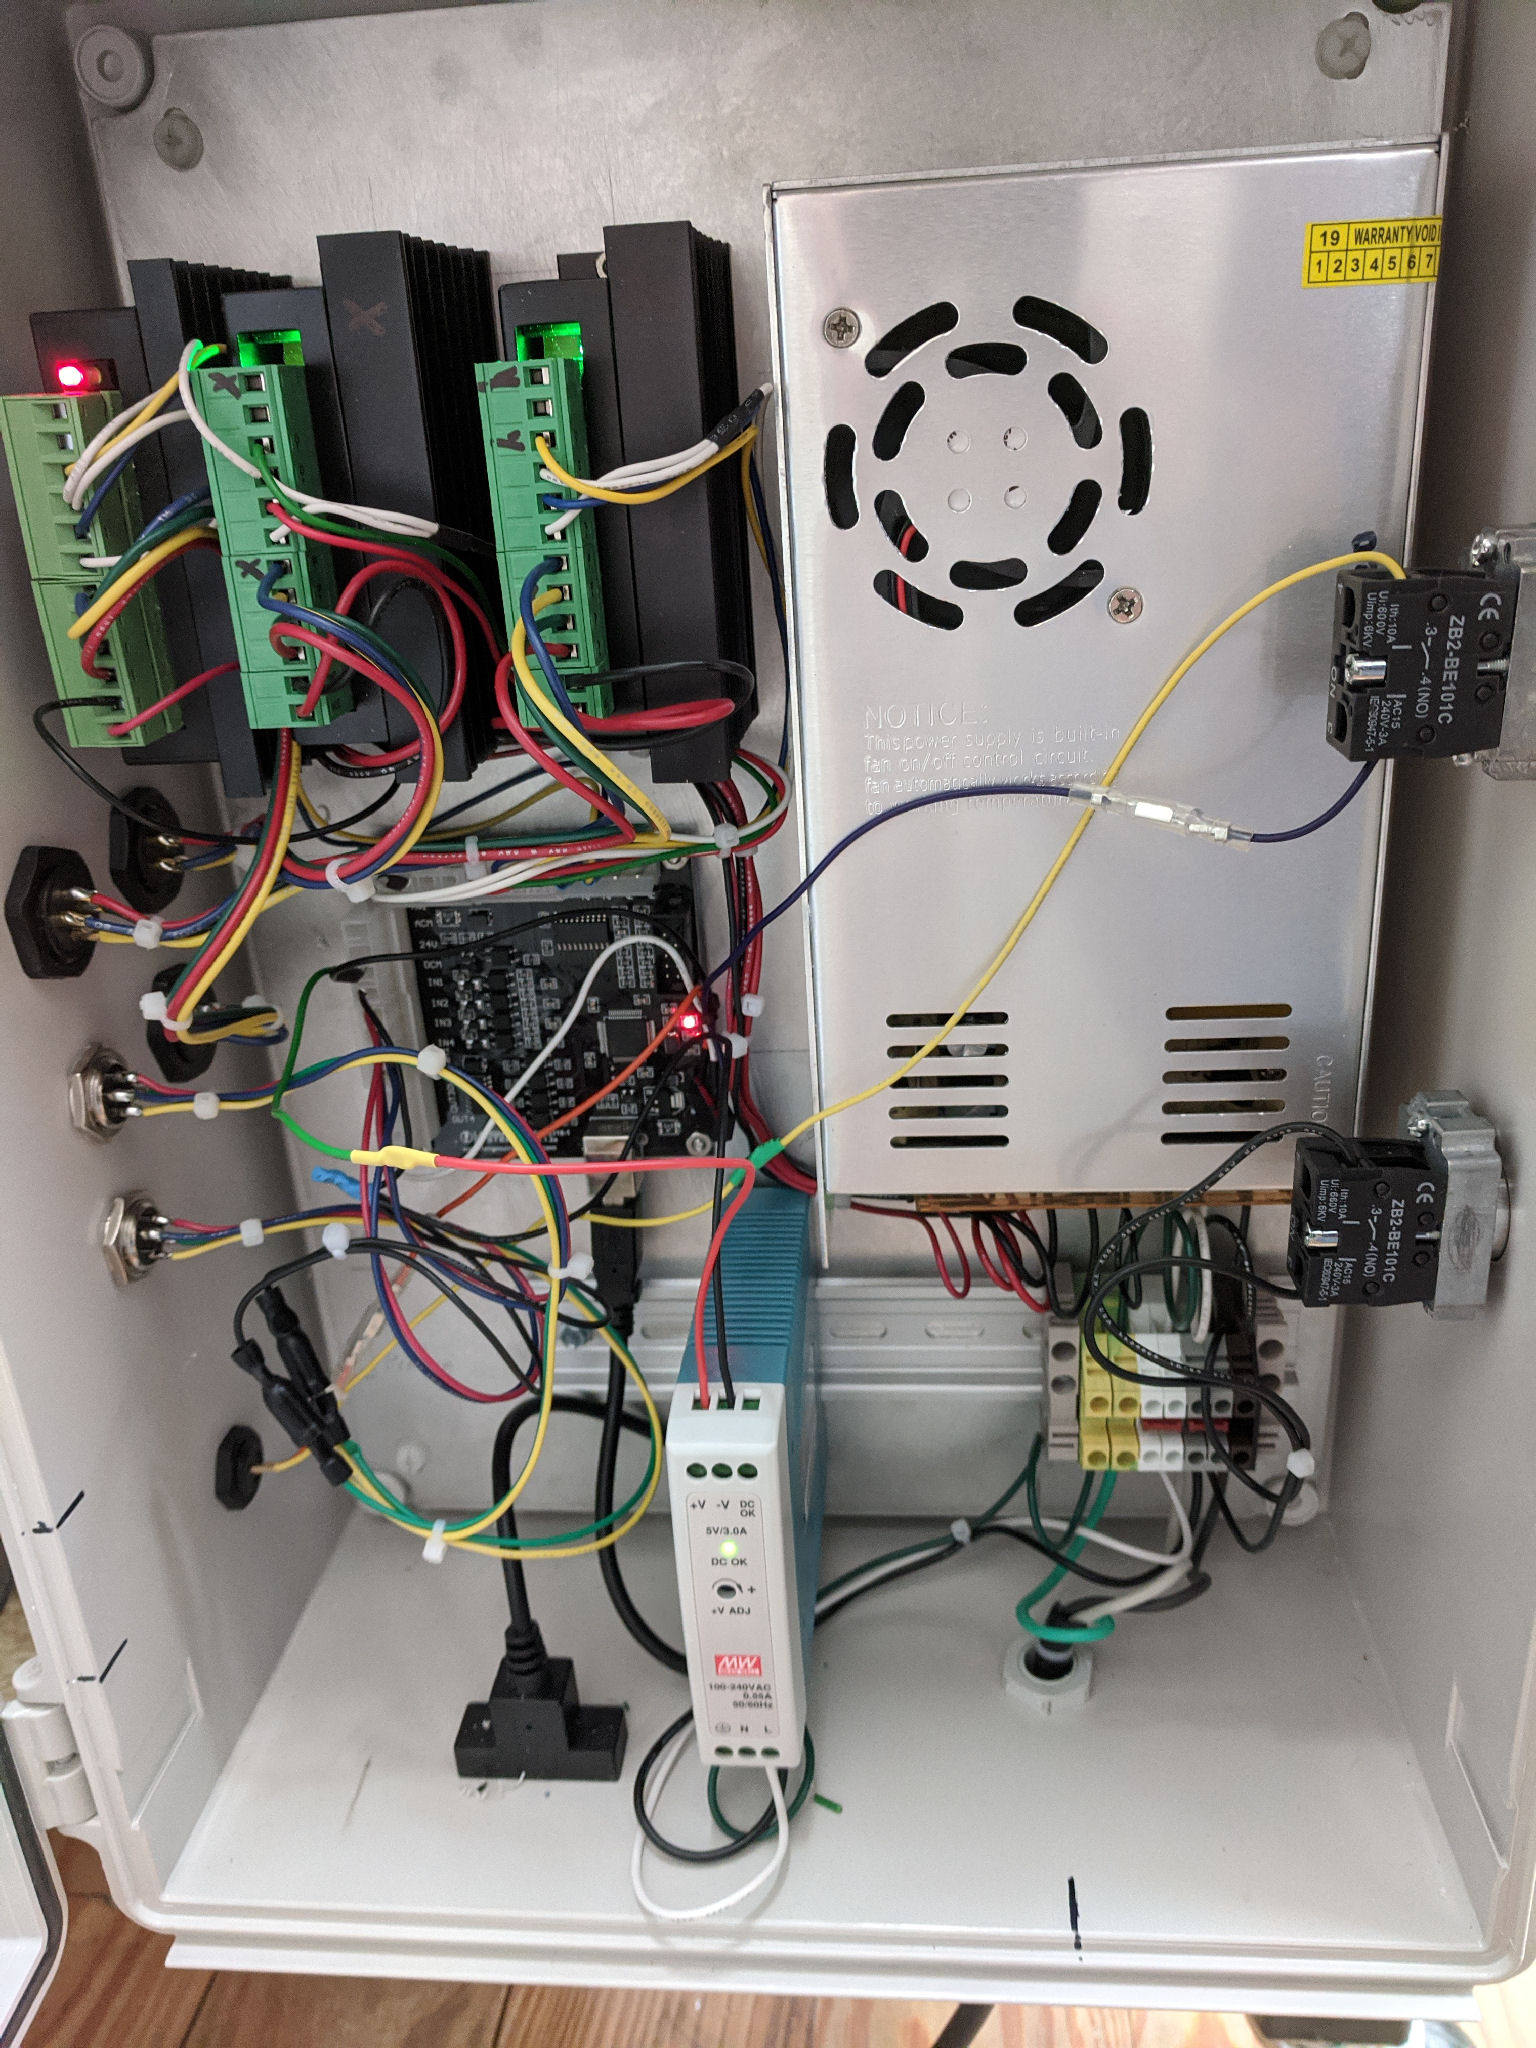
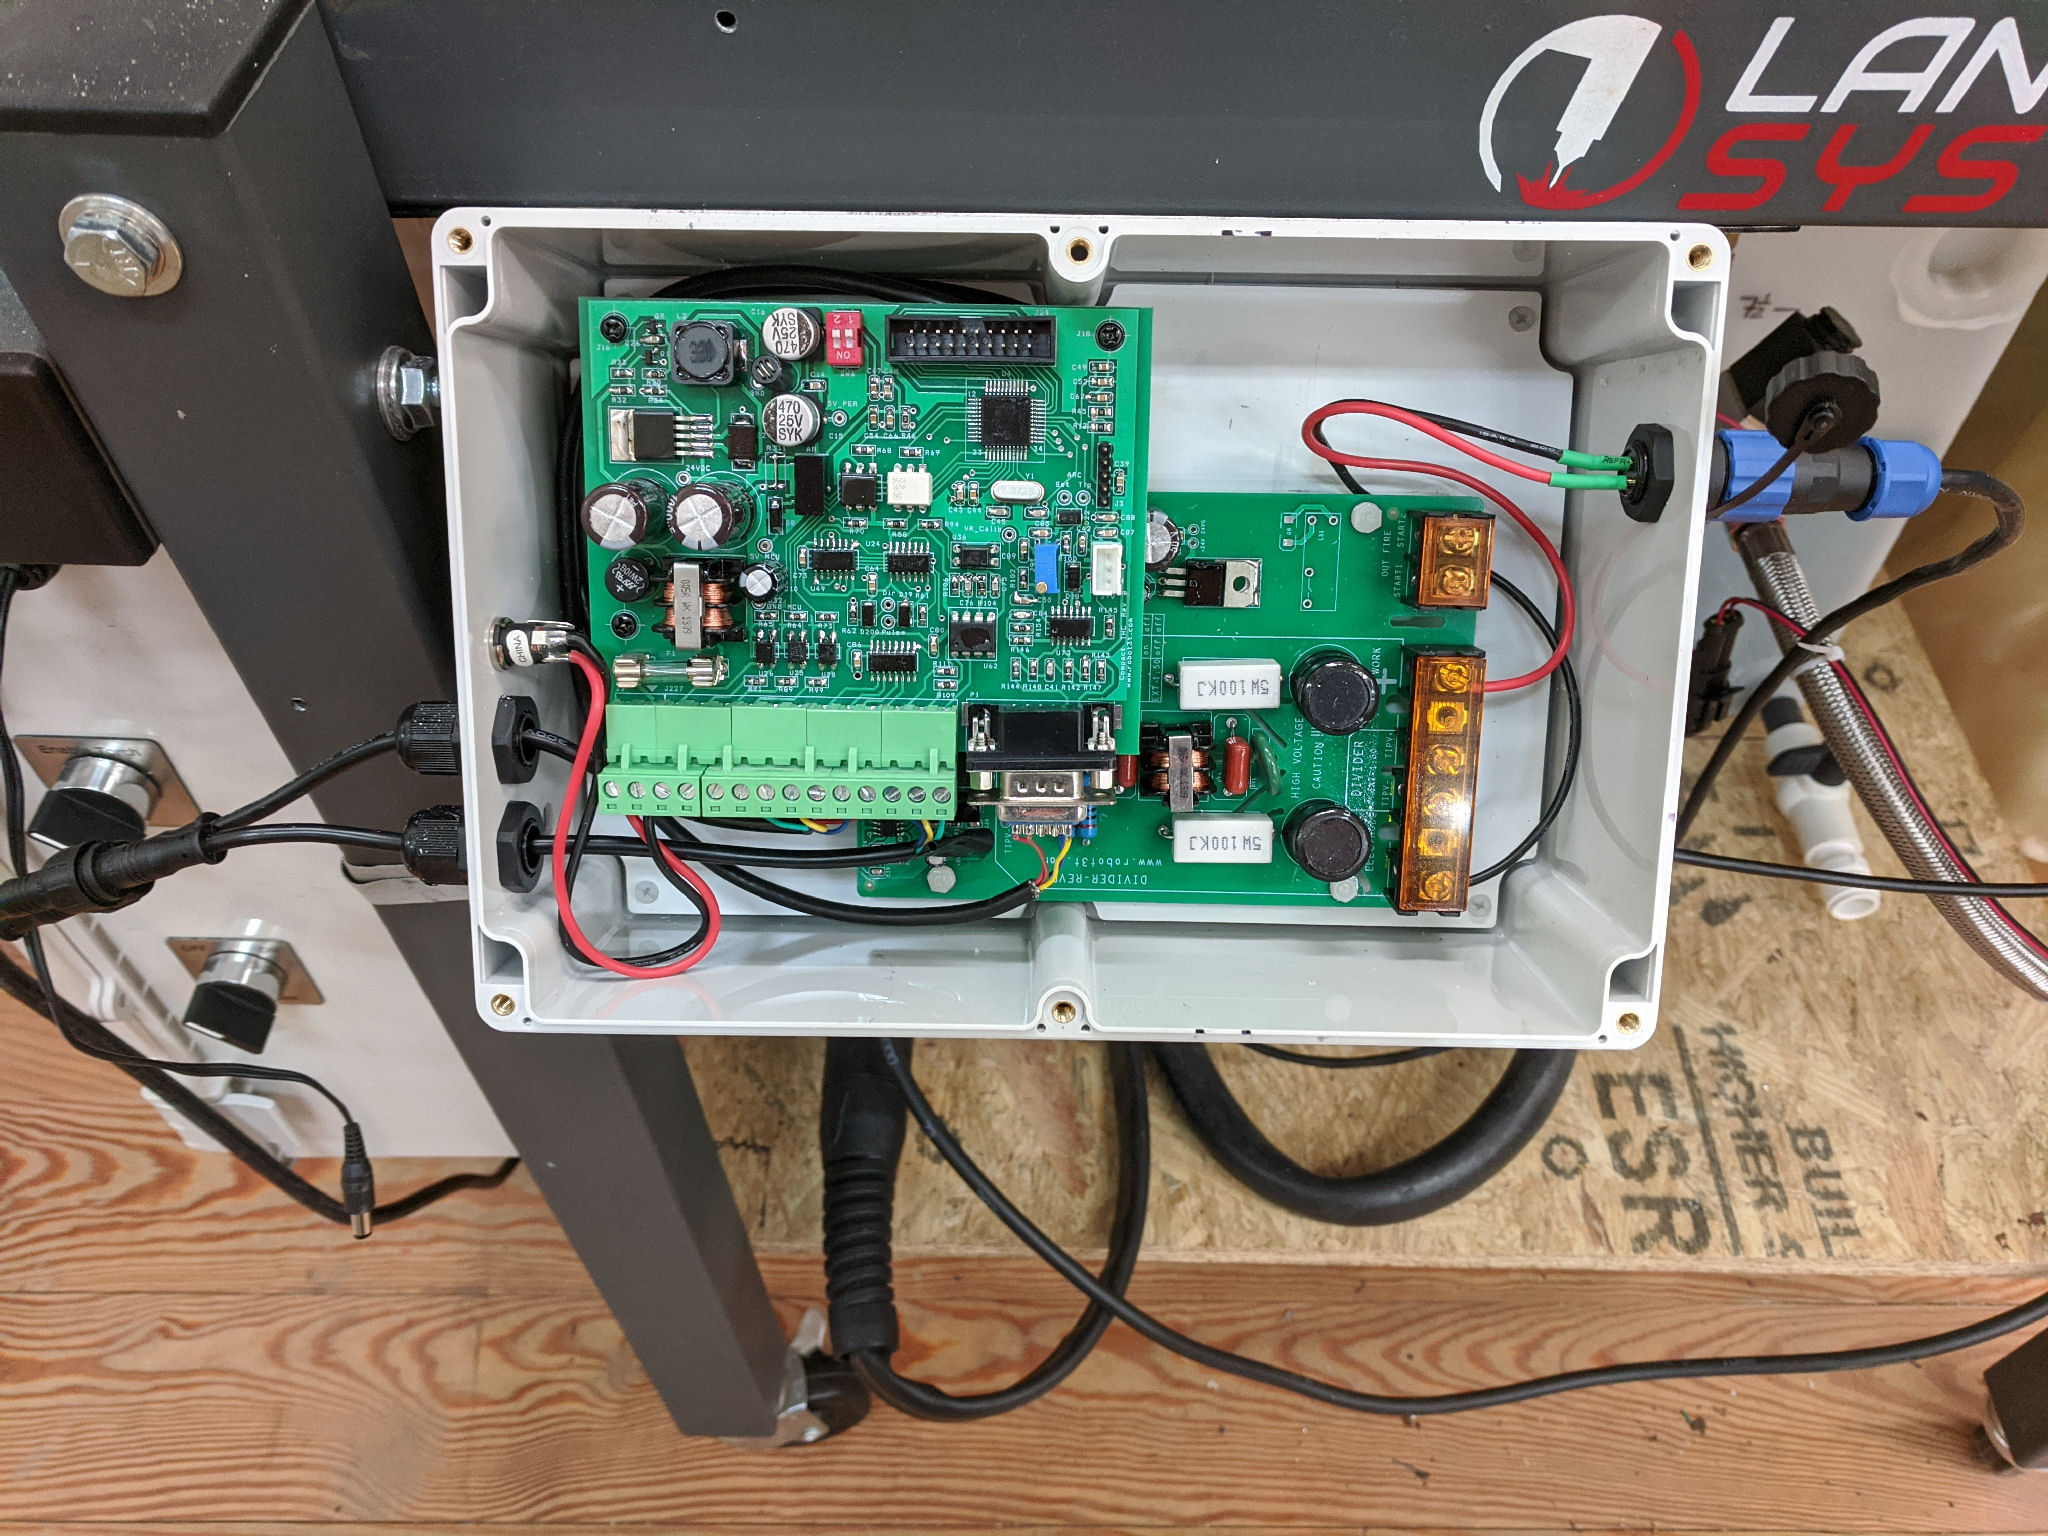
Enclosure inside:

4 Likes

That looks nice and you may want to get one of the funnels that some folks are using to go around the plasma torch where it cuts, that would probably cut down on sparks and splashing, it would be a terrible thing to mess up your pretty wood floor. have you thought about putting something down under your table so that you don’t have sparks landing on the wood floor? Just a thought.

Good luck

1 Like

Yeah, I’ve been looking at those. The only concern I have about them is they increase the probability of getting caught on a tip up or warp.

You’re right, it is a concern of mine, but so far, maybe because I’ve been mostly cutting with low-mid X values, the curtains have done a good job containing the ‘dust’. The sparks that have fallen on the floor haven’t seemed to bother it (yet), but I am keeping an eye on it and the fire extinguisher is within an arm’s reach :wink: If you look closely at the front views, you’ll see that I re-purposed one of the slat guides that came with the base kit (didn’t need it with the water table) and it does a pretty good job of stopping most of the sparks flying in the outward direction. Of course, that will all disappear (even the curtains) once I start cutting sheets larger than the bed. Maybe in that case that cutting will table place outside…

I should try the funnels sooner than later!
Thanks!

3 Likes

That is what I was wondering about when I saw them, and I have seen tip ups on my table that I was able to deal with since I don’t use the funnel.

1 Like

Can you provide links to the enclosure and parts you used? I’m running in a woodshop as well and using a microPC that I want to house in the enclosure with the electronics so I only need an HDMI out and a bluetooth keyboard. Love the drag chain, where’d you source the extension cables, or did you cut and solder longer cables for the steppers? Thanks!

1 Like

I will, but it will have to wait as I’m traveling this week.

2 Likes

Here ya go, see attached spreadsheet (.ods file, remove .dxf extension) CrossFireModsPartsList.ods.dxf (4.0 KB)

I just included the parts you asked for, if you want a complete set, let me know.
The X Stepper motor cable was replaced with 18ga wire due to the extra length (about 8 feet in my setup). The section of wire between the drag chain and the enclosure connectors was wrapped with nylon spiral cable wrap (listed in parts list).
As I note in the parts list, the enclosure datasheet has incorrect numbers for the mounting post spacing. This will only matter if you make your own panel, which I did. You can buy a steel panel from Bud, but I don’t think Amazon sells it. They sell a plastic one but you won’t get the necessary heat sinking with a plastic panel.
I didn’t list the riser I used to mount the Drag Chain to the torch swing arm. It is simply a 4 inch length of 1" Aluminum square tube. The swing arm fits nicely inside the square tube and still swings freely and the drag chain is attached with two long nylon ties. Note that I skewed the position of the drag chain to be even with the back side of the square tube. This will force the drag chain to ride over and to be slightly lifted by the X Motor mount and will allow the drag chain to be self-supporting as the gantry is moved along the Y axis. The X motor side of the drag chain is screwed into the top of the X axis bar with small sheet metal screws.
Let me know if you need anything else.

2 Likes

As a lot of you know, the notion of ‘completing’ mods on our CrossFires is a ludicrous notion. We’ll NEVER be DONE! And, as the case may be, I have, once again ‘Completed my CrossFire Mods’.

This time I’ve finished up adding the Z Axis, which I described in Crossfire Gets An Upgrade - Floating Z Axis Installed - #89 by TomWS, and, as I stated there, I wasn’t certain if I’d add DragChains or not. Well, I have added Dragchains, (Thanks to @RockMountainLLC and @felich for providing the sourcing information). I have also added X and Y Home switches and, because I never did like powering the Homing and Limit switches from the LapTop’s USB port, I also added a new 5V supply to the Enclosure just to ensure that the switches are truly isolated from the USB port and the CrossFire Controller.

I added the X & Y Home switches as I wanted to make sure I have a consistent reference point as I start planning Indexed cuts. More on that later, I’m sure.

In any case, here is the new and ‘final’ version of my system:


And the new wiring in the enclosure…

I suspect I’ll be back IF I think of any more upgrades… (like THC to take a random example).

5 Likes

It’ll never end… Just get bigger… lol
Nice work TomWS! Once my back heals from surgery, I will put my Pro together, and put to practice alot of what I have picked up on the Forum. Great advice out there, and some awesome ideas from others. :+1:

1 Like

Ain’t that the truth!

Well, y’all knew it was coming…

After installing the Floating Z Axis on my CrossFire, I decided to use the Z calibration procedure to map out the ‘level-ness’ of my table (with respect to the Gantry). I discovered, probably after all the hacking around to install the new gantry, that from peak to valley, the Z difference was over 0.100" inch. I guess I wasn’t too surprised given some of the collisions I had along the way.

So, given this, I had a choice, go back through the tedious procedure of realigning the Gantry Arm, live with this since it won’t affect most of the small cutouts I was making (pre-cut Z Calibration would remove any error), OR do I bite the bullet, go all the way, and install THC on the table?

Any takers?

Uh, yeah, you guessed it. I already had the THC parts on hand and ya know new parts can never sit idle for long so…

Here is the finished THC unit added to my table:


As you can see, I added a Robot3T THC03-02 controller to the system but had to enclose it in a splash proof enclosure. The electronics probably would have fit in my main enclosure (which is splash proof), but the controller has manual controls that need to be accessed for each material’s setup so an easily accessible enclosure was called for.

Here is the inside of the enclosure:


The two cables coming from the main enclosure are the Z Step/Dir Outputs from the CF controller and the return of Z Step/Dir from the THC controller. The Z Axis driver was already mounted inside the main enclosure from the last update and, with the motor power supply already there, it was easier to loop the signals through the THC unit. A benefit of this is that the inline cable connectors are mating so if I have to pull the THC unit for any reason, I’m not shut down, I can just connect the Z out to Z in cables and use the non-THC configuration.

Finally, mounting the enclosure naturally required brackets that were ‘bootstrapped’ from the CF system. It gave me a chance to learn and exercise the Sheet Metal Design features of Solid Edge and my newly acquired Bench Vise bending jig :slightly_smiling_face:

There you have it. I’m sure I am truly done with improvements on my CrossFire! :roll_eyes:

6 Likes

I finally got around to pulling together the documentation for the enclosure (thanks to prodding from @Cletus). It’s all in the attached zip file. Let me know if anything is missing.
THC_Controller_Enclosure.zip (13.7 KB)

3 Likes

FWIW, I’ve updated my GitHub repository with the SheetCam post processors I have customized for my setups.

2 Likes

Made a few mods myself and posted them to my blog.

1 Like