Ideas on fixing an interior letter that fell out

So I just bit the bullet and made the cut again. Even at 2’ in diameter, were only talking about $10 worth of steel. I took your advice and ran the F bomb first - I was happy enough with the results although I still need to get a feeler gauge to check my height. Maybe you could tell me why there’s so much more dross on the back of the sign vs the back of the bottle opener. There was hardly any on the back of the f bomb. It’s a gloopy mess on the back of the sign.


1 Like

are the bomb and sign the same gauge of metal?
did you drain your tank of water?

but what a huge differance to you large sign…nice!

2 Likes

The bottle opener had fairly straight cuts and no small radius that had the torch slow down. When the torch slows, the plasma will leave more backside dross. You need it to slow to allow the plasma stream to catch up to the torch. This happens on the turns and quick changes of directions (stars and letters) otherwise you will have a sloped cut, which is not desired. You can look at the CAM set-up and see different colors of the cut path. In Fusion 360 you will see blue is your stated cut speed, green is lead-in/lead-out (so naturally slower) and yellow is the slower speeds for small radius and change of directions. That is where most of the extra bottom-side dross will be expected.

Another reason is that there is more opportunity for your air supply to become moist. This moisture will cause issues with the cut. The bottle opener cut doubtfully required your air compressor to cycle.

Larger plate of steel gives more opportunity for there to be some highs and lows and warping. Even with THC, it will have issues trying to react to all of the changes so if the torch encounters a high area, there will be so additional dross while THC adjusts.

I will say that yesterday I cut out 125 plant markers out of aluminum and was amazed that 40% had no dross of either side, 55% had no top dross but a little bottom side dross, and 5% had some pretty ugly bottom side dross. Go figure. I know the aluminum sheet was warping. I will know to hold it down next time.

4 Likes

Thanks! They are the same gauge, yes. Didn’t drain the table. Thank you for the article, lots of good info.

1 Like

Thanks for the detailed response! I’ll keep that in mind.

You don’t need to drain the table. I believe @toolboy was inquiring if you had drained the compressor tank to remove an additional source of water in your air stream.

2 Likes

Ahhh ok that makes sense. I have an air dryer.

well…an air dryer is part of a system…it is not the only thing…all parts need to work together to get dry air.

here is my air system that gives me dry air…

tank draining is still required if you have an air dryer…after an air dryer you need to still monitor your air and filter it from any crap that might get in it…

2 Likes

Holy smokes that’s a nice setup. I just assumed the air dryer would be sufficient. I’ll check the drain valve and see how the compressor itself is doing.

Getting that water out of the tank is your first line of defense!

2 Likes

If you don’t want to remember to check your compressor tank for water, install the automatic drain valve.


https://a.co/d/fw3UjiP

You can set this to cycle every 0.5 minutes to every 45 minutes. Way too often to cycle so then you buy the Inkbird to turn power on/off to this valve each time your compressor cycles. The valve will open for 0.5 to 10 seconds (0.5 seconds is plenty).

Attach the Inkbird temperature probe to the compressor charging tube that leaves the compressor (going to the tank, usually). When it reaches the temperature you set (85 degrees F, is good), then power is turned on to the automatic drain valve.
Inkbird ITC-308 Digital Temperature Controller


https://a.co/d/amIZX0v

You may say, “Don’t they make a timed drain valve specific for compressor tanks, why buy two separate gizmos?”
Answer: Yes. But, this set-up will cost you about $60 to $70 dollars.

This is how much you would pay for the other device:

2 Likes

On the other hand (my hand of course) I don’t like over complicating things and would just go with a auto drain and let it run every 45 mins for how ever many secs it takes to clear the tank. This will be different on every compressor set up. some will need a .5 sec and some may need 10 secs.
As always just my opinion :slightly_smiling_face:

1 Like

Totally get your approach as well. I did find that if the drain valve was operating on its own, independent of the compressor cycling, the noise of the valve opening would be startling. I started to get used to it and just felt annoyed if I happen to be walking by it but my dog never liked it. Previously, I had it set up with a smart plug and had it turn on two times per day.

Now, I never hear the release because the compressor is running when it happens. As you say, “To each their own.”

Always enjoy your opinions, though!

1 Like

My compressor is way in the back and noises like that don’t bother me as I am use to that type of environment. Plus my drain goes into a bucket that muffles it somewhat.

@Knick @ChelanJim @toolboy - OK so yeah there was definitely some moisture in my compressor. That was pretty dumb of me, wasn’t even thinking about that. I’ve owned compressors before, but not one of this size and not one I was using on a daily basis. Will definitely keep this in mind moving forward.

I’m also going to assume that this moisture may have played a not-insignificant role in burning out my first consumables in what I felt was an extremely short period of time.

4 Likes

@toolboy How do you use a feeler gauge to set torch height? Do you start a program and disable the torch from firing and check the height? Is there a way to dial in a height in firecontrol and have the torch jog to that height and just adjust from there?

If you run this gcode with FireControl:
cut height test.tap (224 Bytes)
This will run the table/torch as if it is going to start a cut. It will go thru the IHS to determine the surface of the metal and will allow the assumption of the springback to be set at 0.020 inches.

It will then set the torch at what it expects to be 0.060 inches and without firing the torch, STOP.
You can now measure with the feeler gauge to see what your cut height, in reality is really being set at when you thought you had set it as “0.06 inches.”
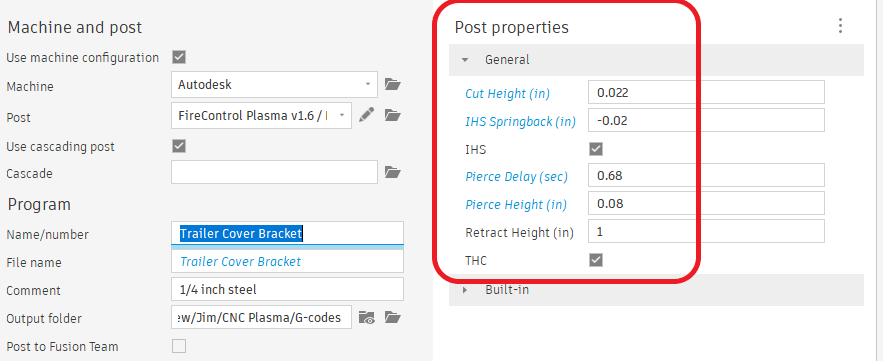
Now make the necessary changes on your CAM during post processing.

The springback determination is complicated by the reaction of your specific table. If you want more detail on that, here is a good read:

I started out with a cut height of 0.105 and this is how I ended up changing it in post processing to get to a cut height of 0.059:

Don’t use my numbers. Do your own independent testing with cut height and springback changes. Do a test run with a real test piece. To stop the torch and keep it at the same position, simply press the space bar with FireControl. Measure distance of torch to metal.

2 Likes

Awesome, thank you. I will give this a go and see how it turns out for me.

sorry for not getting back to you…but I see Jim got it covered…
got bogged down with projects

1 Like

Not a problem whatsoever. Thanks

1 Like