@Wsidr1 Thanks, sure, I can post it. I haven’t ever done that so it might take me a little bit. Most of my stuff starts off from free dxf or some other place, i grab a lot of different elements then combine them and tweek them how i like them. Be Cautious, I made this about 14 x 22. if you go very much smaller that detail may rise up and bite you. I set my kerf at .036 and i use .08 nozzles on my everlast machine torch at 28 amps on 16 gauge. The two pieces that made me cringe most were the grill…and that arm for moving the tarp to cover the load.
@Wsidr1 I posted it. Very smooth interface for uploading it. Much less painful than I envisioned. Again, Langmuir has their stuff together!
2 Likes
Oh man, thanks… I think ![]() Now I have another F360 project!
Now I have another F360 project!
This is not something I did on the plasma table but rather something I did because of it. I finally got around to plumbing in the air to air intercooler between the compressor head and the storage tank. I also added a self emptying water trap on it as well. here is a very short little video immediately following the first cycle of the compressor for the day. Ambient air temperature was 70 degrees. Relative humidity was 33%. Inlet temp of air cooler is about 215 and outlet temp was 74 degrees. This is on a twin cylinder 17.3 cfm @ 90psi compressor. The entire system was new and unused till this cycle. I suspect on runs from now on even more water will be expelled as i suspect a lot of condensation adhered to the internal surfaces of all the new plumbing. I think this is going to make a big difference in my air quality. video of water caught in first cycle after adding cooler . I was blown away at how much water was caught.
3 Likes
Wow, same thing at my place. Forced myself to drain my table until I get my air drying resolved so I wouldn’t waste metal and/or throw my laptop across the garage after a misfire. ![]()
I have all the supplies to add an intercooler before and a copper pipe loop after the tank. I have a few fittings ordered to be able to add the cooler, and I need to sweat the copper for my after tank loops.
I read in another thread on here some folks have concerns/doubts with the “between the compressor and tank approach”. Backpressure and additional heat at the compressor, water ponding in the condenser coils, and oil from the compressor not removed before entering the aftercooler are the ones I remember.
I am going to try it and if any issues arise, I’ll move it to after the tank. Won’t be difficult because I am going with flex lines between condenser and tank/compressor head.
2 Likes
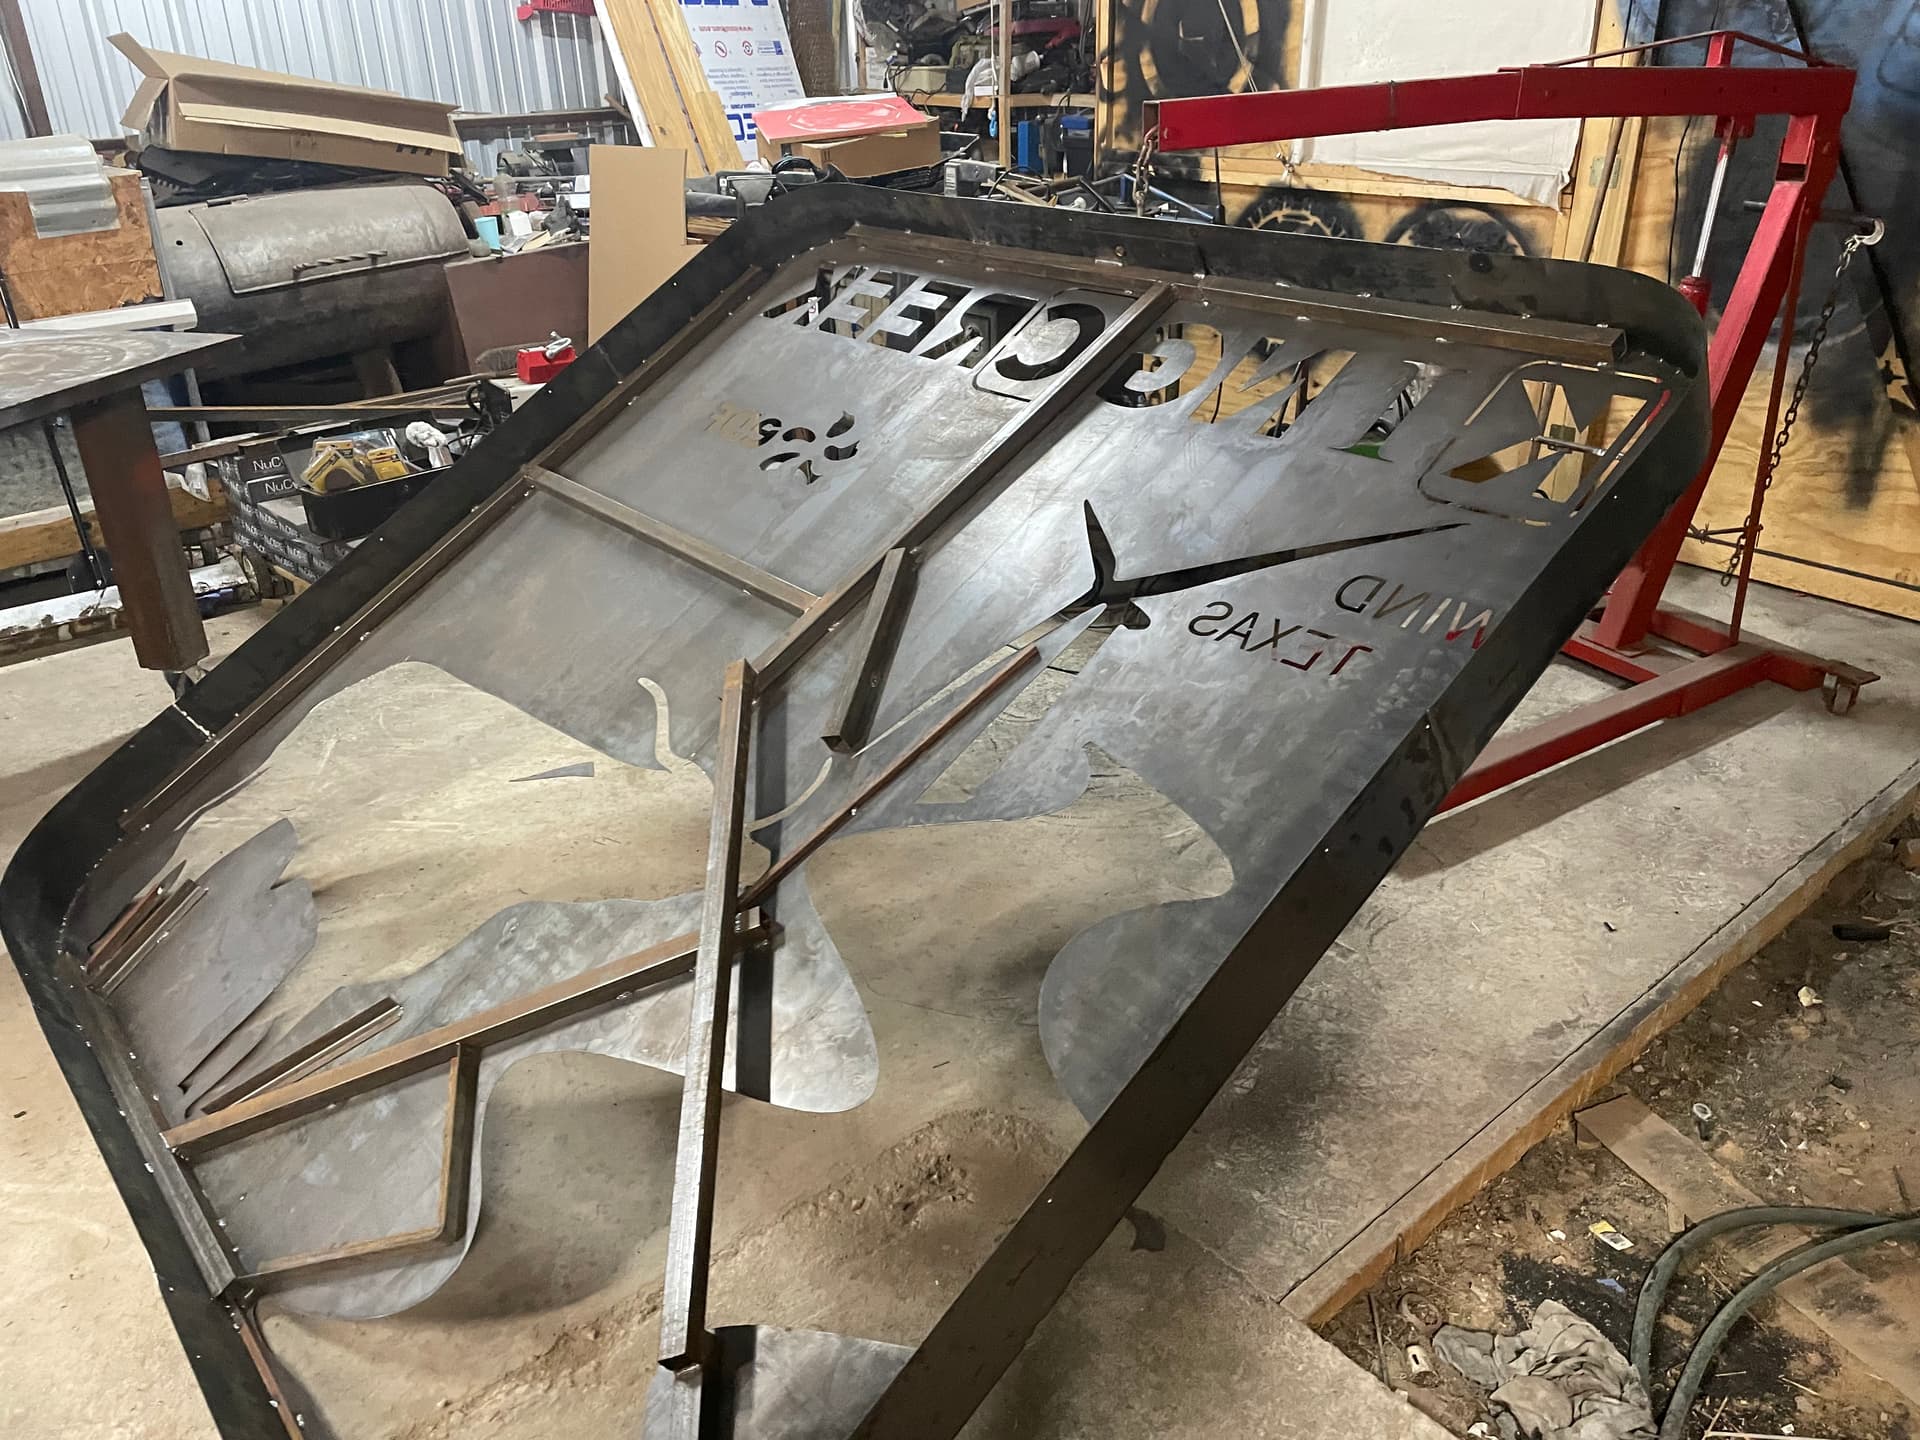
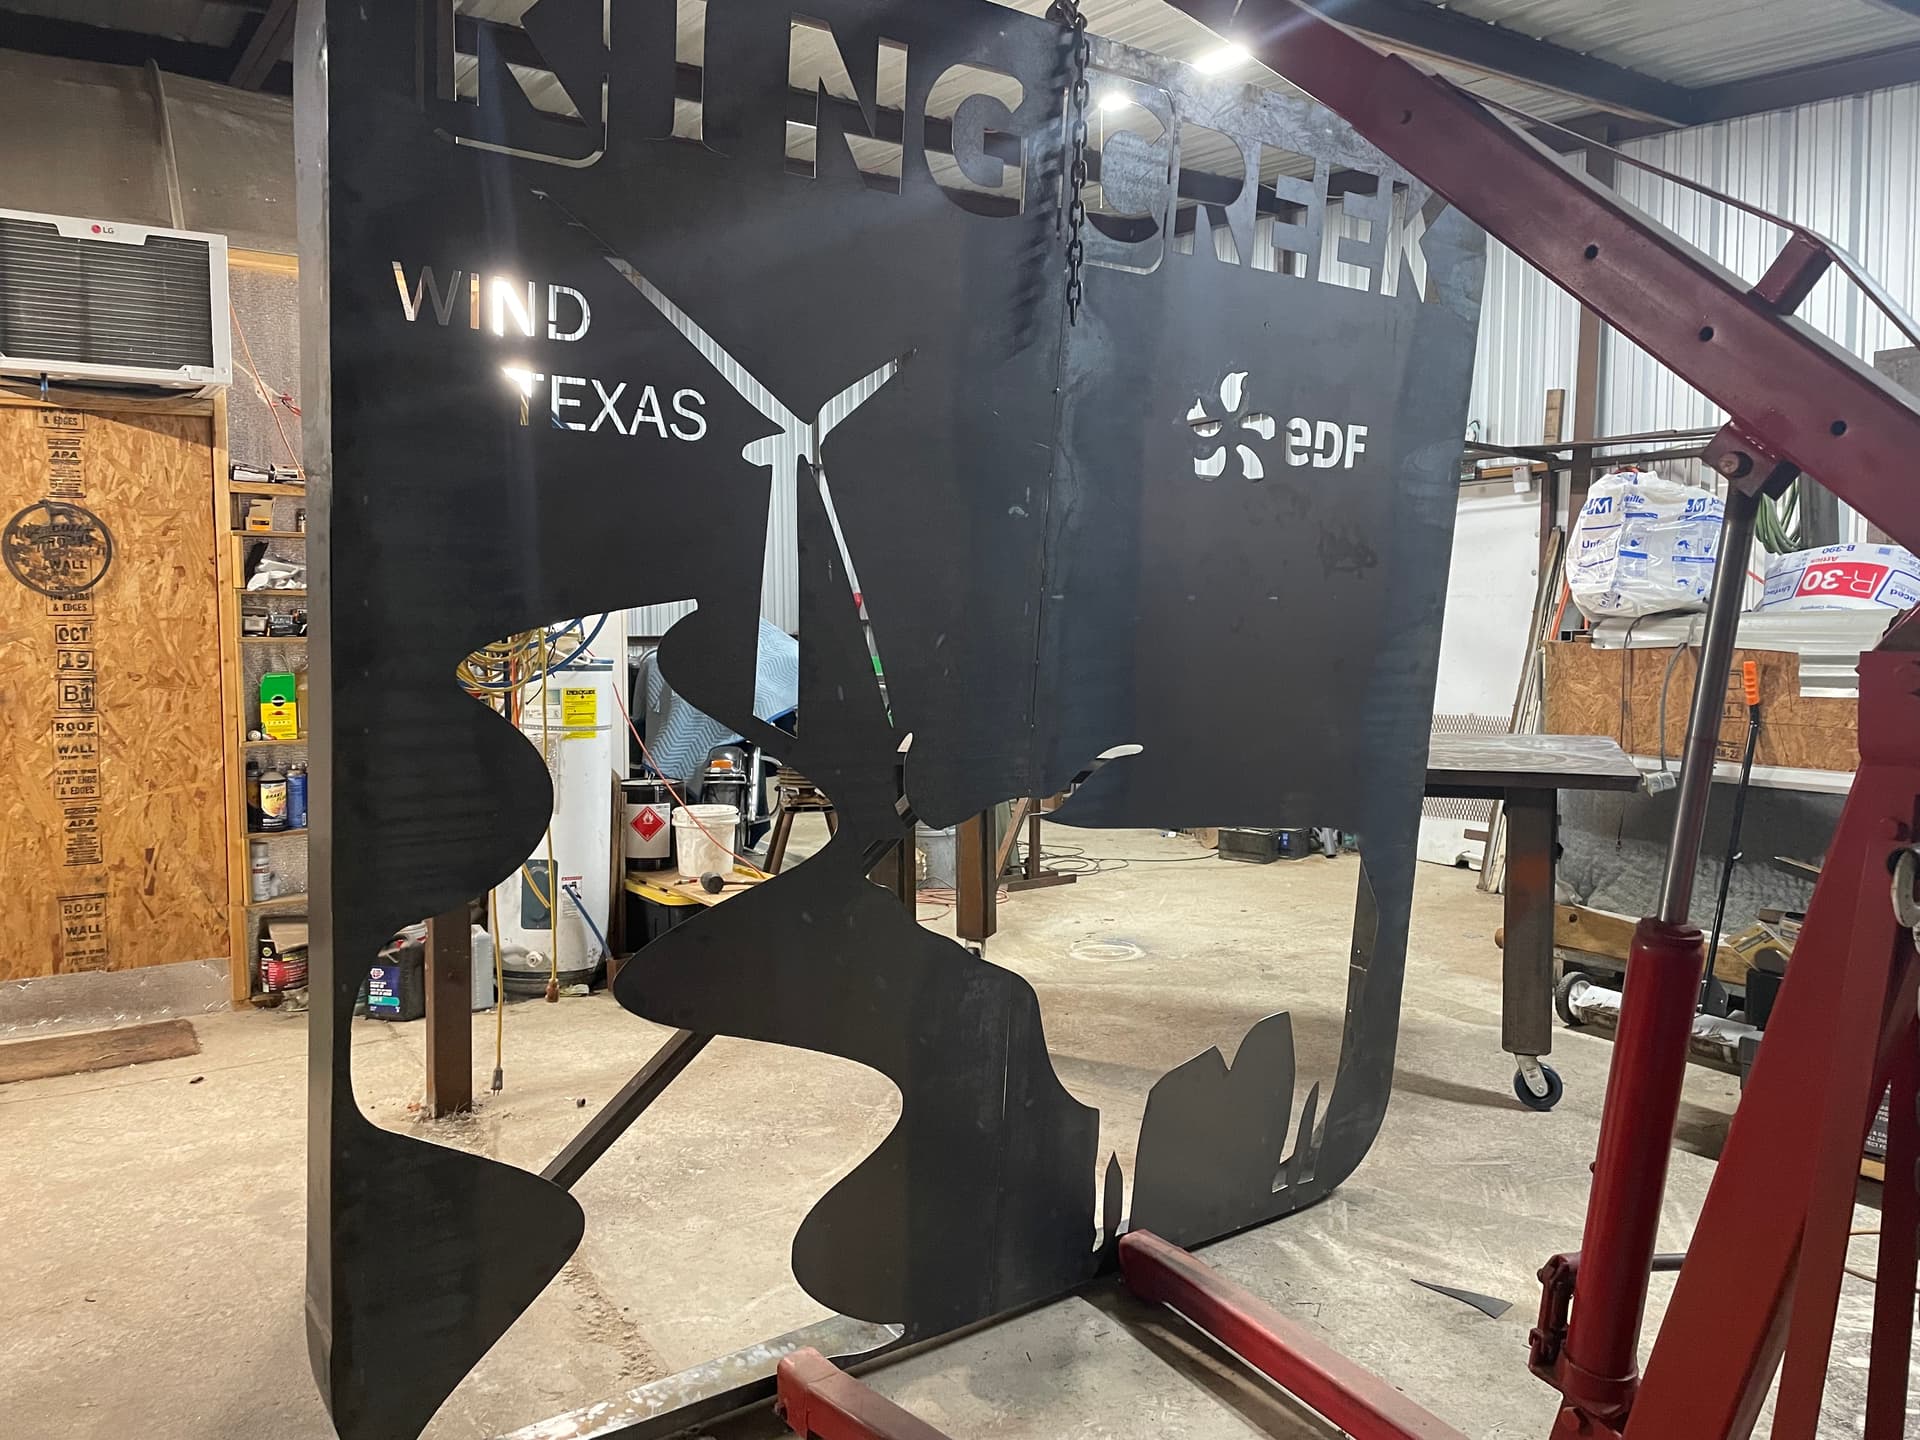
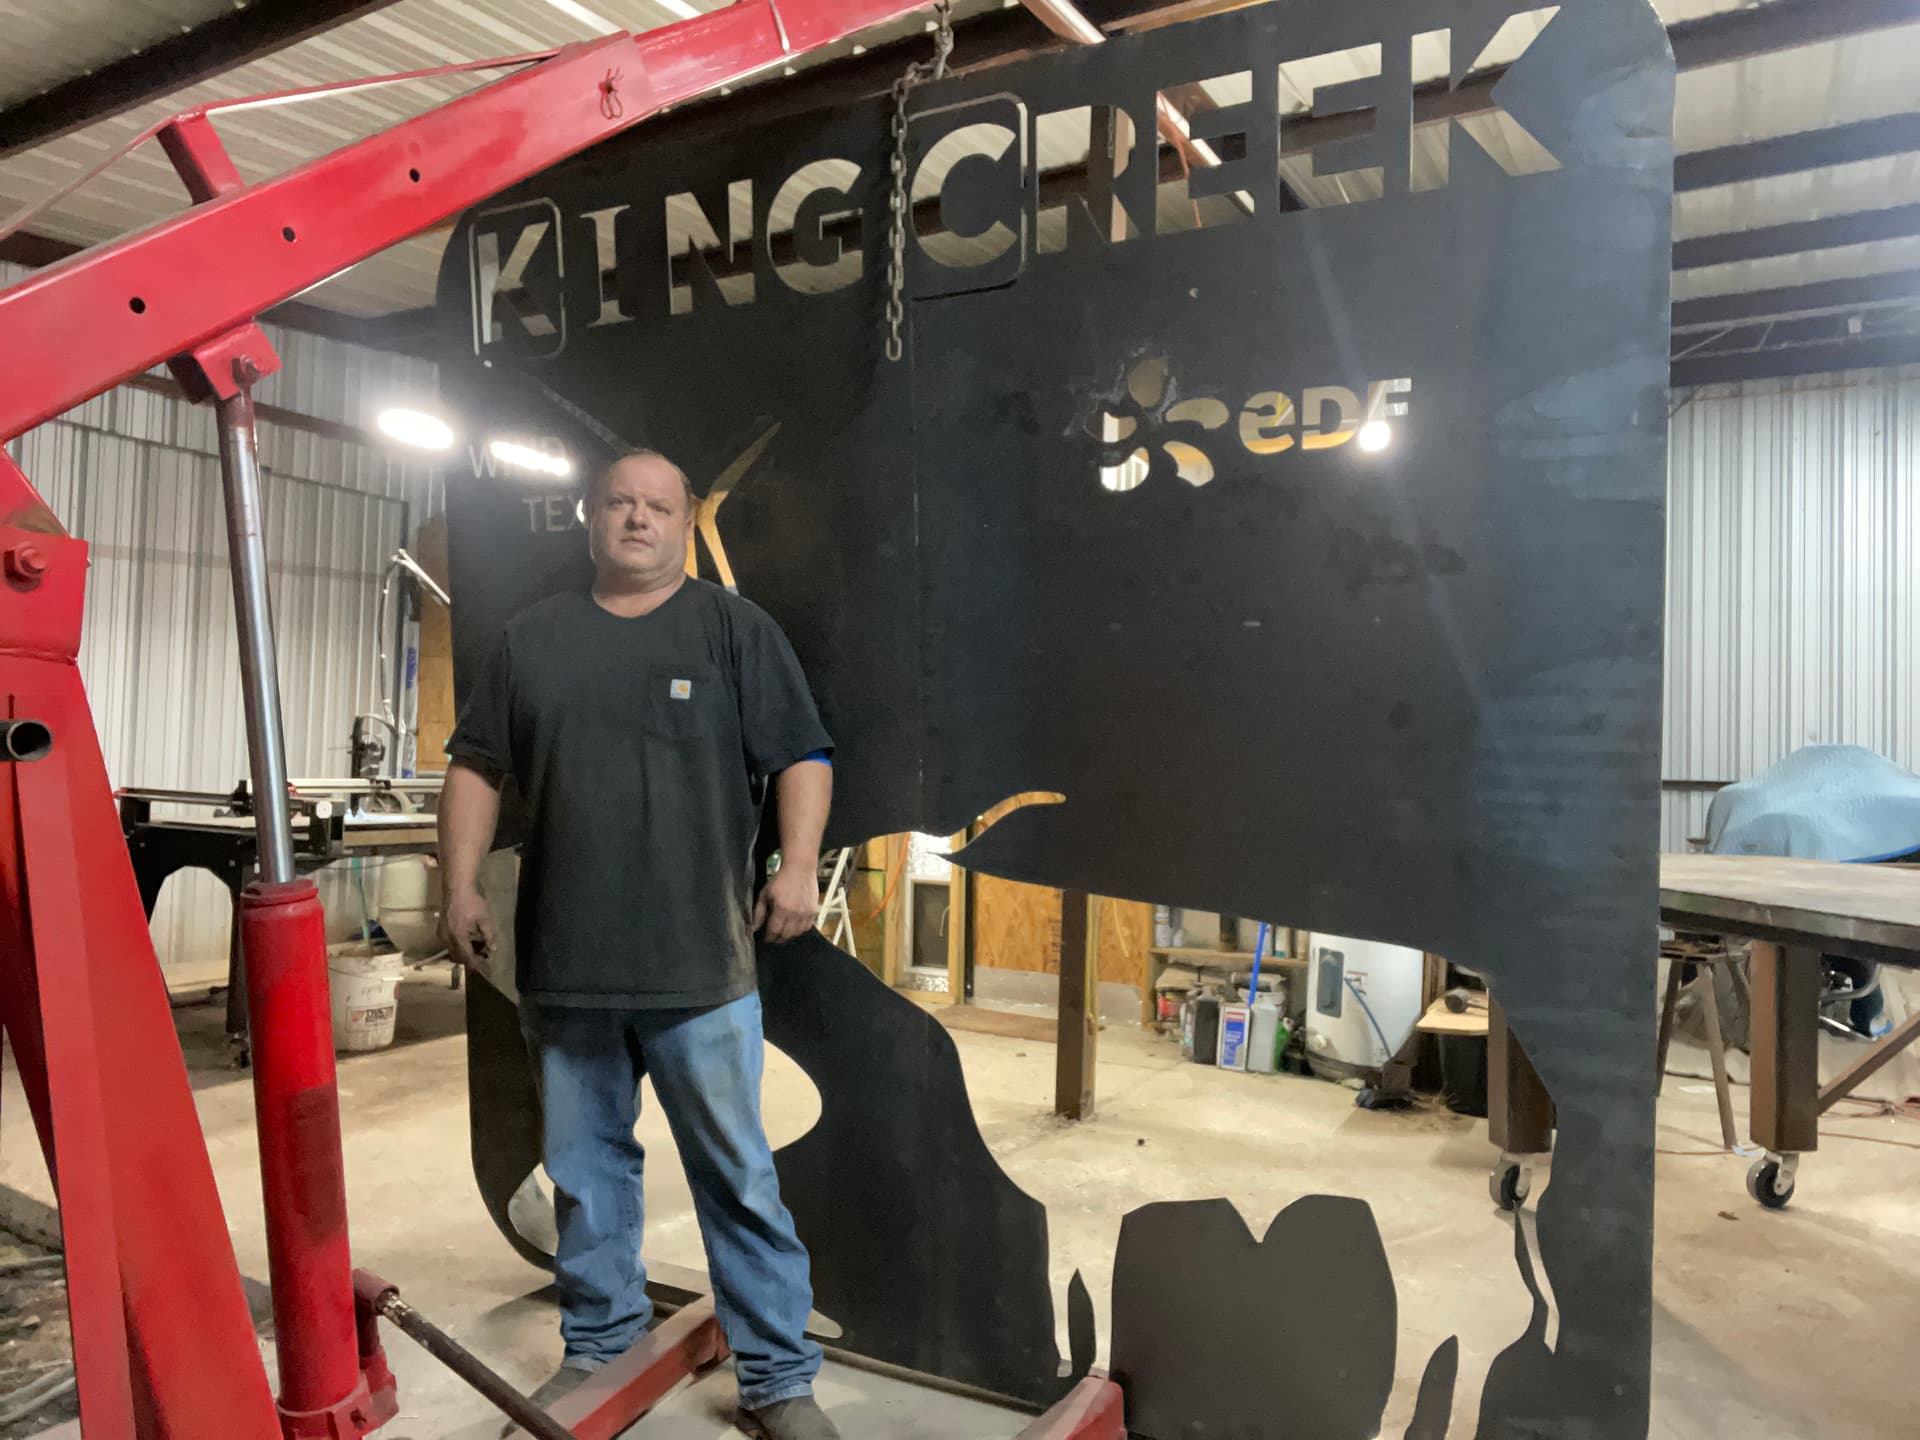
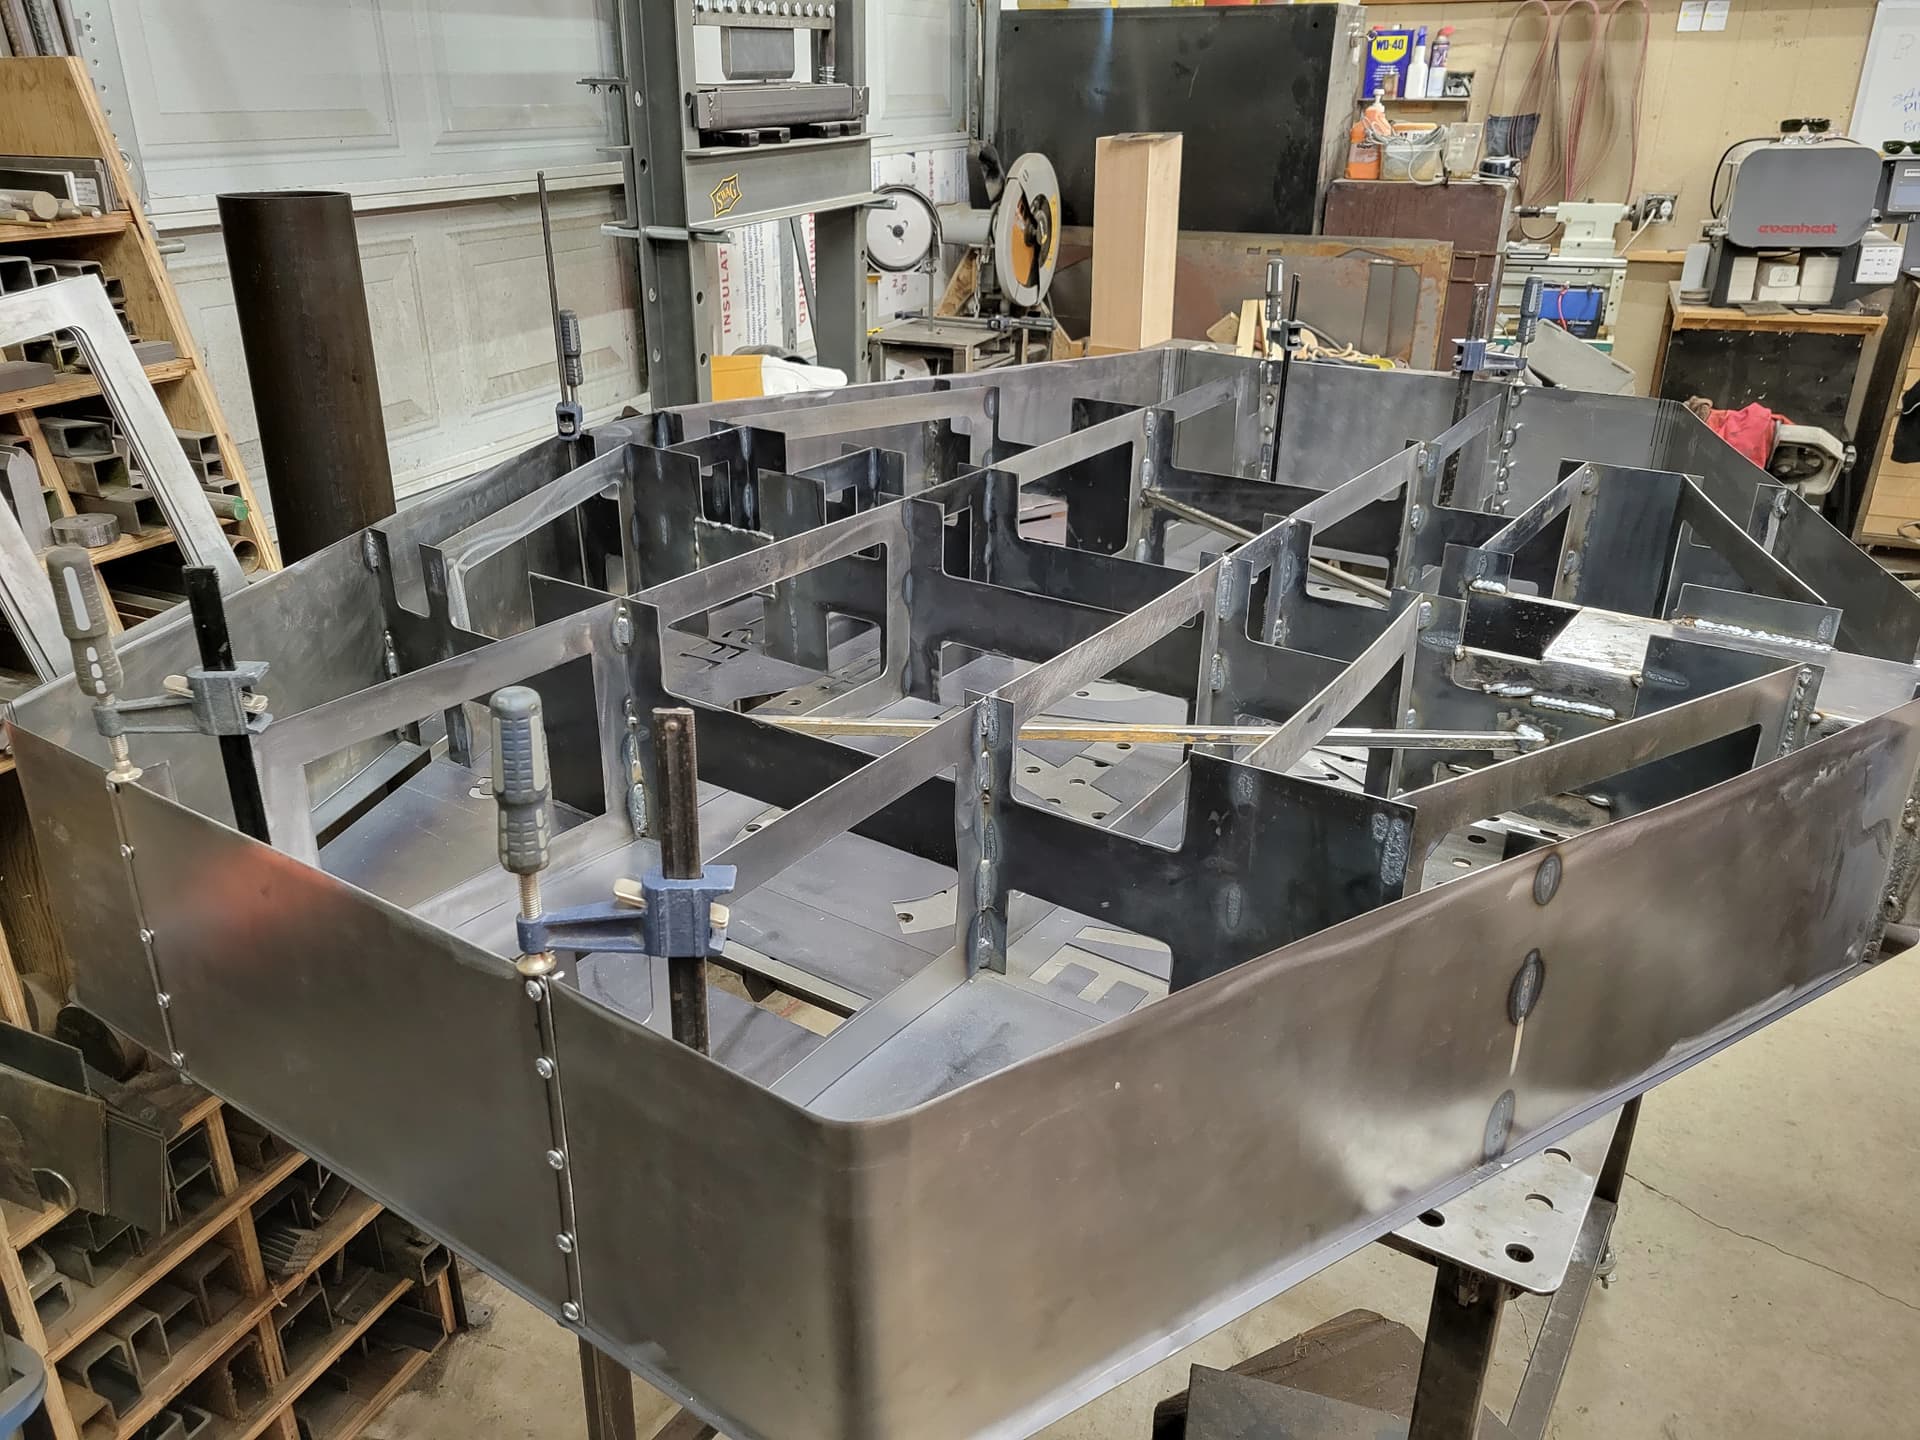
Here is a project I have been working at the last week and a half or so. This was all cut on my Pro table. See my indexing linked here on the forum if you haven’t watched it. Anyway, it is finally fully braced and these are pics getting ready to do the final weld. This is an 8 foot weld running the entire vertical distance of the sign. right down the center. This is 16 gauge material. For those that haven’t done a task like this. Its super easy to put too much heat in the material and screw up the entire project!! It is done, and I will share some pics of the final results later. I haven’t taken any yet. This is almost 8ft by 8ft. What do you think? All of the cutouts will be filled with sheets of acrylic and backlit for a local wind generation company near here.
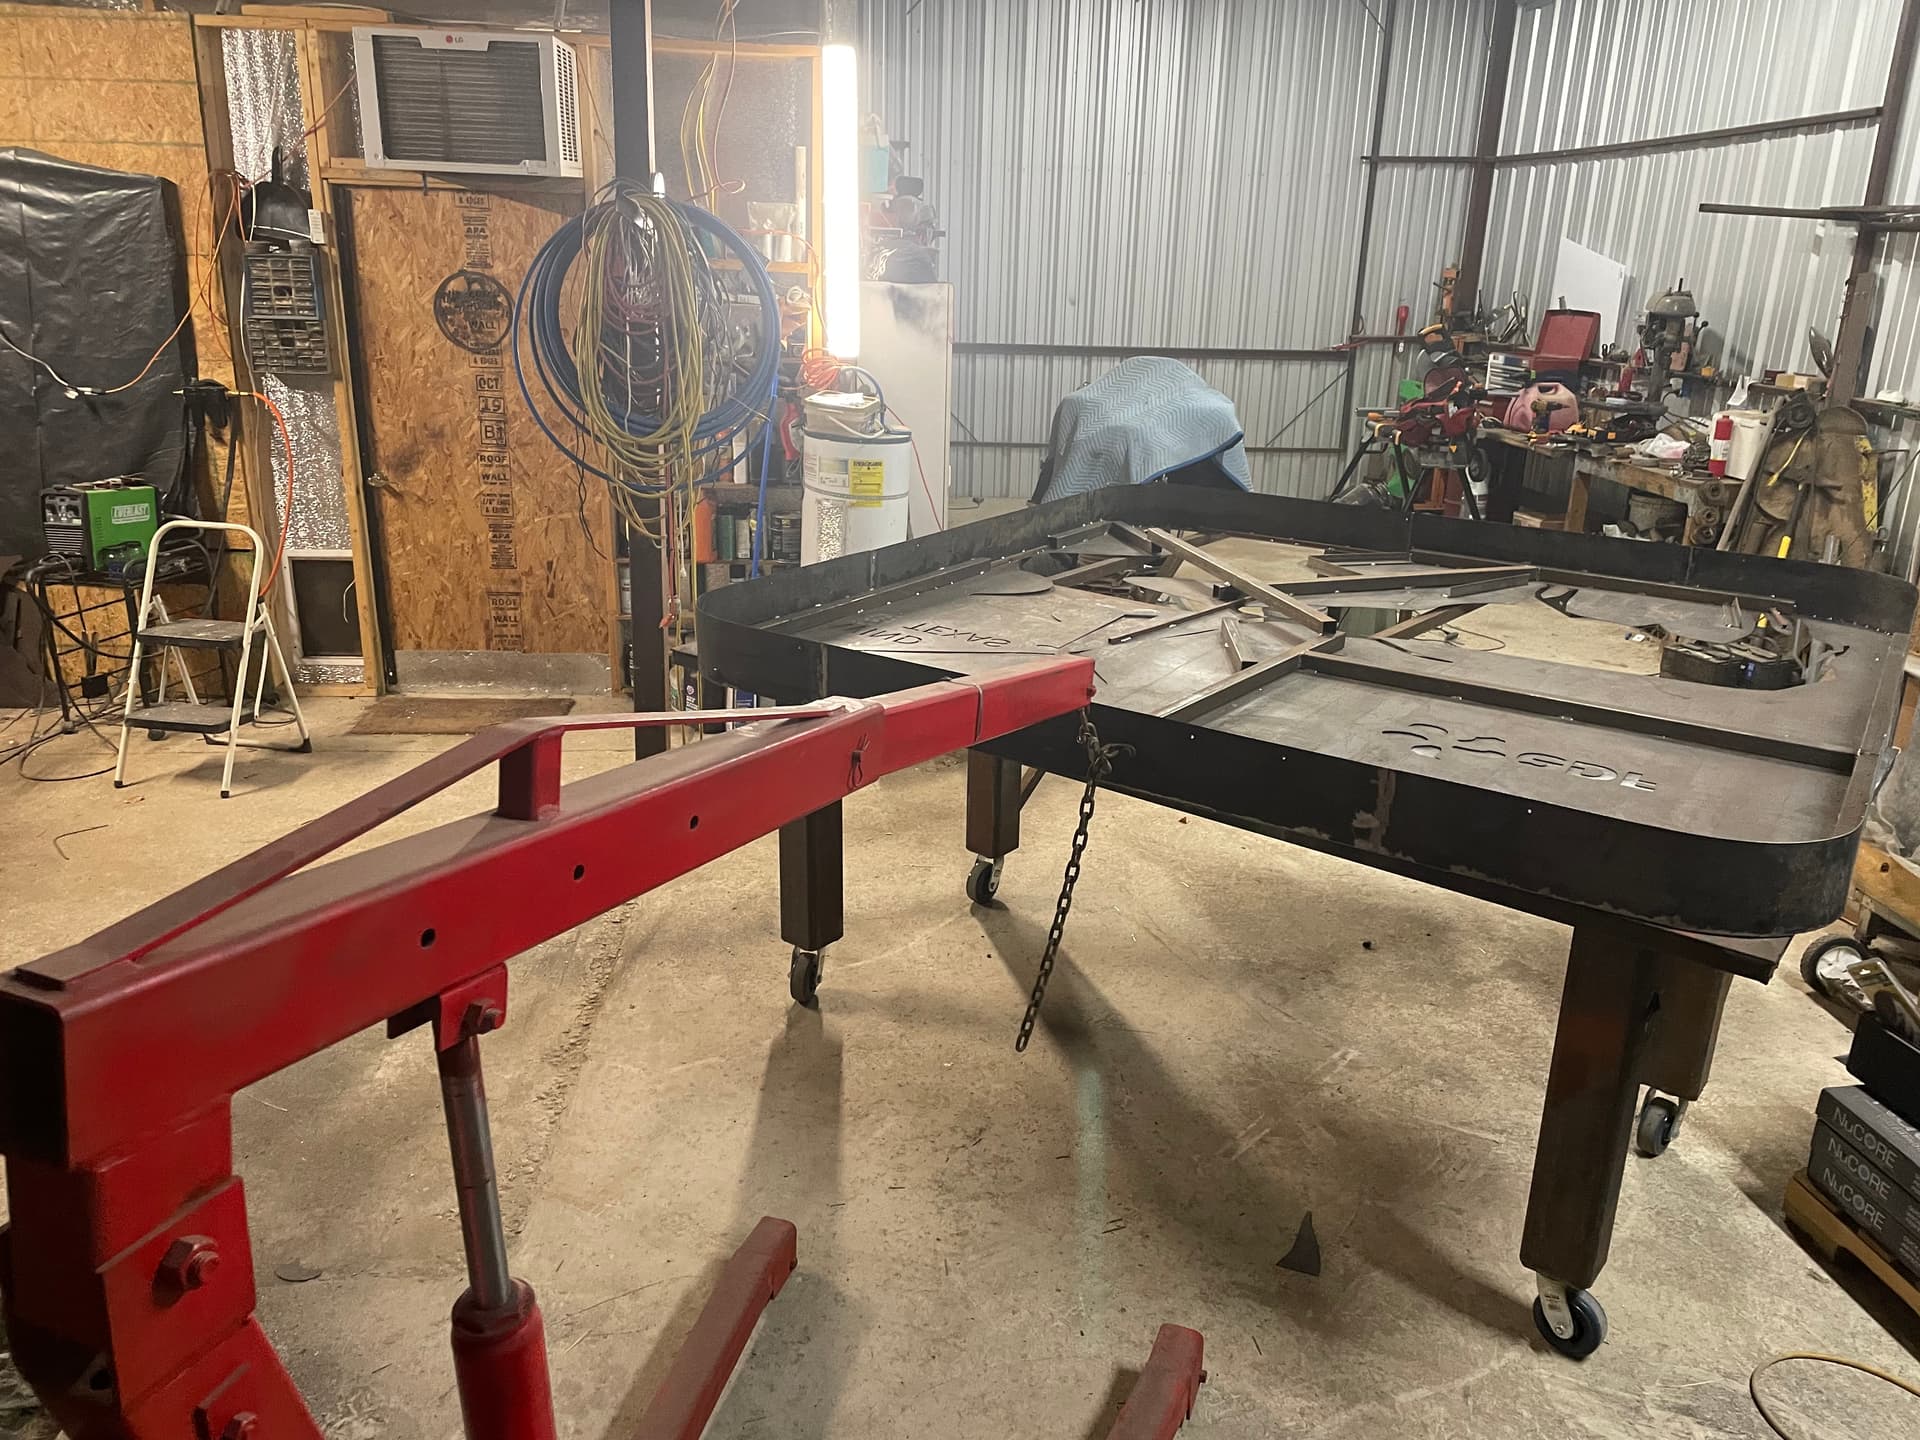

13 Likes
Wow! That is Texas sized ambition right there. I don’t even dream of projects that big, let alone make them happen. 16 gauge it surely will last a while. Do you have a metal fabrication business full time, or just hobby on steroids?
Can’t wait to see pics of it painted and mounted up.
We got a new guy on the forum who is an awesome welder: @Kwikfab . He and I would both be interested in what type welding, any lessons learned, etc. I think I see a Titanium MIG in the background but I could be wrong.
2 Likes
@DnKFab - nice sign!
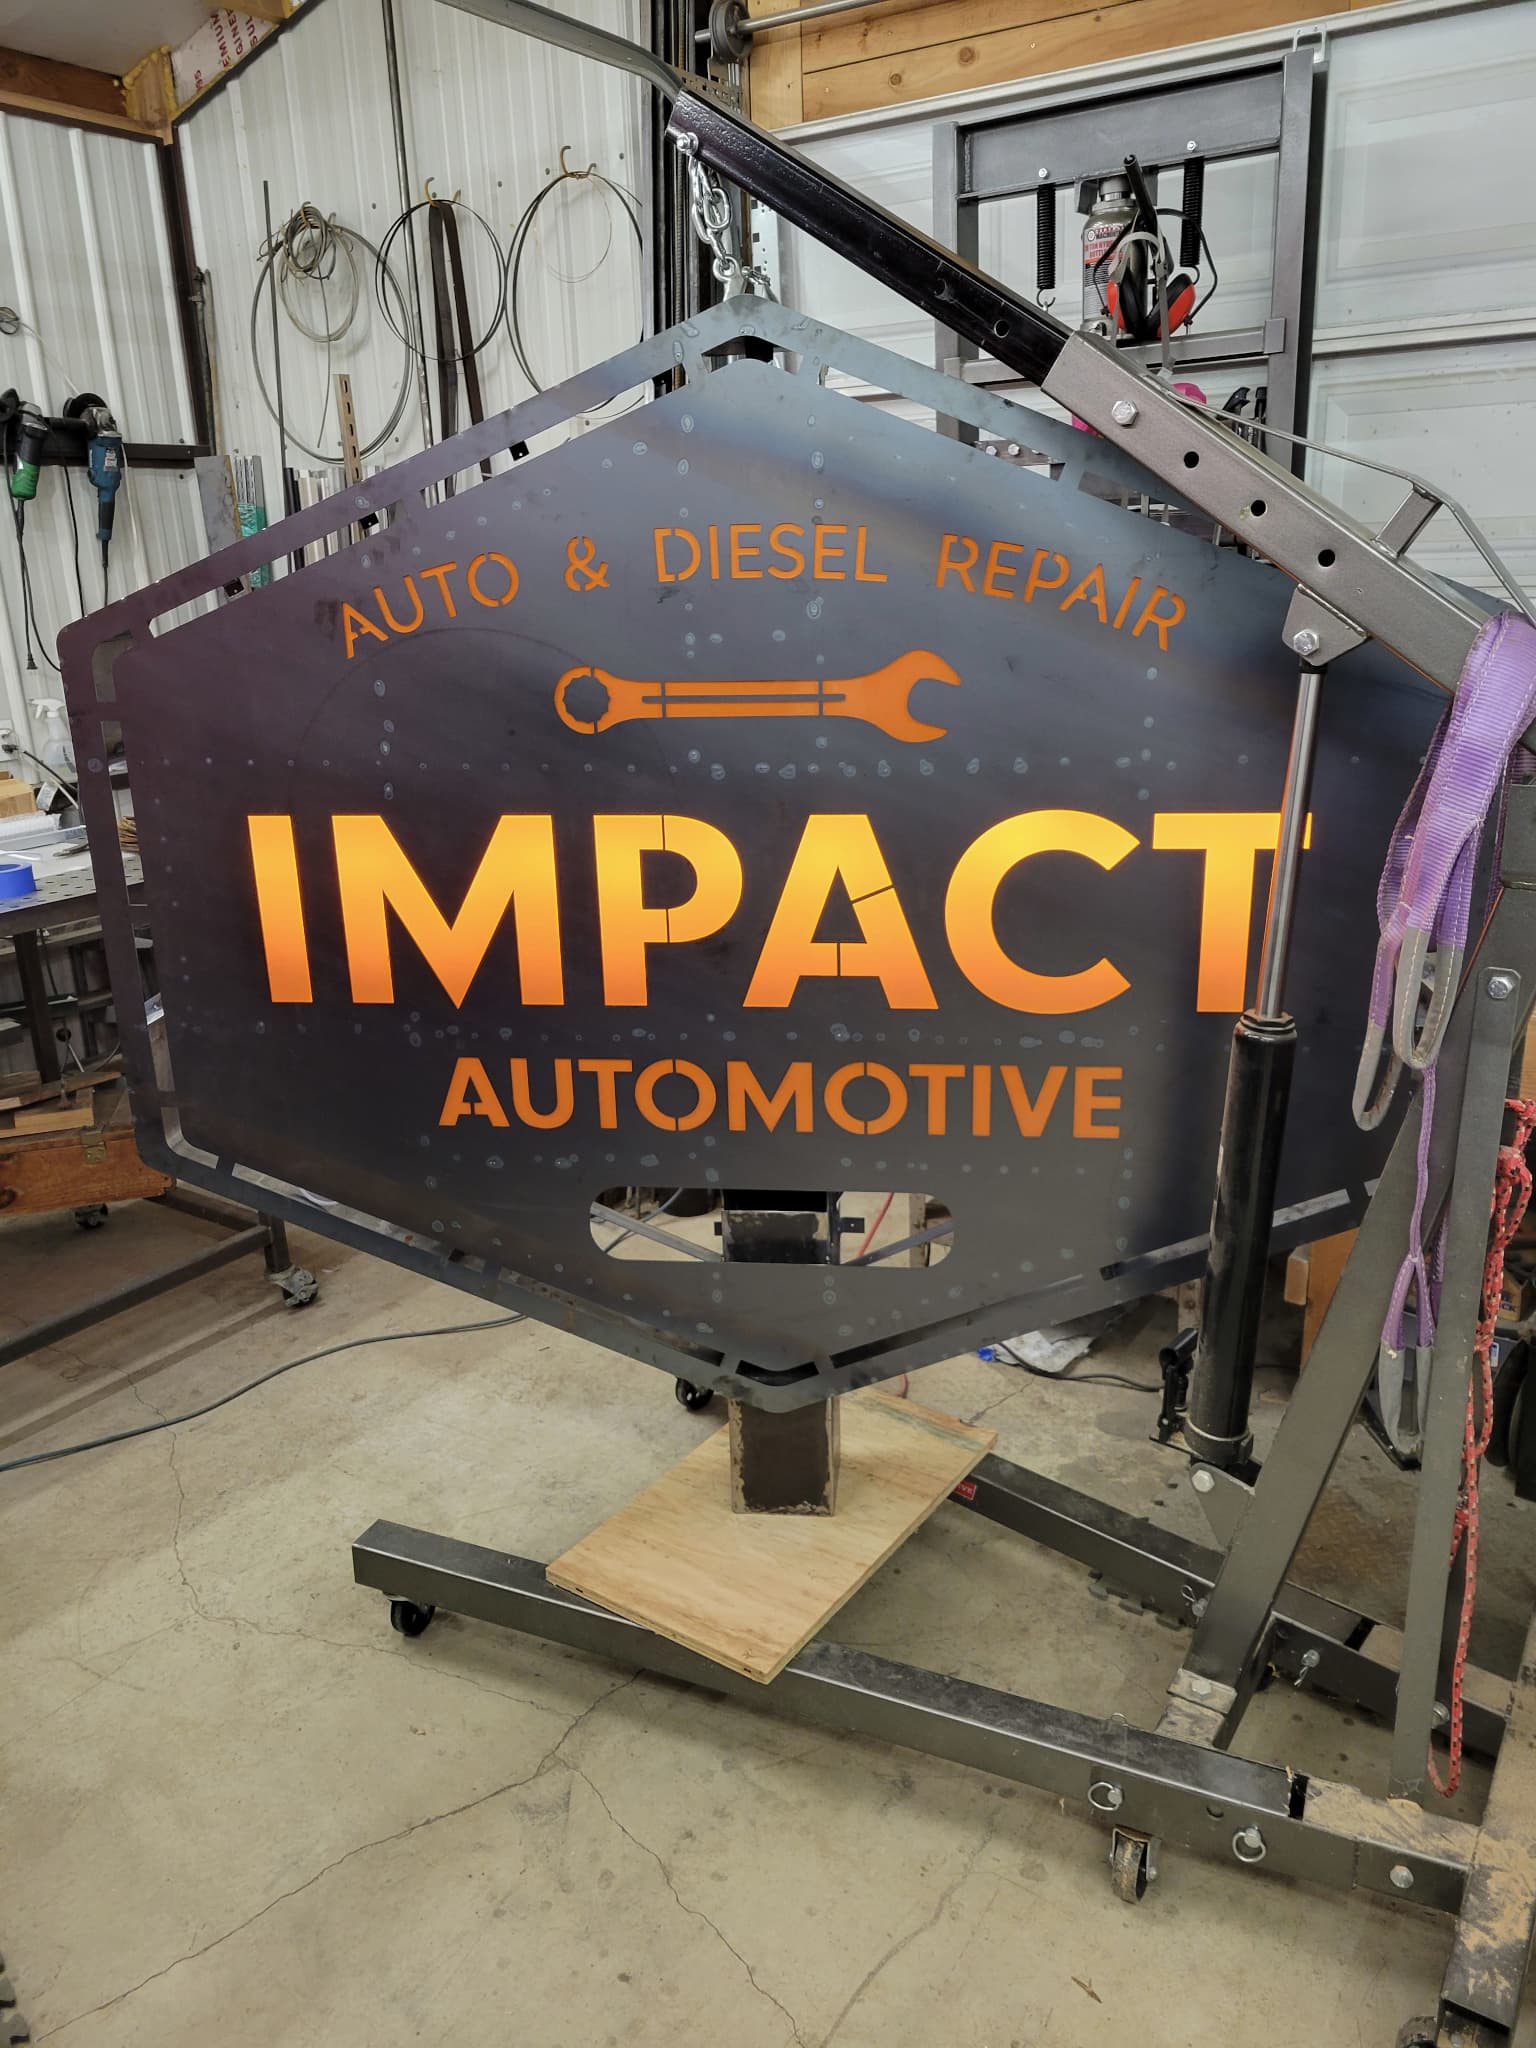
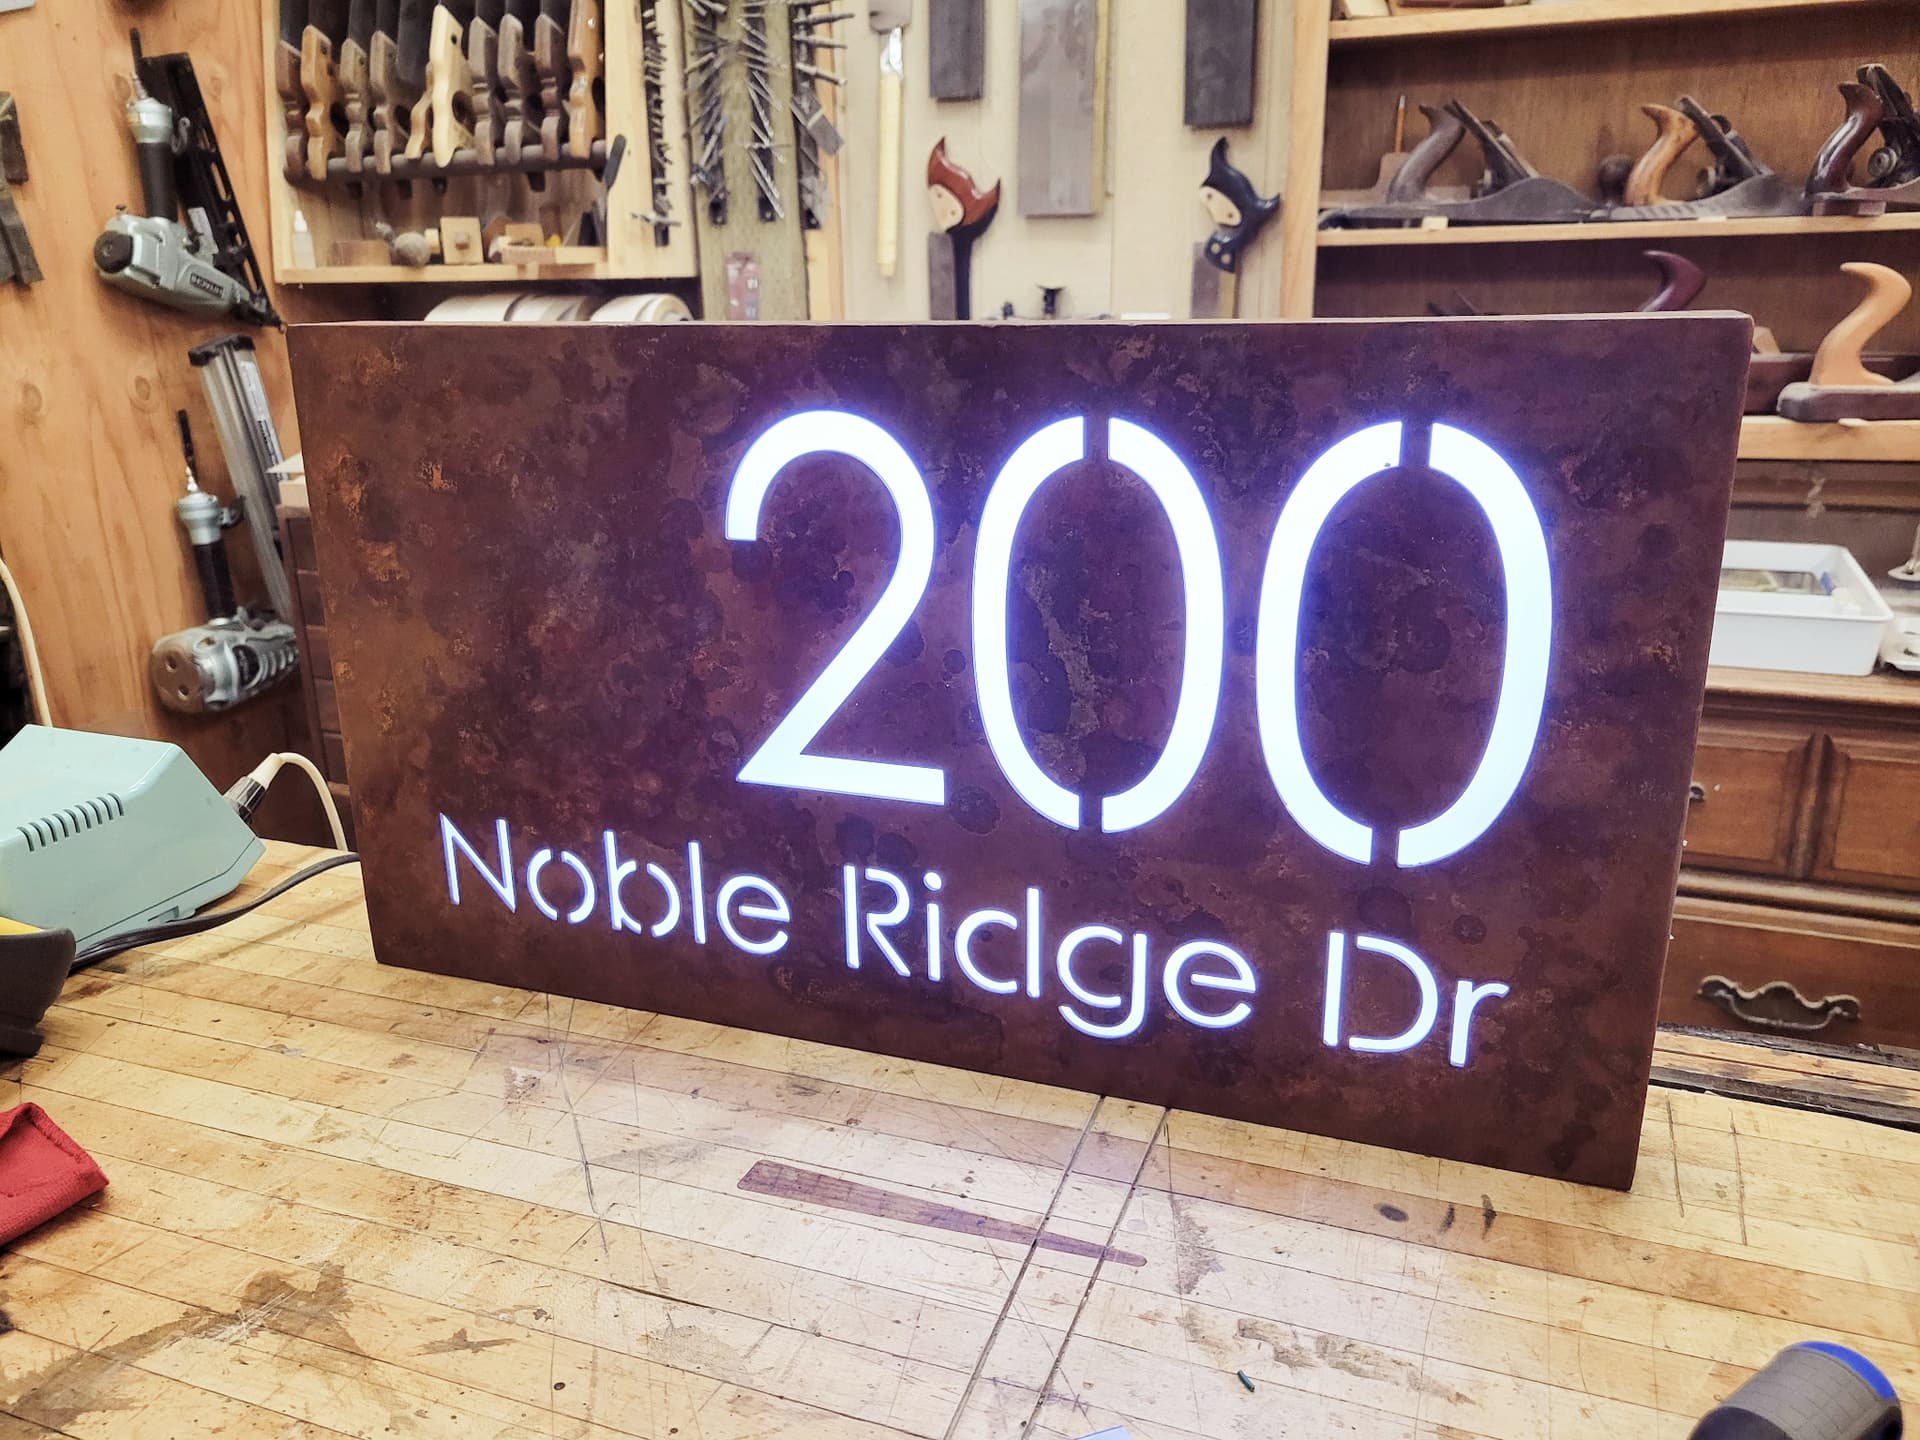
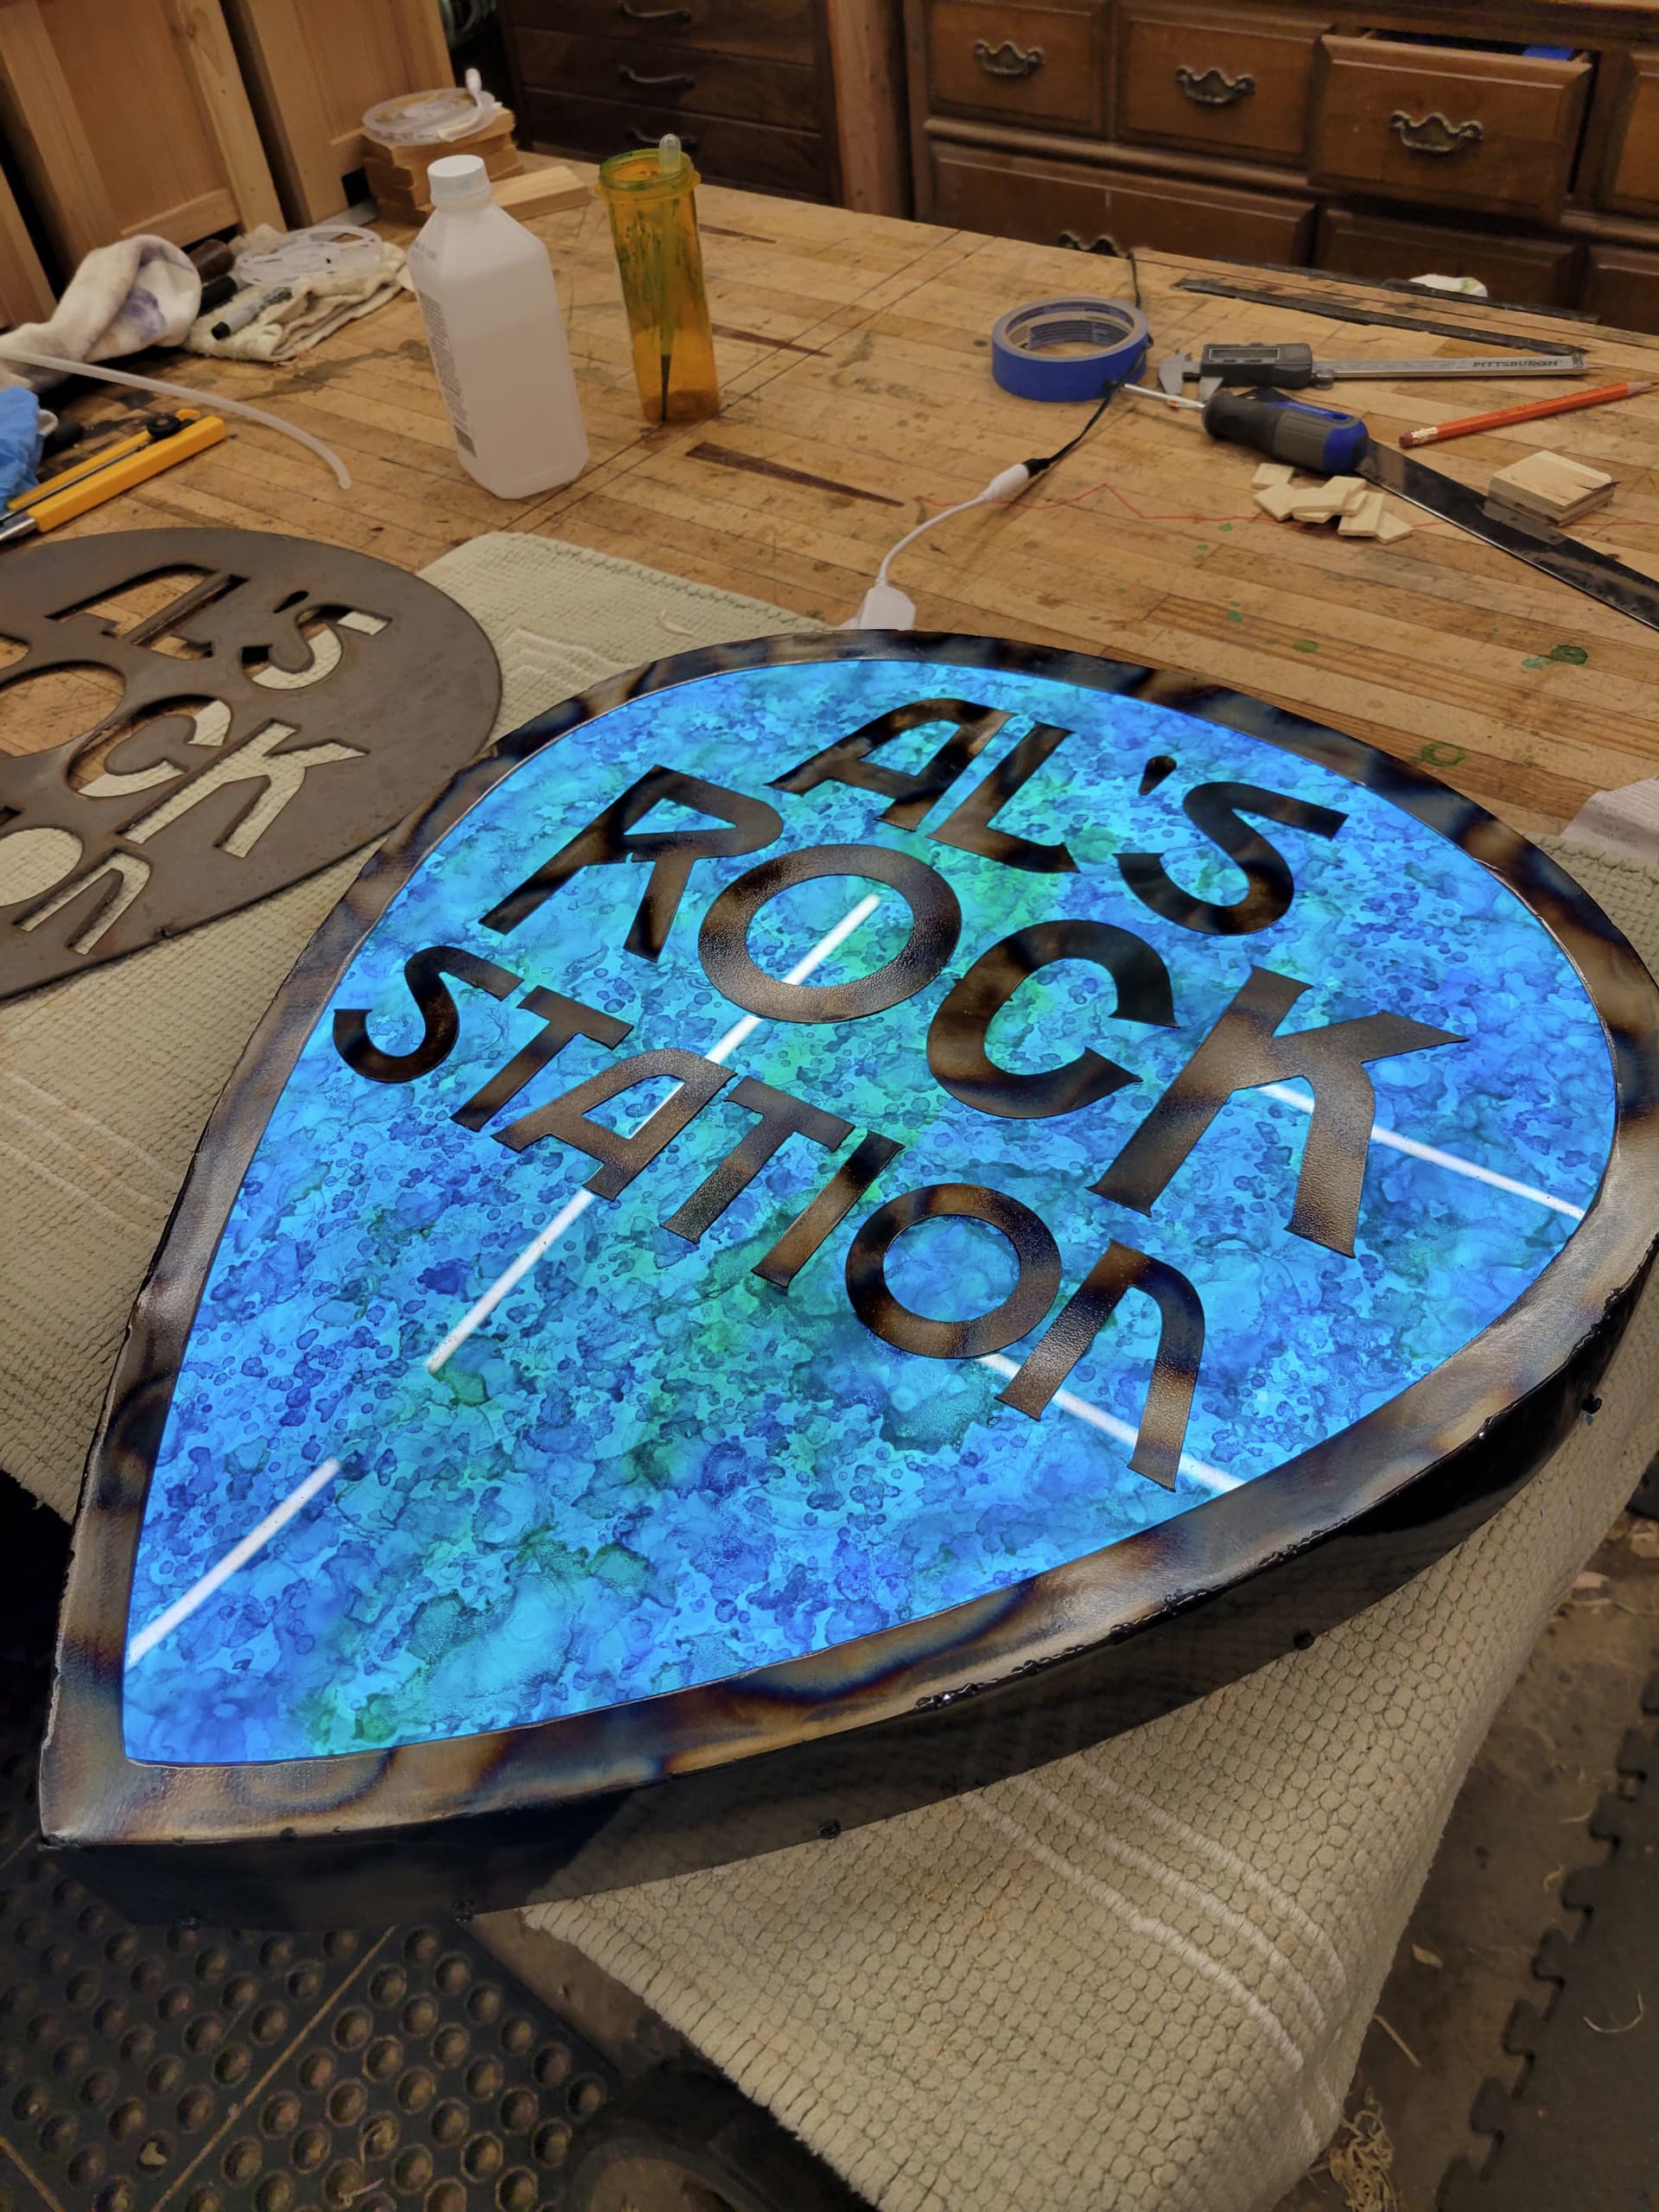
Here are a couple of signs I have done over the last couple months.
The big one is not complete.still have to remove the tabs for letters, powder coat, finish lighting, etc.
8 Likes
Hey @Roadhawg - where did you get that USMC logo file ? I would love to cut a couple of those for my Marine friends !
those are beautiful!!
@DnKFab I like you internal structure!
I cut out a bunch of internal structure “ribs” for my big sign. In hindsight I could have gotten away with about half of it… but it was a fun exercise and I figured out some useful shapes to use on future projects.
4 Likes
That internal structure on yours is impressive! I like the design. I was shooting for a minimalist concept of reinforcement with the least amount of interference with lighting. As it sits I think I am right around 130 pounds for 8x8 and 5 inches deep. Weight will increase slightly with lights and acrylic. Speaking of lights, initially I was thinking of going with strip led lighting. I’m using colored acrylic so I am only using white light. I am considering doing 4 5ft long led shop style lights. They are 6000 lumens each. Anybody have any experience or suggestions on that front? I am using 3m mounting tape for affixing the acrylic to the metal. I had planned on clamping but I think the 3m adhesive will do better and it is clear so it will not block any light inadvertently.
@DnKFab I have been using these:
https://www.grimco.com/Catalog/Products/HANLEYLEDPHOENIXNRGSERIESII
https://www.grimco.com/Catalog/Products/HanleyLEDPremiumPowerSupplies
There are not cheap, but not super expensive either, and very high quality, rugged, very bright, waterproof, etc.
As for my internal structure, you probably cannot see it easily in photo, but there are cutouts for the lighting “bars” which correspond to the areas of the sign where letters/cutouts are.
3 Likes
@Wsidr1 , Thanks for the compliments. Things I have learned on this project.
1 I had to learn how to index cut. Was very intimidating to me but finally just did as best as I could. Came out great.
2 while a 16 gauge 24inch wall piece can have any design in the world and support itself…that is not going to happen with an 8x8 sign. Large signs take significant internal support structure and I did not consider that till I had two very floppy sheets of 16 gauge.
3 stop and think….let me repeat that…stop and think. From the index cutting to the reinforcement to how it welds together. I constantly had to slow myself down and try to think as far foward as I was able and ask myself if the current course of action I was considering would screw me later.
4 heat is your enemy. Whether grinding, welding or cutting. Keep the heat inputs as minimal as possible. Heat will make large pieces of light gauge material warp and buckle and crawl all over the place. So when welding this I woul do a half inch weld and move to a completely different area. Also, like the seam… I would actually blow cold compresses air on my stitch welds to keep everything cool enough to place my hand where I had just welded. If you ever feel heat to your bare hand directly on the metal you need to slow down and put more cooling in and less heat into the metal.
This is indeed my full time gig. Started off as a hobby but has evolved. I love it. I retired from being an mri technologist. I’m too young not to work so this is my second career now. In regards to the welder. It is a harbor freight titanium 200 unlimited. I bought this for fence pipe fence welding where it excelled. My shop welder was a Hobart 210 mvp. Expensive American made transformer style welder. Bullet proof. A couple weeks ago I got tired of the noise of its fan so I decided to set this titanium up in the shop. I’m liable to catch crap from the welding purist but without question that titanium welds so much better than my Hobart does. The arc is much smoother and crisper. The voltage feels to be more stable as well. And as a plus it’s fan isn’t as annoying!! Lol. To top it off I just started an aluminum project and the spool gun for this thing is fantastic in my personal opinion. I will post a video of the spool gun working in a few days probably. Sorry for such a long response but I thought your questions were worth clear explanations.
5 Likes
Man, if I were younger, I’d be following the same path as you. I recently retired form Toyota. Worked on new model designs. Since retiring, I have gotten more into metal working (hence CF Pro). Only had tinkered with MIG and Arc before retiring. This CNC grew out of me missing the CAD side of Toyota.
If anybody gives you crap about the Titanium (IGBT) vs Hobart (transformer) I can attest. I own a Hobart MIG I bought 30+yrs ago. Been rock solid. I also have a Primeweld 225 TIG/Arc. My previous Arc welding experience was on a Lincoln tombstone. I was mediocre at best. But the arc is so smooth on the PW it is like a completely different welding process. I can Arc weld! And the sound is so clean.
Thanks for the details and those are some great key points from the project. I’ve already had issues with warpage on the few times I tried anything thinner than 18 gauge on the Pro. 18 gauge is my favorite so far.
1 Like
That’s some serious engineering going on there.
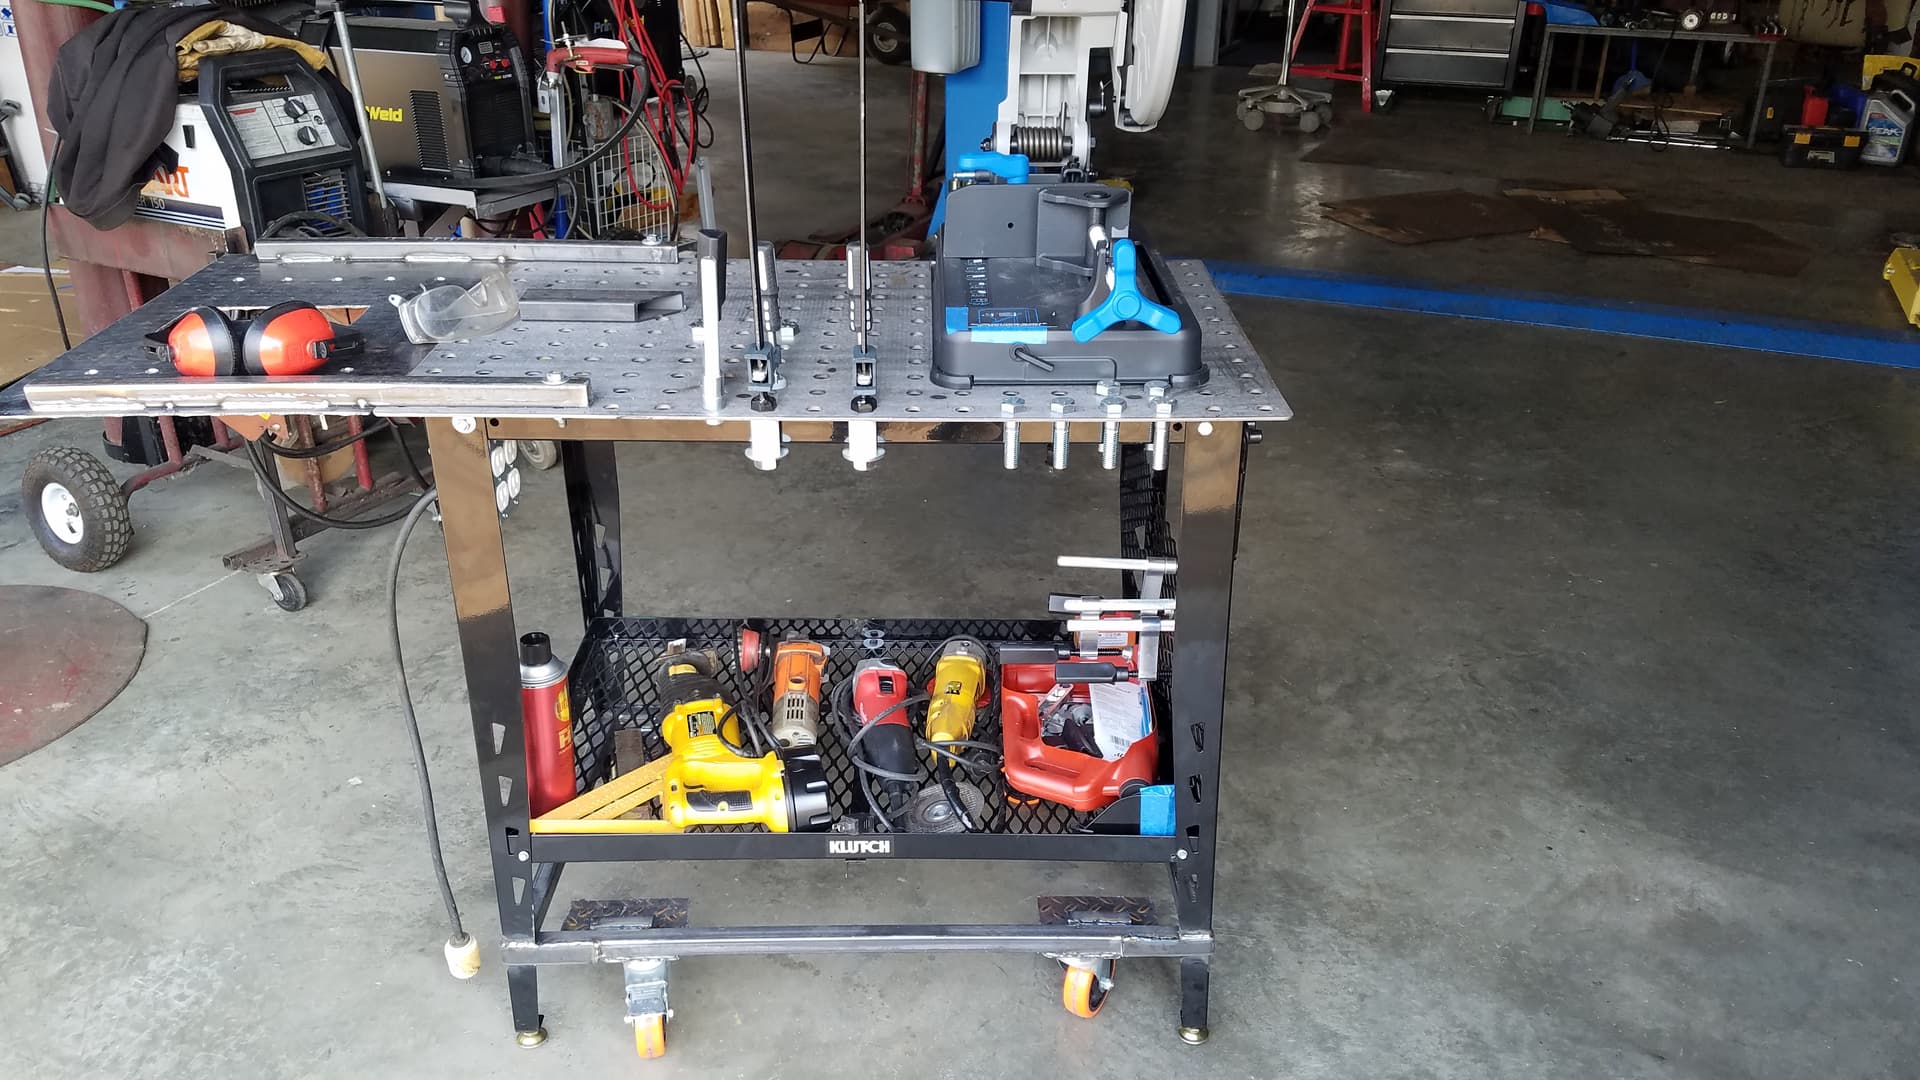
I think I recognize that welding table. Here’s mine right after I finished it. I pimped it out with casters, extended clamps, a bottom tray, a 4 gang receptacle, and a table extension for my Evo metal saw.
Man, it was so clean then compared to now.
1 Like
@Wsidr1 - similar table yes.
Soon I need to start cutting out drawers - I have a 48" box/pan brake coming soon - so I will be cutting drawers of many sizes - to go under tables, welding carts, and cabinets.
I make a lot of metal+wood furniture and have started making tool and parts chests/cabinets - so that should be fun use of the plasma rig too!
2 Likes
It’s amazing the doors these small CNC units open us to us.
2 Likes
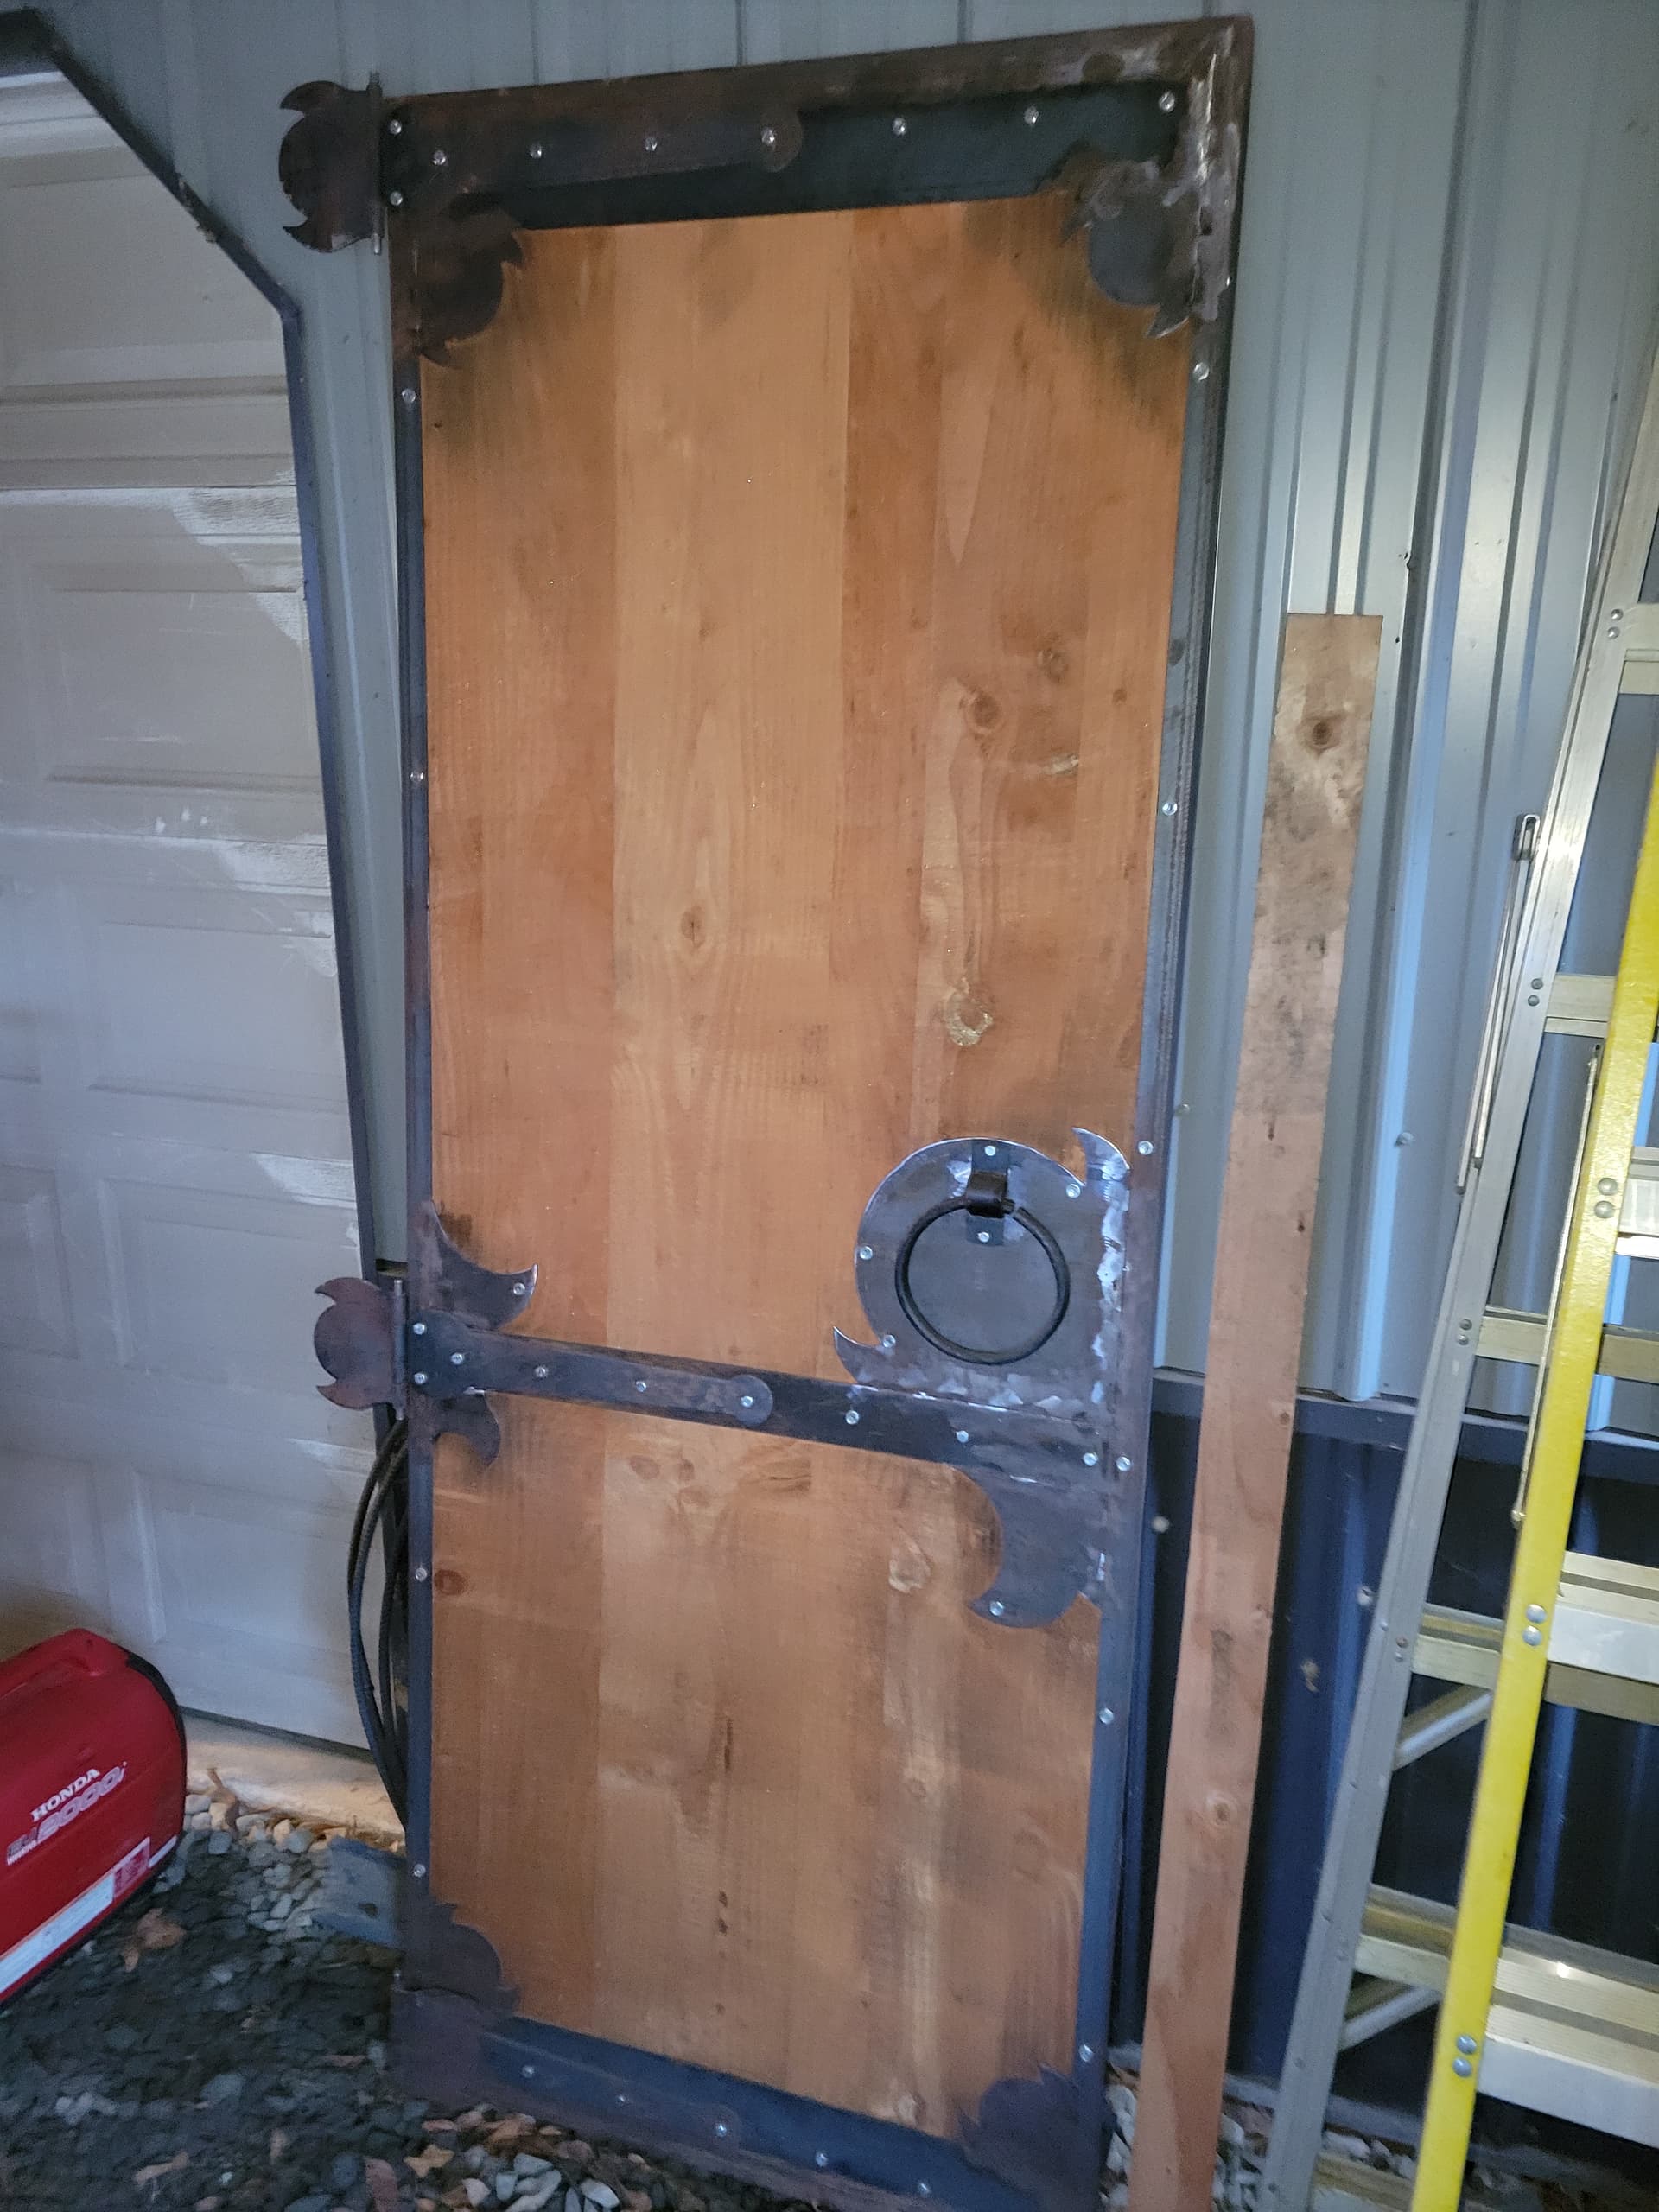
@Wsidr1 - funny you should mention “opening doors” in this thread…
8 Likes
That’s cool.
Man, ornate doors remind me of “This Old House”. Those guys spend a fortune remodeling houses we’d tear down here in the Midwest. It’s great though to see them bring those places back to life.
2 Likes