I am getting to wits end, I have been struggling with cut quality for week and have tried just about everything under the sun and am wondering if perhaps I am having a THC issue or if it really is just machine settings.
I have used Fusion 360 and Sheetcam for the CAMing.
I have the Crossfire Pro table and am trying to cut 1/4" mild steel. I started with using my PrimeWeld Cut 60 and hand torch and my outer corners and sides with tabs have been severely rounded and severely beveled. I tried with 60A and 45A nozzles and the range of settings and eventually started using Path Rules. Couldn’t improve the tabs.
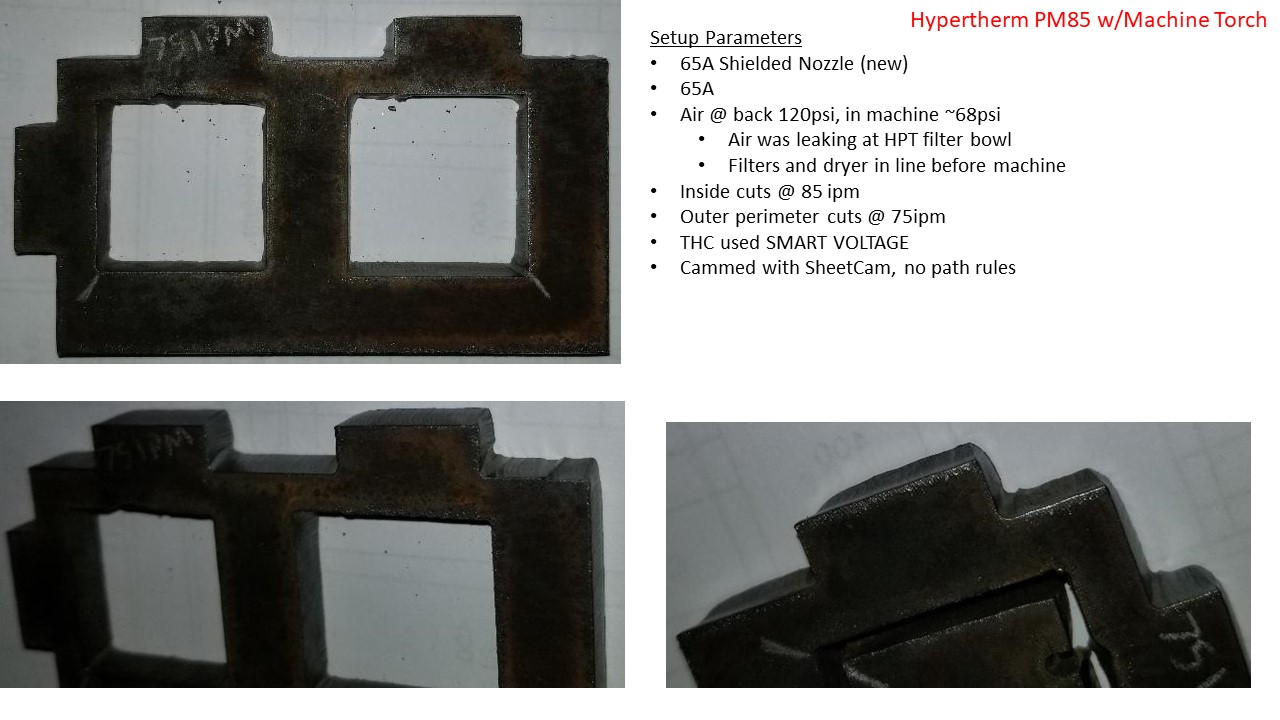
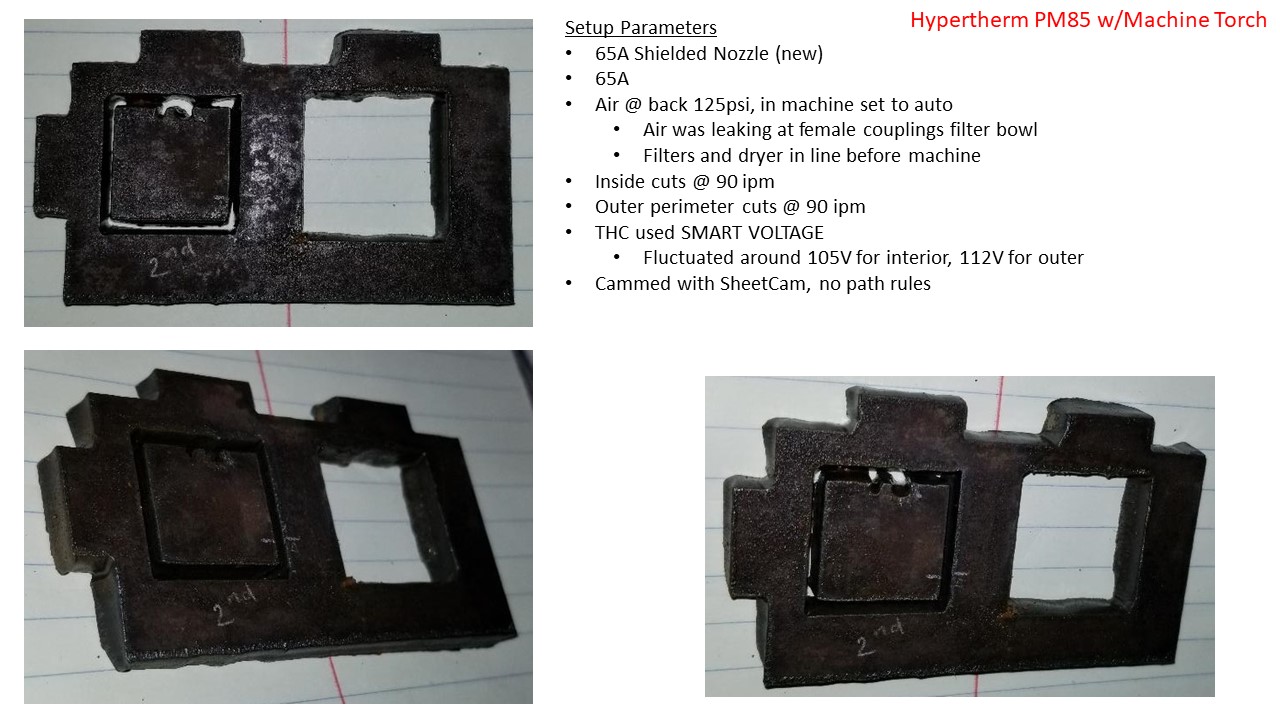
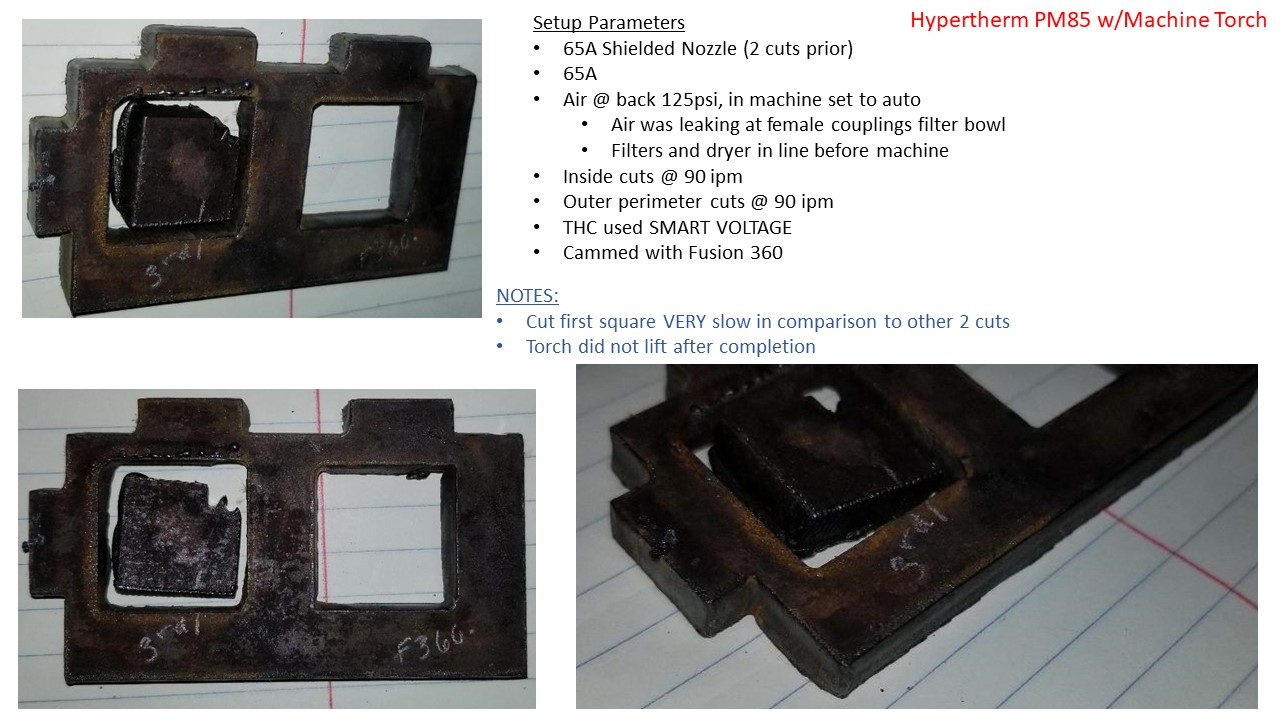
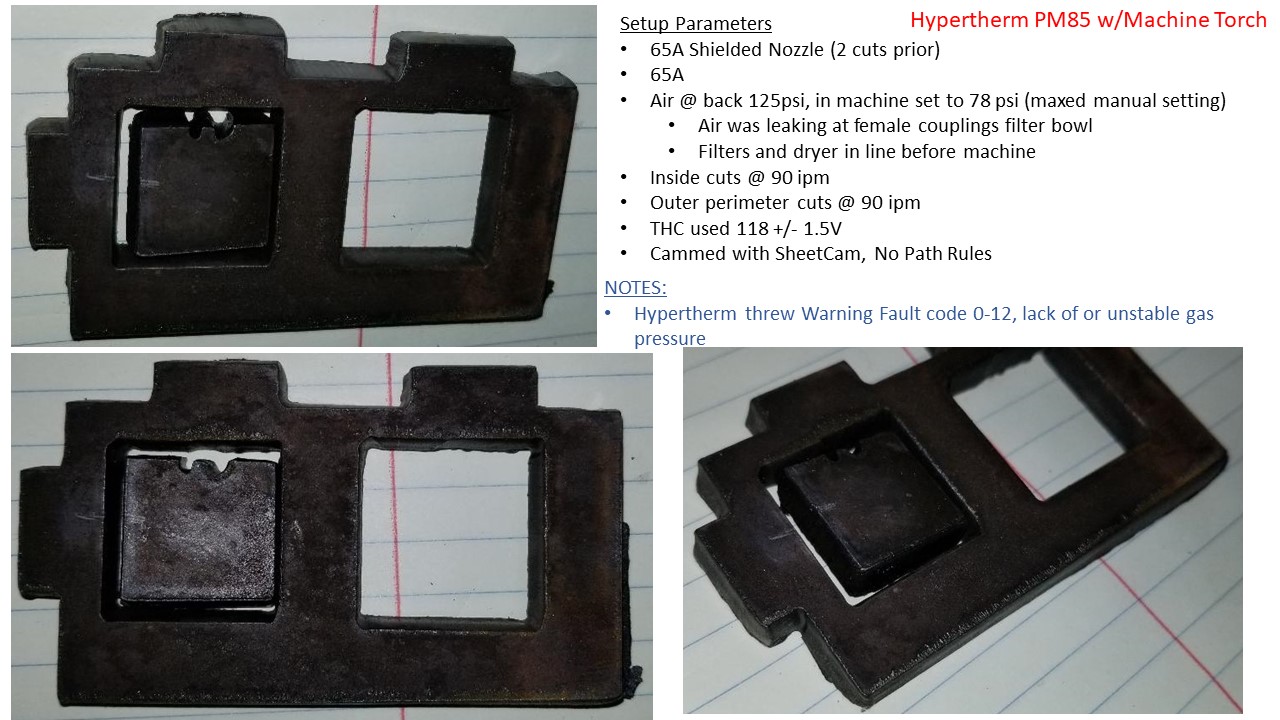
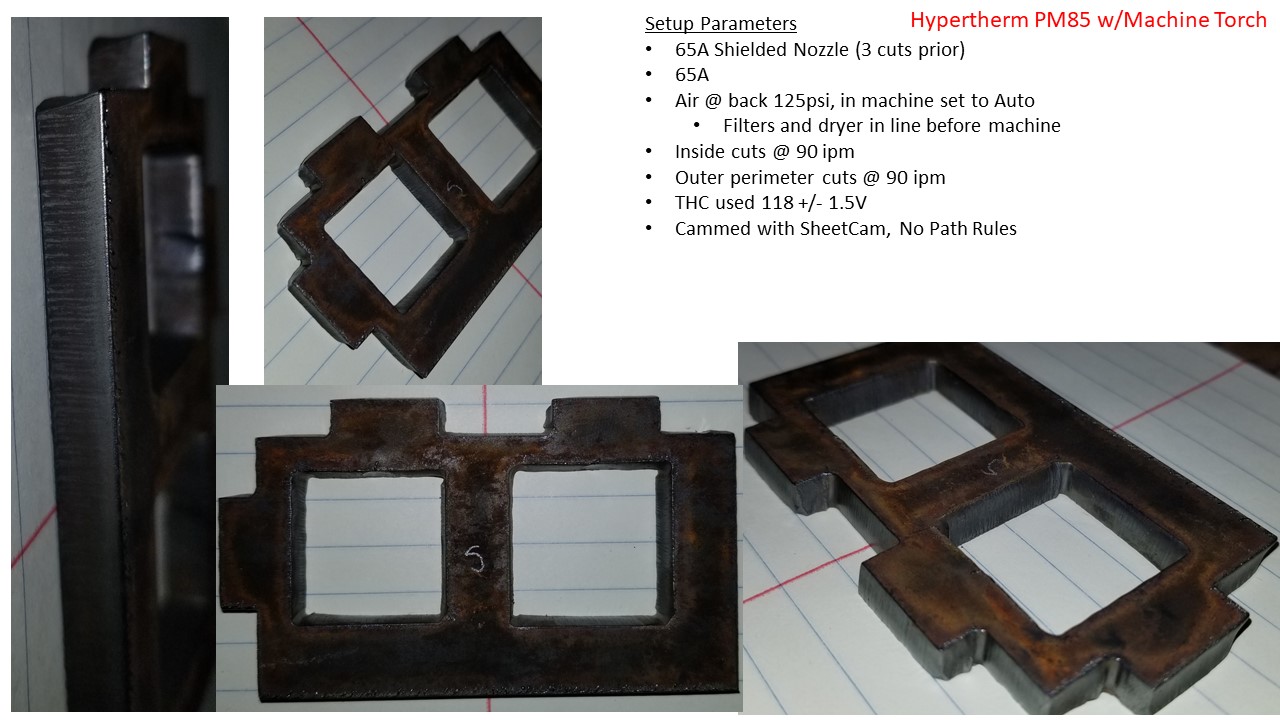
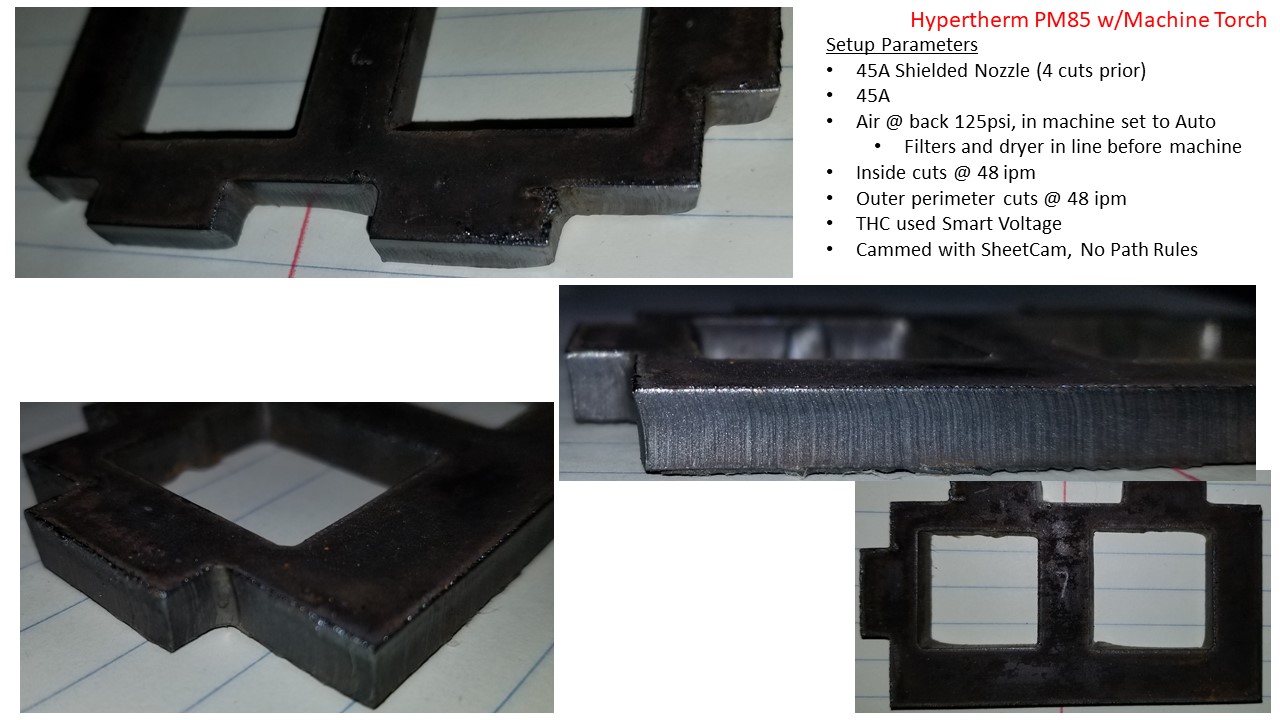
I also have a Hypertherm PM85 and recently acquired a machine torch so I now have that set up with my machine. I have tried cutting with both 65 A & 45A consumables and parameters per the Hypertherm manual and I am getting convex and concave edges in the same cut and my corners are still pretty rounded. In all cases the cut height has been set to .060" as specified in the manual and pierce height = .015", Pierce delay either .6 or .5 sec depending on consumables, Kerf per the HPT manual as well.
I had air leakage issues that I corrected before the cuts shown, so I don’t think air supply is my issue
Post your gcode, use the upload button, it’s the one with the arrow above where you type.
As suggested on plasmaspider thread, run with the plasma cutter off and THC disabled. Pause the program where it is “cutting” and measure the cut height, is it correct? Pause it during the torch fire and measure the pierce distance, is that correct?
Assuming yes, if you haven’t already try doing a cut with THC disabled. Any better results?
What are the dimensions of the part?
FWIW I recently did some test cutting on 1/4" material. My first test was bad (parallelogram effect) due to an electrode. It was almost new, but looked like:
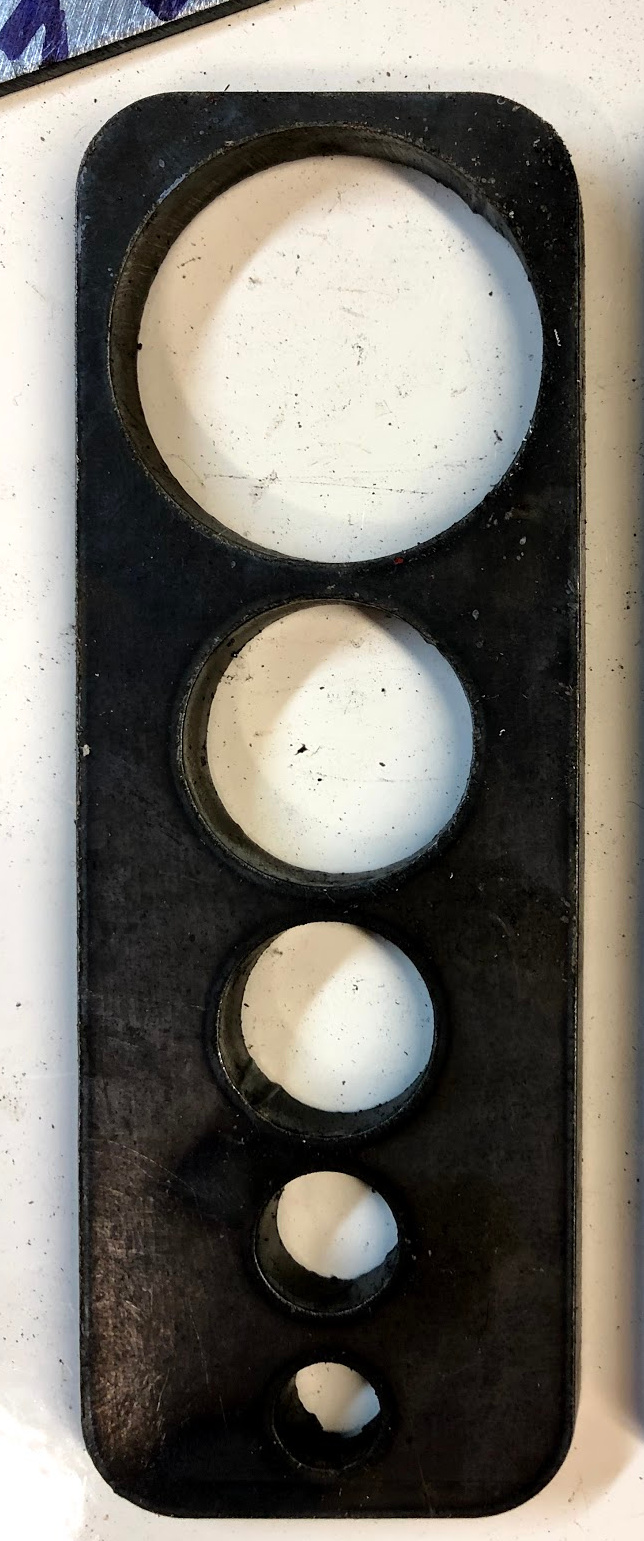
That was enough to give poor results. I changed it out and ran again, these are 3/8 to 1-1/2 holes. All holes under 1-1/2" were cut at 60% feed rate (so THC disabled). This was done with a Hypertherm 600 with the retrofit Duramax torch.
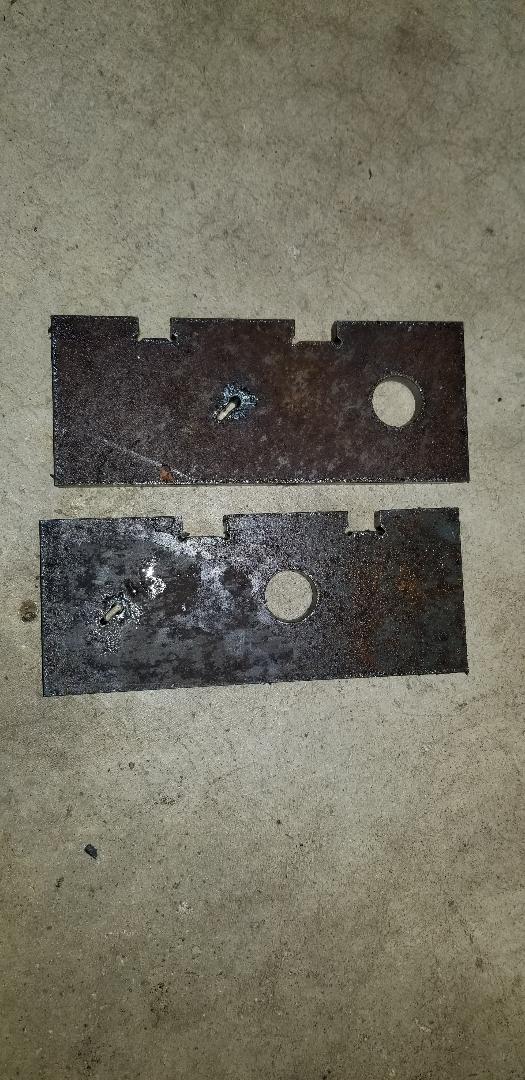
So my pierce height is off on the parts cut using Sheetcam, I had a typo where I misplaced a decimal. So my pierce height was .015" instead of .15". Cut height was confirmed at .060"
I had the issue on my very first cut with the Hypertherm with all brand new consumables, but I will take a look the electrode now.
I am no longer concerned about the excess slag since I see where my error was, but the poor cut quality on the sides with the tabs has been plaguing me we numerous new consumables and 2 different plasma cutters and I have mimicked parameters from others.
I have done the slower the speeds both set manually and using path rules and I seem to trade one flaw for the next.
The bad pierce may have ruined your electrodes and doomed the rest of the cut. That picture of the electrode above is really zoomed in, it’s hard to see the defect by eye (at least my eyes ). If you upload the dxf, if the part isn’t too big I can try cutting it to give you a comparison.
Thanks Greg, It is small and I appreciate the comparison. I didn’t realize it wasn’t attached to this post, I must have only uploaded it on Plasma Spider.
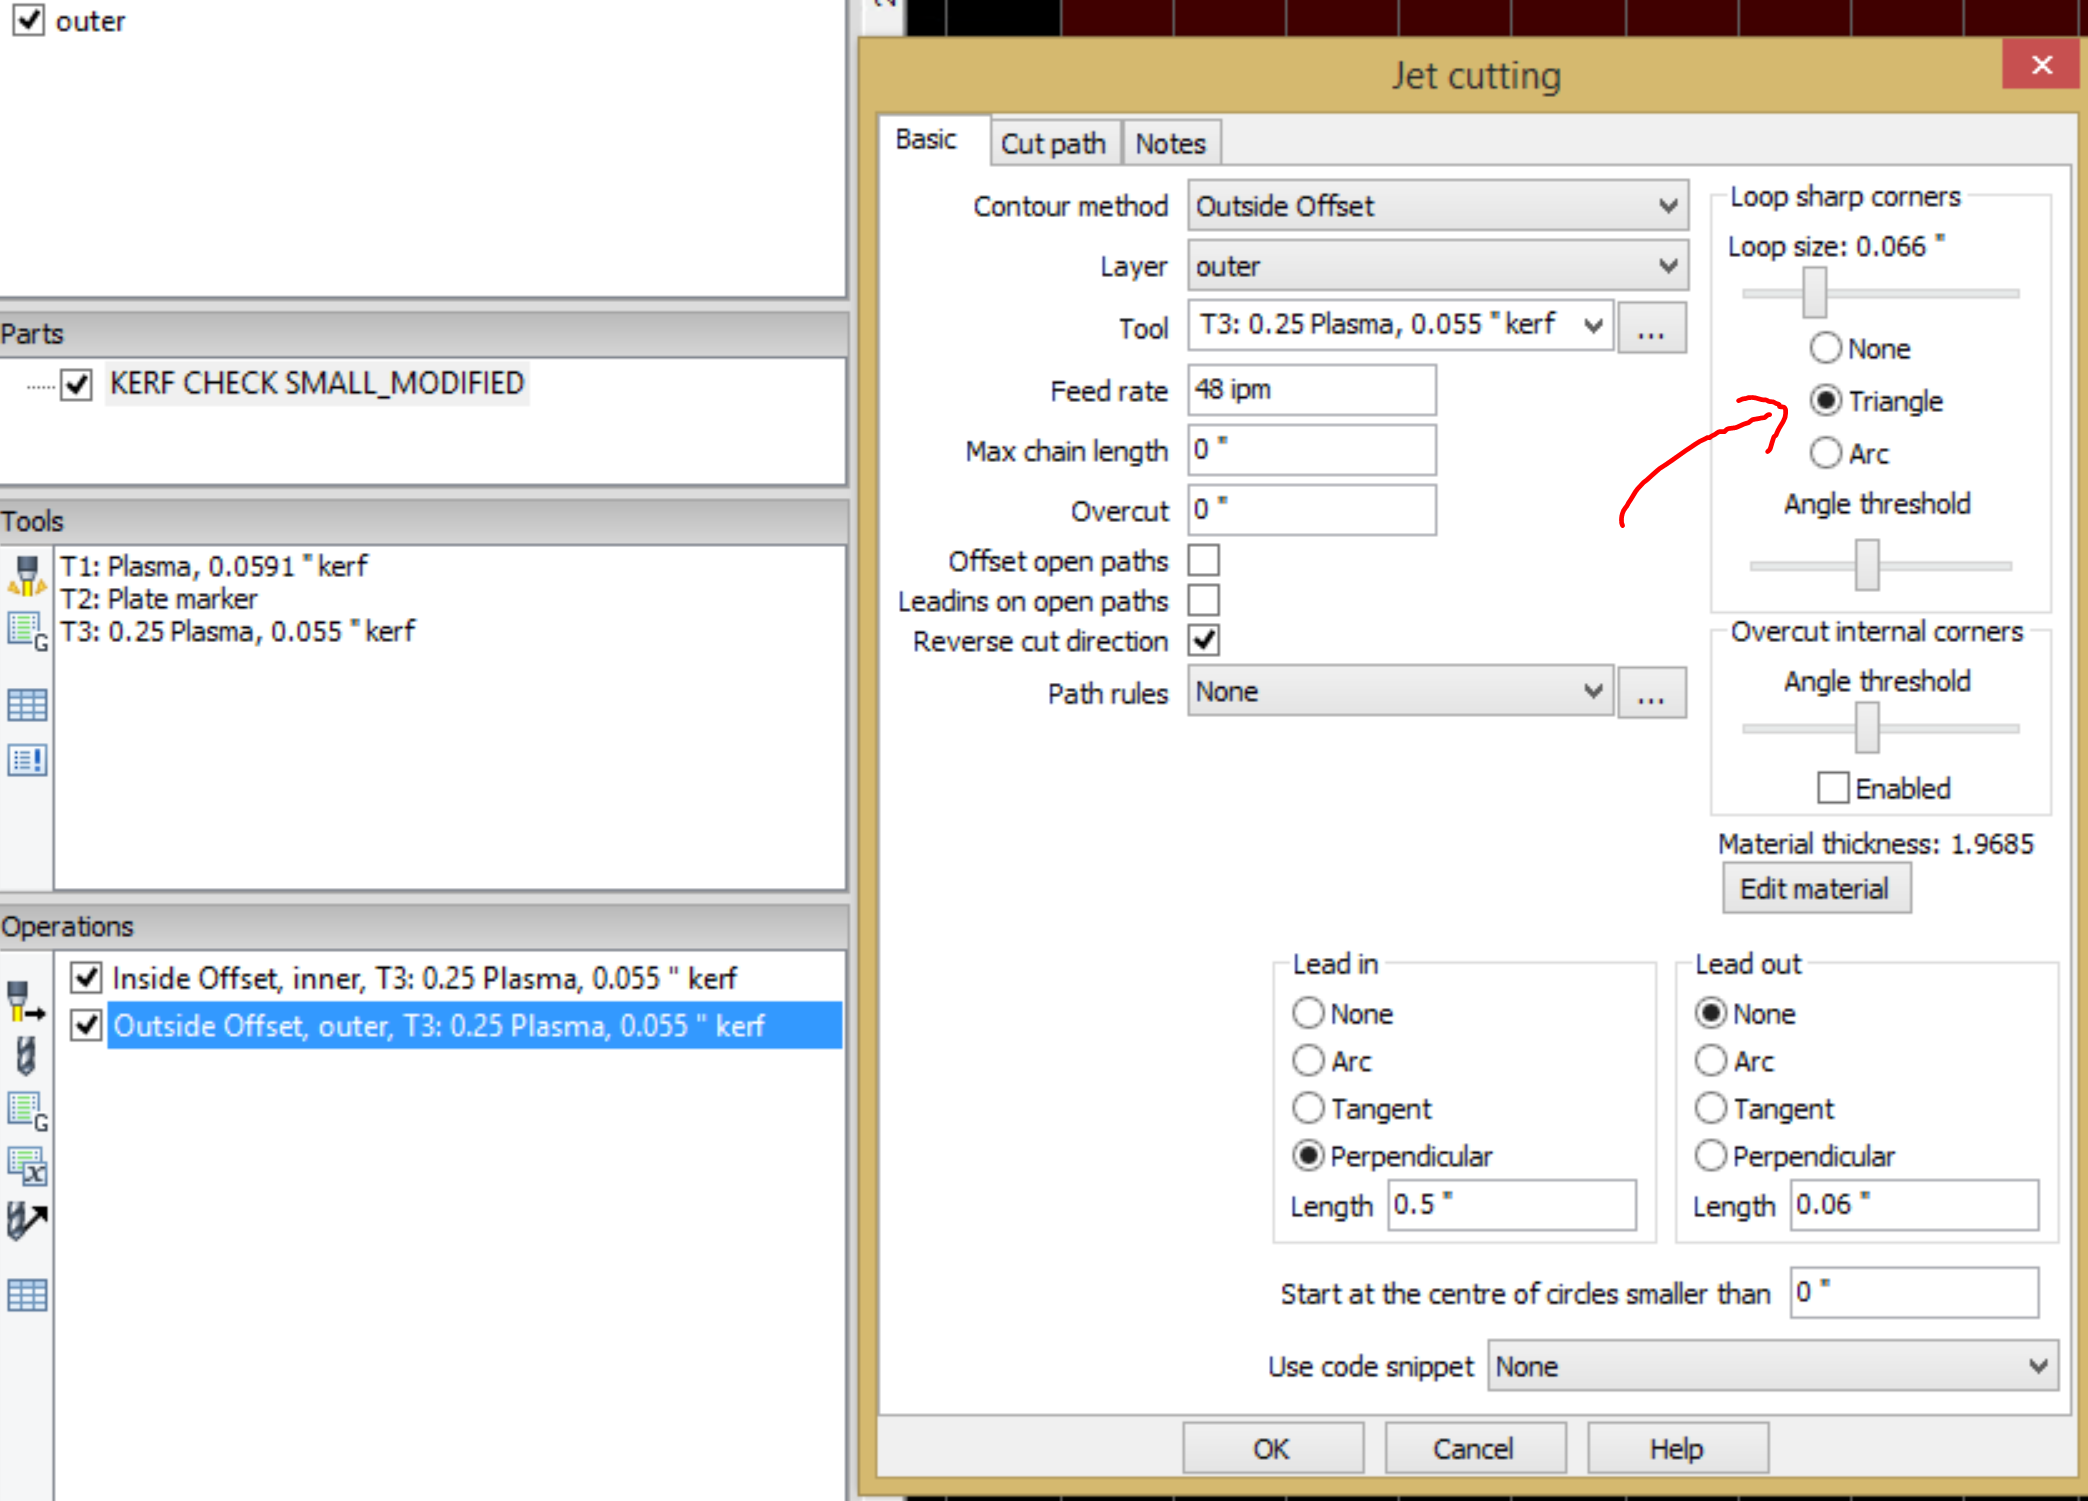
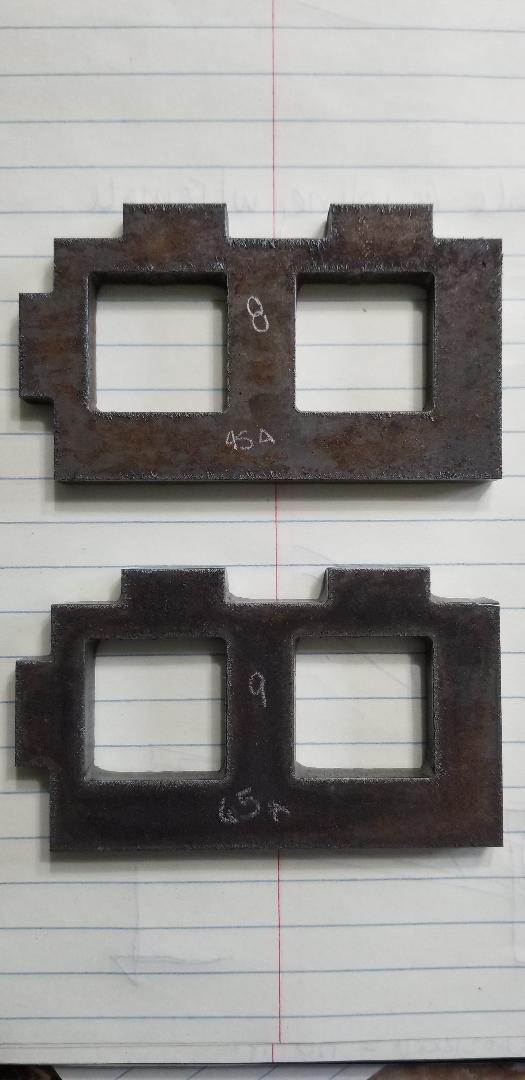
The ‘inside’ corners on the outer contour can use some work. The outer corners I used the Sheetcam feature to loop the corners and they turned out much better. The inner squares, could probably slow down the corners further. I did the complete inner squares at 60% feed (29 ipm in my case). The outer was all done at 48 IPM (full spec). So I think those ‘inside’ corners on the outer cut could clean up with slowing down. I may try that. The still pictures at the end of the video, first is front, second is back. Dross on back was removed with a screwdriver, no grinding on front or back.
Sorry forgot to add, my machine is a Hypertherm 600, it’s a 40 amp machine and that was what it was set at. It has the retrofit duramax torch, I was using the regular 45 amp Hypertherm consumables.
Greg9504 Thanks for the help. I replaced my electrode and re-cut the part with the corrected pierce heights with both a 65 and 45A nozzles. I also used the triangular outer looped corners and my cut has significantly improved. I tried running slower on the outer perimeter but the inner corners still need a little work. Seemed better at 65A so I will continue to make some adustments with the 65A nozzle. I am definitely heading in the right direction though. Thank you.
Mecahnic416 - You are right, for 100% 90deg corners hours will need to be spent with a file fighting with a case hardened edge. Not everything I cut I designed, so there isn’t always the extra tolerance needed for rounded corners. Plus the CNC plasma is supposed to be a time saver once figured out…
BUT for those that need corners with clearance so that parts can go together like puzzle pieces quickly, The slower speed helped and I actually gave the developmental version of SheetCam a try for it’s “overcut on internal corners” feature. Works great, my parts fit nice and tight together making welding it easy.
I still have a few bugs I need to work out, but my cut quality issues are pretty well resolved.
Luckily for me I only need overcut corners when parts need assembly and welding.
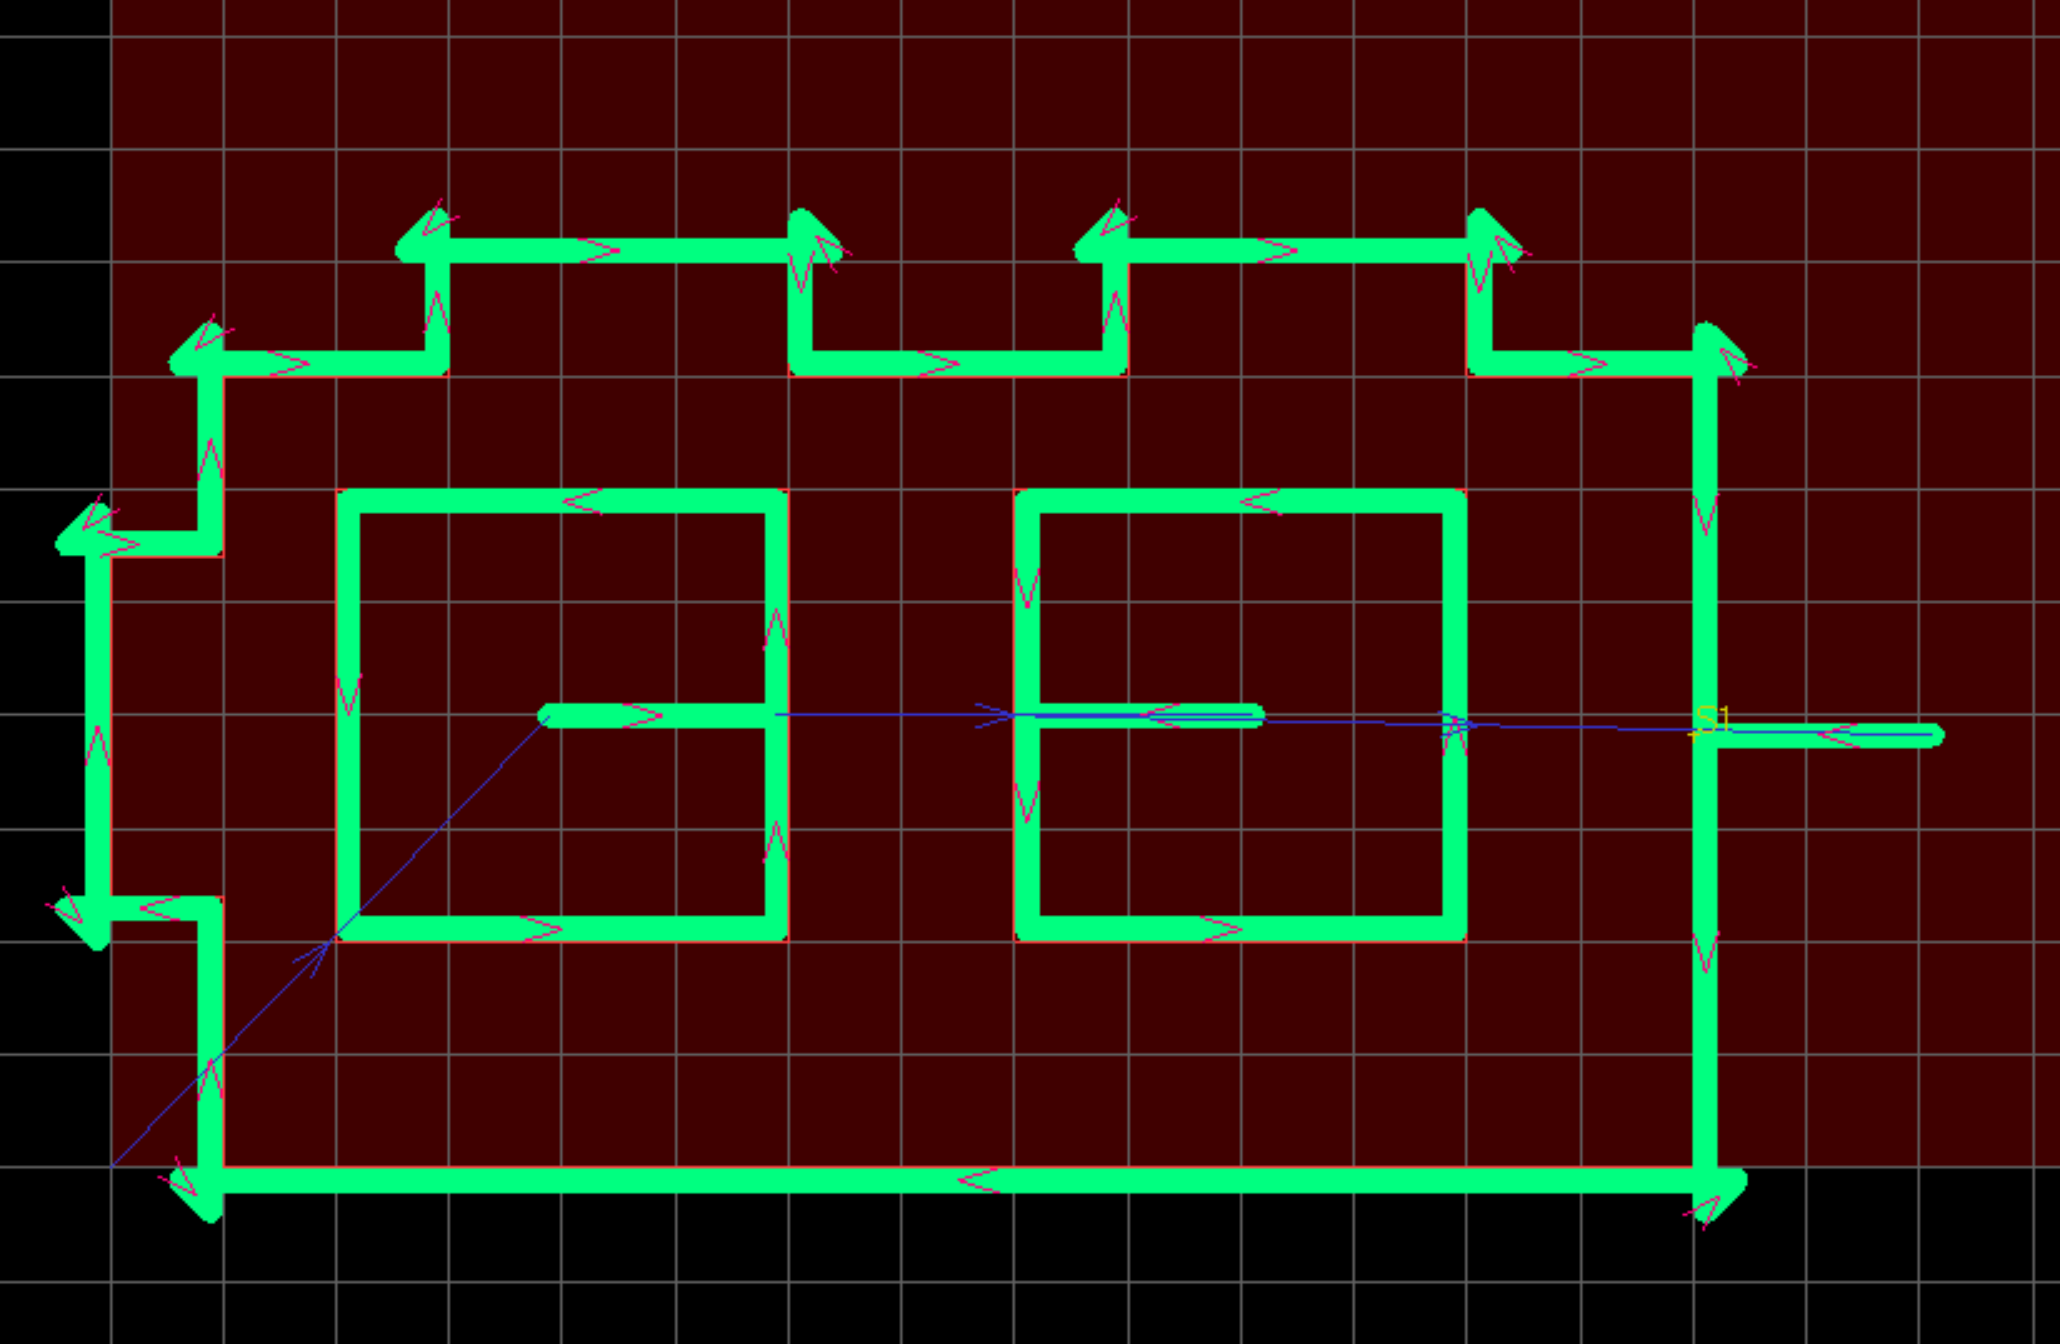
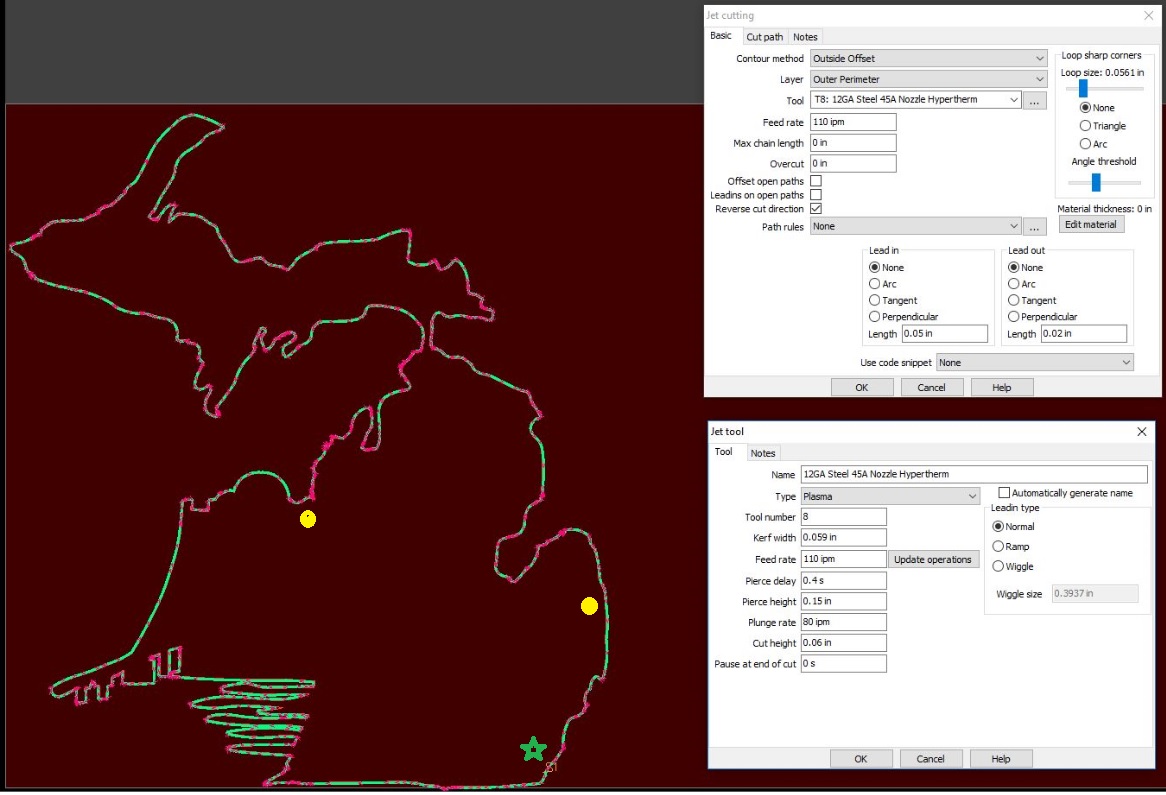
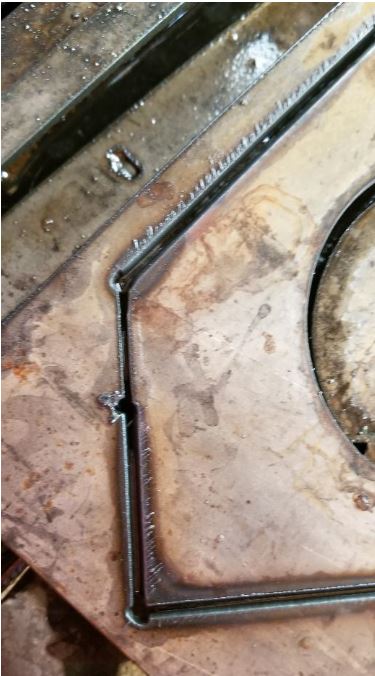
On to another issue I need some help with that may actually be a THC issue. I was recently cutting a decorative piece and I did the part in pieces since it was my first detailed part with lots of curves and small pieces. Part came out well but during the final cut of the outer perimeter the torch raised up pretty high, still cut but was clear it was 2 to 3 times higher than it had been for all other cuts. There is excessive beveling in this area as well. In the image below the start point is marked by the green star, the yellow dots mark where the torch started the high cut. Outer cut was in the clock wise direction. I used sheetcam and this is only the 2nd part I have cut since I updated to the v1.5 sheetcam post process.
I made point to look at fire control when the torch went high thinking my THC was having issues but there was no errors during any cut on the part and THC looked to be running normally during the cut between the yellow lines.
Any ideas what is going on?
Also - Anyone using sheetcam know of a way to program a return to XY zero and pause between parts or cut layers instead of having to post process each layer individually and run them as separate files?
Is there a way to do this in sheetcam (setting?) or do you just make the cut path oversized / longer in cad? I’m working on making one of those welding fixtures that uses lots of slots in .25" and don’t relish the idea of filing 50+ corners.
If you download the developmental TNG Sheetcam, there is an option to overcut interior corners right below the looped corners setting when creating an operation. If you have a license for sheetcam you can use it with the developmental version and you can maintain both versions on the same computer so you are not giving up the stable version or buying a second license. You will simply have 2 icons on your desktop like you have 2 separate programs.
Got it - thanks! I do have the experimental, but keep going back to the current version, as I find the icons pretty ugly and it’s a little quirky still. I guess I need to get used to it and start playing around with it more.
OK, Tried to cut the crossfire laptop stand downloaded from the Langmuir site today. I am cutting out at 10GA steel and I have 2 things I could use some guidance on.
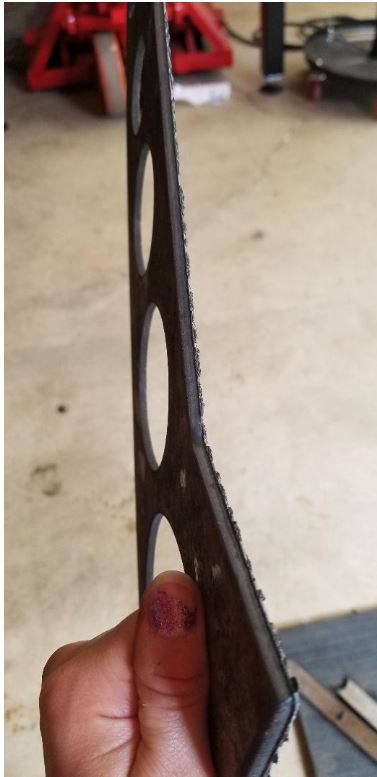
First thing - while cutting the outer perimeter of the actual arm component the torch just lifted randomly about 1/6th into the cut (happened to be at a corner). It lifted probably about .25 to .5" and resulted in REALLY bad beveling and just barely got through the steel. This has happened once before when cutting something decorative (mentioned above). The decorative part was cam’d before I updated my post processor to fix the randomly piercing but not cutting holes. This part was cam’d with the most recent post processor. I received absolutely no errors during the run. I managed to get a photo and video of it running once it lifted.
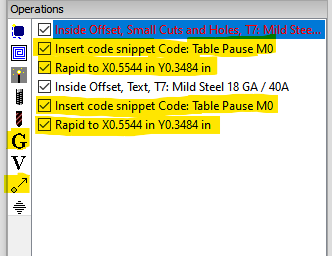
Second Thing - I started my attempts at programming a move to X0Y0 then a pause between components so I can pull anything off the table that may have flipped up and could collide with hte torch. I did a really simple G0Z.25, G0X0Y0, M00 code between layers that differentiated components in SheetCam and got it to work in a dry run the way I wanted. But when I tried to run it while cutting I got through the first component, lifted and moved to X0Y0 and paused but then I got an Arc Voltage Lost error. The error makes sense some sense with the lifting of the torch but Firecontrol wouldn’t let me “Run From Here” and kept throwing the code at me when I tried to restart. Any thoughts?


 ). If you upload the dxf, if the part isn’t too big I can try cutting it to give you a comparison.