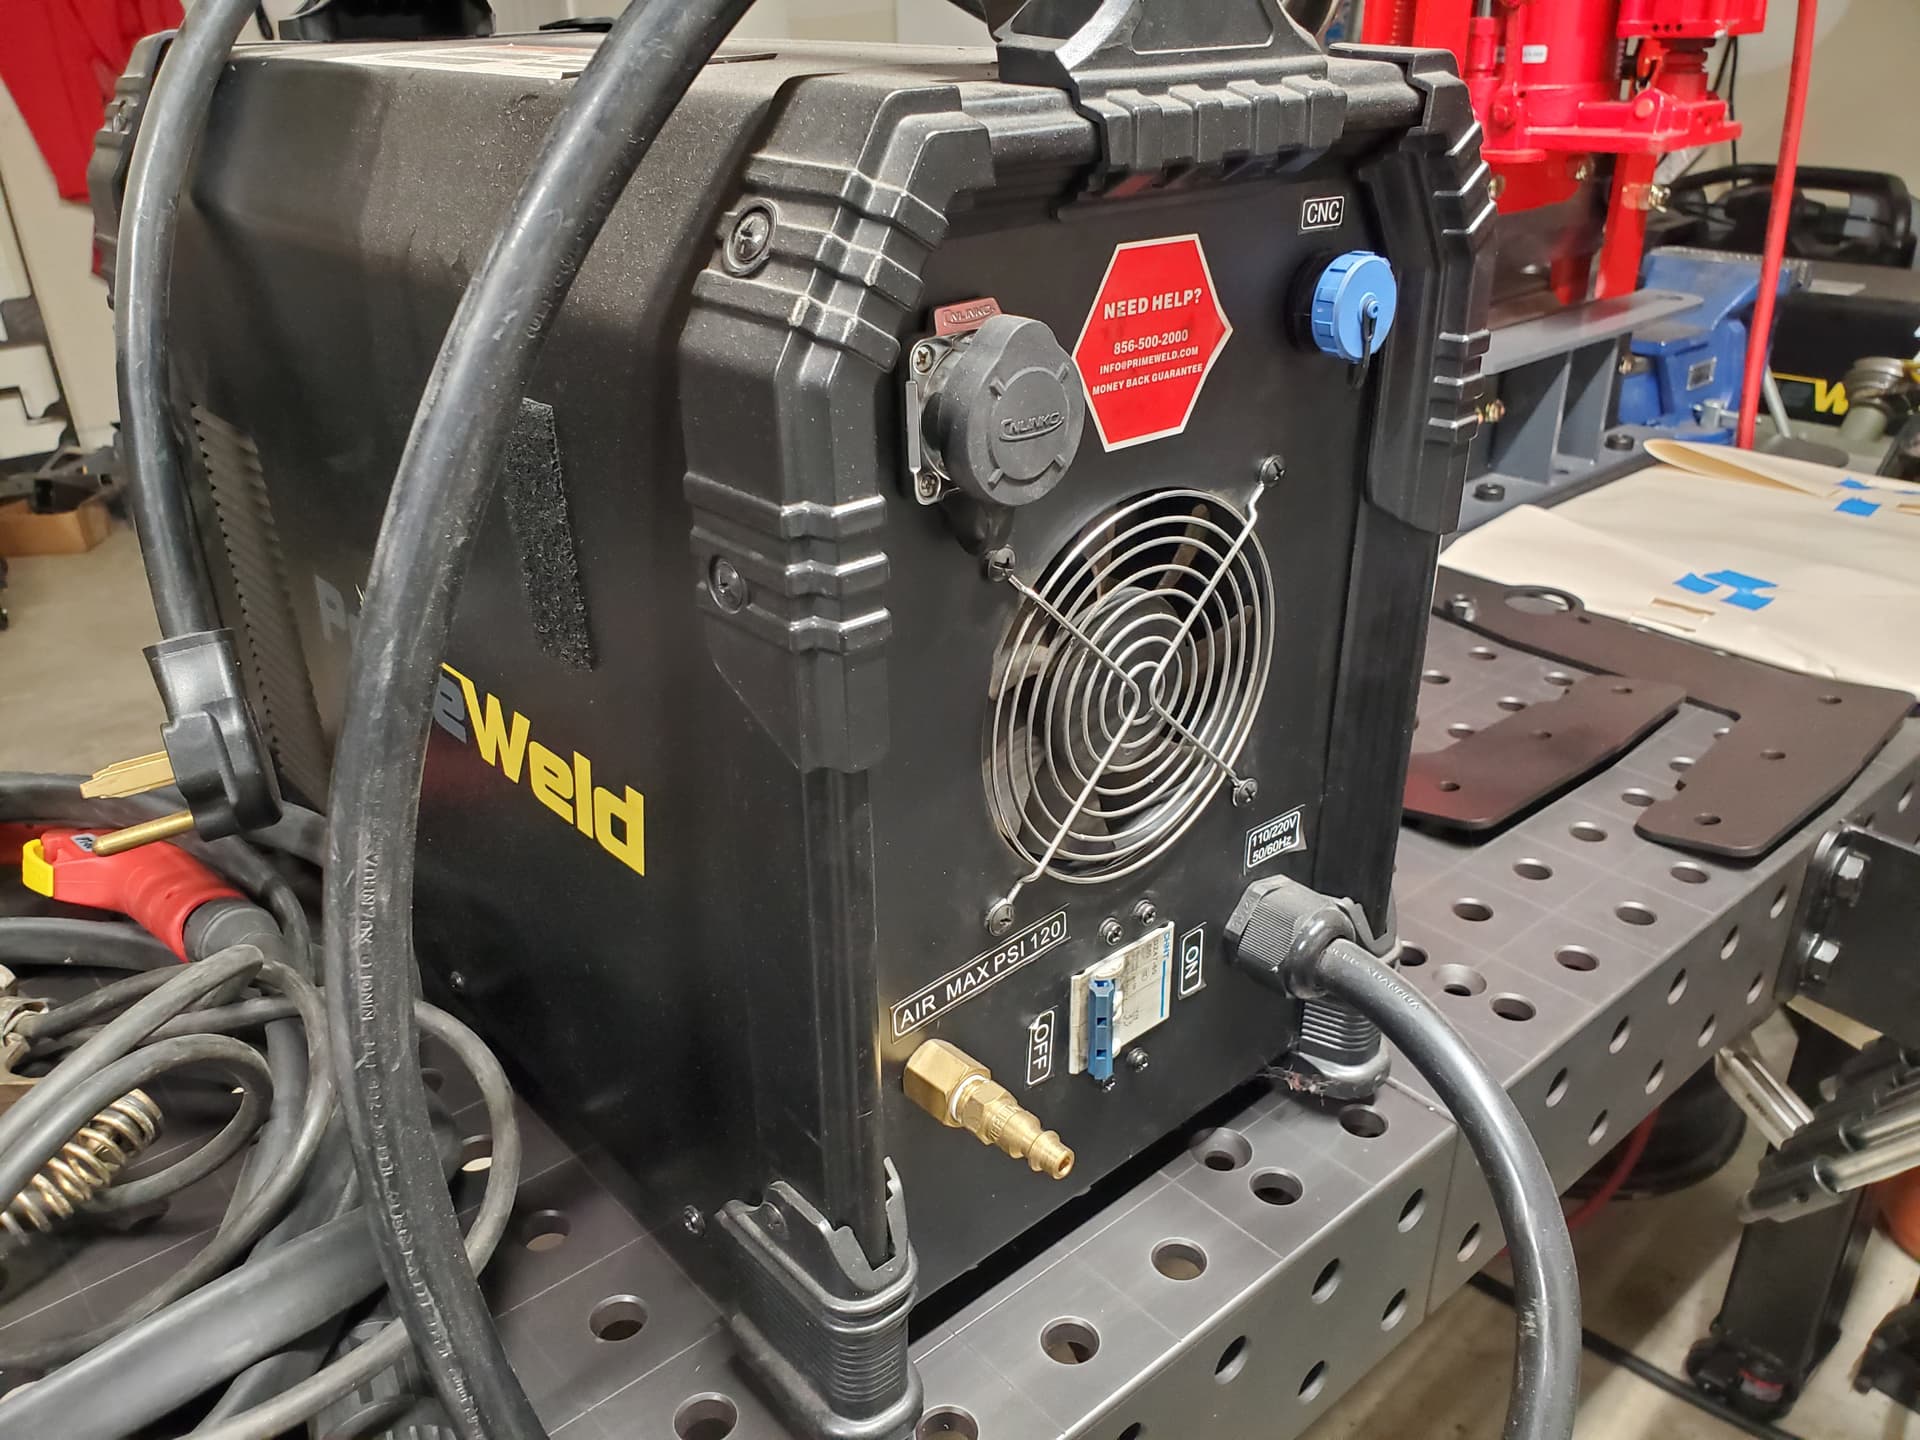
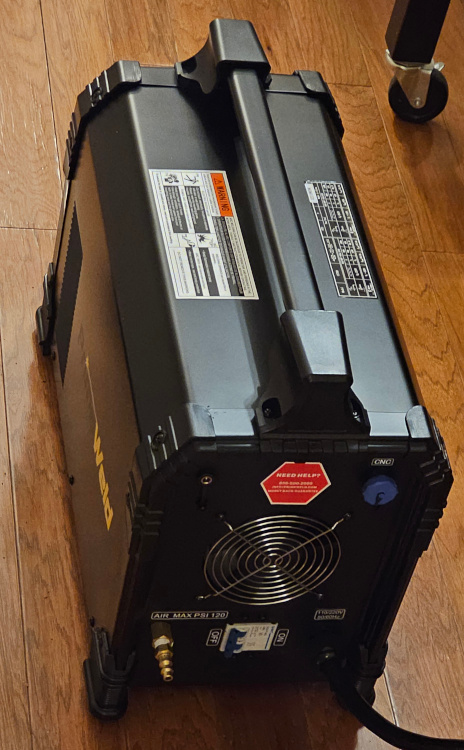
Also, just dug through my phone pictures to show you these. I sold off my CUT60 so these are pics I used in the ad.
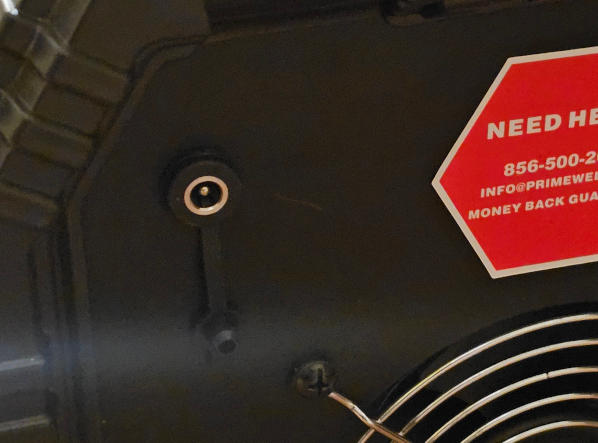
You’ll see the second port there on top. I tapped in for raw voltage and wired them directly to the port so I didn’t have to deal with any cables hanging out the side or anything.
Edit: To add, the XL kit only applies to the regular Crossfire but the instruction is also located right there with it. I know because I started with a regular Crossfire with XL kit.
Yes, I actually saw a post of yours with the plug plugged in. I will likely do the female barrel connector inside the back of the case where you did your plug. It’ll be there with the CNC plug I’m still using for the fire control. This reminds me of an unanswered question I have. Are there blade connectors inside the Cut60 case for the fire control so I can skip the CNC plug for fire control?
I just saw the answer to my question. It is possible to tap into the trigger switch wires inside the case to fire the torch without using the CNC plug pins. I guess I have to decide which method I prefer.
I reached my daily post limit for a new member. Thanks everyone for your help!
I was assembling the CrossFire table, not the CrossFire Pro. There is no link in the CrossFire instructions to THC. It never occurred to me to check the CrossFire Pro instructions, so I’m happy for those fortunate folks!
When you say “inside for the fire control” what are you referring to exactly?
The only items your large control box needs in order to communicate with your plasma cutter are these -
Torch on off, as this is normally an open circuit that ties into your plasma cutter’s “trigger”. When Firecontrol receives the signal to turn on or off, you’ll hear a relay click within the large control box which means it closes the circuit to fire your plasma cutter.
The only other connection is that of live voltage. It uses this in one of two ways, depending how you choose to use it.
The most common means is by the use of Smartvoltage, which is the means of Firecontrol establishing a “reference” voltage that it measures when your torch is cutting your metal at your programmed cut height. Throughout the remainder of the cut, your Z axis will jog up/down as it cuts to maintain this voltage (which in turn, maintains your cut height).
The other method (really only common for Hypertherm users) is Nominal voltage. Us Hypertherm users are provided a voltage chart that basically states “for this material thickness, your voltage will read as xxx for this specific cut height”. Even some of us Hypertherm users still use Smartvoltage but for thin material, Nominal voltage is where we benefit as thin material can flex causing incorrect read errors with initial height sensing.
You’ll understand all of this later but really, you’ll just be using Smartvoltage.
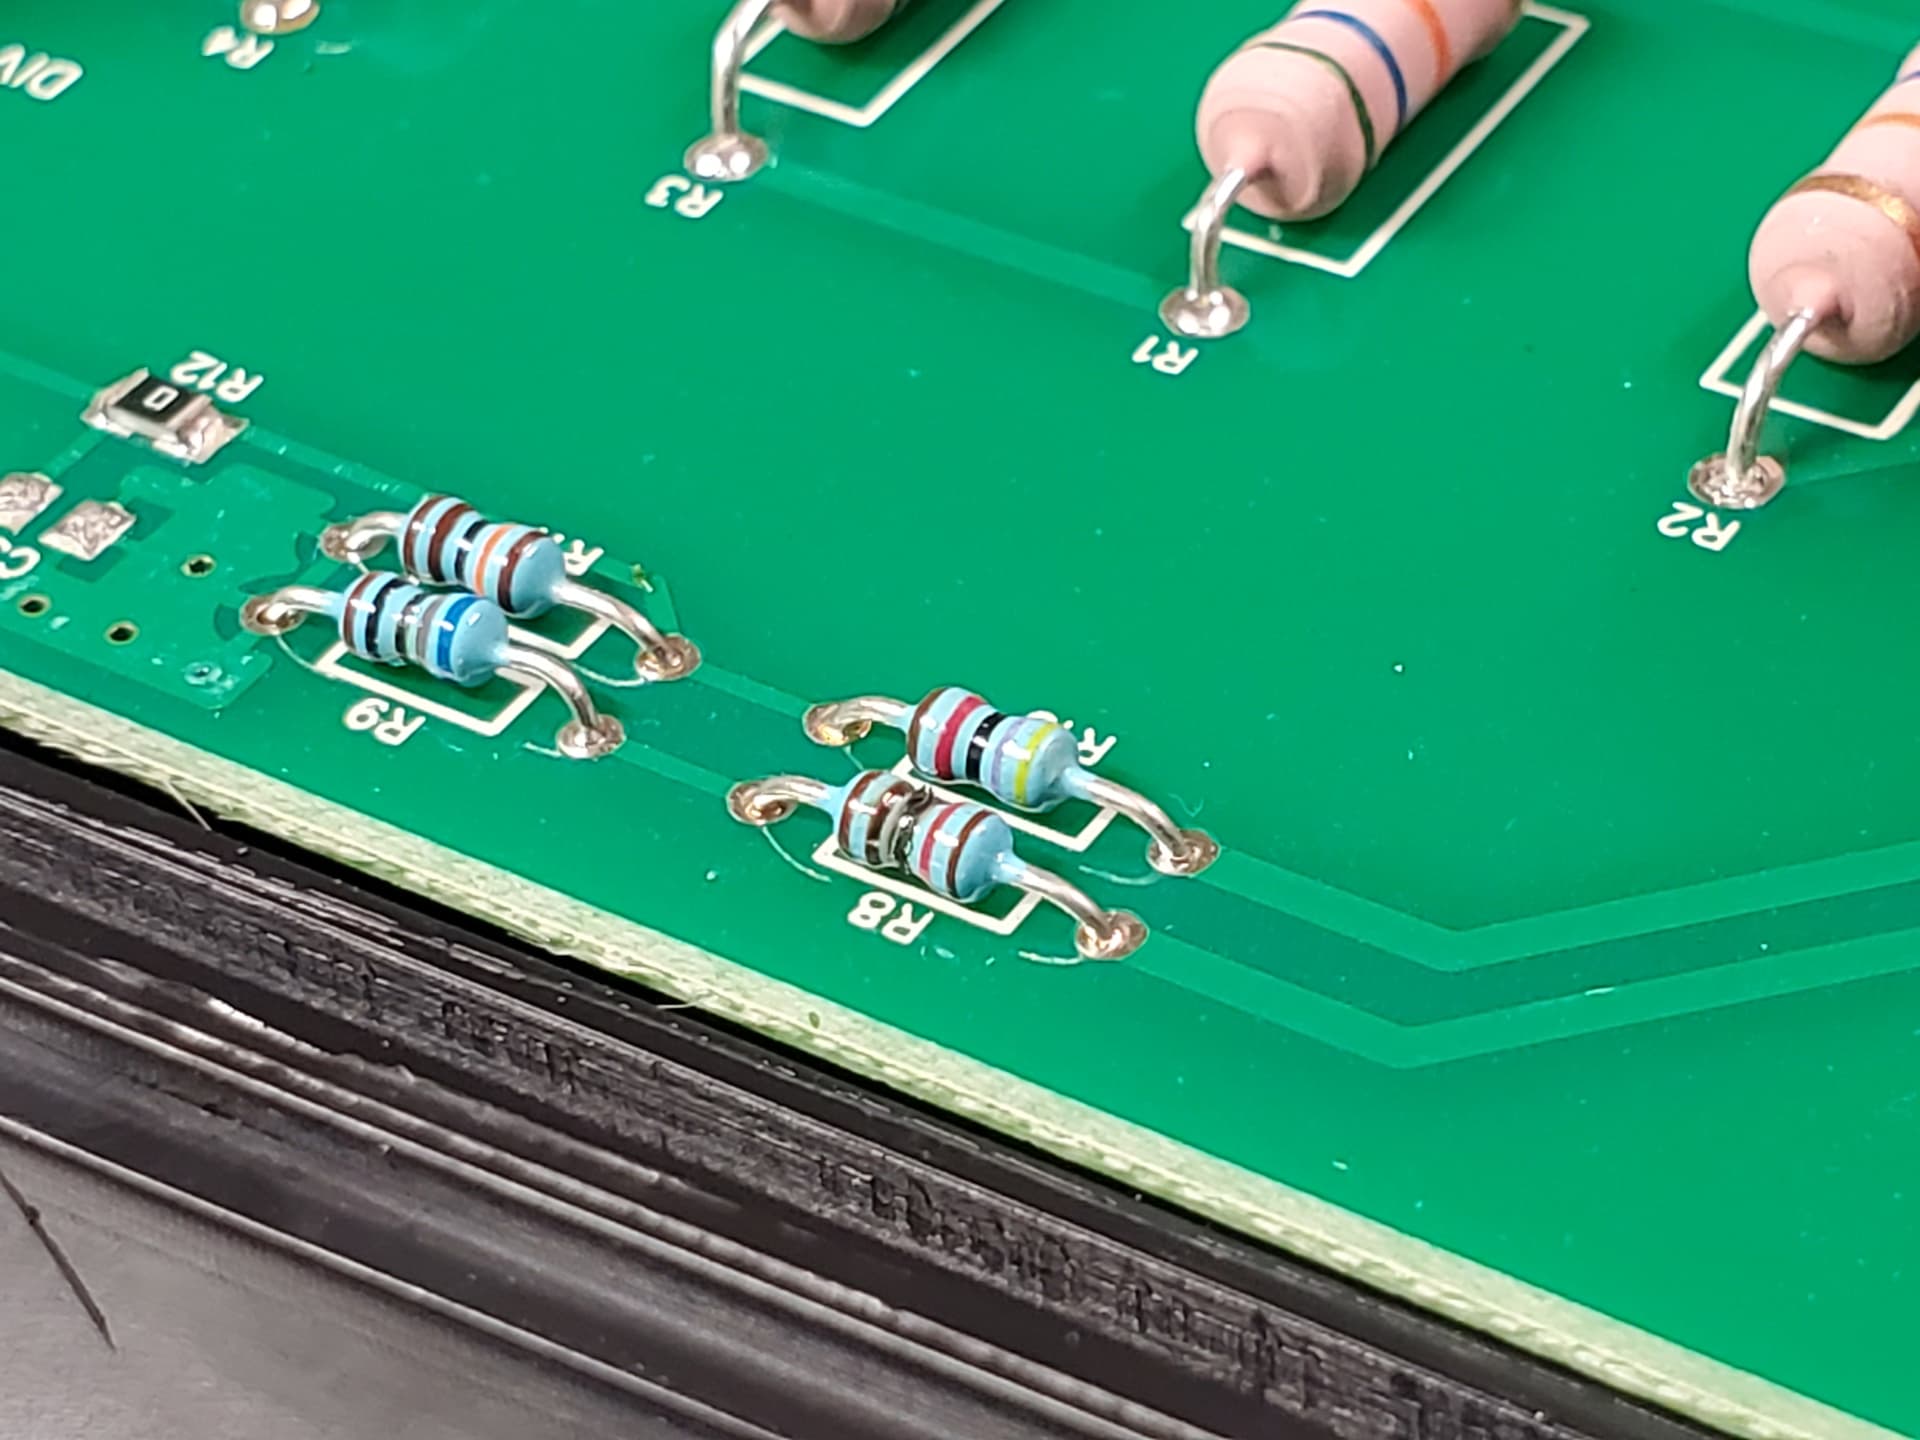
Wow! Makes me glad I did the raw voltage. My brother is using the divided voltage with his CF-Pro table with no problems for him so far. Here’s my installation. The PV out goes to a female barrel plug with a dust cap at the back. The VIM box is mounted inside the case which I like. I’ll be testing this weekend. Thanks for your assistance (and everyone else too)!
Looks great. Lets see how it works. Having it outside the cutter gives it a Fariday shielding of sorts. It may not be bothered at all.
This will be the test. It is a great installation.
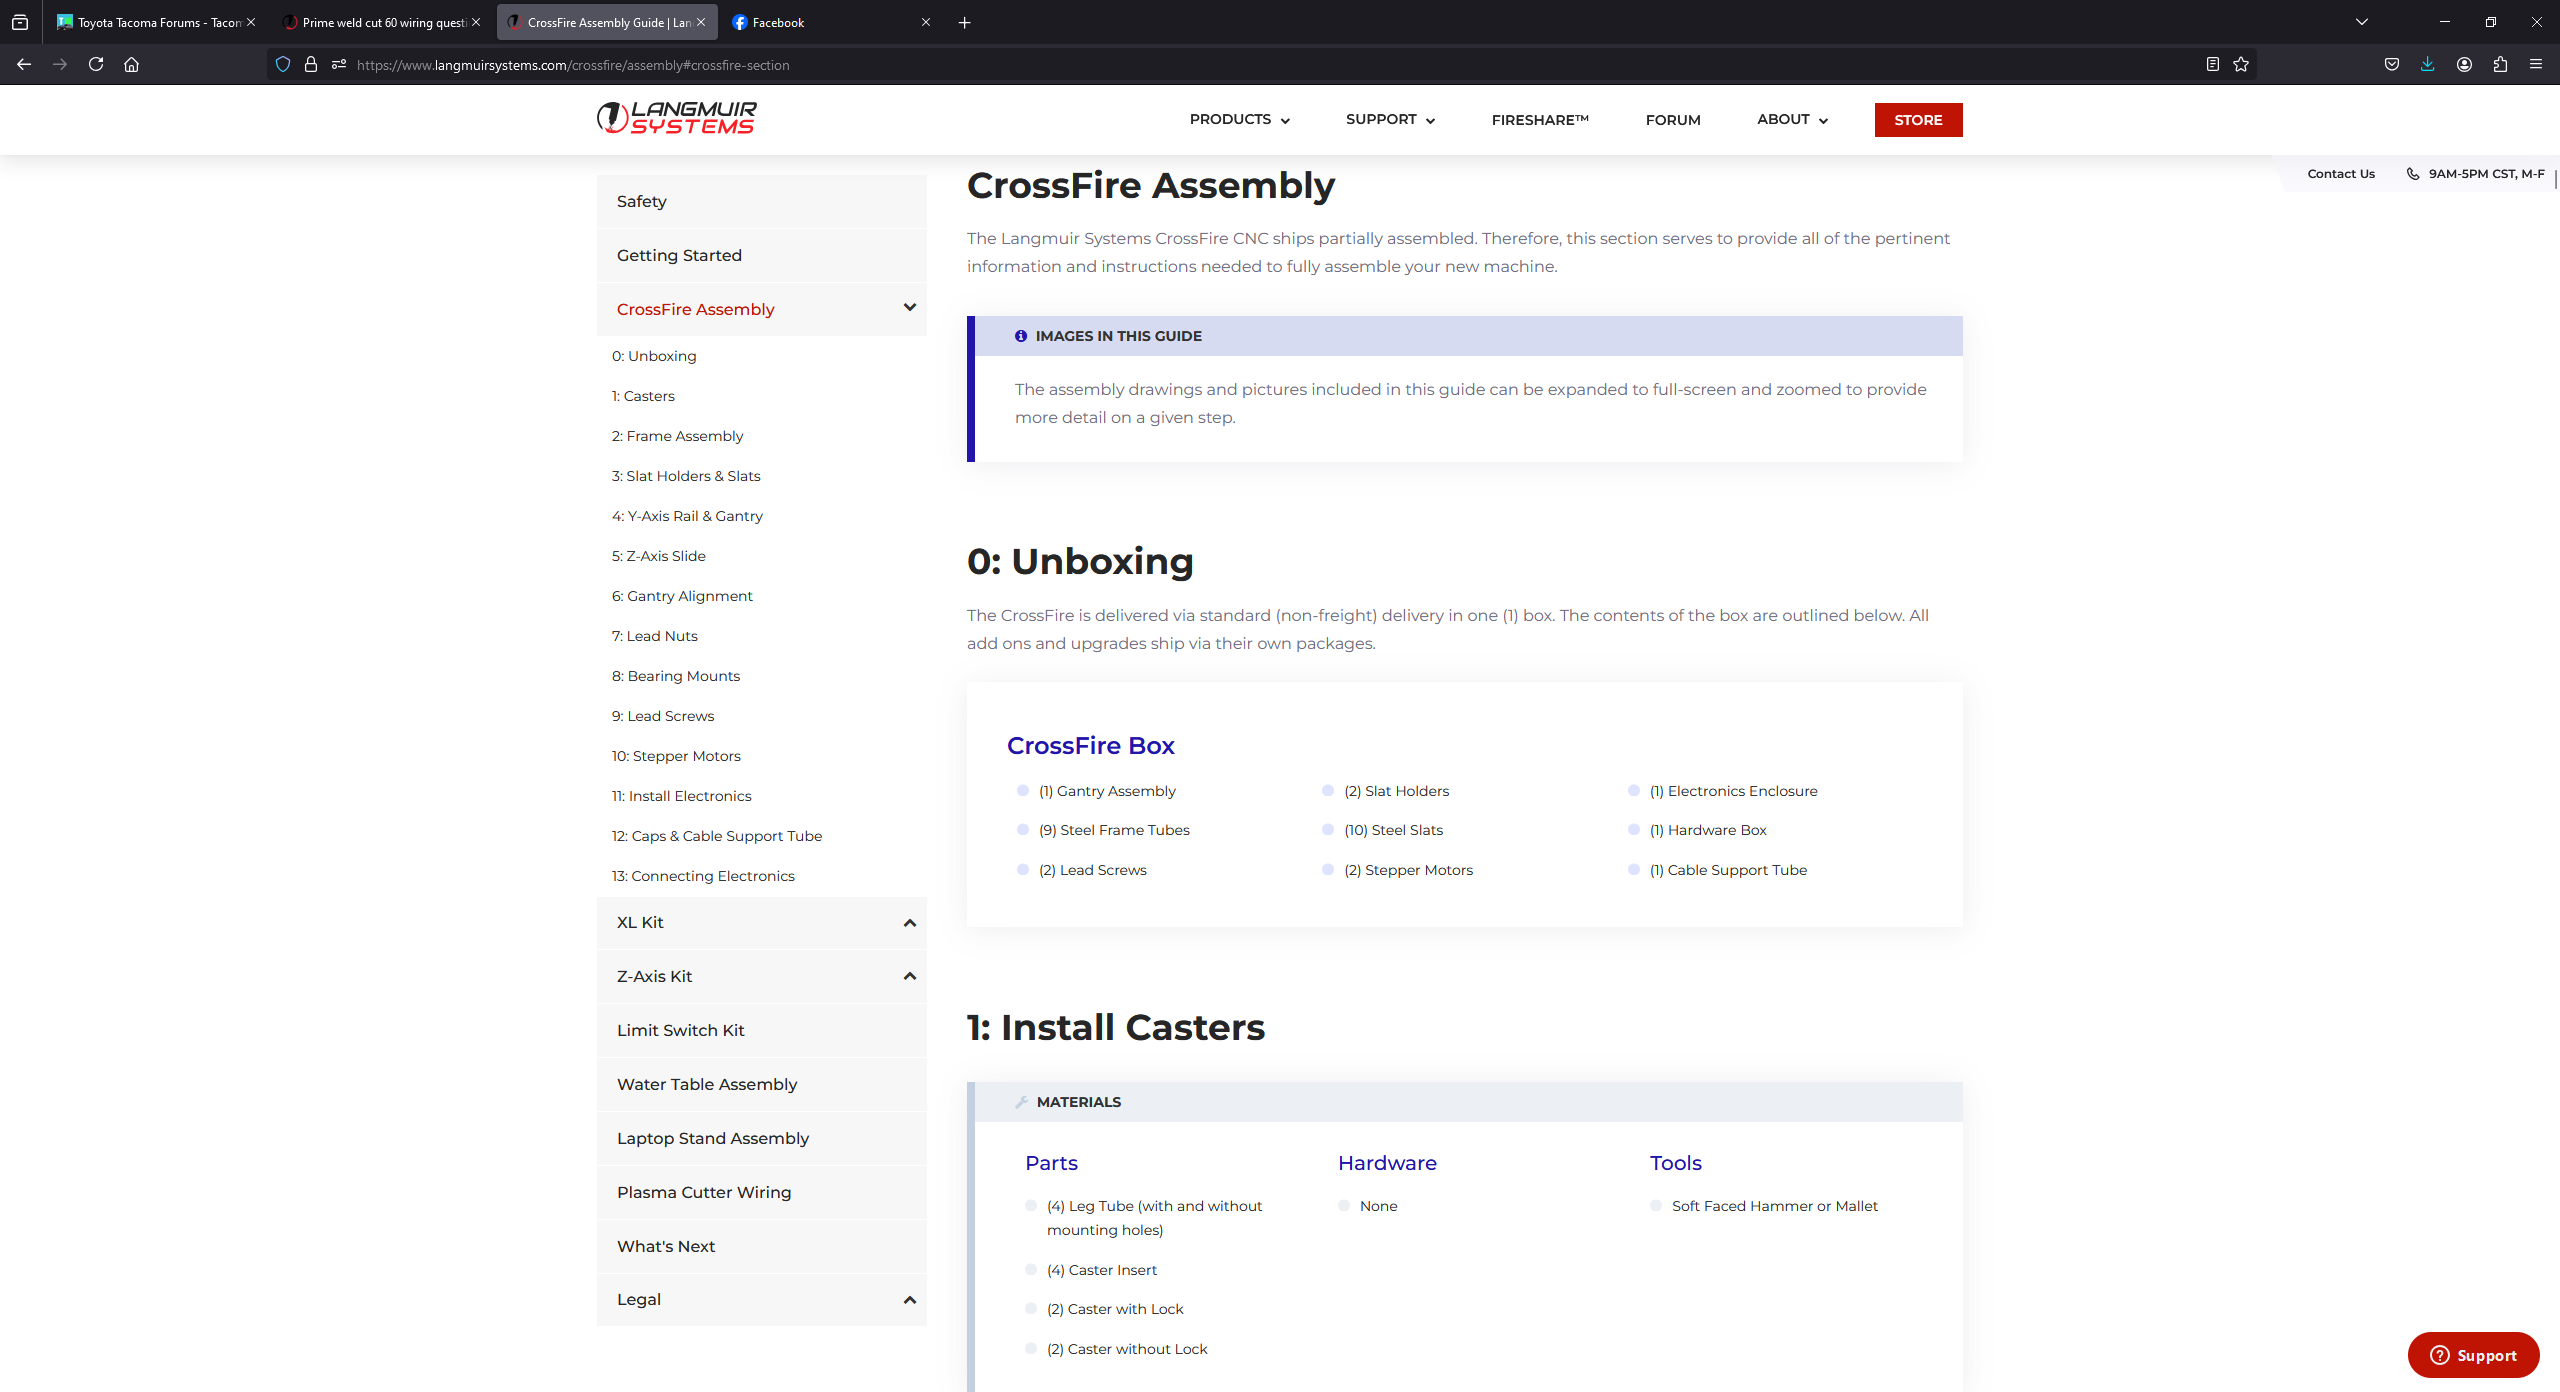
I am John. I have been using divided voltage for about a year now and up until the day I have had no issues. Now I am getting, no voltage is being found when I do the THC Test. I started a cut today and it kicked out saying no voltage detected. It seems I lost voltage from the CNC plug so tomorrow I will like others and have been wanting to do anyway to switch to Raw voltage inside unit. My question is, I hope it hasn’t done any damage to the control unit like you show in the photo. I have noticed lately that on cuts sometimes the torch Z axis will rise due to warped plate but then it seems to stay up and won’t go back down after the hump and continues to cut at a not desirable height. I am hoping going Raw voltage might correct this problem. My voltage from cnc port did seem to be eractic and I am using th Primeweld Cut 60. Thanks for any help you can on this. I just been using the torch today with the THC turned off with no issues.
the damage Kwikfab shows is from the divided circuit in the VIM box. you should be able to use the RAW side of the VIM box since its on it’s own separate circuit.
Remember to use the PV output once you switch over.
I want to thank everyone on the forum for all the great advice. I have had my machine for a year now and I am very pleased with the Crossfire Pro especially after I added the Hypertherm compatible consumable machine torch and what a difference. I spent another great time building my own system to dry the air out of the compressor and to multiple filters and what a difference how long my consumables now last. But back to the issue I had with my height control. From the beginning on my Primeweld Cut 60 I wired to the CNC divided voltage port. It all seemed to work once I got the ground issue fixed which was the ground plug on my monitor that caused all the headache. I just chopped it off and all was good. But the height control never seemed to consistantly work the way I thought it should. My voltage seemed to be all over the place until last week, 0 Voltage and everything came to a hault. I also had times the torch would just rise up and not go back down for no apparent reason and made some of my cuts not so good. So this weekend I ran through the different volt tests from the forum and no luck so from reading here about going to RAW voltage on that machine I yanked the cover off, and wired it to the RAW voltage. Instead of going out the side grill I just drilled a 5/8" hole in the back and used a strain relief that will keep from the wires getting yanked out or being cut on the grill. I just don’t like the idea of high voltage resting between the grill and if it somehow cut its way through the wires you have voltage through the chassis. I am a bit of a neat freak when it comes to stuff like that. All back together and fired it all up through the height control tests and WALA, I got a 142 volt reading. I then ran multiple straight line tests and the torch performed perfectly. No more error messages such as, THC didn’t find voltage etc. I did a up hill and down hill straight line test and the torch maintained the exact perfect height through all the tests. Now for the real tests, I had 10 art cuts to make for a guy with around 60 pierces in each one that was 20 inch diamater 1/8" mild steel. I kept it on SMART setting and did all 10 pieces of artwork. Best cuts I ever seen too and hardly any dross what so ever. I then checked my consumable in my machine torch and it looked like they was barely used. I wish I had from the beginning went with RAW voltage. I didn’t get a single torch rising up beyond my preferred cut height on all 10 pieces. It maintained the height perfectly. I now only wish I had gone with RAW voltage from the beginning. Primeweld may say the problem with the newer machines was fixed but I still think they have some issues not to mention it must of fried the THC control box on the divided voltage side. Langmuir did it right though, RAW has its own circuit and divided has its own circuit in the same box so I was not out having to buy another THC controller. Lets just hope this keeps running like it did the past few days.
John
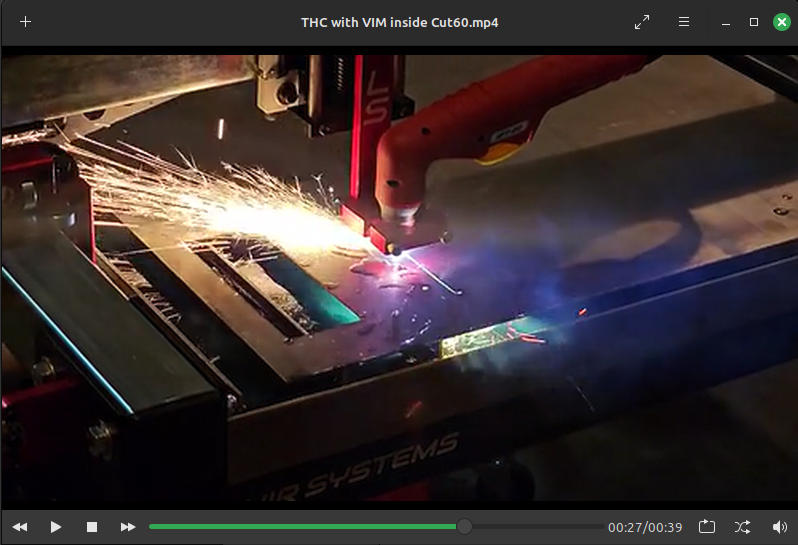
Here are the results of putting the VIM inside the Cut60.
THC seems to work fine. This was my first time using the Crossfire table. I didn’t think to record the first bracket I cut, but I did record the second one.
I realized I should turn down the air a little, use less water, less clearance height on rapids, and cut my pieces perpendicular to the slats. Lots learned and I’m very happy with the results! Thank you everybody for your insistence on using the raw voltage with THC.
The blue water is borax and food coloring. I like the look. The table cleaned up just fine afterwards with nothing trying to rust and my borax water is in two buckets with lids for next time. I did caulk the inside corners of my water table with silicone after cleaning because three of them leaked slightly.
I guess I can add I used FreeCad with the Sketcher workbench. Exported a dxf file and imported this to SheetCam. Set up the job and produced a FireControl G-Code file which I imported into FireControl.
I cut four brackets so I can manage my CrossFire cables with X and Y drag chains. I’ll post pictures when that’s assembled.
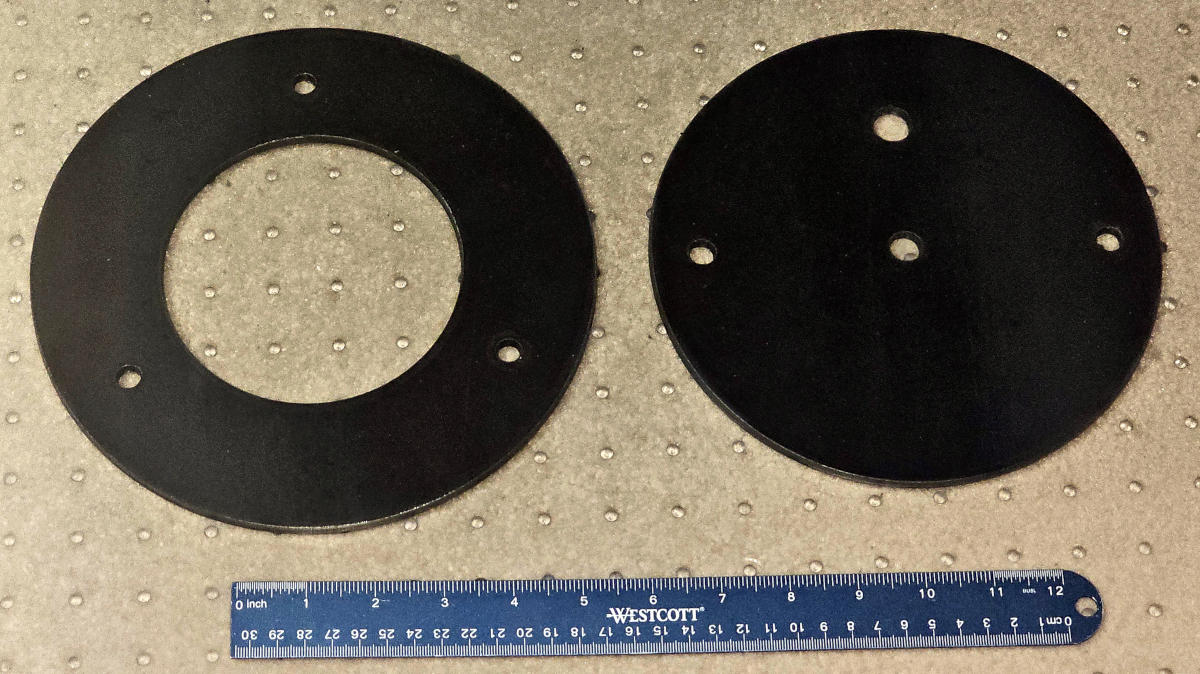
I used FreeCad Sketcher workbench and then SheetCam for the left disk. I then used FreeCad Draft workbench (much simpler) and then SheetCam for the right disk. The PrimeWeld Cut60 cutting speed reference table in the instruction manual was right on. I got great cuts! These are 3/16 inch plates for a telescope stand.
I also discovered the warning about using more than 45 amps with the water table was not a joke. I could see the outline of the two disks on the bottom (using 60 amps) after emptying the water. 99 percent of the outline wiped away, but not all. I need to get a square plate to cover the bottom of the water pan between the slat holders to take the extra juice when cutting above 45 amps.
The water table does a great job of keeping the air clean so I can keep the garage door closed longer in the winter time. But I’m wondering if anyone has stopped using water to avoid the time it takes to clean the water pan afterwards and how that’s working out cutting in a garage?
It’s not a good idea to have no water in the pan. Additionally, please ensure the work clamp is securely attached to the metal you are cutting. I’m not sure if you have parked it on the pan. Just a heads up! Great job on the drag chains as well.
You’re definitely correct, but I think he means he had water while cutting, then emptied. However, if the 2nd pic is the amount he had during cutting, to me it looks too low.
Thank you both for responding. I mean using no water without the water pan attached so the sparks and slag (and dust) go down to the floor maybe on a welding blanket for easy cleanup and floor protection. I’m wondering if too much dust gets put into the air without using water (and without the water pan, just the slats).
Yes the water was closer to 1 inch below the workpiece instead of the 3/4 inch recommended by someone at Langmuir (read in somebody’s post somewhere). I wanted to try with less water to avoid more splashing. I’m sure I would have had less of a mark on the bottom with water 3/4 inch below workpiece instead of 9/10 inch when cutting at 60 amps.
I understand allowing the metal to cool slower yields stronger metal (not as brittle), so I wanted water further from the metal but also I wanted it to trap dust from the cutting process. It worked great, less splashing, no perceivable dust in the air unless the steam in the air afterwards contained dust.