I’m going to save that PDF, if you don’t mind. @Wsidr1 Bret
3 Likes
Just go RAW voltage.
Takes a few minutes and will give a reliable means of voltage for Firecontrol to monitor.
As mentioned, torch is negative.
Bunch of people incorrectly refer to the clamp as ground when it isn’t.
4 Likes
Thank you for this PDF. I spent several hours online figuring out what this document simply shows how to do. Most everyone is recommending the raw voltage wiring, so I will do this. Conveniently, my Cut60 is open at the moment.
I was thinking of installing the VIM inside the case, with a hole drilled (slowly) for a female THC barrel plug to be mounted inside the case too, but I noticed this morning the Cut60 manual says “Do not install any kind of converter or divider inside the machine.” So I’m wondering if mounting the VIM inside the cover instead of outside the cover is what PrimeWeld is saying not to do?
1 Like
One more thing to add - you said banana clips. There are no such items used in your kit so I don’t know if you’re confusing them for the CATIII style plugs on the VIM.
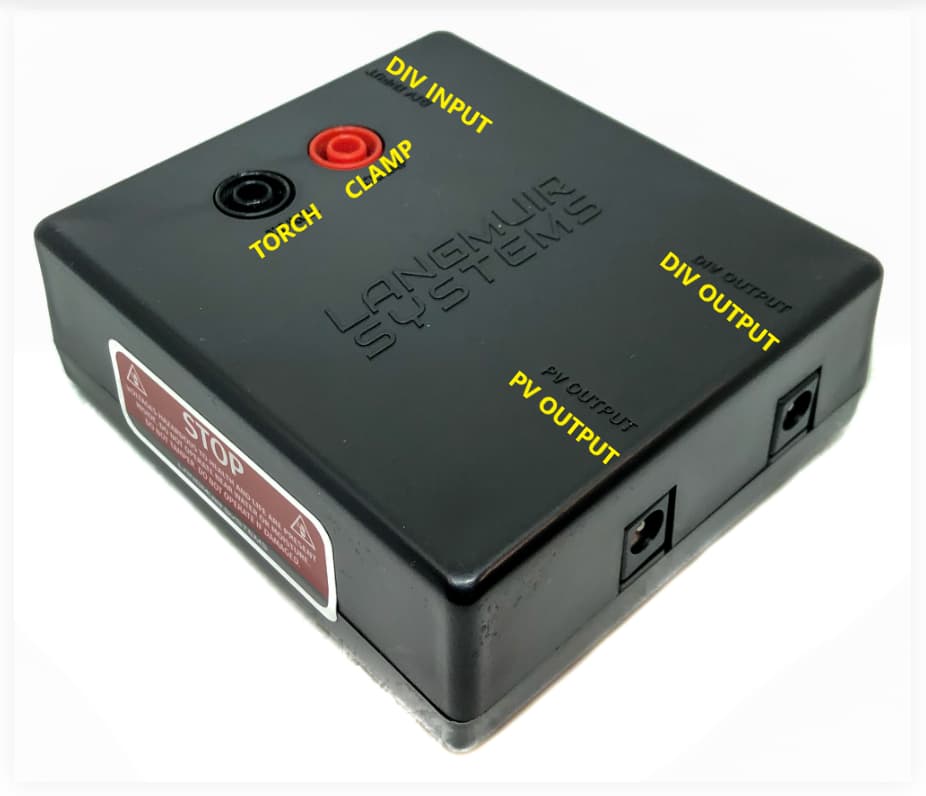
Langmuir gives you visual instruction as to how things are wired up.
Since we’re talking raw voltage, here taken from Langmuir’s site -
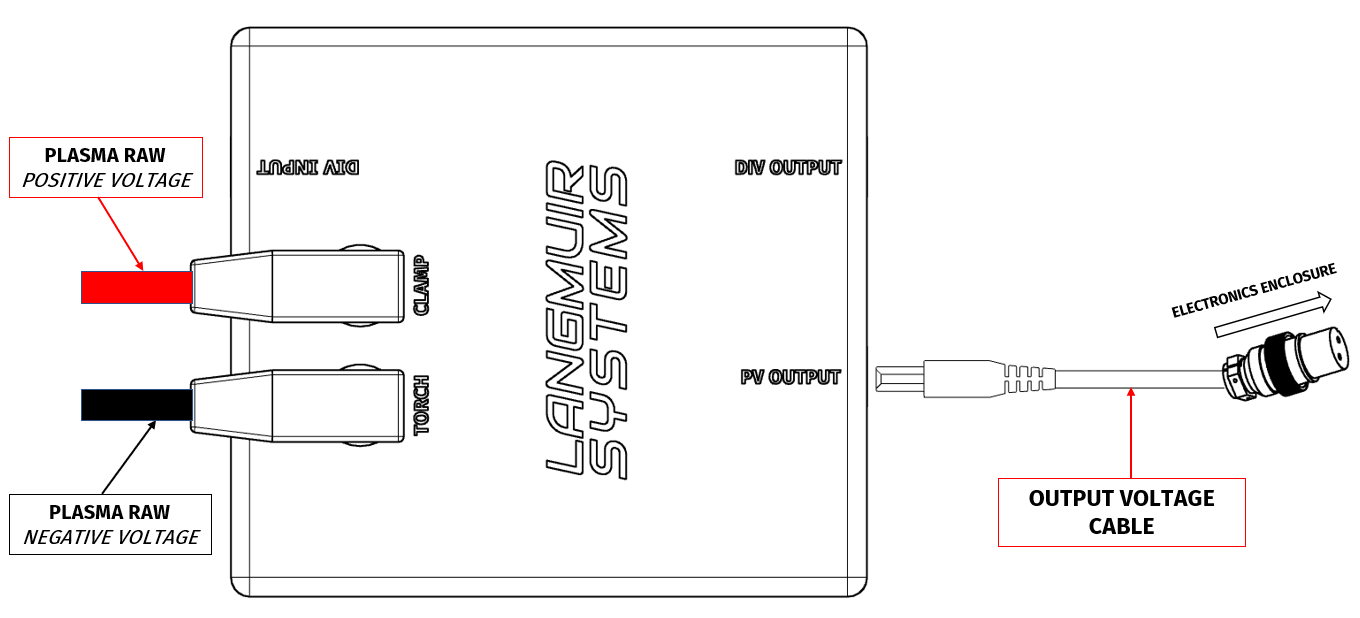
The VIM box assists in reminding the end user that the torch is indeed negative (black).
1 Like
One user installed his VIM inside his plasma cutter. I believe I saw that in the FB group.
Everyone runs their cables through the vents.
I was the only other user that added a plug to the rear of the plasma cutter as a means of a quick disconnect to the VIM. I didn’t like the idea of cables hanging out the vents.
1 Like
I removed the word “banana” from my post above. I always call these banana plugs, but yes I see they are CAT III plugs.
1 Like
I’m an industrial union electrician by trade and have called them banana plugs for 40 years.
Technically, they are cat lll plugs.
We have developed a electrical vocabulary in the industry that everyone knows.
4 Likes
OK. So I’m hearing you have not experienced any proximity issues with the VIM inside the machine (inside the case shielding). This is good. I just called PrimeWeld and they told me it shouldn’t be a problem to install the VIM inside the case (won’t void the warranty), so I’ll do this too.
1 Like
Mine is double sticked taped to the side of the plasma.
2 Likes
I’ll double stick mine inside near the floor so if it falls it won’t travel far. ![]()
1 Like
As for the VIM inside the case, I can only say that someone else didn’t experience issues.
Myself, I never placed it inside the machine and I’ll explain why -
I’m a fabricator, so I found value in having a plasma cutter I can quickly disconnect from my table to take on a job and easily place it back on the table when I got back home.
When people run their cables through their vents, even if they remove the plasma cutter from their table and disconnect from their VIM, they’re left with two cables supplying raw voltage when the plasma cutter is running. Not only that, the cables have thin jackets and are easily susceptible to getting cut up (even from the vents themselves).
I installed a plug on my plasma cutter, the same way it has a built-in CNC port, and ran that for raw voltage.
1 Like
Mine is wedged between the plasma cutter and the small cart it’s on ![]()
Too lazy to cut up some double sided tape and place it on my Hypertherm. The logo is just too cool to cover up lol
1 Like
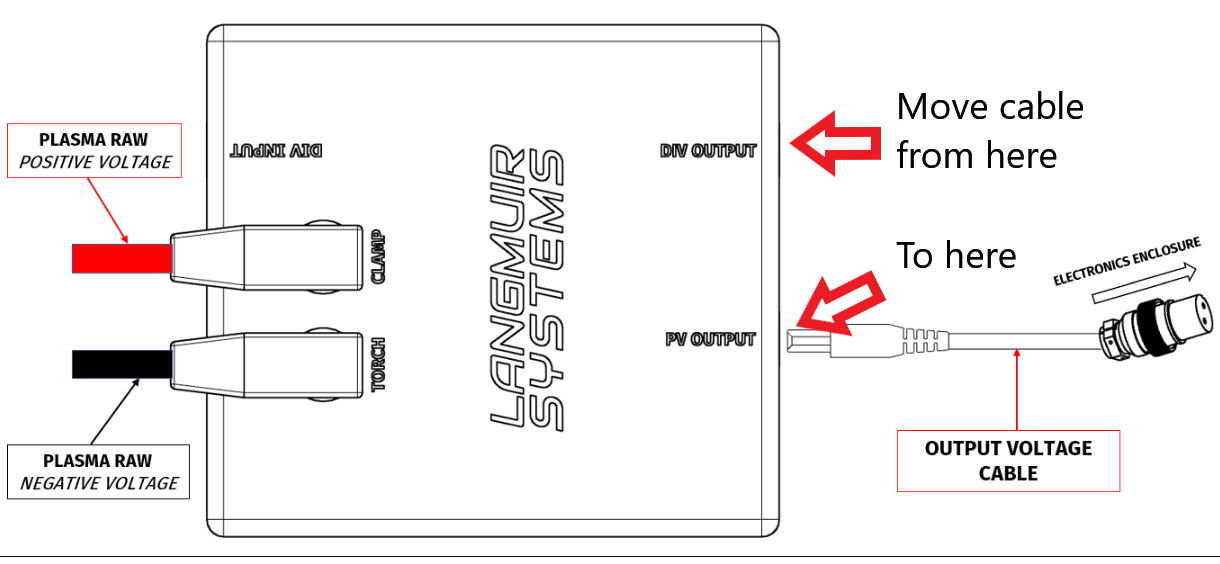
I’m assuming the PV output on the VIM is reduced voltage for the THC input, but I will make sure I use a female barrel connector with a cap on it for when I’m disconnected from my table. Thank you for the heads up. I have to roll my welding cart to the table or vice versa in my garage, so I will be connecting/disconnecting every time I use the table.
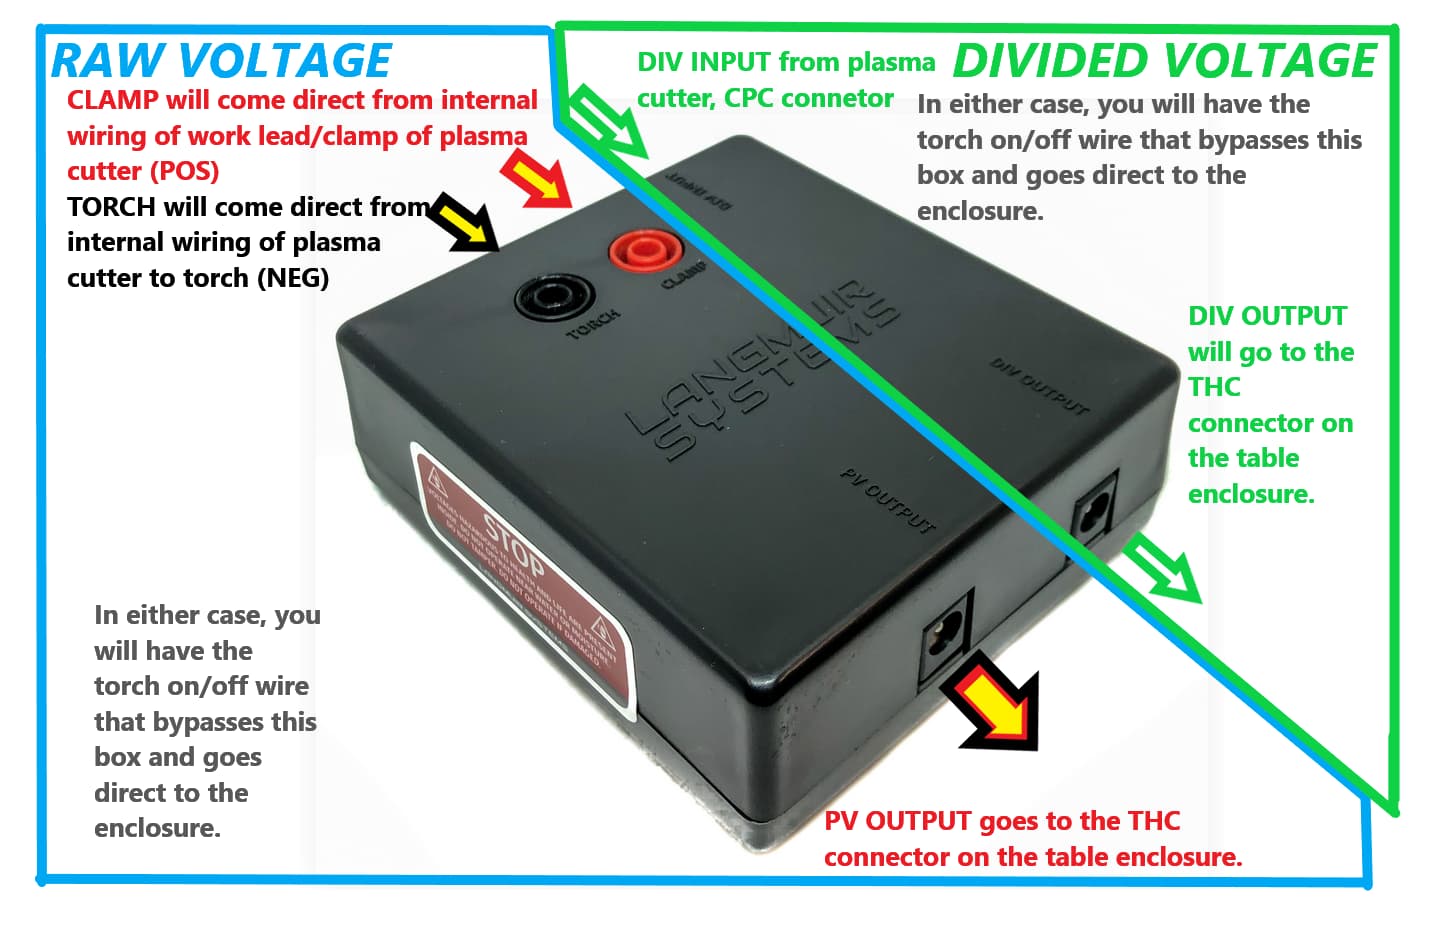
Inside the VIM are two circuits.
One for raw, and one for divided.
Yes, the VIM is its own divider and handles 50:1 or raw hence the two inputs and outputs.
I supplied the image above because your earlier statement sounded as if you were going to use pin 4 and pin 6, and somehow incorporate the use of the CATIII plugs as well. I’ve actually seen stuff like this happen and more.
One user wired up for raw (correctly) only to also connect the torch ON/OFF barrel plug (pins 1 and 2) to the DIV input of the VIM…nowhere in the instructions does it state to ever do that.
Just follow the instruction, and it’ll make sense. Don’t plug things in where they’re not supposed to ![]()
“Instructions unclear, dick stuck in CNC port”
2 Likes
Yesterday, before I started researching how to hook up the THC module, I had no idea what plugged into what, so as stated above, it’s taken me several hours to get straight what cables and plugs to use. I accidentally stumbled onto Langmuir Systems THC instructions on their website. I didn’t get to them from the table setup instructions, so I missed the link or it wasn’t there. I would have saved hours if they had put a simple instruction sheet in the box with the VIM explaining the mutually exclusive ways to wire things up!
1 Like
It’s been over 2 years for me, but I’ll look now.
I can see how it’s frustrating if there’s no link to take you there though I always thought there was when you hit a certain step in assembly.
1 Like
Thank you. These instructions will help other people searching like I was yesterday! Thank you for posting them here.
The Langmuir instructions seem all over the place. I set up the mechanical stuff several months ago and got so tired of going all over the place to figure out what was next. I had some time off to tackle the rest this week.
I think it would help a lot for Langmuir to post a set of instructions for the CrossFire table without the extension, and one with the extension for initial setup. It was painful to have to merge the two together in my head never having set the table up before. ![]()
The instructions are better today than several months ago, so either I had time to sleep on them or they made them better since then.
To be more clear in case Langmuir Systems reads this, the CrossFire instructions need:
- Regular table setup (done).
- Modifying regular table with extension kit where table is already set up (done).
- Assembling table first time with extension kit (missing).
- Link in THC assembly instructions to the full THC instruction page on website (missing).
1 Like
I believe it to be separate because not everyone buys THC.
It isn’t included in both the Crossfire or Crossfire Pro. Only the Pro has IHS but not THC as it’s still a separate feature. I can imagine some people seeing it and asking “am I missing parts? I don’t see these in my box!”
But the THC instruction has always been there. I just can’t remember if they were linked at all to the original assembly for “those that bought it”. Pretty sure they did as a separate link?
2 Likes