I finally got my machine to the first cut. Which is pretty sweet.
But it doesn’t complete my initial design. It will cut the first shape, move to the next position, torch will locate the material, move to the next cutting position and throw the “no voltage detected” error. I have increased and decreased my pierce delay and feed rate and doesn’t seem to make any difference. It will cut the next shape, and then throw the same error. over and over. Pic 1
I read a few posts, and turned off my THC to see what it would do. It then cut through the whole design - but for each shape, it looked as though it started in a random spot, and exited through the lead out correctly - but didn’t complete the shape. See the pic2.
I have no idea if the 2 issues are related or not. The THC appears to be working properly as I get good + voltage.
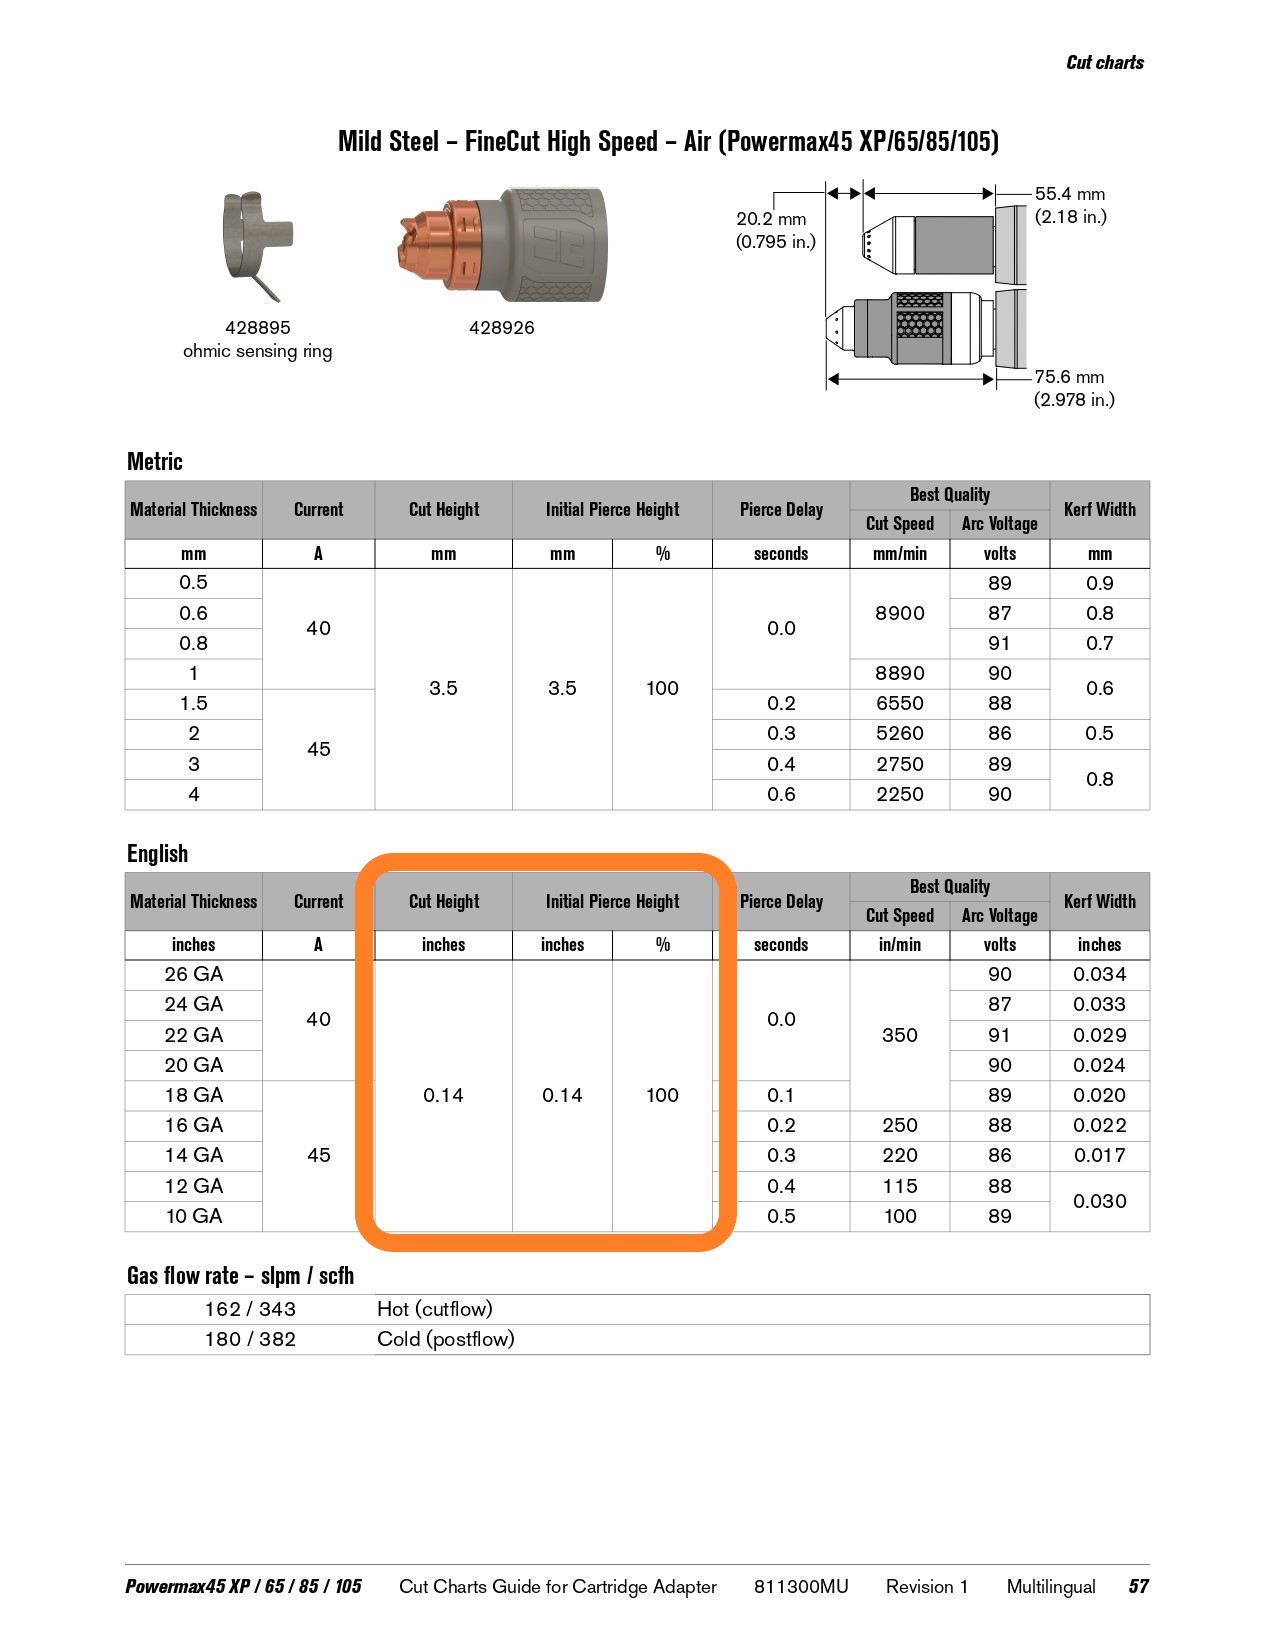
i’m cutting 16 gauge mild steel with a fine cut sync cartridge on a powermax 65.
I’m brand new to this, so I’m using the Hypertherm cutting guides for my settings in fusion360.
pierce height/cutting height: .14
40 amps
pierce delay: .2
cut speed 150 ipm
I’m hoping to figure this out. and honestly i’m not sure if it’s a firecontrol THC issue, or a Fusion360 issue. Need some guidance.
Pierce delay is too short. Hypertherm measures delay from the time the torch actually fires. Firecontrol measures from the time the signal to fire the torch is sent. You need to add about .3 seconds to the delays in the Hypertherm chart.
Firecontrol always makes the first delay longer than the programmed delay(I don’t know why, but it does). This is why it works for the first cut and fails on the next.
Your pierce height of 0.14 is okay but it cannot be what you use for the cut height. Cut height needs to be closer to 0.06. You will want to confirm what your actual cut height is if you have NOT done so yet.
@ChelanJim@JPOusley is ok with his cut height. the SYNC consumables in many cases have the same cut and Pierce height. The tool I programmed today was .14 Pierce height and .14 Cut height.
THC is great but not critical to cutting. My suggestion is to deselect it and create a new gcode and cut a few signs and feel accomplishment. You can spend many days later trying to keep troubleshooting the THC. Great when working but over half the issues on this forum are related.
Ok - so I went back out this morning - increased the pierce delay by to .7, and it worked. It cut through the whole design, no errors, great stuff.
The quality of the cut wasn’t good enough though - especially on the text. This was a pretty small piece, I’m curious how small you can safely go with the powermax 65 for text…
either way, it worked and I’m stoked. I know the quality is a separate issue.
Sometimes the differences are great. Mine was over 0.095 when I was setting it at 0.060. Through various processes, I now know to set my cut height at 0.022 and I get an actual cut height of 0.059.
Since you are off by 0.11 I would set the cut to 0.03 in post processing. You might be pretty close. You will notice an amazing improvement of the cut.
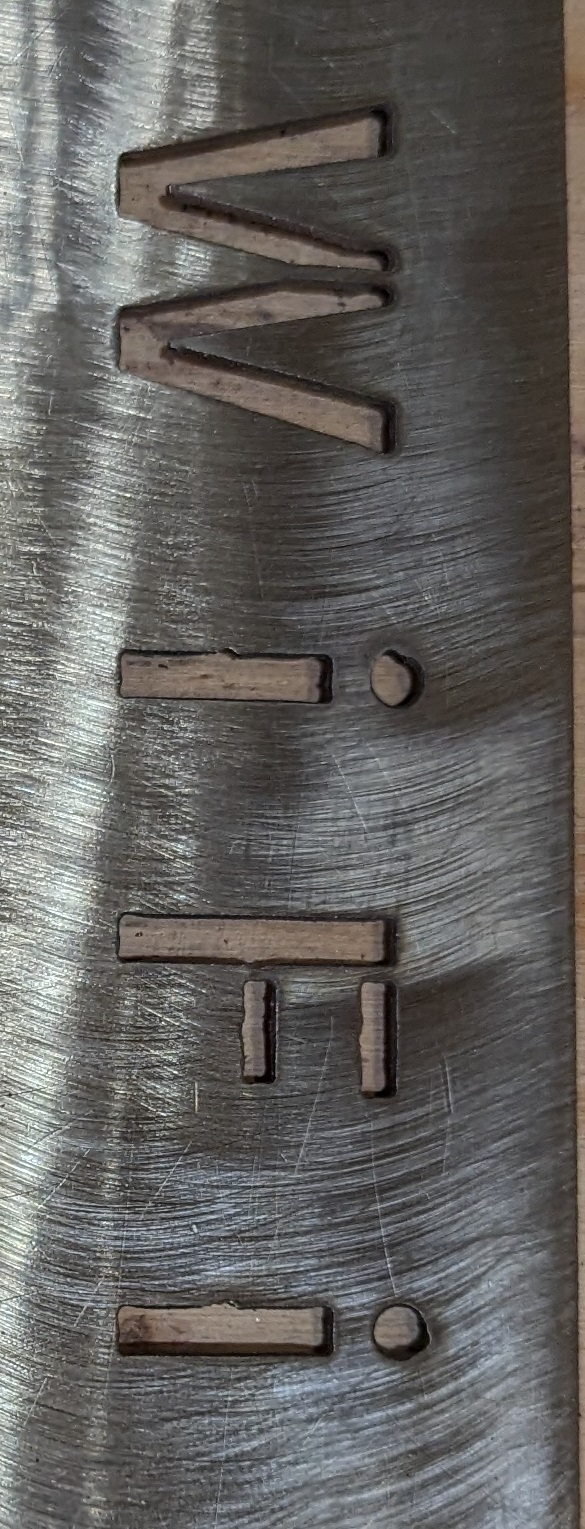
As far as letters, you need to have about 0.1 inches of space between each line/cut. If it is a bridge and is less than that, it may not survive being cut from both sides. If you were using normal consumables, I would push to be closer to maintaining 0.125 inches of a gap. To get the absolute least damage to the letters, you want the least amount of amperage that produces a good cut (no dross). You can measure the actual kerf and that will help you see why the letter survived or failed.
The other thing with the letters: If the space between the lines of the letter are less than your kerf setting, the CAM operation might skip that area all together. Here is an example (suspect areas marked with red circle) where you would want to measure:
The way to improve that would be to pick “bold” if the font has that option; or, make the font larger.
I’m fusion guy but I would recommend using arc with lead-in and out. In fusion I use 60 deg and 0.05" for lead in and out. For straight line cutting you don’t use lead in or outs. This will put that mark on waste inside those letters and you won’t see it on edge of letters.