Checked out that second link and I think using that Universal G code Sender program would work well. Then I found this Calibrating your CNC axis and steps - Beginners guide - YouTube . Which would calibrate the axis around the pipe to get it to spin the right amount. Djlois you are smart. Think I’m ready to start cutting and building my setup. Then order parts, put it together, and start testing/calibrating.
3 Likes
Keep this thread updated with your results!
Would you mind sharing the dxf files??
OH LORD!!!
Now you guys have me interested! ![]()
![]()
![]()
![]()
One crude idea would be different size pulleys on the motor for different sizes of pipe. Another idea would be like a stepped pulley arrangement on the motor.
Yet another idea (and I have not fully thought this through as i’m yet to have my coffee) might be an Arduino interface between the x-axis signal and rotary driver that can interpolate and regenerate the step signals for various diameters of pipe all in firmware. therefore you just set the diameter with a rotary switch or select via push button and LCD screen. Will think this through tonite over a good bourbon (or two)! ![]()
![]()
![]()
1 Like
Hey Cletus…even with pots of coffee I still could not understand what you just posted…
1 Like
Try some Canadian Whisky ![]()
![]()
2 Likes
nah…prefer a good scotch or Irish whiskey…
You all seen the pipe g-code generator on this site?
1 Like
Seems that it would be easier to buy a chinese rotary kit with a chuck. Though I do love your diy ingenuity. The center of the rotary axis could match the pipe and only need to adjust the tail stock for support aligned with the axis.
I’m adding one of these to the DIY CNC router i am designing and building. Vetric and other software supports 4th axis rotary, though i am not certain how it would work with langmuir control.
If you guys are having trouble matching steps per rotation mechanically. You might want to try just changing the steps/mm code in the motion controller (LS uses GRBL 1.1f I believe). I’ll have to try this. Add
$100=??? some number to your job file at the top.
$100 is for X
$101 is for Y
I’ll try this tomorrow to see if it works.
2 Likes
Is there a way to control the table with different software than firecontrol? If it was still controlled by mach3, our issues would be much easier. I believe the board for the LS has an A axis output. Add a driver and a china 4th axis, then purchase the rotary plugin for sheetcam for 65 bucks. I believe you wouldn’t have to change your distance per step using sheetcam. Could even do square tube as well.
I like firecontrol but would be great if we could run this with different software for the tube function.
1 Like
I am interested to see what you come up with, can’t give any advice as I have no idea.
If you had the knowledge, yes you can.
The table control box has the three drivers inside for each axis. You would need to hook up whatever control system you have to those drivers, or flash the control unit inside for the new program if it is compatible.
There is a lot that FireControl could do if the Langmuir programmers wanted.
Some simple $250 3D printers have the ability to add another drive motor/axis and change the parameters/steps for each motor if needed on the control box.
The open source slicers that create the G code for the 3D printers have the ability to do a lot of what I wish Fire Control could do.
1 Like
I’m an OG crossfire owner with the THC upgrade, so I still have my old control box that runs on mach3. Might be easier to add a z axis to that brain and switch to it when I want to cut tube…
hey i just wanted to contribute to the brainstorming here because i came across these ideas and they seemed really useful for square tubing… but also possibly for round as the y axis potentially can have alot more travel allowing for more opportunities (like long slotting on the side of a box tube or text) … and if you’re modding the machine and code might as well go whole hog if you’ve got a good reason. anyway i’m trying to learn all this generally and get up to speed on the basics before i start making any kind of rotary axis but figured this might give some people more ideas. share the wealth. seems like you can either make an adjustable opening with bearings or it might be easier and possibly more precise to do it the way the guy with the green one is doing it as far as just cutting a disc with appropriate hole for each size you use if you’re not having to switch between 5 different styles or sizes of tubing all the time.
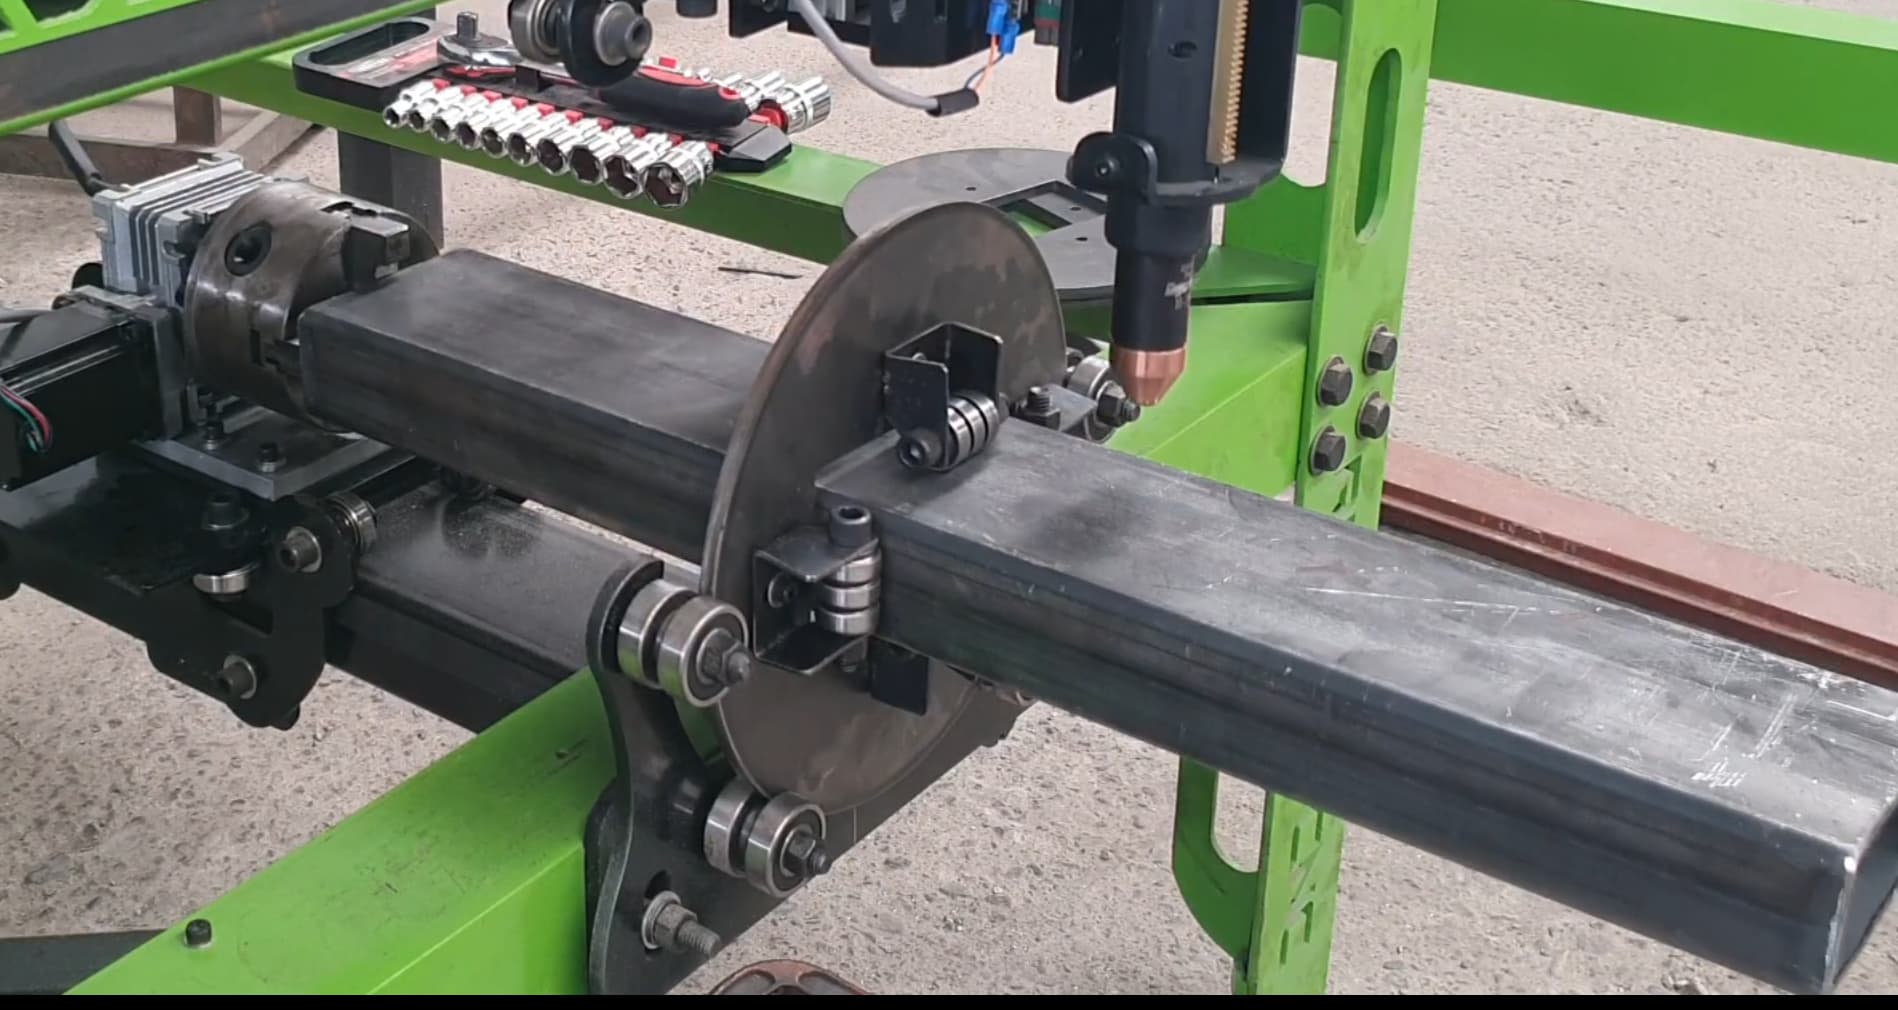

if i can remember to come back here and post the links to the YT videos i took these screenshots from i’ll try to do that, but i get a little out there trying to find info on 20 different things at once sometimes so i might forget. basically whats going on in the green top pic from the mexican fellow is the same as in the bottom one the irish guy made only the disc is captured by outer rings and the large bolts you see are holding the bearings in between the rings and he’s got those blocks with slotted (like a keyway? i’m not great at the terms here) rod going through on each side to keep the bearings in the right orientation
i’m not sure if the fixed disc from the green machine is riding on a smaller bearing in between the large ones… i think it might be but the video was in spanish so i didn’t catch most of the detailed parts of what he was saying. the bottom one seems like it would be a PITA to get things centered up properly too…but this was his rough draft very first iteration per the commentary
3 Likes
The guy from the 2nd picture has a very good YouTube page. Every day I run this machine, I get closer to ditching fire control in favor of mach3 or myplasm. Fire control is great if you want to turn the machine on and hit go, which is the target audience of an LS table. It’s really a poor system of you are a tinkerer and want to modify your table.
1 Like
Nailed it! ![]()
I just finished Myplasm Motion control install last night along with a 48v power supply. Huge improvement of stock imo.