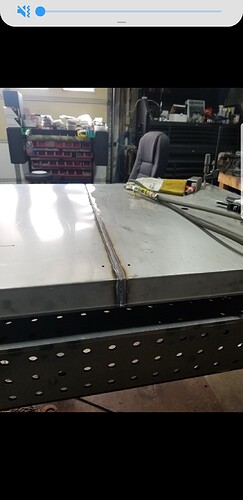
Anyone elses water table leaking? I let the silicone dry for well over 24 hours. Ive been a carpenter my whole life so I know I siliconed it properly. It started 3 days after I finished putting the table together leaking at the front bottom on the seam. I went out today and now its leaking at the back on the seam. Seems like bad silicone. Just a pain, now I got to drain it and fix it and be out for a couple days. Wish it had a one piece water table
No leaks here but I will say I put it on LIBERALLY.
Anyone know what type of stainless the water pan is? I may just weld it
S201 stainless steel (austenitic). Sorry about your leaking issues! We assembled a half dozen tables here and found that using the whole tube and applying liberally was the best method to prevent leaking when filled.
Clear silicon sucks. It doesn’t stick like RTV black does.
Was it concluded that the plasma arc would never bother the silicon used to seal the water table? I guess it must of been. How far down below the cut metal does the arc reach? I guess one can tell by looking at the damage to the slats.
it only goes down about 1/8" into slats. nowhere near where the 2 tables connect
what gauge thickness is the stainless?
20 gauge stainless steel
How about gasket sealer instead of silicone? You probably did, but tighten from the middle out to keep from buckling the flange.
I got bit today. Used Permatex Silicon but it she started dripping so time to tig it. 
Just an update on my welded water pan. Still no leaks! Lol
How about just adding additional fasteners?
It could possibly get me by but tig welding it will help me sleep soundly. I got about 1/3 through it and ran out of argon… on a Sunday! Yuck.
I cut some parts across the silicone and I got a drip. I’ve never welded stainless, so a local machine shop is welding mine and welding on two 3/4" stainless couplers for drains for $65. Thought that was pretty reasonable.
I have had the table together for a couple weeks now and spent some time playing with the software and cut some box tubing which worked great. Real happy with the build. Table seems to be on the money squared up so off to the races. I spent an inordinate amount of time attempting to seal the tray halves during the build so TONIGHT I’ll see if the effort was for naught. I am, for the first time filling this thing up with water(coolant after leak check). If this thing doesn’t hold i’ll follow the herd and weld them together. If you don’t hear back… success! Cheers
Update- Got an entire weekend cutting parts and playing with the table. Water all over the floor from splash but no leaks. One for the win column.
I originally used solid silicone material but it was too thin to close the gap. I ended up using Permatex Red RTV High Temp gasket maker. Time will tell. No leaks at the moment. Then again no cutting yet and it has only been 2 hours since I filled it with pure water for the test. I have Green Cut to fill water tray after testing is complete. I plan on letting the water stay in for 24 hours before I drain it.
After 5 months, we have a leaking table. When installing, I used the sealant provided by Langmuir. I also then laid silicone over the seams, then sprayed truck bed liner all over the table. No ability to weld. Will let the table dry and, once again, lay sealant and truck bed liner over the seams.
@langmuir-daniel - Allow me to be the first to purchase a one piece water table.
I went against the grain, said F…it, and used a tried and proven water retention method.
I roughed both surfaces, applied liberal amount Of 3M 4200 on both sides, let skin for 15 minutes and bolted together with supplied hardware…I then added about 10 spring type clamps between the bolts, let set a couple days and 6 months or so later no leaks. Silicone is not made to be used like this…you NEVER use silicone below water level on a boat…3M 4200 and 5200 are proven products.
