The Borrowed Idea Build

Long time lurker, minimalist poster. Received my table a while back (longer than I’d care to think about) and am nearing the end of the build. As the title suggest, it’s mostly compiled from a lot of great ideas I’ve read about here, cobbled together with a couple things of my own that maybe someone else might find interesting. I certainly enjoy everyone else’s pictures, so here’s a few (!) of my own in return.

The table itself is pretty straightforward and well documented. My first deviation was using the 3M sealant on the pan seams instead of the little silicone tube provided. I have a tig welder but without a lot of hood time, so not confident on how well I would fuse the pan halves together.

Used some sections of 1” square tube to clamp the seams together and let sit for the recommended cure times before bolting it together. Early results are very positive, time will tell on how well it holds up.

I got one of these arms and a touch screen monitor based off another members build.

It came with nice and beefy mounting bracket that was mostly useless for what I wanted to do with it. So I chopped it up, drilled some holes, and welded it back together.


Next up was to address the lower shelf everyone adds to the table. I really like the concept of keeping the table separate and allowing independent leveling. I think Hellbent (?) is the one I copied this from.
Getting the frame square. Love these Fireball tools.

For the actual shelf I don’t have any expanded metal at the moment, but do have a bunch of this sturdy racking material handy. Chopped up to fit and welded in place.

1 Like

Other forums I’ve been on have a 10-picture limit, so going to break this up over a few posts.

Cut up some C-channel and 1/8” plate to capture the legs.

Next thing was to make a little cart for the plasma cutter itself. Includes a desiccant dryer attached to the side. I want the ability to use this thing around the shop, not just on the table.

That built, it’s time to chop up the rolling shelf.

Provisions for a docking station.

Long shoulder bolts cut down and welded through the tube.

Matching holes drilled in the plasma cart

Welded these little spring loaded thingies to the shelf and welded corresponding tabs to the cart

Between the dowels in the back and locked in the front, the table assembly with the cutter in place rolls around nicely.

My last project prior to the plasma table (and in preparation for) was to put in a new air compressor and delivery system in the shop. This also required a new sub-panel for the big compressor, plus I added a bunch of outlets where there wasn’t any. Anyways, as a result I had a good amount of both copper tubing, fittings, and a ton of electrical stuff left over. Might as well use some on the table project.

Starting with electrical.

10 gauge extension cord will be permanently attached to the table. Used one of these nifty strain relief thingies going into the first box.

The computer, monitor, motor control box, and lasers will be plugged into the first gang box. Being tucked under the table pretty good, I’m hoping small splashes from the table won’t be too big of a concern.

The other end of the table has this quad box that one of the receptacles is tied to a switch, which will run the water pump. A fish bubbler to keep the solution agitated (preventing mold/bacteria growth) will plug into another receptacle, leaving one free for whatever.

Bent up and attached some decent sized 1” strap for the back of the table for cord management.

As I am only a hobbyist I don’t plan on using this constantly so wanted to be able to drain and fill easily to minimalize water evaporation and dust/dirt collection. With 10 feet of ¾” copper tube and a bunch of fittings left over from the compressor built, that’s what I’m using in conjunction with van stone flanges. I had never even heard of those flanges until I started reading this forum.

Several years ago I built a circulating coolant system for my little horizontal band-saw using a Harbor Freight pond pump. It’s still working ok so far, so figured I’d try that with this build, too. For the table I got the next size up in pumps. The hose is whatever Home Depot had that matched the pump outlet size and I got corresponding fittings for the copper ends. Water is being contained in a black and yellow tote (27 gallons?), which I had a few empty ones laying around. Bent up a little piece of aluminum to keep the pump a couple inches out of the water (hopefully won’t suck up muck from the bottom) and puts it at a better angle for the hose/copper connection.

1.5 minutes to fill and approximately 3.5 to drain. A very small amount of water is left in the pan, as drain holes still aren’t 100 percent the very lowest point (really wish I could tig stainless and put one of those sump mods like I’ve seen here) but I am going to use a wet vac to clean the table after each use, so shouldn’t be too big of a problem.

Which brings us to wire management and drag chains. I really like the aluminum channel capturing the drag chains modification, but alas I don’t have any aluminum in my pile o’ stuff so I thought I would try it without and just use some custom brackets for attachment.

Drilled holes in some small pieces of plate and welded tiny bolts in place

Cobbled together some more bracketry to weld those to. In efforts to keep the table relatively clean by not drilling a bunch of extra holes, I’m trying utilize what’s existing as much as possible.

Which brings me up to date where I’m at today, which should be ready to start test cutting. (still need to permanently mount the computer and do some final wiring clean-up)

3 Likes

Those of you with keen observational skills may have noticed that the torch is disconnected in the last two pictures. This is because after manually jogging the table around (testing the drag chains) I went to fine-tune the machine torch height adjustment and the manual up and down adjustment stopped working. Motor is making noise upon button press, but no movement. Cleaned and lubricated what I could without taking everything apart and seems to help when turning the screw by hand, and now get a very tiny bit of movement on occasion, but still no-go. Checked the coupler and the bottom three screws are snug, but the top one just spins, like it’s been stripped. Could the motor shaft be spinning inside the coupler? What else can be done and/or checked?

1 Like

it does sound like your coupler is slipping. I used set screws and drilled, tapped the couplers and filed flats on the motor shafts and leed screws so they couldn’t spin.
But it turned out to be a bad stepper driver in the end.

1 Like

I’d investigate that for sure first.

The other option is that the end of the shaft could actually be snapped off.

Incredible documentation and amazing ideas and mods you have done…thank you for sharing with us.

As the ever pessimist I do have some concerns on your mods.

  • your electrical is not any type of sealed components I would be a little concerned about water getting into the boxes and causing a short…
  • your plasma machine sits right under the most possible leak location on the table…a glued seam.
  • your plasma unit is sideways…so unless you plan to roll out the plasma unit all the time you might find it a bit of hinderance trying to adjust your amps on the torch when you need to fine tune the cutting.

but overall…nice work

Your welding work looks great…I am no where near a great welder but I did bolt my 2 water pans together, no caulking or sealant, added 1/4" water to each pan then used my TIG to fuse the standing seam between the pans…no warp…no leaks…no warping.

As for our plasma unit I would greatly consider putting a drip shield under the table to protect the plasma unit…

2 Likes

Earit and TinWhisperer – Thanks for your thoughts on the coupler issue. Looks I’ll be tearing into that next.

Toolboy – Thanks for the feedback!
• I am also concerned about the water/electrical combo (never a good thing, right?) and will certainly be keeping a close eye on it. Tucked up under the table frame I’m thinking (hoping) any splashing will not travel inside and then back up to get into those areas.
• So aside from being able to freely roll it around the shop, another benefit of the plasma cutter cart address a concern I’ve read about here, which is the electromagnetic interference that sometimes causes havoc with the control box. Maybe not as much with the Hypertherm, but still… I was planning on running the table with the cutter moved out from underneath and as far away as possible from the control box that the cables/cords allow (second to last pic as a demonstration, not stretched out all the way). It’s really only going to be under the table when not in operation, thus allowing me to store it in the same footprint as the table. Square footage in the shop is valuable, and all that.
• If the magic 3M sealant ends up being not so magical - I’ll probably try autogenous tig welding of the pan with your water trick to minimize warpage. A drip pan seems like more of a band-aid than a cure and I really don’t want any leaks or wetness under the table period. Having zero experience in this, viability of that remains to be seen. I have some ideas kicking around about splash shields, but I’d like to see how much of an issue it will actually be before tackling that.

Again, I appreciate your input!

1 Like

@Stormcrow …hey Todd…when you need to direct something at someone in the forum…you start with @ then type the name of the person…the forum will actually autofill some names for you…like I did for you…

As for your electrical…it is not the splashing I am worried about…but the way water can travel along and edge under a pan and find a place to drip to…open electrical boxes…

My saying in life …the two most destructive forces known to nature both start with a W…water and…Women…wtaer can destroy a mountain…and men have had to move mountains for women…wars have been fought over water and Women…"

I do like the fact you can pull out the plasma and roll it around…I really like that.

1 Like

I am brand new with my table and still figuring out what goes where. I was really surprised with all of the water that occasionally splashes out especially when the torch is doing its cool down over the water bed without any metal resisting the air after the cut is finished. But I love your creativity and skill. I too need this table to be mobile as I move it all over the place: it performs where my car is usually parked. My solution was less sophisticated and much less strength. I welded 3/16" plates to the bottom of the legs. I might consider you method if I add the water/fluid circulation system. Really love your StarTrek docking station for the plasma cutter cart.

1 Like

@toolboy you gave me a chuckle about the most destructive/powerful things: Water, women, wars…I know it doesn’t start with a “W” but many of us have stories about grandchildren. When you are parents, you usually don’t own many things of value and/or you are conditioned to store your stuff out of harms way. When you are grandparents, you get used to your “stuff” being available. Love them with all my heart.

1 Like

need women for children and grandchildren…

heheheheh

2 Likes

First off: @Stormcrow , I don’t want to hijack your thread but I really like many of your ideas. I tried to find another thread that would have people share what works and doesn’t work with their “builds.” I thought your “borrowed idea build” seemed most apropo.
My thoughts/experiments:
I would like to experiment with increasing my USB cable but my set up is currently working.
I think it might have been @jamesdhatch (on another thread) that said he used a removable pin with the laptop stand: outstanding idea. I did not have a long enough pin. It would require 1/4" x 5" pin to work nicely. But, I found that I could put 2 bolts secured with nuts (both pointing down) and it works great.
I may regret part of my hygiene with the water but I am just using it until it needs to be changed. No filtration, no draining. I have added 8 oz of washing soda for limiting corrosion and about 3 oz of Physan for killing growth of stuff.
When not being used, I put a 1/4" plywood board (coated both sides with spar urethane) over the slats and this becomes the place to store the cutter, cables and laptop stand.
And I was initially disappointed with spending the extra for a machine torch as I already was forced to buy a laptop just for this setup. No money left for outfitting the build anymore. At some point, enough is enough, BUT!!! I love the simpicity of the machine torch.


1 Like

@toolboy - I’ll give this “at” thing a try, thanks! I always type everything out in a Word document first, and then cut/paste it to the forums. I just find it easier to put it down in writing here first, versus directly inputting into the various forum formats. The water/electric thing does weigh on me a bit, I might need to spend money on some of those Liquidtight fittings and weatherproof boxes. Shouldn’t be too much work to swap out the components.

@ChelanJim – No worries about any hijacking, your comments and input is appreciated! The extra shelf space was a must for me, so the casters on the shelf versus straight to the leg is where I went. Your set-up looks clean though, and I’m sure works great. I like those leveler/wheel combo units, everything I’ve read says they work pretty good. I’ve mounted my computer to the table (you’ll see below) and so far no issues. I went with SterlingCool Plasma Cut for my table. I’m sure the DIY recipes work just fine, I just wanted something I didn’t have to worry about and was designed for this work. Time will tell how it holds up without a bunch of filtration and I’ve had good results with the fish bubbler on keeping any growth at bay. I like the plywood covering the table. In my shop everything gets dirty. Between large gaps under the doors, open soffits up top, and living next to the desert…it doesn’t take long for everything to acquire a layer of dirt/dust. So even when the table is drained it will get some accumulated dirt unless otherwise addressed. I’ve already talked to my better half and she said she might be able to make some sort of cover that goes over the whole table. Kind of like a fitted sheet-tent thing. Maybe even cut/sewn from an old sheet?

So took the Z motor off and it works just fine, the coupler must be the culprit. I spun it 180° and re-installed, thinking there might be a very slim chance it would work that way. Can’t hurt to try, right? Was only able to get one of the screws tight this time, as two more stripped out after just a small amount of torque was applied to them. Aluminum… So back to the forum and used the search feature to find replacement couplers off Amazon. (the one on the left)

Ordered four of them, just in case and considering it’s not the only coupler on the table. Installed and the Z-axis now functional again.

Ran the break-in program and then made a quick series of shapes to do some test cuts on. Ran that through as a Dry Run only multiple times and the machine was acting wonky (technical term). X and Y run-aways like you were holding the button down, program stopping mid-stream, etc. Seemed more EM/software rather than mechanical. Went back through all the Langmuir literature again and noticed that in the THC user guide they had a picture of the Voltage Input Module (VIM) mounted to the plasma cutter. For convenience I had temporarily mounted mine to the table right next to the electronics enclosure box. I pulled the VIM off the table and stretched it out as far as the cable would allow and tried running it again. It ran through multiple programs and movements without a hiccup.

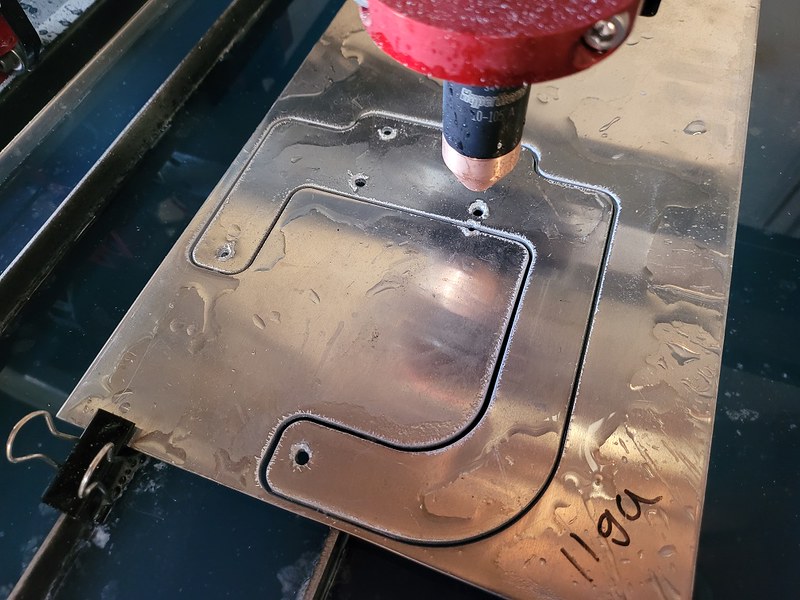
Time to make the first cuts! Sample shapes out of .070 aluminum.

Seems good to me, time to cut out a real part.

Bracket and lasers installed

I saw this somewhere here, but can’t remember who to give the credit to. Ran the power wires through one of the table tubes and installed a switch in the end-cap. Powering the lasers from a cut-up 5v charger found in the “charger and cable” drawer. Everyone has one of those, right?

Some fun stuff out of .125” steel.

2 Likes

Next I used the Straight Cut function to get a rectangular piece of aluminum to size. Bent up on the press brake and drilled holes for mounting.

A little rattle-can paint job and mounted to the table. The computer has a new home.

Here’s the set-up, ready to run.

Oh, after refilling the pan up for the second time it started to leak. In two places. One is at the van stone flange, evidently I monkey fisted tightening it and cracked the plastic threads. Fortunately it’s dripping right over the tote lid, which then drains back into the tote, so not a big deal for now while the replacement flange is on order. The second is a slow-drip from the back of the pan, right at the mating seam. I gooped some more sealant across the whole thing and am crossing my fingers while it cures.

Had to do it all over again I think I would have just done the dimple-die mod with the kitchen drains and tig welded the pan seam. At least I can still (attempt to) weld the pan seam if it continues to leak.

2 Likes

nice work…you got it now…

Another idea to borrow you will not regret…my simple indexing jig.

I’m using it again today to cut a 45"x45" complex piece, but it stays on all the time as a great alignment tool.

1 Like

Love your laser set-up. Btw, I have already abandoned my home brew and just filled my table with SterlingCool this weekend. My mixture was foaming too much and I did not like the white deposits on the table. I am looking forward to see how the SterlingCool makes the hot debris turn into bb’s (or so I read). Just ordered more metal - had to take out a loan from the boss. She said it is my Father’s Day gift. I was hoping to get a 20 ton press from HarborFreight for Father’s Day. Oh well.

1 Like

@Jpep – The indexing thing is something I will probably end up borrowing at some point. Right now I’m still cutting my teeth on smaller stuff. Thank you for the link and recommendation!

@ChelanJim – Thanks, but that laser idea was borrowed from Mr. Jpep, so all credit goes to him. I am digging the functionality of it, though!

I hear you on the metal costs. I recently picked up 40’ of .125” wall 2” square tube for another project and thought I’d throw in a half-sheet of .125” sheet with the order. Total cost came to over $400! After picking my jaw up off the floor, I just took home the square tube (still $200+). I’ll use up some of my scrap pieces for now before taking out a second mortgage to afford new plate.

I put together my HF press a few years ago (sheesh, where does time go?). Did the standard mods – grade 8 bolts, casters, air over hydraulic with foot pedal, and hand-crank winch for the table.

The SWAG press brake is also a worthwhile investment, in my opinion:

Just used it this past weekend on another Borrowed Idea – the table scoop: