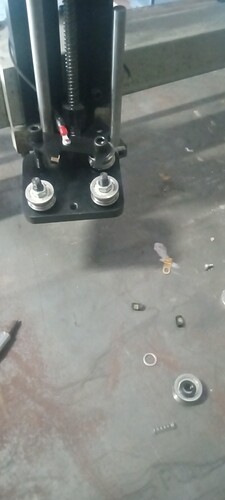
Anyone know of any video or written guide to disassmeble the Langmuir Systems Plasma table THC device? One of the wires broke off my THC and would like some sort of guide if possible. Otherwise… I’ll just go at it. Thanks for your help!
Do you mean IHS wires on Z axis? THC wire goes from Control box to THC box nothing to tear part, except at plug barrels at each end of THC cable.
Yes… Not sure the terminology… One IHS wire broke from crimp. Already been warned of watching for the spring under pressure when taking it apart.
I recently disassembled mine because I accidently loosened the wire. Now that I took the roller bearing guides loose I realized a much simpler approach is to loosen and removed one of the guide rods. I am not 100% sure that you can pull it all the way out but I would try that. Don’t scar or bend those rods and especially don’t scar where the rollers run.
I will try to find the two areas of this forum that I described the process for two other people just recently. Give me a few minutes.
Edit: Still looking for it. But basically here is how I approached it:
-
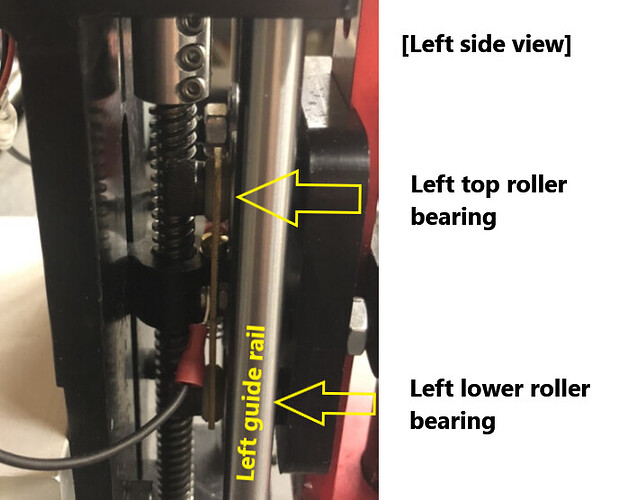
Since the roller bearings on the right are the adjustable ones, leave them alone.
-
I then removed the left top bolt holding the left top roller bearing.
-
Now I loosened the bolt holding the left lower bearing to the point that is was about to fall out.
-
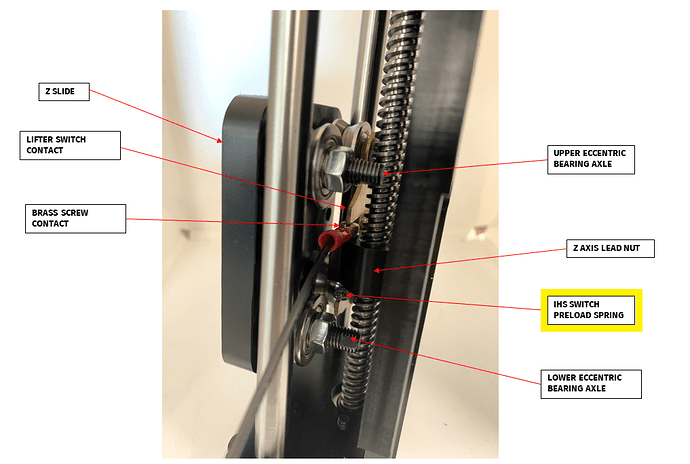
To really remove the z-axis carriage there is still not enough room so I loosened that rod on the left so there was some give. Be careful because this is when you will lose the spring that is part of the IHS system. Move the torch holder plate up and down and you will see the spring and how it is positioned. The upper part goes up in a hole on the bracket and the lower part rests on the nub of metal.
-
As you jiggle the carriage it will fall free, so will that spring.
-
Now you have full access to the wire connection.
-
Putting it back together…have no idea. Haven’t used it since

 Just kidding.
 -
Putting it back together is obviously the reverse but something that would have helped is to have an extra hand to stabilze the carriage while you get that left top roller guide attached again and not lose the spring 6 or 8 times in a row, like I did (might be an exaggeration…I do that sometimes).
Technically that is the the wire for the IHS (Initial height sensing). It is used to judge where the plate surface is.
Edit: I forgot to mention…all of that loosening and tightening has to be done from the backside so you need to use pliers on those machine bolt/screws. Very small movements!!!
That was an awesome assist! And, I employed all of your experiences with my process as well. I did this work this morning… and have yet to test things, but… I’m pretty confident that it will work. I have a little more to deal with since my exhaust tube follows my torch on the trolly to get rid of all the nasty fumes so there was a little extra to deal with to get to the IHS gear. But it’s all back together. Thanks for taking the time to help an old dude out.
I went to follow your procedure and I guess I got a little bit too wompy with it. The spring popped out on me before I could even look in and see where it went. Now I’m not even sure where or how the spring connects onto there? If you could help me that would be greatly appreciative.
It is so hard to see the parts when it is all put together. This image is as good as anything that I could take. (I just tried to do it.)
The top of the spring goes up into a hole in the bracket. It is only held in place with light friction. If you use a mirror or your cell phone, you can look upwards and see the hole. The bottom of the spring is sitting on a little nub on the bracket that holds part of the IHS contact. So when you are putting it back together, you have to keep them in a “close enough” spacing so the spring doesn’t drop out. You might try an old plumbing trick: use white bread to help fill the gap then you can rinse it out with water. ![]()
Edit: Here is additional guidance from Langmuir but tread lightly: this will disassemble the entire z-axis to get to the IHS contacts!!!
IHS Contact Switch Components Swap Guide.pdf (7.1 MB)


