Based on the prep work you’ve done so far, I’m sure it’ll be fine. Good luck and hope you’re cutting soon!
1 Like
Your motor guard filter should be last inline.
2 Likes
I have Tru-Flate Dessicant Dryer after my Motor Guard M-60 as @Domo does in the picture. Guess we need some others to respond. Might not matter but works perfect for me.
1 Like
I should have said why.
Desiccant beads vibrate as air pass through them and will create a fine dust that the motor guard will stop.
Probably not a big deal for most hobbyist but @Domo was still mounting his.
2 Likes
It’s not likely, because the dessicant dryer has a filter on the pickup tube, but the motorguard would catch any particles of dessicant that make their way through the line.
3 Likes
A MotorGuard filter adds nothing to the drying process, it removes literally all dust and particles from the air, and will be ruined if if gets wet. Which do you think should come last…
3 Likes
Is this what your saying….

6 Likes
LOL, perhaps ![]()
1 Like
I learn something new everyday. Thank you to everyone for helping.
1 Like
Ya know @Knick, I had the very same thought and have gone back and forth on whether I should re-arrange the filters.
The Motorguard system was bought as a whole (M-1000) and I was curious as to why the micron filter was in front of the desiccant, especially as I understand the desiccant can create it’s own debris through use and excessive moisture (if excessive, something was missed before desiccant)… I was and still partially am half tempted to rearrange the micron filter after the desiccant, but don’t want to change anything under a false understanding. This may sound dumb, but I’m trying to wrap my head around the the reasoning of the micron being before the desiccant. I would think that one would want this last before going to the cutter, but don’t want to think that I am smarter than the designers of said sys in my bumbling through this for the first time…
The air will hit three vertical traps with auto drains before it hits the motorguatd sys. I can’t say with certainty, as this is not something that I have done before, but the air hitting the desiccant sys should already be partially conditioned re: Temp/RH. I’m crossing my fingers in hopes that the traps pick up a lot of the water to feed decent air to the M-1000, and not saturate/ruin my consumable MG micron filter. My current “plan” is to “maybe” put a dust filter after the M-1000 just before my cutter, but the cutter has it’s own little baby water trap with filter, so…
Semi-cohesive thoughts, semi-flying-by-seat-of-pants also, so open to suggestions considering logically reasoned. Today is going to be a braze-n-chill day while I consider the MG further.
1 Like
From the M-1000 paperwork. Not saying anything absolute, but my take-away…
- 20’ of supply line needed prior to system (proper traps as well I presume), as to not overwhelm with moisture.
- A prefilter combination is an absolute necessity prior to desiccant.
- M-60 element should be replaced when saturated with water.
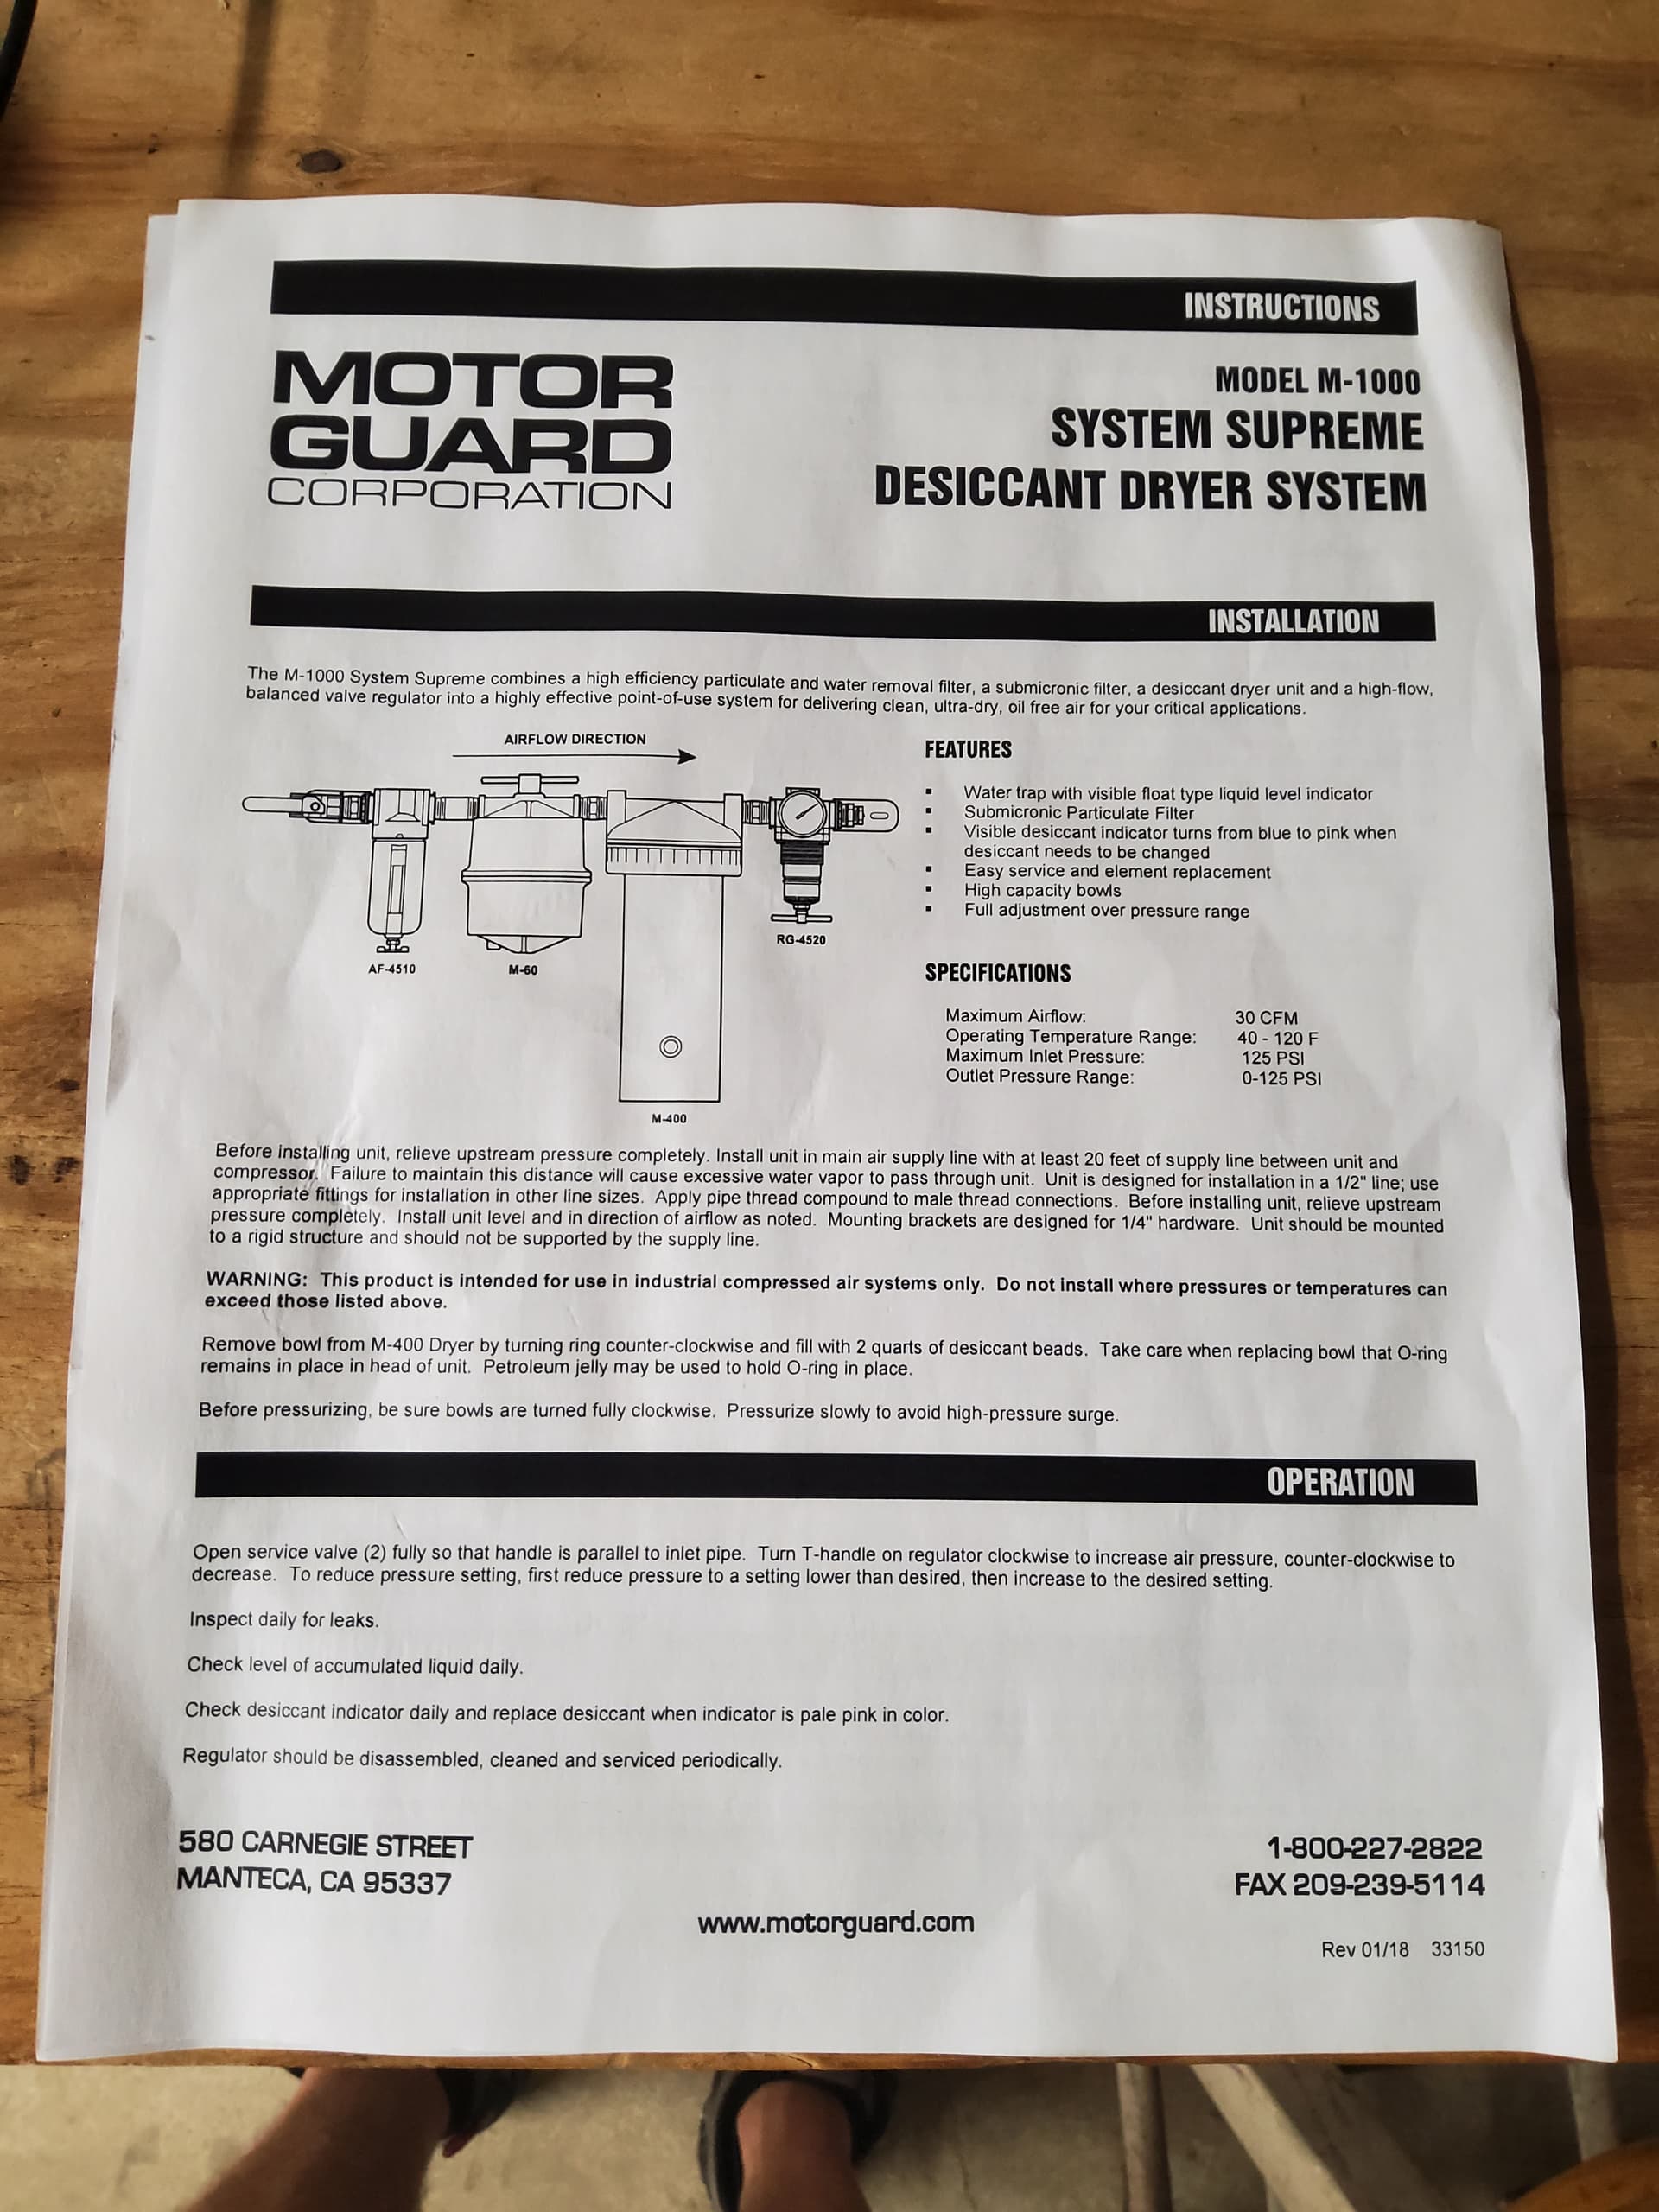
No wonder they recommend more frequent filter changes than seem warranted (or necessary in my setup).
4 Likes
This is all take with grain of salt, as I will not be running this thing 8hrs a day, 5 days per week, nowhere near. But if I were… ?

2 Likes
You should have a coalescing filter somewhere prior to the desiccant filter.
2 Likes
I have a coalescing filter in front of my desiccant filter. I see they say you need a filter after the desiccant but they don’t show it in that picture you had.
A lot of these filters they are talking about are for oil, your compressor age and quality have a lot to do with this. If your dealing with a cheap box store compressor or a very old neglected one or both you will have way more oil in lines then if you have a good quality pump.
They sure listed a lot of filters, probably erroring on the side of caution!
2 Likes
This post is not intended to sway anybody that trap before desiccant is best approach. Just info on how the filter suppliers set these combo pairs up.
I have a non MG filter and desiccant trap combo I bought from Harbor Freight. I know, not the best but that’s fine with me.
That setup also came with the coalescing filter before the desiccant. I’d read on this forum about the thinking that the reverse was the best approach, but since I have 2 coalescing filters before and 1 small particle filter after this pair, I left it as it came.
2 Likes
I am going to put a coalescing filter before the desiccant system. May swap that first particulate filter with one of their CO4515 coalescing, then use the particulate in front of that to protect the 4515. Brand new Quincy compressor so hopefully shouldn’t let too much oil by, but would still just like to do everything that I can to ensure a good end result.
This air generation/distribution/drying has been the biggest stumbling point for me so far. My old compressor was a roll around with about 40’ of flex-line, so now I have to think in terms of permanence and work flow, noise, heat, drying apparatus loc’s, uugh… Rearranged the compressor location 3 times now. I see a number of people who put their copper piping right next to the compressor and I wonder if the radiant heat it is raising ambient temp in the area taking away from it’s ability to run optimally. I think this last move will be the final location. That damn copper is expensive, don’t want to botch it… ![]()
Cheers!
2 Likes
Oi…
So, inching along… Finished my copper plumbing and the soldered fittings pressure tested good. The only thing that I found was a couple leaky threaded connections at two water traps which have been rectified. I added a particulate to my Motorguard filter array in front of the coalescing filter, mounted it up, pressurized and she leaked worse than a truck stop wh… umm… air pump. Disassembled all connections, threw the stupid Teflon tape away, applied Permatex thread sealant, been sitting now near 48hrs. Going to pressure test this afternoon again to see results. Fingers crossed.
Despite the Motorguard system being leaky, before disassembling, I went ahead and tested THC along with the other initial tests, and all look good.
I am hoping to get my first cuts going this weekend. I have gone through and done some Youtube practice bracket tutorials in Fusion, documented steps for it to eventually stick, and ready to hit the streets on the design front!
The CAM functions/setup has me a little bewildered though. I have some basic round shims that I want to cut this weekend (to level compressor/floor slopes a bit at edge) I have created the flat pattern, simulated the cut, but getting hung up on creating the g-code. I am lacking details on my machine (Everlast 62i) and need to add it to my fusion machine profile. Being as it’s not a built-in, I suspect that manual entry will be the way that I have to get it done. But when I start thinking about nozzle width, kerf width, lead in/out, ipm, my smell smoke coming from my ears from the overclocking thinking about all of the reading/learning that I have left to do before even firing this thing off. ![]() I know that there is no official cut chart for Everlast, but that there is enough info out there to cobble together good starting points (Razorcut Chart?). Is there anybody running one of these 62i’s who would be willing to share some fusion plugin specs as it relates to your custom “saved machine”? I’ll be digging around in the mean time, but could use a cheat sheet (even if only personal and generalized) if one exists.
I know that there is no official cut chart for Everlast, but that there is enough info out there to cobble together good starting points (Razorcut Chart?). Is there anybody running one of these 62i’s who would be willing to share some fusion plugin specs as it relates to your custom “saved machine”? I’ll be digging around in the mean time, but could use a cheat sheet (even if only personal and generalized) if one exists.
Set the nozzle diameter the same as kerf width. It doesn’t make any difference with the actual gcode but the simulation in Fusion will look better.
Lead-INS and lead-outs are generally 60% of your cutting speed. Inches per minute cutting speed will be close to what your chart with the cutter has.
The one value you really want to pay attention to is the cut height. Due to how the spring back works, you may end up with a wonky cut height. Check it with a feeler gauge on a scrap metal/project. Try to interrupt early in the cut or disable THC so it doesn’t complicate the reading.
Pierce height is generally 250% the cut height.
Pierce delay varies. (.3 to .5 seconds for most. I am at .73 seconds with Hypertherm)
2 Likes
Wheew, thank you for that @ChelanJim, good info. I found some general cut charts posted here some time back, but would be neat to have something more centric to the Everlast. I emailed Everlast as well to see if they have any info that they could share re: machine usage being as they sell a CNC interfaceable unit with machine torch. Seems that they would have some of this stuff situated, but it is a discount manufacturer so won’t be too critical of them if not.
Digging around and trying to wrap my all of these concepts, as I can only cover one bridge at a time as to not get too overwhelmed. I guess that it’s a given that where the tires meet the road, there will be a learning curve and some material wasted in the process. ![]() I just like to try my best to do my due diligence before acting to try in an effort to minimize.
I just like to try my best to do my due diligence before acting to try in an effort to minimize.
1 Like