New (soon to be) Pro Owner from VA

Hello, I’m Domo from the central VA area. This is my intro so that when I pop into the forum with some whacky question, you won’t be scratching your head in confusion as to who this yahoo is. :crazy_face:

Ha, no but in all seriousness… Middle aged dude who started his post high school career fresh out of vo-tech in the metal fabrication space. Did that for 8yrs in a few capacities, went back to school, been doing comms work for a large Telco for the last 24yrs. I have always had “some” means after getting out of fabrication, but built an 18x32 detached shop about 6yrs ago to make my hobby (eventual side-hustle) shop. I have outfitted it with the ability Stick/MIG/TIG steel and alum, have a 4’ manual sheet roll, RogueFab tubing bender, 4’ (60 ton) Swag brake that I built myself, fast cut saw, plasma, a variety of other misc stuff as well. Not balling, but not bad for a home “hobby” shop.

Been wanting to aquire a plasma table for a number of years, and finally I said screw it. Don’t want to go off on a tangent, but with banks failing due to financial neglegence, inflation reaming a big one from the back side, worldwide political turmoil getting crazier by the day… I went ahead and said screw it. Not much on carrying debt, but I have felt that a CNC table would be a keystone to unlocking the next level in fabrication. I have always used stone-age layout techniques to do EVERYTHING and the Crossfire Pro will be a breath of fresh air, no doubt! I’m prepping my shop and re-arranging to set of a nice protected space for her to live. Happily, I will do a lot of work from the comfirt of my office in the house, then will send to the machine in the shop to git er done! While my CAD experience is limited, I did design a whole 7x16 cargo trailer toy hauler conversion in sketchup, then later executed the build, I am a quick note. I of course plan on messing with different sign builds, but I really want the table to make professional components that I can repeatably/uniformly cut for any fabrication job that I might encounter.

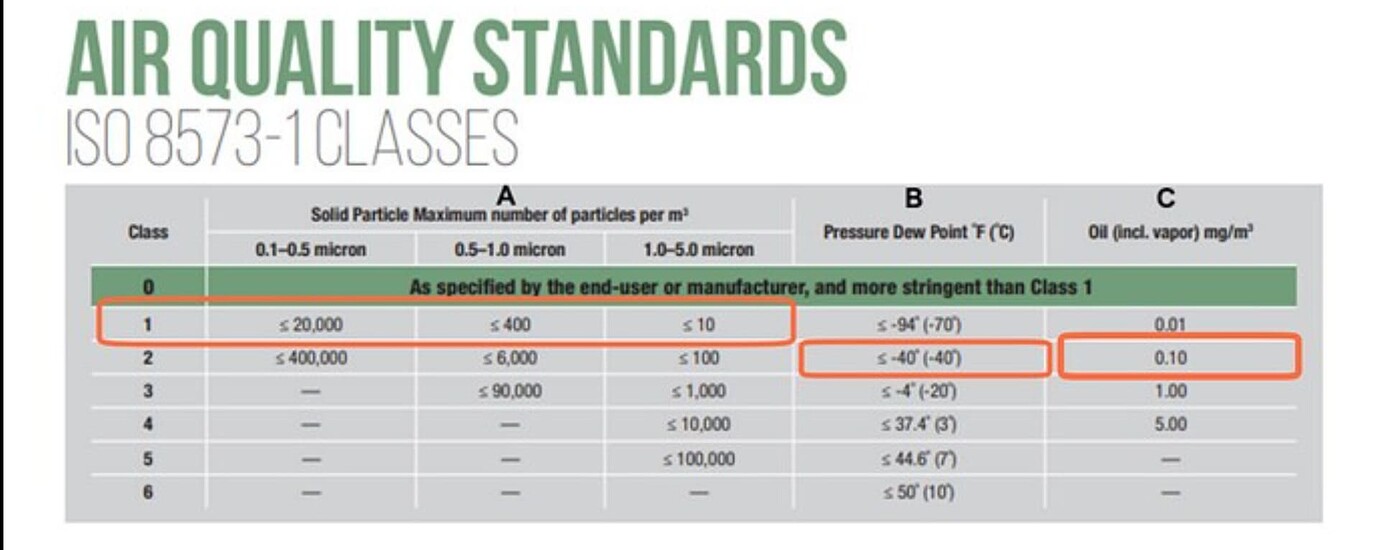
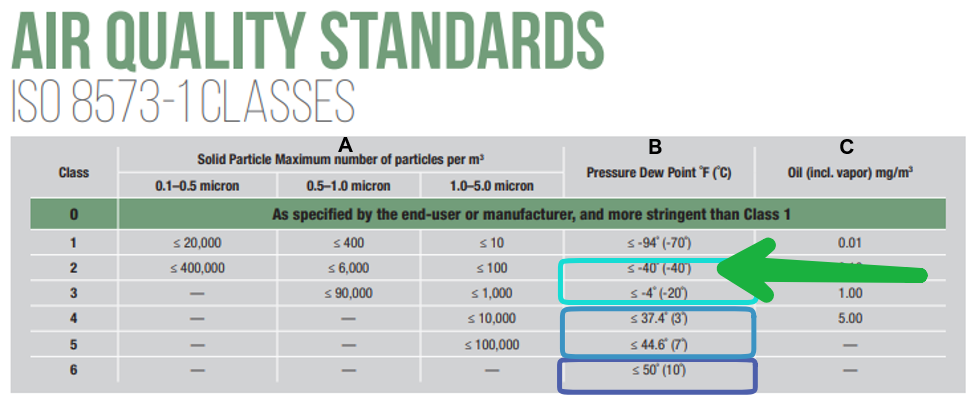
The table is due to arrive on Monday, along with an Everlast 62i, as my current cutter isn’t sufficient. Same with my current compressor which is now a garage compressor. I have a 3.7HP Quincy 60gal in the shop as of yesterday when it was delivered. This noted, I really want to do things right, shorten my learning curve and have a good experience with this, so I am considering my air drying options carefully. Being in VA, we regularly experience 80-90% RH in the summer, so it’s not a matter of “if” I’ll need one… I’ll need a GOOD one! :joy: So, with this in mind and all the reading that I have done, I think that for the sake of my 100A already tapped shop feed, I would like to go passive. Either a custom copper or radiator aftercooler/condeser setup, or maybe a custom dessicant setup, or BOTH. ~ ? The copper system won’t be cheap if I use 1" pipe, so would hope that I could knock it all out with that, but cold hard reality doesn’t yield to emotion, so I am prepared to do a two-stage if need be and run it through dessicant on the output of the aftercooler…

Oh, one begging question if somebody knows… The paperwork that I have read so far says that the tables logic/servo controller requires a 20A outlet. Is this correct? I haven’t read anything that actuallly indicates input current, but was wondering if this is actual? I have a 15A outlet next to the tables new home, but can run a 20A feed if this is actually the case.

So there’s my long winded intro. I hope to engage with you all soon as I begin my journey, and hopefully circle back around and share some of my eventual creations. Utility and geometric art are things that excite me and things that I will be focusing on.

Cheers!

-Mike

5 Likes

Welcome in !! Southwest VA here…
Make sure you do get your air fryer setup right. I can use my compressor as a pressure washer!!!

3 Likes

Ha, I believe you man! :joy: The water that spits out of my air tools, sheesh! Thanks!

1 Like

is-air-frying-healthy44-79f5ff9

5 Likes

I wouldn’t waste a ton of money on a 1" copper pipe array. I have about 60 feet of 3/4" copper with 4 drop legs and I hardly get any actual water from them. Occasionally, the air feels a bit damp when I open the valves on the drop legs, but no liquid.

I installed a transmission cooler between the pump output and the tank, with a water separator on the outlet of the cooler, and that pulls out about an ounce of water every time the compressor cycles. It was much cheaper than the copper pipe and fittings and I can see the water being removed.

I still run the air through the copper pipes and into a 1 quart dessicant dryer before it goes into the motorguard, just before the plasma cutter.

2 Likes

DS, I do like the idea of the tranny cooler tween the pump and tank. Thanks for your experience with the copper condensate columns, maybe 3/4" would be better. So all of the above, minus the large diameter copper then? :grinning:

If I were doing it again, I might skip the copper pipes and just do the trans cooler, dessicant and motorguard with RapidAir piping. It certainly can’t hurt to have the copper pipes, but I don’t see any evidence that its removing much moisture.

2 Likes

Gotcha. The dessicant system that I’m thinking of doing is going to be pretty large (1gal+), so maybe that will be sufficient, and can skip the copper after the tranny after cooler. :thinking:

1 Like

I prefer the square baskets vs the round, but meh… :laughing:

Lots of good info in this thread about aftercoolers. Make sure and read to the end.

Air Compressor aftercooler Info thread - Projects - Langmuir Systems Forum

2 Likes

@Domo Welcome.

A smaller diameter will increase the Reynolds number ( turbulence ) in the pipe which is great for heat transfer and bad for entrainment of condensed moisture. This means that some of the liquid moisture can be carried along to the next device. a Larger pipe will also lower your velocity which subjects the air to the heat transfer of the heat exchanger for a longer time while minimizing entrainment.

Personally I have a different opinion on this .

Dessicant is a must if you hope too achieve the correct pressure dew point in your air .

This is the standard you should be aiming for.

ISO 8573-1
Class 1.2.2

Column b deals with water vapor.

The dark blue is where a passive or active ambient air cooler will get you to.

The blue color is where a refrigerated air dryer will get you to.

And the light blue is where a desiccant cell will get you to.

Sketchup is…was awesome !! I used Sketchup from 2008 to 2020 then i moved to Fusion 360. You could still use Sketchup with SheetCAM which maybe a good combo.

Where are you reading this?

A rough rule of thumb for recommended amount of desiccant would be approximately 0.2 to 0.3 pounds per CFM of compressed air. but this will vary depending on temperature and RH of the inlet air to the desiccant cell.

4 Likes

I think they are just referring to a typical house current 110 v receptacle. Most house use 12-2 wire which is rated at 20A so most 110 lines are protected with 20A breakers in modern houses in the U.S.

The control box on the table doubtfully pulls anything more than 10 amps. That includes the motor operation for moving the torch.

Welcome to the forum!

2 Likes

Never know a man gets hungry while working

Auto correct got that one. Sent the message as I was getting a call didn’t look… oh well

4 Likes

Id love to have an air fryer in the shop!

2 Likes

It was a nice chuckle moment!

The first one I saw, I asked the people if they liked it. They didn’t “like” it, they “loved” it. I then asked “what is their favorite food that it does well?” They both replied: “tatter tots.”

I thought, my gosh, you bought an appliance primarily so you could enjoy “tatter tots!” They are fine in an oven! :rofl:

3 Likes

My wife bought one the first time she used it all I could smell was hot plastic…

Yeah I have yet to eat out of one because of that… and that one no longer lives here.

2 Likes

How often do you have to swap out your beads? If you could relate it to hours of cutting time, or some such metric, that would be useful.

1 Like

Dang TinWhisperer, thanks for the detailed response. I was/am not keenly familiar with the affects of larger/smaller diameter copper or ISO 8573-1 (not an engineer, just a hack), but you have given me much to research and hopefully a target to achieve with this info. I was operating on a “If some is good, more must be better” approach, but could really use to sit diwn and geek out a bit to at least create something that I think achieve my needs vs $, overkill and praying (typical of me). :joy: Admittedly, this has been a back burner issue to my other shop preps and gear research, but front burner at this point now that said gear is starting to show up!

Cheers and Thanks!

  • Mike
1 Like

I don’t keep track of the interval, but I dry them out before any cuts that have a lot of pierces. I’d say the last time I dried them was after about 700 pierces and there was still plenty of blue beads left in there.

3 Likes

Hi Chelan, I read it in one of the “prepare for delivery” docs. I skimmed the table’s assembly manual, but didn’t see specific’s re input amperage… Our house was built in 2013 and all electrical is builders grade with 14ga wire and 15A breakers for standard wall recepticles. When I built my shop, I was short sighted in this and only ran a few 20A recepticles, not one near the table. Nonetheless, I can run one in if needed, just one more thing that I have to account for. I’ll probably wait till I get the table and look at the PS’s stamped specs (hopefully there) if there’s nothing in the manual on it. :+1:

2 Likes