
3 Likes

3 Likes
new 3d project.
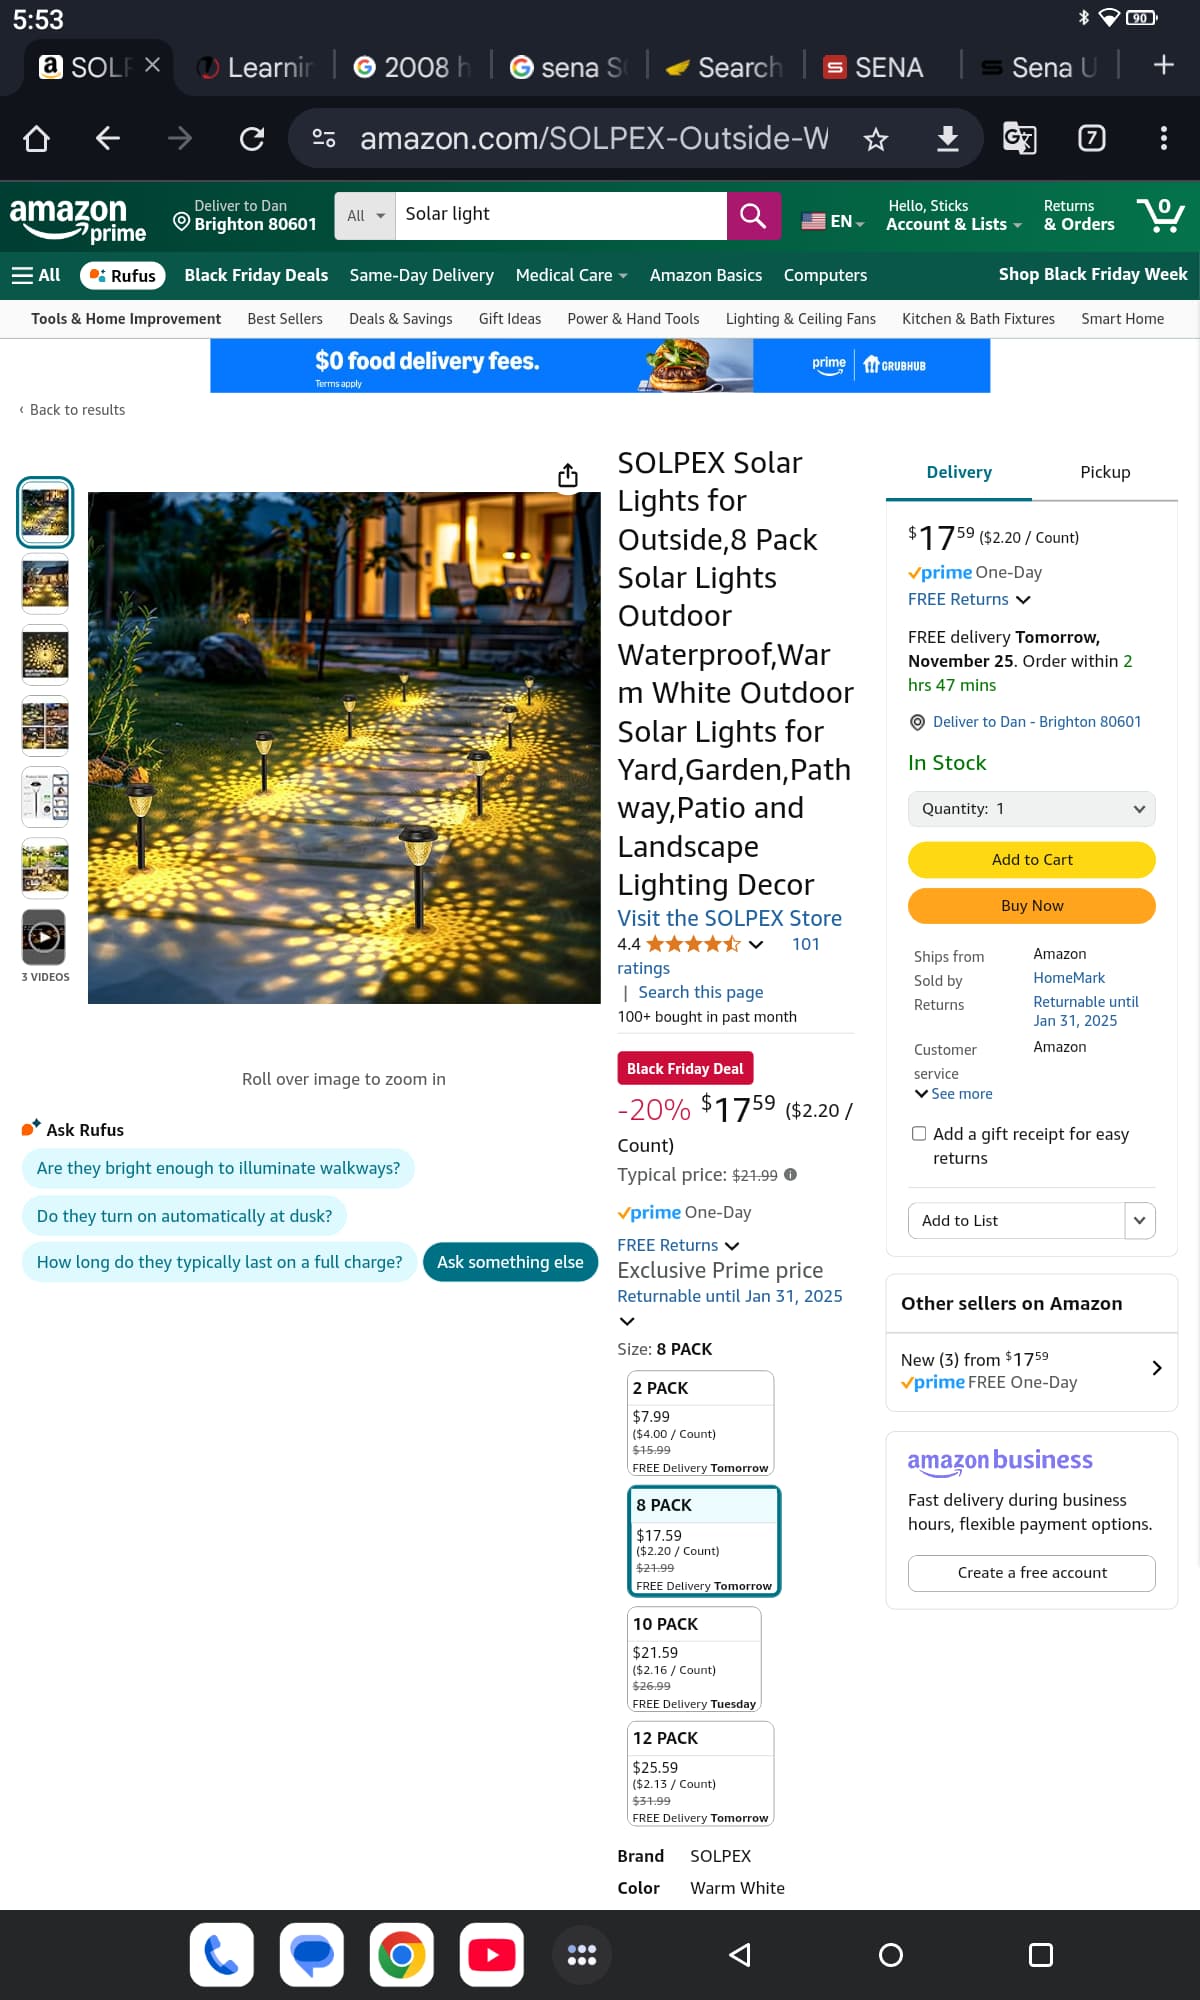
My wife ordered these lights cap our fences posts.
but we have a few true 6x6 posts and this company does not sell version in this size.
Well I am designing a scaled up version.
I have drawn the original and scaled to up in fusion but now its time to figure out the working bits and what i am going to use for “glass” or a solar light. Any suggestions please let me know.

this fills most of the build plate
Sacrifice a cheap solar light assembly to retro fit your model.
Super thin clear plastic sheets cut to shape and slid into internal grooves to hold in place
2 Likes
I like this. was thinking about sandwich method but your idea is better
1 Like
Also check out BL maker world. They are starting to sell lots of components to do this sort of thing. Motors,controllers, chargers…
I have been having great success with GratKit transparent PETG. It is very clear. Could you print the window panes?
Currently on sale for $60 for 6 rolls:
https://a.co/d/bwrpWXr
The bad thing??? These spools do not work in the AMS and you would need to move to a non-standard spool. If you decide to go this way, I could send you my files for printing a reusable spool that fits. So far they have sent two different types of cardboard spools with different sizes just in the last month and it was a third size 4 months ago. ![]()
You never know when they are going to change the spool size. I have had to adjust to 4 different configurations with this company. If it were not for such great filament, I would not keep buying. But “Buyer beware”.
1 Like
Jimmy i am sure it is great filament but I do not go outside the Bambu ecosystem .
1 Like
Smart move!!! I am not always known for such decisions…ask my wife!
Well, then try the Bambu translucent!!!
1 Like
I’ve used some .
Learning 3D printing - #870 by TinWhisperer
I still have some and more on order . the postal strike is starting to take its toll.
I’ll try a couple test prints so I can compare the translucent-ness of the flat printed sections to the curve printed sections .
2 Likes
This light might be simple to install in your post topper. No need to make the windows if you wanted to just make the framework and have a hole in the top.
https://a.co/d/515szDn
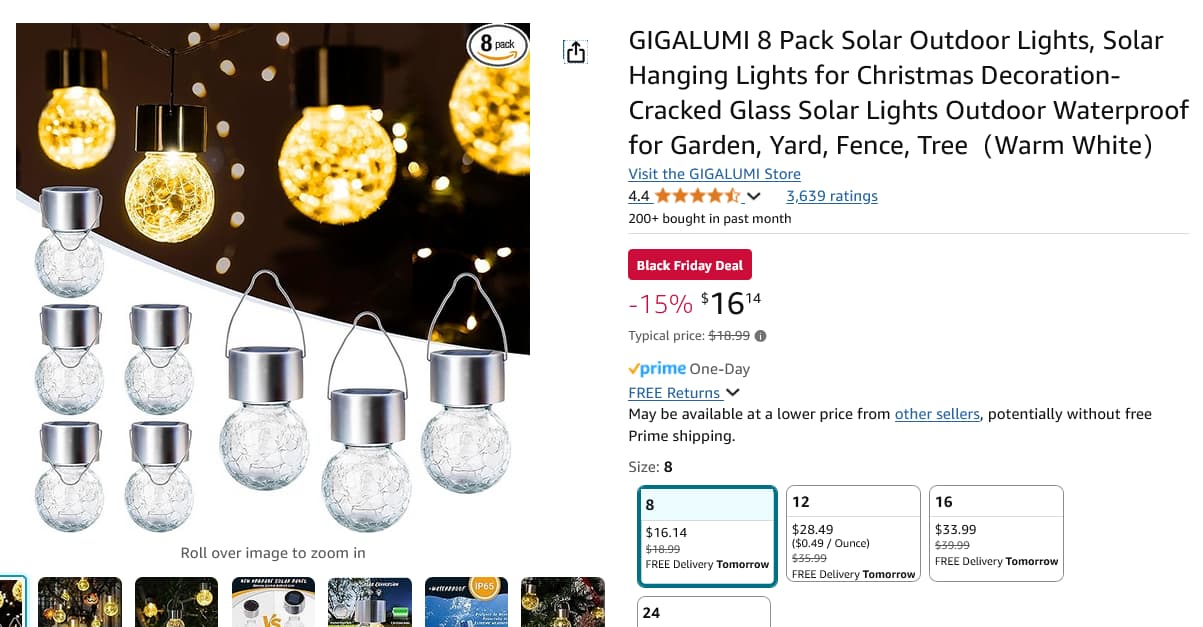
Similar to Sticks idea.
1 Like
Heeeeyyy…
I’ve been away. I just came back around to see what’s new (and look for some Everlast 62i cutting specs for 1/4” aluminum if anybody wants to share) and I have to say I’m very excited to see so many of you here into 3D printing!
While I’m sure there are MANY great 3D printing communities out there, I’m not a part of any of them. ![]() But there is no greater community than the Langmuir Systems Forums Community, in my humble opinion, and so seeing this thread here just warms my heart!
But there is no greater community than the Langmuir Systems Forums Community, in my humble opinion, and so seeing this thread here just warms my heart!
Allow me to provide, as evidence of this fantastic community, that I only got into 3D printing myself shortly after @ds690 sent me a 3D printed machine torch holder for my Crossfire Pro that was giving me nothing but trouble. While the torch mount was the least of my issues, I’ve never forgotten that kindness. A month or two later, I found an old Anet A8 at an estate sale, and rebuilt it. And then for about 6 months and 4 “kit” machines, I absolutely went off the deep end, building and tweaking until finally deciding I HAD TO buy an X1C Combo (18 months ago), and I haven’t looked back since.
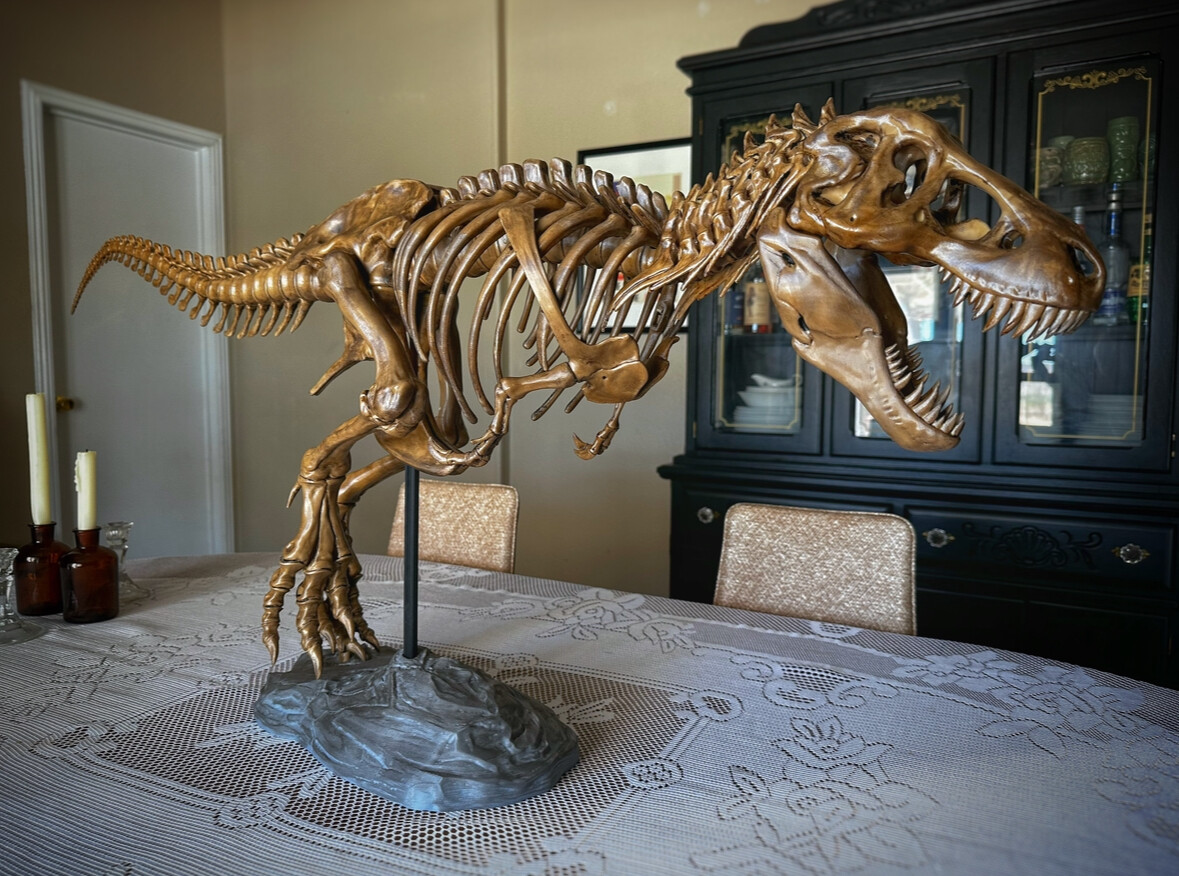
In fact, a few months after buying my X1C, I entered Bambu Labs 2023 Christmas contest, and got the first honorable mention (unofficial 4th place) with this print, here:
But I mostly use 3D printing for tools and organization, some small functional parts, and something a shop the size of mine would NEVER normally have the means to do, which is rapid prototyping.

I also hope, over the winter, to delve into the world of aluminum casting, and will use my 3D Printer for printing patterns. In fact, I’d like to purchase a second Bambu Labs machine (probably a P1S) to outfit with a 0.2mm nozzle specifically for this task.
Anyway, I couldn’t bring myself to read through all ~900 posts, but I am definitely subscribing, and look forward to the camaraderie I’ve come to appreciate most from this community.
Cheers!
Casey
7 Likes
Good to see you Casey. You remain a legend here with your massive thread. Perhaps this one finally surpassed your threads number of posts.
Very impressive T-rex! ![]()
You make me feel good that I started with the X1-C. Still learning but you know that gray matter is not what it used to be.
Don’t be a stranger!
3 Likes
Here’s a sketchy looking heated chamber kit for the X1 carbon that I might order.
Here’s the official heater kit for the x1e. It’s too bad they don’t make this kit for the x1c. I wonder if you could use this kit on the x1c?
2 Likes
You deserve a stocking stuffer!
(I am starting to think that I will not be getting an air pressure gauge in my stocking!!!CRAIG?AREYOULISTENING?)
With those exotic filaments you use, that is a good idea…If it works. You need to hook it to 220V? Bummer.
1 Like
I have not been impressed with 3D printing (in terms of strength for a plastic), that is until I saw a video incorporating continuous glass fibers in his 3D printed parts.
Unfortunately, the target audience is that of the 3D community meaning there’s a lot of terminology I don’t understand - what kind of 3D printer would I need to utilize such a printing process?
1 Like
I have found the same thing with PETG and PLA. ASA is pretty strong if it is 1/4" thick. But those layer lines are the weakness.
I am still a novice but have you tried PolyCarbonate? It is suppose to be strong enough for engineering parts and you can literally tap threads for screws in it.
But, you may need a heated chamber for good results.
1 Like
YouTuber Clough42 has done some strength tests on Nylon-X (PA6CF!?) that were fairly impressive. I have 3 rolls of it that I’ve yet to test. The trick is, it’s incredibly hard to keep dry…
2 Likes
I have posted this item before and still really like it. The price has gone up but compared to my filament dryer that is limited to 6 hour duration and max temp of 122F, this dehydrator runs for up to 10 hours with a top temp of 158F.
https://a.co/d/3evVC2B
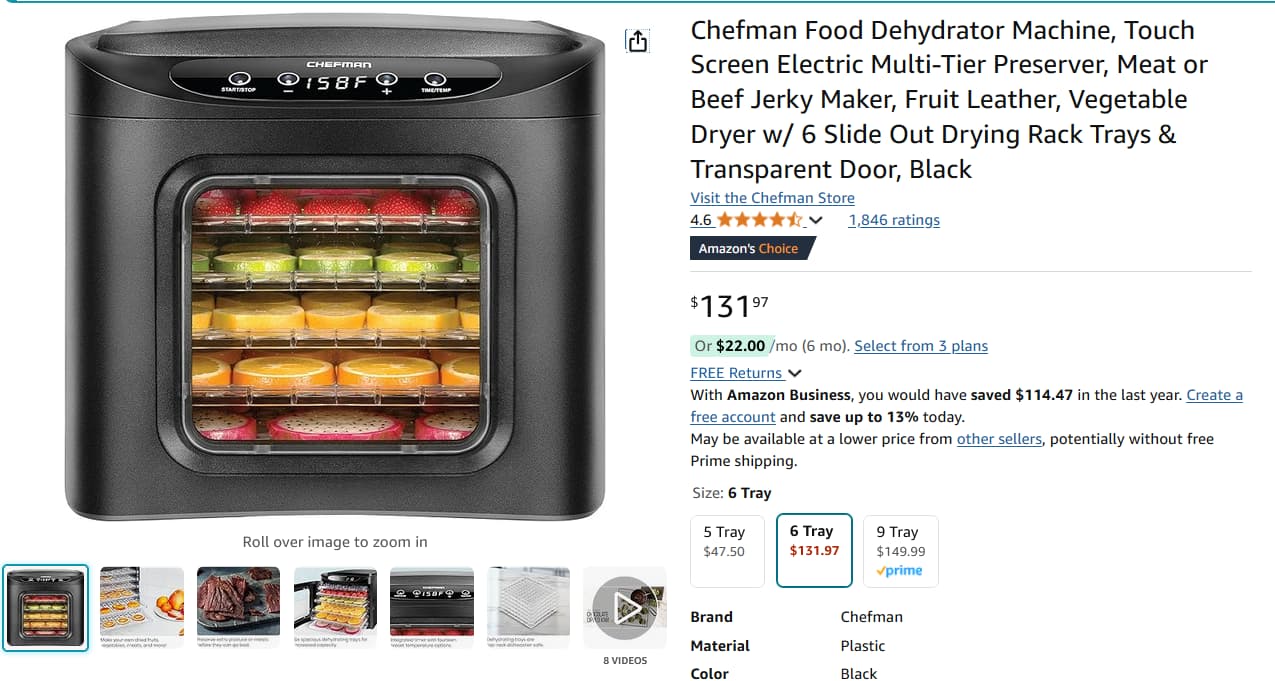
Obviously, it would not need to be THIS dehydrator…but a dehydrator might be a good option. Plus this one will easily accomodate 5 rolls of filament at one time.
This one might just be the ticket for you. To dry nylon filament, they recommend 167F to 194F. This dehydrator goes up to 190F and can be set for up to 24 hours.

https://a.co/d/aGBVaYt
1 Like