Inconsistent Piercing on thinner material with Everlast 62i on Crossfire Pro!? Cut settings like Hypertherm Chart…Looking for Some Tips?

Hey Folks! Been a minute…man, I’m going to try not to sound like a total newb, here. Banging my head against the wall a bit with what seems kinda like a mystery issue.

I’ve been cutting stuff here and there, and slowly dialing in my process. My setup has been cutting “good enough” for what I’m doing 95% of the time. And to be honest, I’m sure some of the problem is in the way I’ve set up my cut chart, but I’m at least a little bit committed to it at this point…

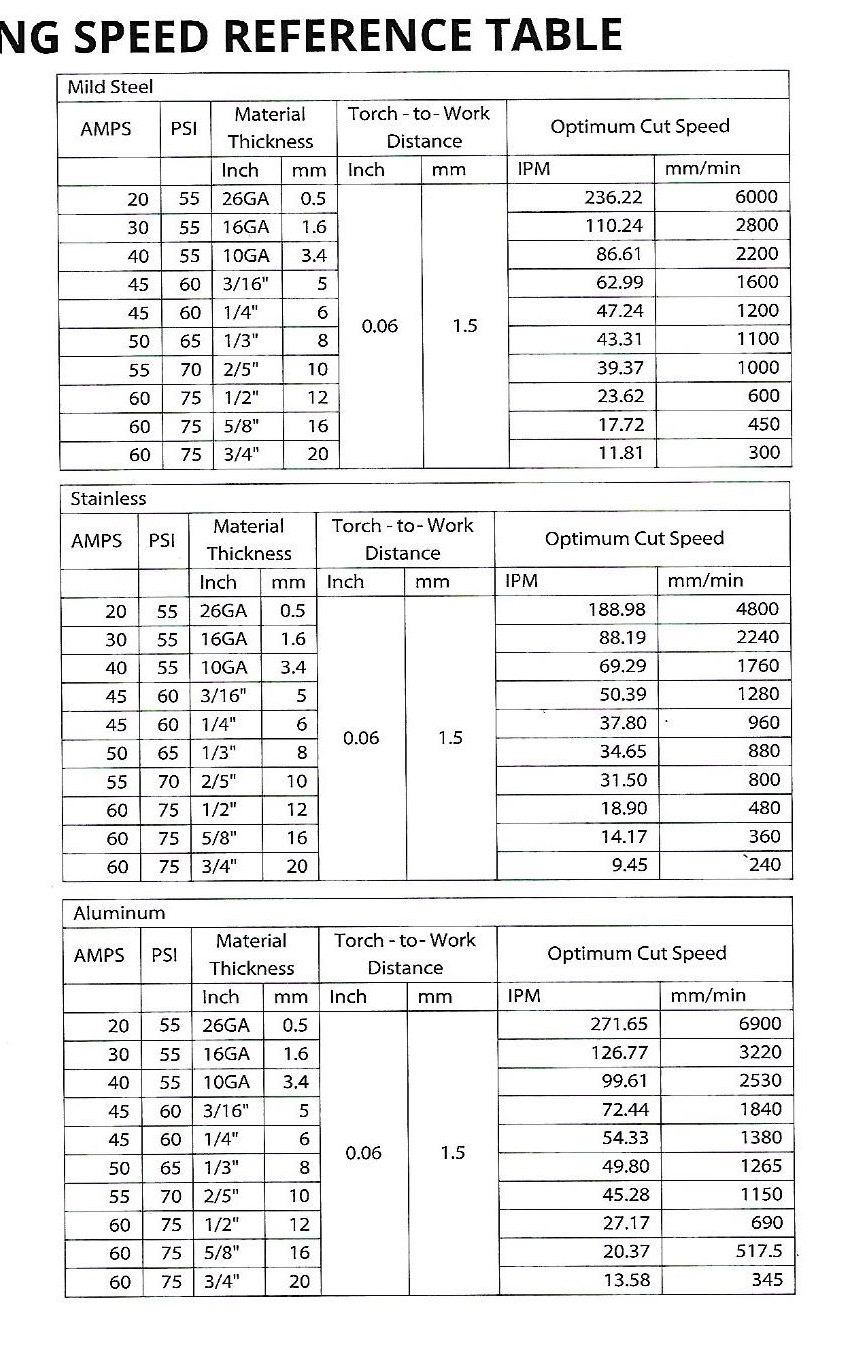
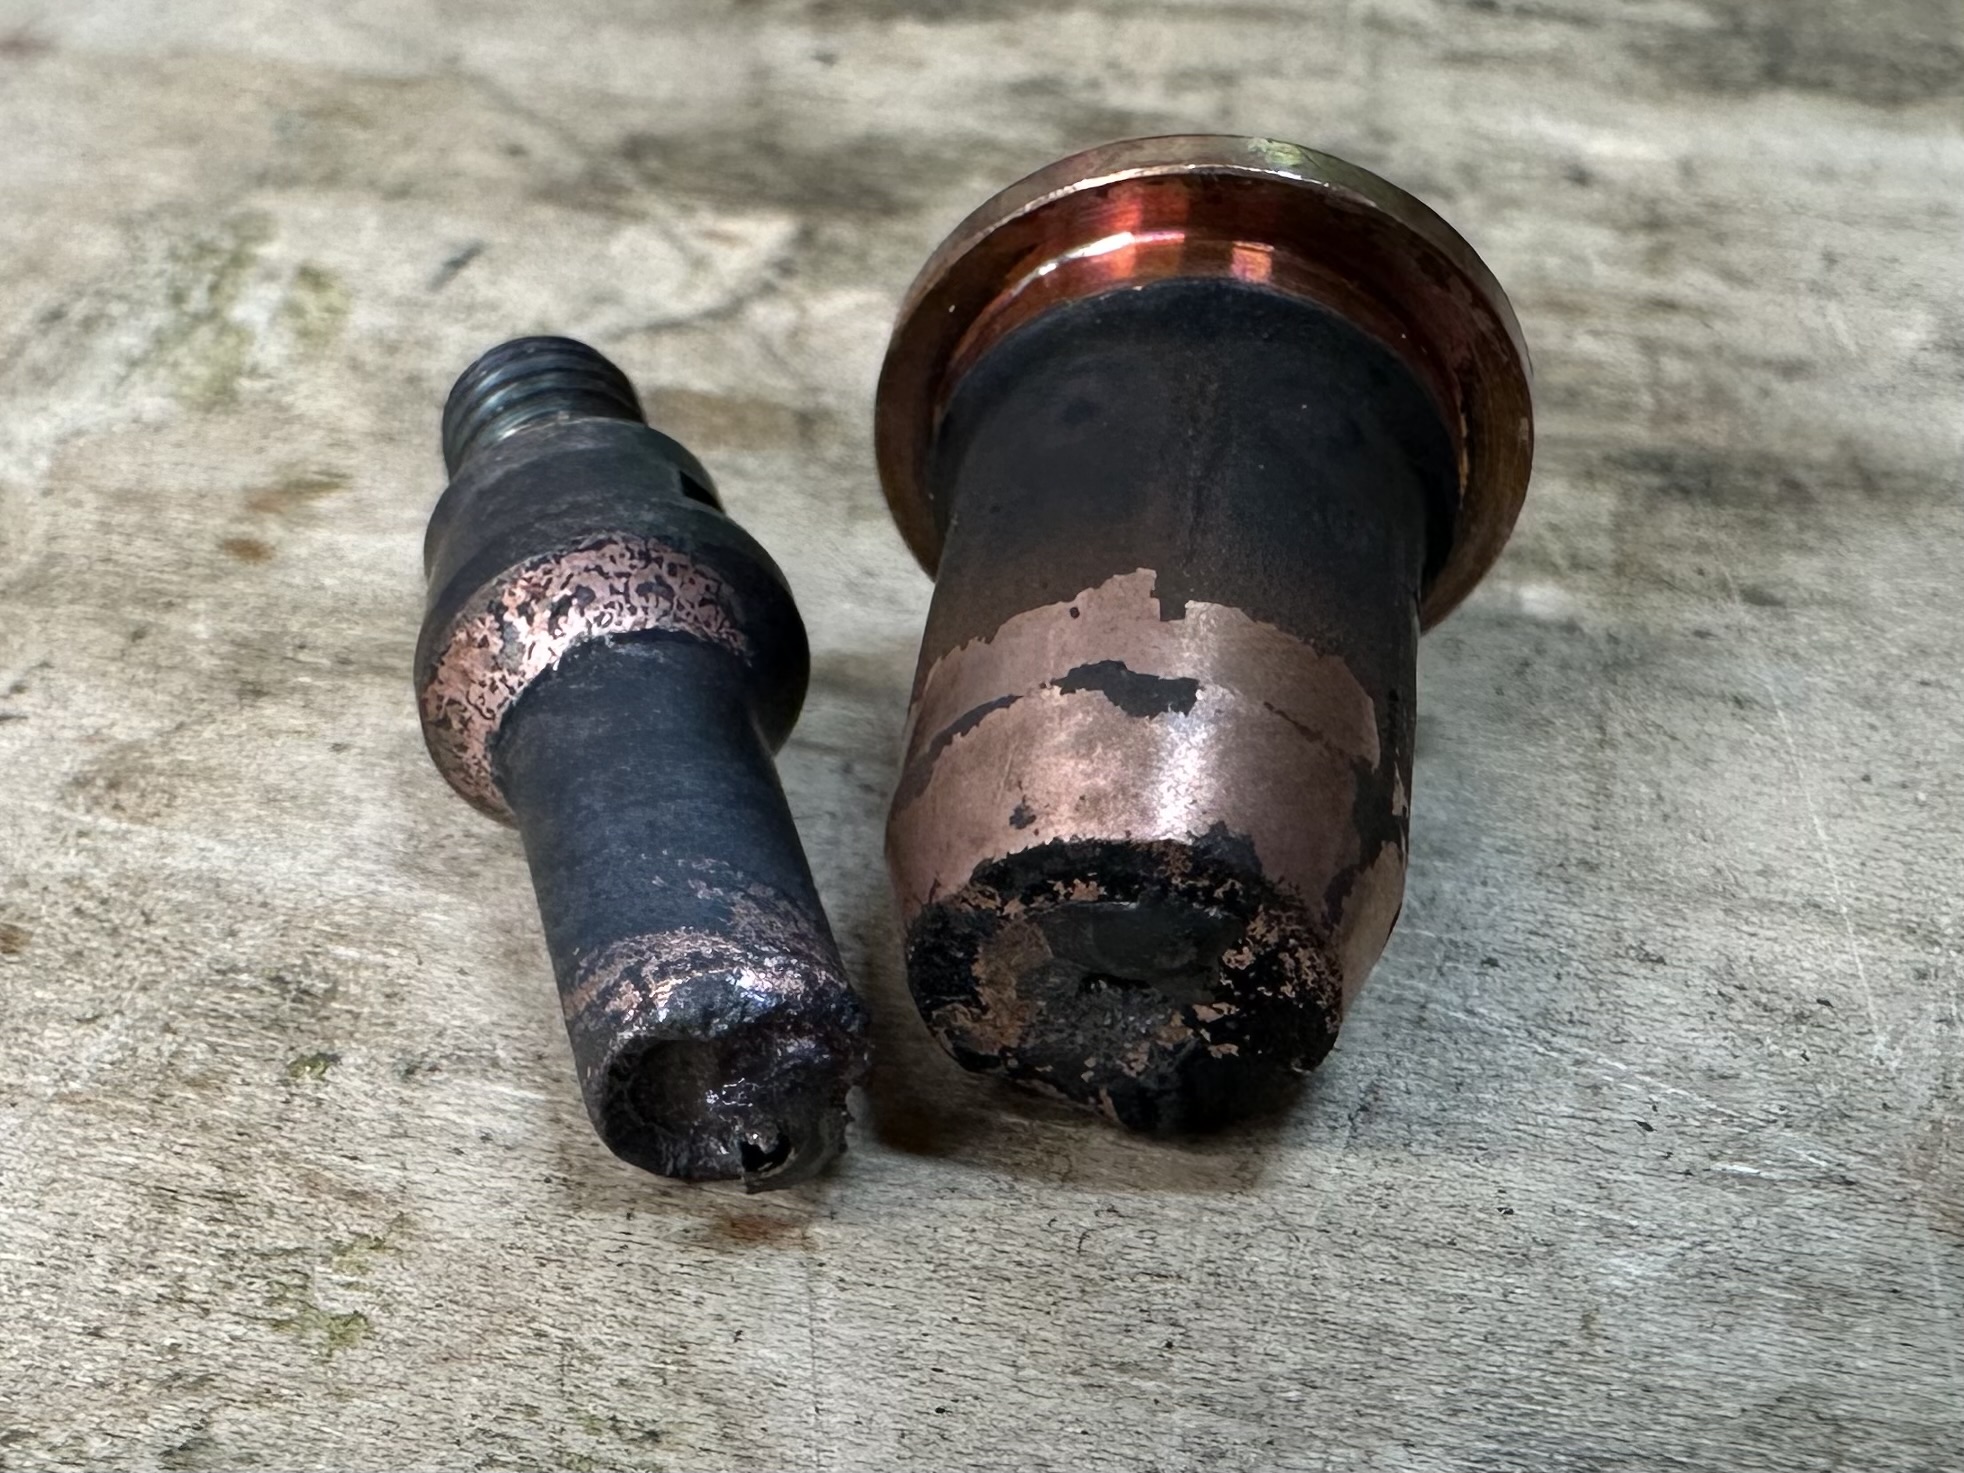
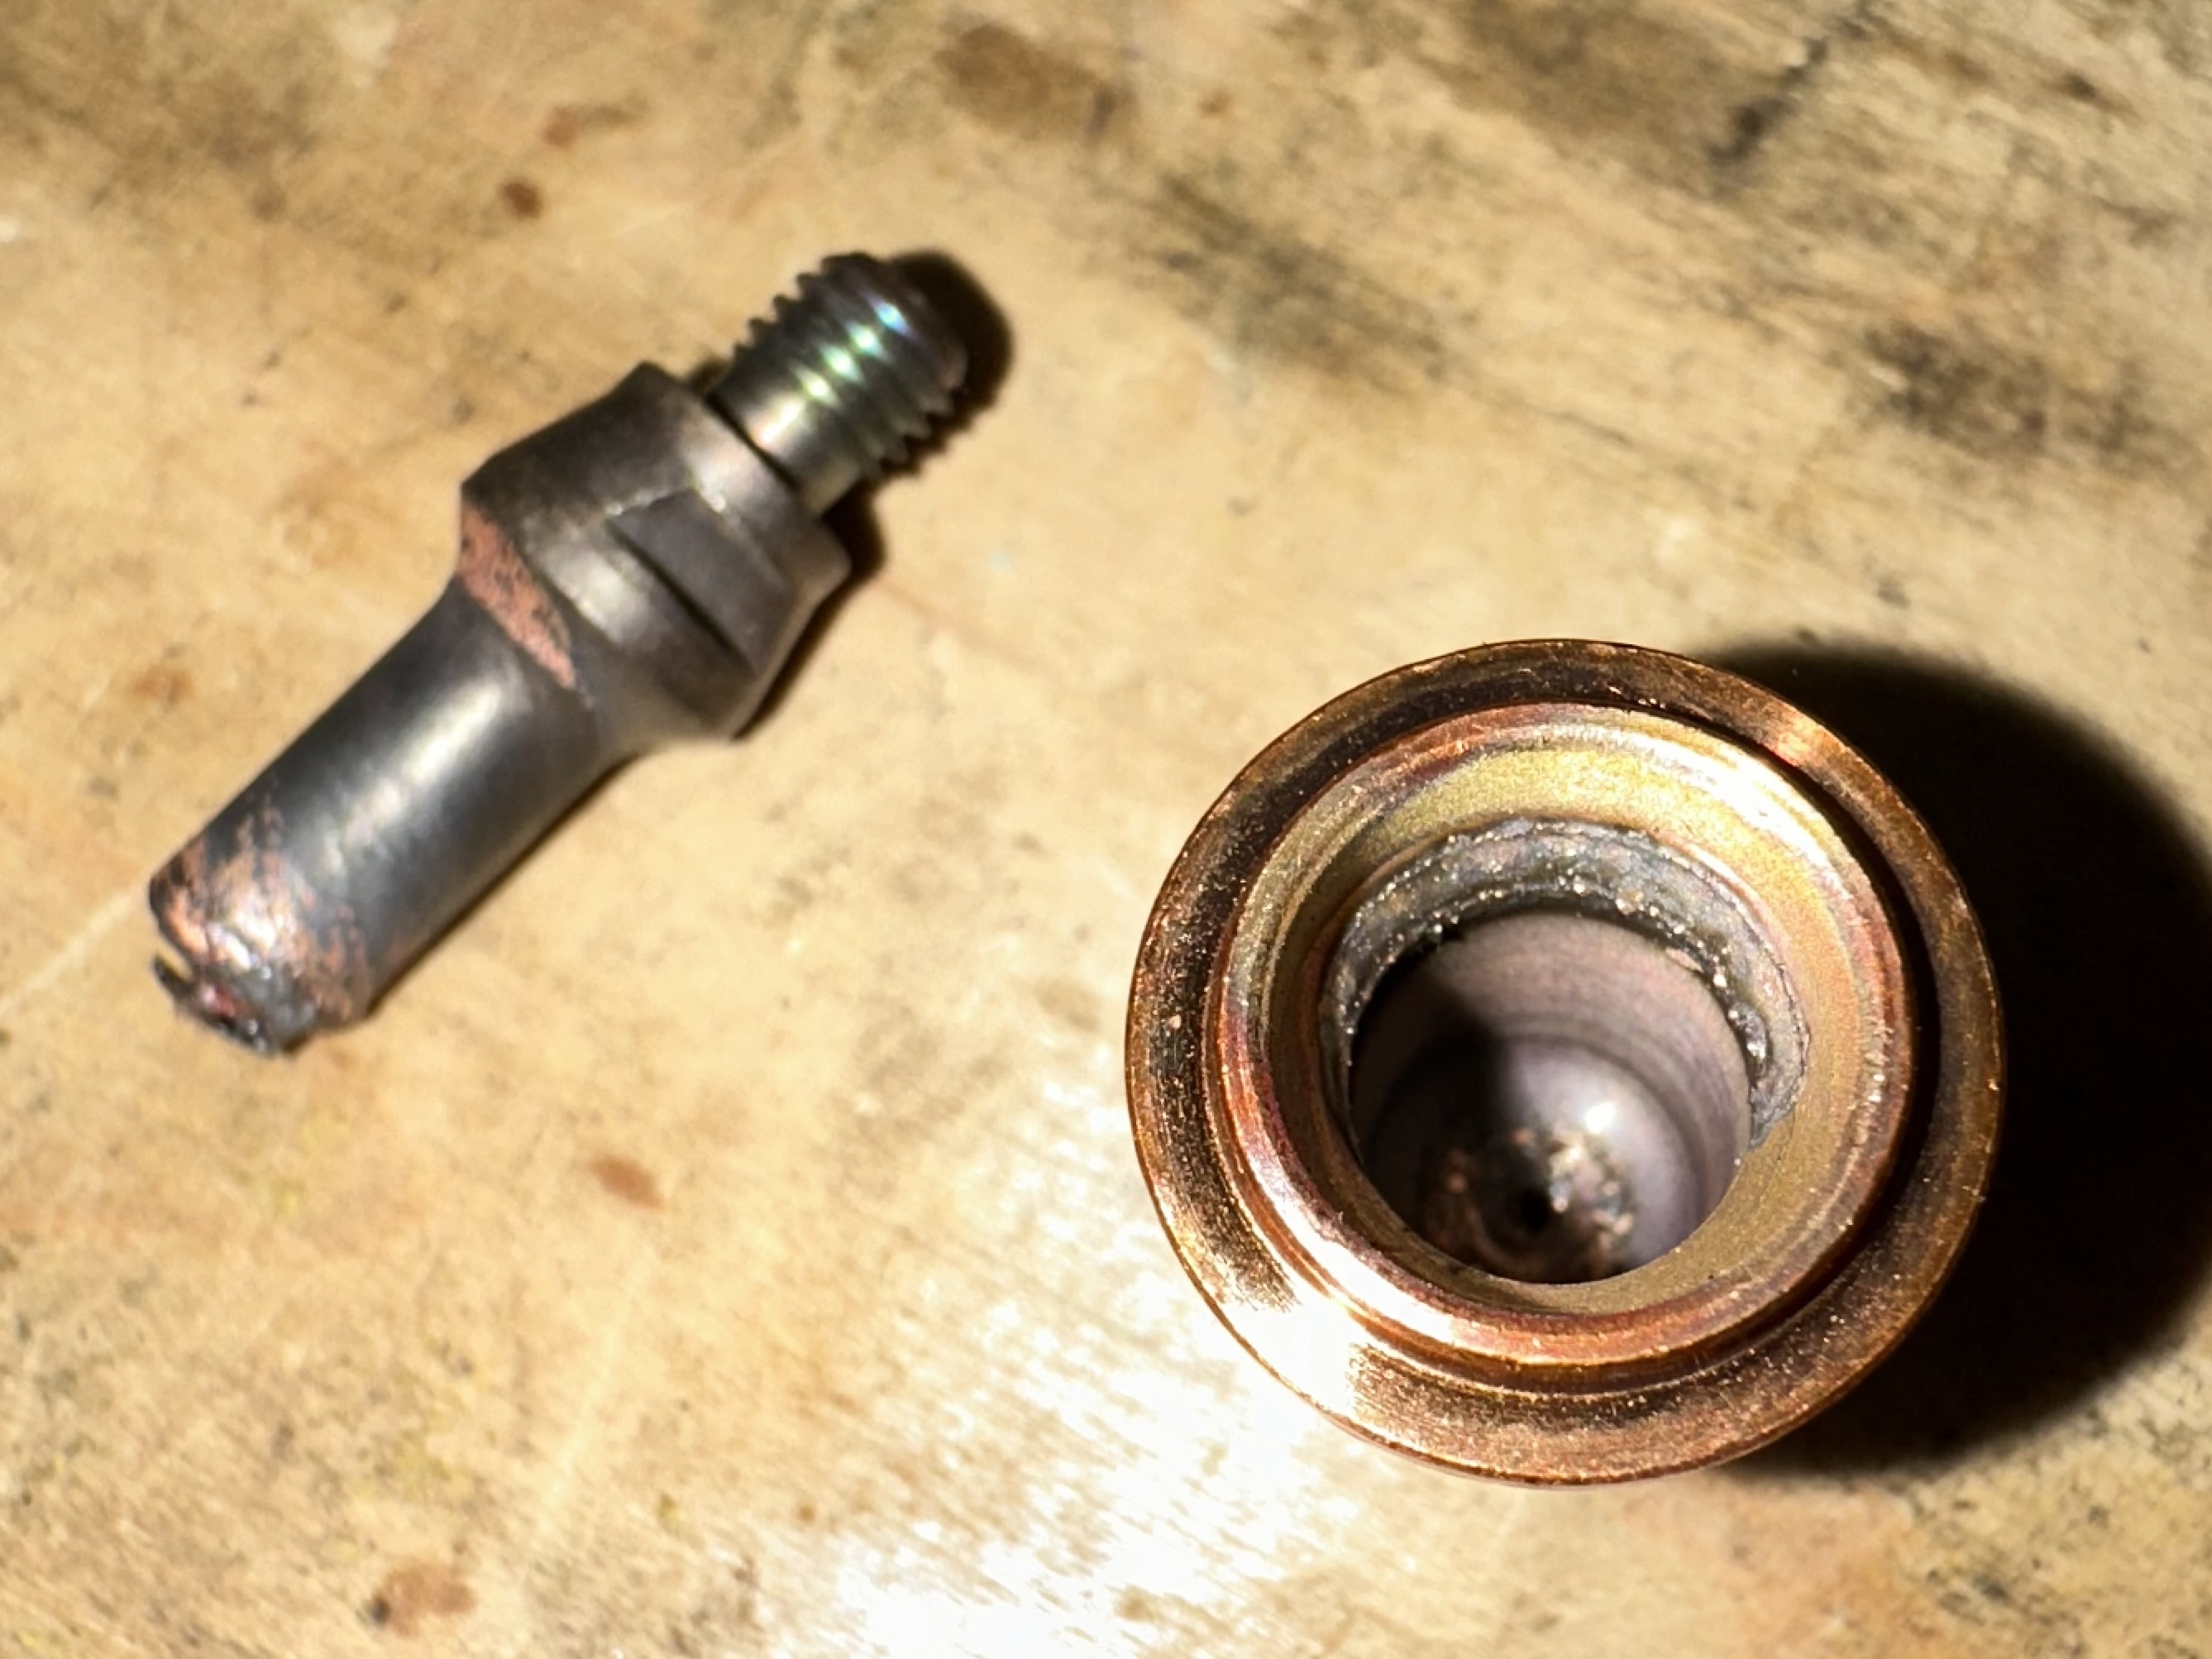
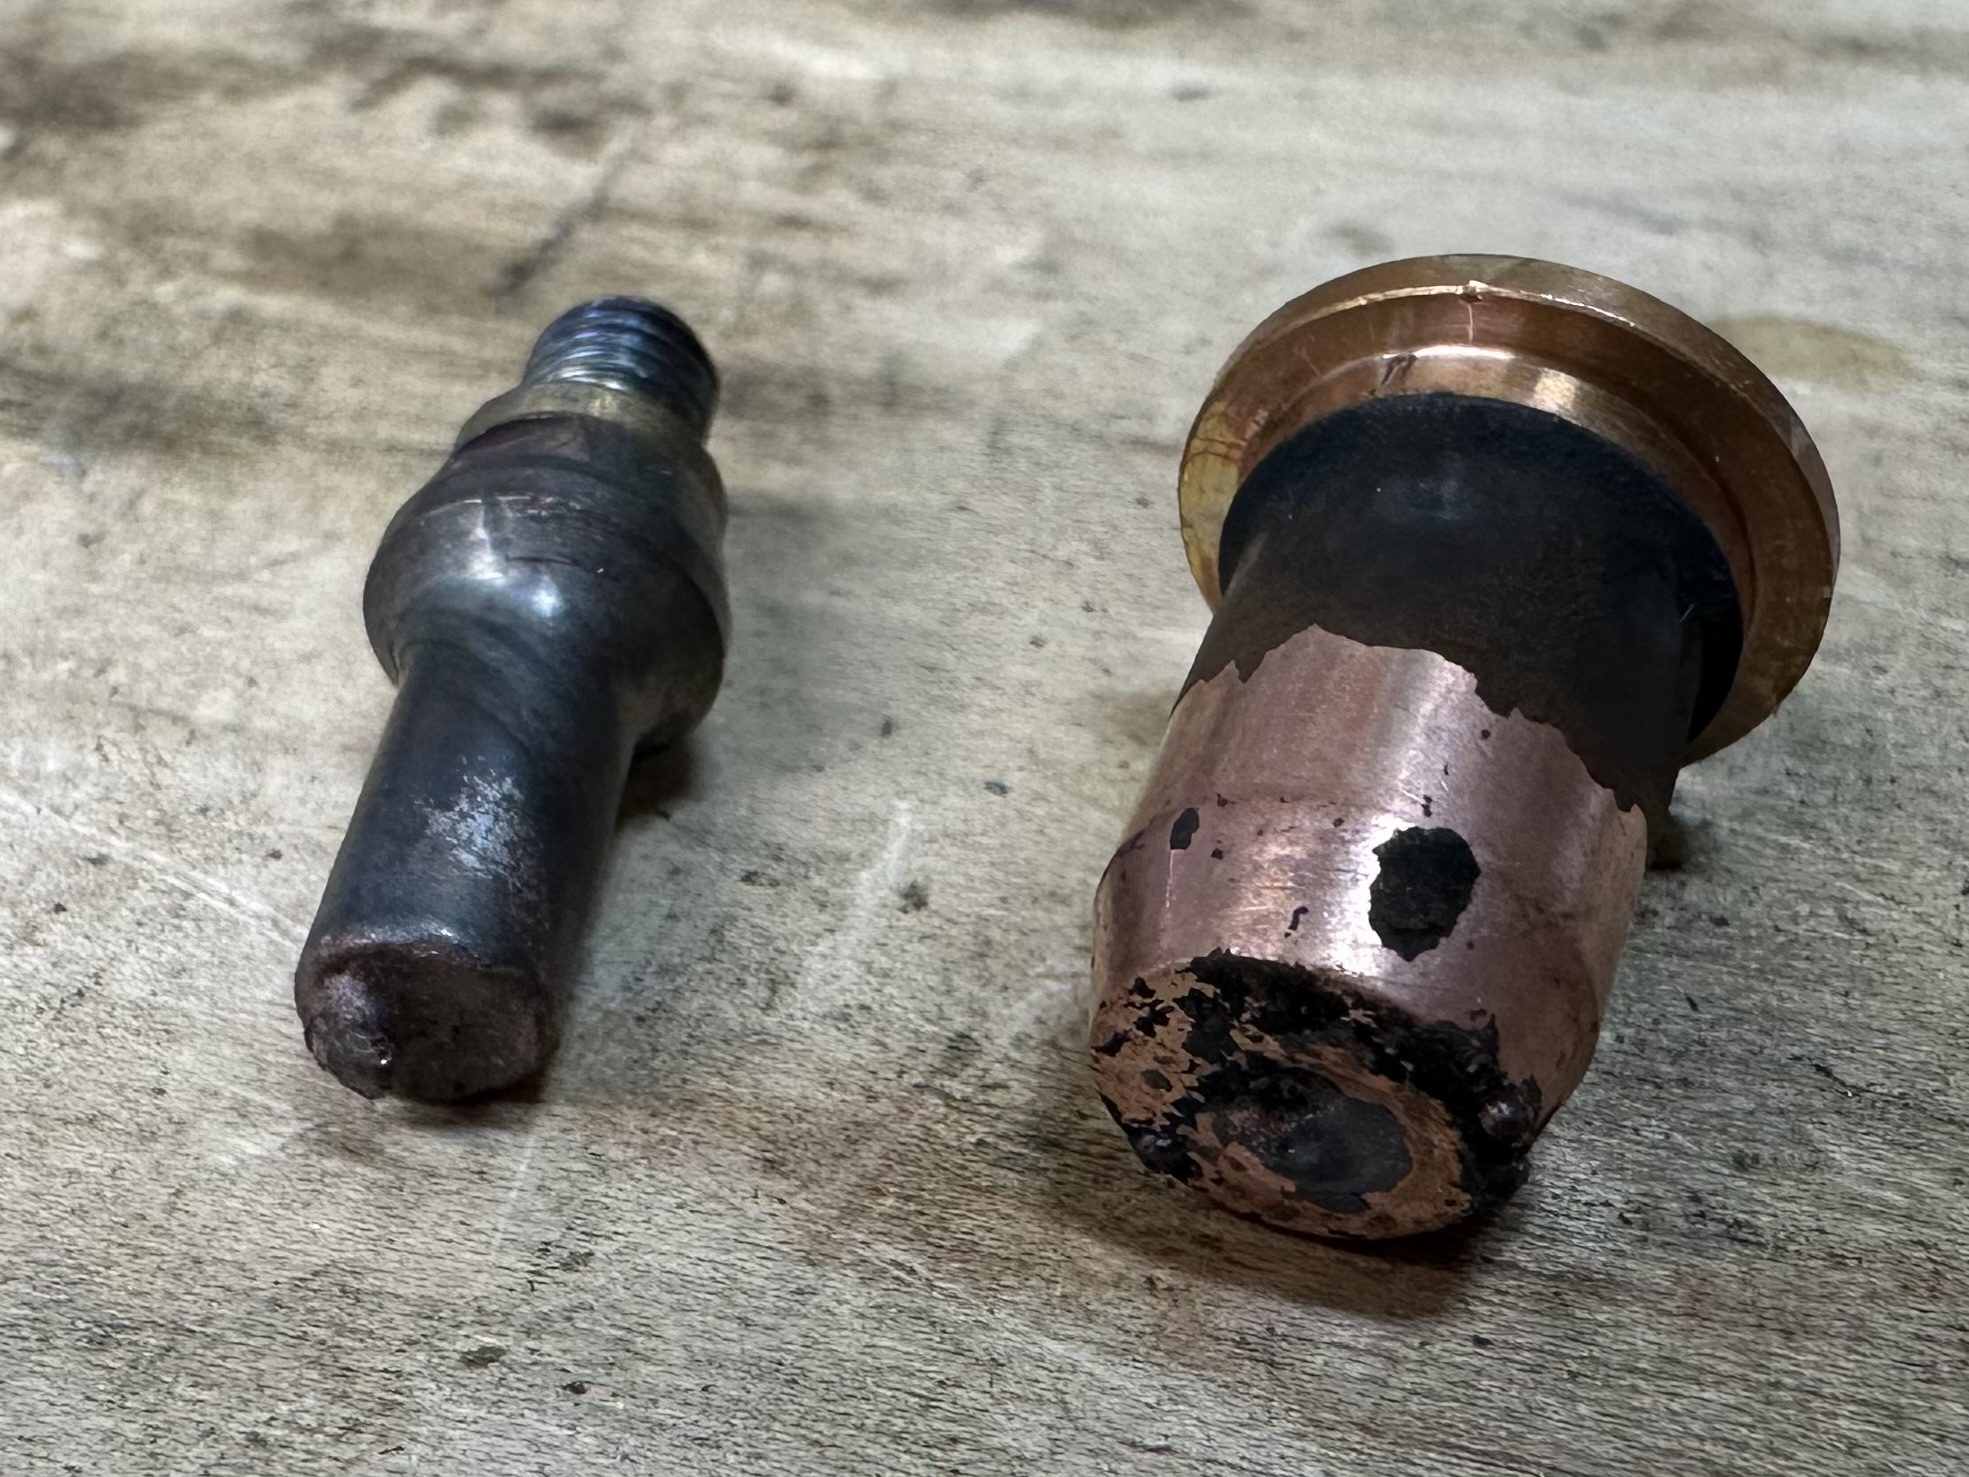
Long story short, I got a great deal on 1.1mm IPT consumables, so, that’s what I run no matter what material thickness I’m cutting, and I set up my cut chart similarly to the way Hypertherm does it on the 45XP, so I run on 45A and 70 psi no matter what I’m cutting; on the thinner stuff I just speed up the torch. So maybe (probably) that’s what’s biting me…

The machine cuts flawlessly on 10ga, which I want to say is “about right” for 45 amps on the 62i. I run 10ga at 100ipm.

And it cuts nice on 16ga, too, but I get inconsistent piercing (I think). I’m cutting 16ga at 160ipm. I’ve dialed in nominal voltage, and kerf settings, and I’ve upped the Z-speed factor to 15% which deals with any warping easily. I set overrun to 0.050”, use smoothing, and slow down to 60% speed on tight geometry.

What I’m running into is that about half of the geometry will cut clean and fall into the water table, and most of the other half will still be connected by thin little slivers and dross near the pierce, but those wiggle out with minimal effort. But then there will be a few pieces that are still pretty well attached; like, almost a 1/4” of cut length where there’s still 50% of the material thickness holding the piece to the parent metal, and these few pieces just take a ton of time to clean up.

I’ve messed with increasing pierce delay from 0.2 seconds up to 0.4 seconds (which is what I use on 10ga), and I haven’t seen any improvement from that. I have the most trouble when the pierce is located on long straight sections, which seems counterintuitive to me, but even that’s not very consistent. I’m using some lead in and no lead out. It’s basically like the torch starts moving before the pierce is complete on roughly 1 out of 10 features, and with no rhyme or reason as to why.

And I don’t know what else to say. It’s very inconsistent, and seems to be less of an issue on thicker material cut at the same amperage.

Anyway, I’m getting ready to do a batch of these signs, and if I can save 20 minutes of fiddling with the handful of stuck pieces per sign, I’m gonna owe one of you a beer.

I’d just keep banging my head against the wall, but I need to come say hi to you guys once in a while, anyway, you know!? :grinning:

Hope everybody is well!

Thanks!

-Casey

3 Likes

I would add a lead out it might get that last little bit… can you slow your lead in speed down?

2 Likes

First make sure your cut height is .060" no more. Next get some 1.0mm/50 amp tips, 1.1mm/60 amp tips are a little large for 45 amps. Also make sure your work clamp is on the metal not the table or slats.

2 Likes

I’m trying to get you my cut chart but it won’t let me load it. Sorry Casey.

1 Like

This cut chart should get you closer to what you need. The Hypertherm chart for 45 amp will give you higher values because the Hypertherm plasma cutter put out more cutting watts at 45 amps then a Everlast 62i will at 45 amps.

4 Likes

Thanks George, thats what I was trying to upload. Got a new phone and it scrabled up all my files.
That is the one that I use Casey. It is almost right on for a Everlast.

2 Likes

I use 50 amp tips for almost everything 1/4 and under. I do not care about kerf width in my plasma world. Anything over that I use a 70 amp tip. I realize that your machine probably has a 60 series torch.

1 Like

Yeah, if anything my cut height is a little closer to 0.055”. That’s what I’m getting at 83v nominal, and at 84v I was closer to like 0.070”. Clamp on the work.

Do you care to make a guess as to why the 60A tip is working well on 1/8” at 45A and I’m only having this issue on thinner material? I feel like it’s got to be the metal moving (warping) as I’m cutting and the THC isn’t compensating fast enough. And it really only does it when my pierce is on a straight section.

PS-I’m not using Hypertherm’s chart. I actually used the chart you posted, and snuck up on my 160ipm speed by raising the amperage and torch speed gradually from that 30A/110ipm baseline listed for 16ga. I use the Hypertherm chart as a sanity check. I want to say my speeds are about 80% of the Hypertherm speeds.

It is an IPT60, and I got a 100 pack of 1.1’s back before I knew what I was doing.

PS-I still don’t know what I’m doing. :rofl:

I’m just glad you cutting. I believe that your thread is still the record.:joy:

3 Likes

Yeah, that’s a thought Phillip, but I’ve already got a 0.050” finishing overlap…and like I said, it’s the inconsistency that’s driving me nuts. The more I think about it. It’s definitely only where my pierce is on a straight section, but it’s not everywhere my pierce is on a straight section…

1 Like

Thanks John. Yeah, that was a dussey for sure. Hey, with this batch of signs I’ll have officially paid for this thing. Now I just gotta pay myself back for all the trouble-shooting I went through to get here.

1 Like

Can somebody answer this for me? On thin material, as you’re approaching the end of a cut, so that the arc is no longer surrounded by material, does cut voltage go up or down? It would go up, right, because resistance goes up? I wonder if my fast z factor on the THC is causing the torch to pull up towards the end of the cut.

I’ve found that every time there’s been an inconsistent result on this machine, THC is usually the culprit.

Thinner metal needs less amps. A 1.1mm/60 amp tip has a .045" orifice hole cutting a wider line. A 1.0mm/50 amp tip has a .040" orifice cutting a thinner line. I would be cutting at 40 amps with a 0.9mm/40 amp tip with a .035" orifice at 70 psi for most of the thickness metal you seem to be cutting.

I don’t under stand the 45 amp thing that I see on here a lot when you do not need that many amps to do the job at hand. Yes if you had a plasma cutter like the Razorweld that is a 45 amp unit using a 45/50 amp tip as that is the only option you have other then a 30 amp fine cut. But when you have the cutting tip size options like the Everlast 62i with a IPT60 torch does, you would not use them to get the best cuts possible.

And yes the voltage would go up because the gap between the metal and the torch is getting larger as the metal is being eaten a way by the plasma flame.

3 Likes

@mechanic416

Yeah, it’s probably a misguided approach, though the higher cutting speeds are nice.

Thanks for explaining the voltage/resistance thing. I think that’s what’s happening on those long straight sections that aren’t cutting free of the parent metal; THC is raising the torch towards the end of the cut. Maybe I’ll try one at 82V nominal and see if it makes any difference with the torch a few thou closer.

1 Like

@CrazyCasey Also check if the connections in the circuit are tight. Your ground connection at your machine plug and at the clamp. Also the connections throughout the VIM circuit. A loose connection will add resistance to the circuit.

1 Like

@TinWhisperer

Yeah, that stuff is all very tight and tidy. Trust me! :rofl:

Ok, so, I solved my issue, and got my signs cutting cleanly, but I was hoping to pick the collective brain about consumable wear.

I don’t have, nor do I intend to purchase or build an expensive air drying system; my “crude” setup is a water trap, followed by 50’ of Maxline (the blue plastic/aluminum multi layer stuff), into a 3 stage Motorguard water trap, coalescing filter, and desiccant dryer setup. I live in the high desert. I never get any actual water in anything but my primary trap, and my desiccant beads take a long time to even start to turn purple (I’ve let them go up to a year without turning pink).

This project had just under 1,200 pierces. I thought I heard that a good setup will live upwards of 500 pierces, so I guess my setup isn’t good.

These are the consumables sold by Primeweld. I believe they are marketed as “genuine” Tecmo, but I believe that claim is somewhat refuted.

Please have a look, and let me know what you think.

#1 Failure @ ~300 pierces:

#2 Failure @ ~300 pierces:

#3 Still Cutting Fine @ 260 pierces:

#4 End of Project @ 240 pierces:

PS, the cutting issue was solved by slowing down the cut speed slightly. I’m an idiot and misread my own cutting chart. I had the speed set to 180ipm. I dropped it to 160ipm, and everything worked like a charm.

3 Likes

Casey, those are some really ugly consumables. Remember that they are cheaper than a sheet of metal. I am just saying, my friend.

1 Like