I made the suggestion because these switches are designed to be your squaring and hopefully return to the same zero after a home. Besides switch damage the 100ish pound impact would likely move your set adjustment and throw off the squareness or zero. You shouldnt need to make stops just adjust the limit switch trigger on the spindle mount for x and gantry for y and place the switch far enough out side that the machine bottoms out on the ballscrew mounts. Re watch langmuirs limit switch setup video and they talk about it.
Well, got my new switches installed finally. Oh what a difference. Lowes and home depot of course did not have any 1/4-20 cap head screws the right length so had to order online. But it is functional for now.
Can you explain how you wired it up. I noticed the same thing you did about 3 of the 4 black wires being tied together. I can either get y1, x and z or y1, y2 and x to work but not all 4 at the same time unless I am using the original switch for the z.
I finally got around to installing the limit switches you guys suggested on the Y axis last week, and it’s been super nice having the machine home out and repeat squareness so well. I will be doing the X axis in another week or so, and possibly finding a way to mount one for the Z axis later down the road.
I do wonder what LS is going to offer as an upgraded option though.
We had same issue while homing machine . replace the sensors with a higher waterproof rating . This one on Amazon is IP67 rating . The mounting holes distance is same as original one , hole dia. is slightly small . I enlarge the holes with hand drill. So far it works ok for couple weeks . Here is the link on amazon.
(Amazon.com)
Is it interfering up the physical movement of the limit switch or causing issues with the electrical components of it? (I don’t have my mill yet - a couple weeks or so away) If it is the latter, something like this would waterproof the electronics if you don’t want to purchase different limit switches:
They will be fine just don’t spray coolant all over them. I added a garden-type spray nozzle to the pump system. I truly believe that spraying the chips down with the original coolant made them fail.
I would order some Fusion 2240 coolant in lew of the supplied type. Any questions about it just search Fusion 2240. Not in any way related to the Fusion 360 Cad/Cam program.
Just follow the directions when you assemble it. Check everything 3 or 4 times before you pour the cement. By the way welcome to the club forum or whatever. We are all here to help.
Ordered a set of these limit switches. Thank you community members for the support in this.
I’m contemplating starting a “Community Notes - Modifications for MR-1” spreadsheet. From what I gather this seems to be almost a “Mandatory” mod for the expected longevity of the machine. The limit switches that come with the MR1 are the same part number as what the cheapest Ender 3 3D printer has come with for the last 10 years.
You won’t regret that purchase. It is a bit of a pain to rig them up, though. I have not had a single problem since. Now, I did leave the Z switch alone.
$200 worth of messed up material due to a limit switch giving unreliable homing - man math tells me that the switches have already paid for themselves.
Any chance you want to share the limit switch bracket .Step file? I had skipped a step on a 5hr program lastnight and I’ve about lost my mind. Ready to make the change to these switches.
Z Precision Limit switch issue?
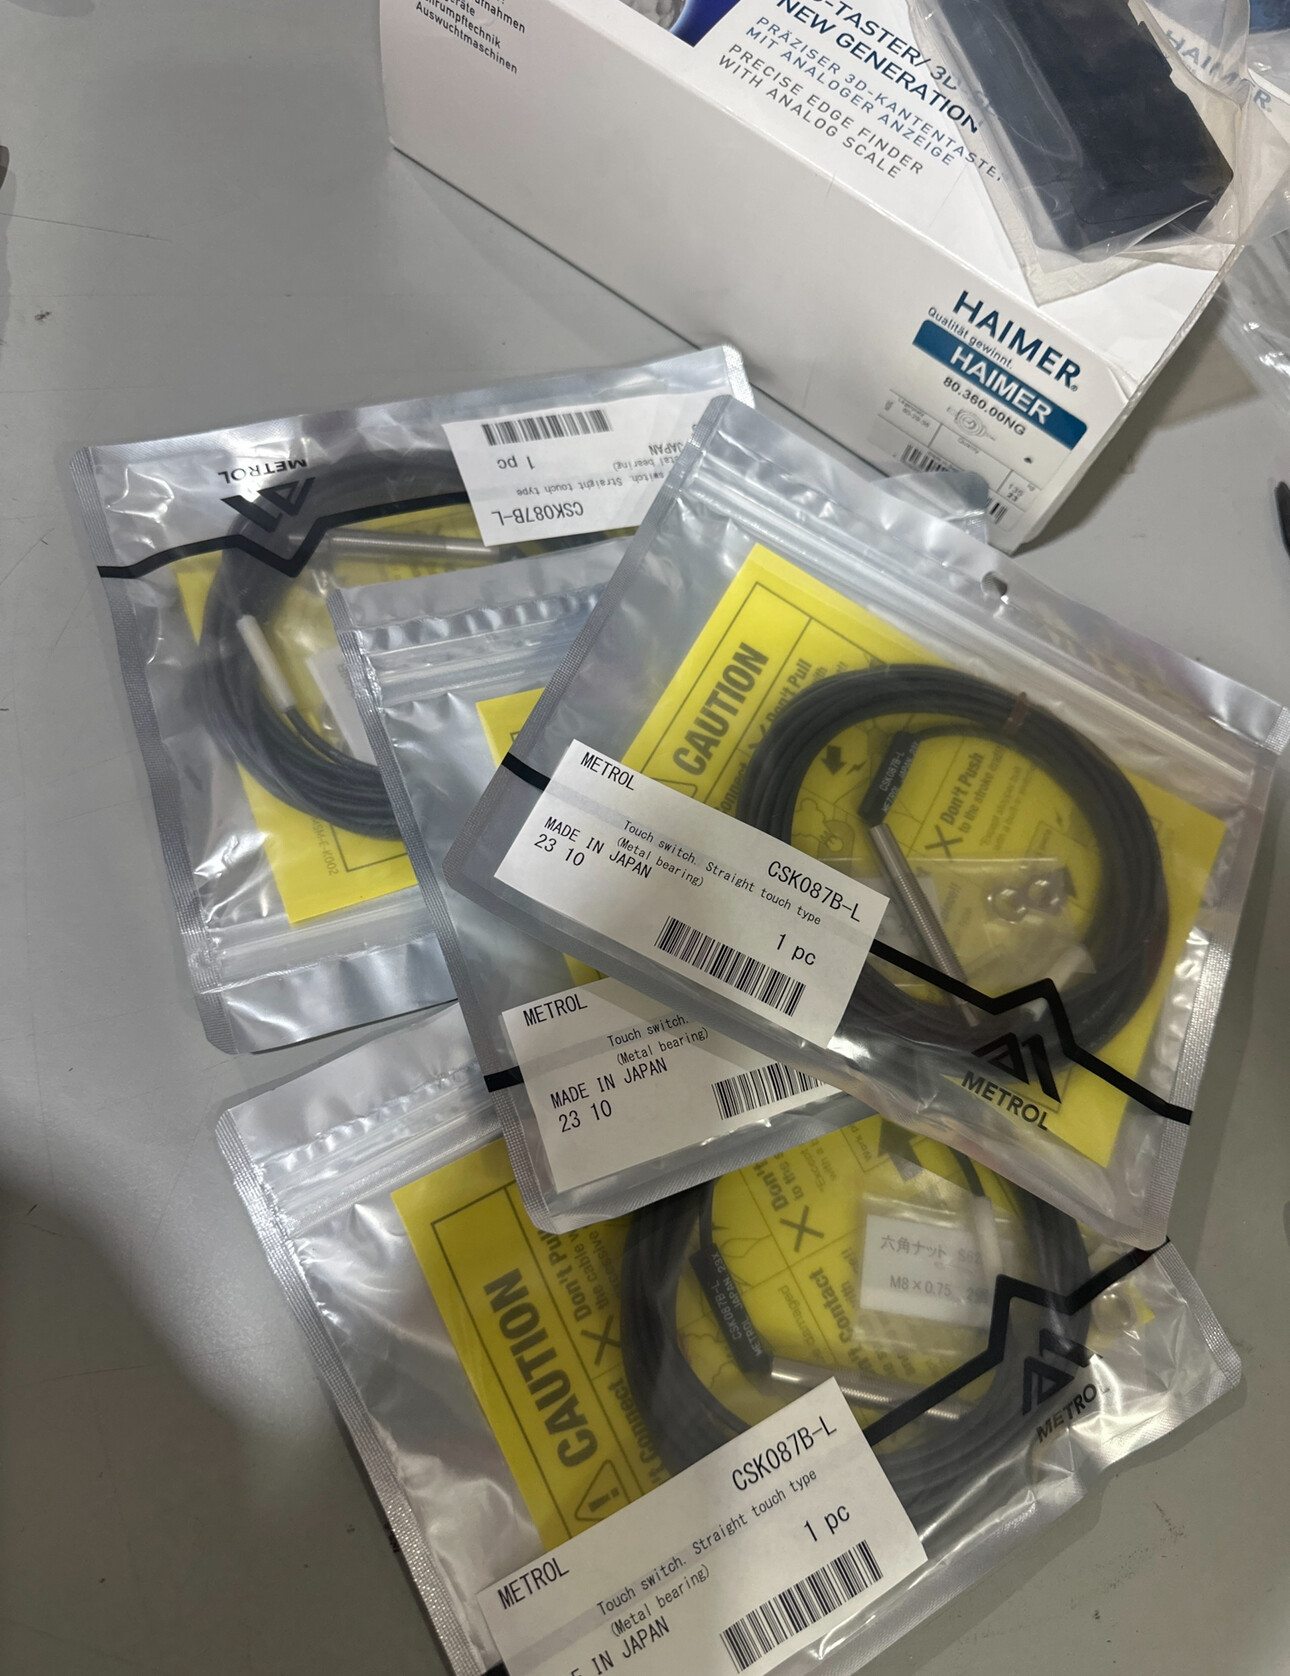
This is one for the electronics experts. Some time ago I upgraded the X&Y limit switches. A big improvement. Recently I decided to upgrade the Z limit switch. I get an error indicating an “open switch condition”. I thought that it might be due to the load from the LED and located the same switch minus the LED. I get the same error message. I have reverted back to the original Z limit switch for now. Any insight would be appreciated.
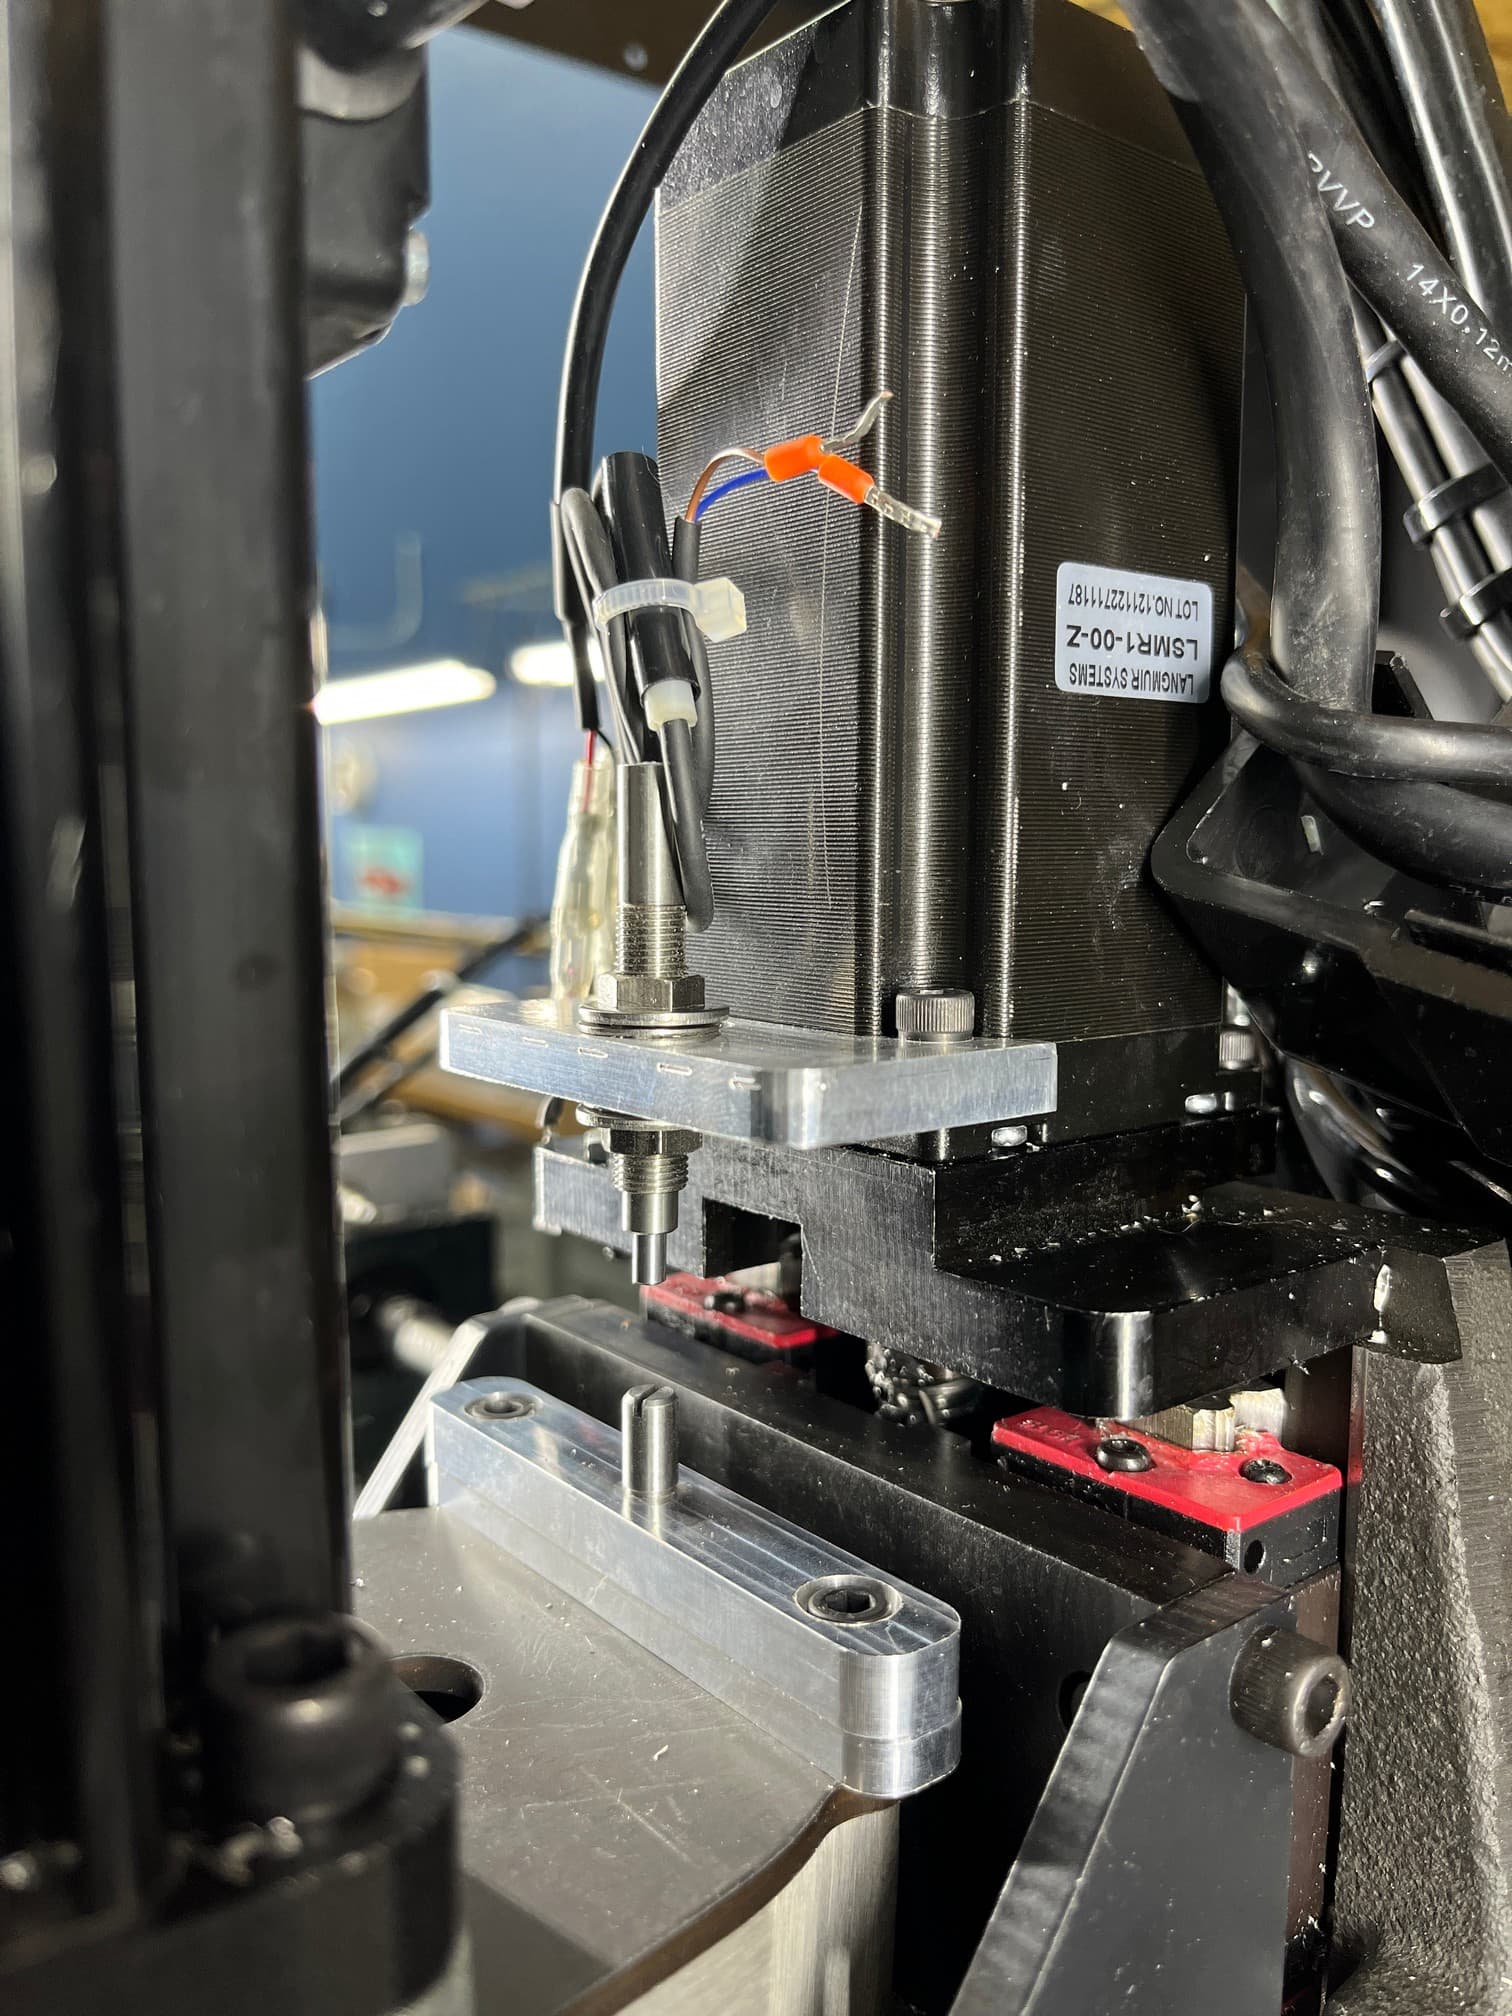
Also. A few photos of how I mounted my limit switches. And a Step file of the Z limit switch mount. I decided to use a small pin contact point for the Z-Axis. I found that chips can sometimes make their way onto the flat surface of the spindle mount. I figured this would reduce the likely hood of the switch coming in contact with a random chip.
Very nice job. I never updated the Z switch on my machine. It will be interesting to find out what you find.
It looked like a pain to get done, and I had several projects at the time. Now, when I get in every morning, I sit and stare at it from my desk. Love your brackets.
Maybe a case of overthinking this on my part. Yes the precision limit switch on the Z axis would be nice but is it really necessary? As you noted the X&Y axis limit switches are exposed and prone to interference. They also use a flexible arm to trigger the mechanical switch component. On the Z axis the lever arm is discarded and the machine makes direct contact with the switch mechanism. For this machine that is probably more than sufficient.
The bigger issue seems to be the inconsistency related to the probe that others have also experienced. You can see it in the mount that has the contact pin.