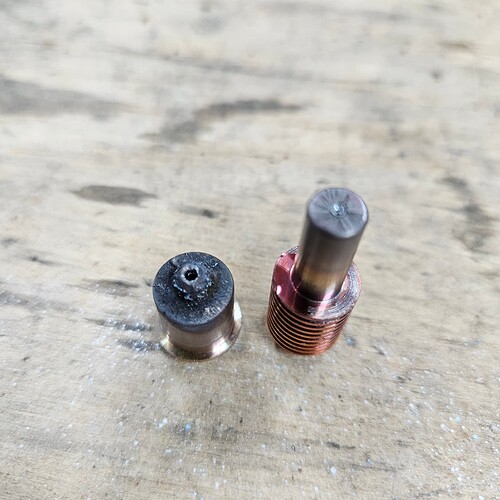
So I’ve had about 7-8 months cutting here and there on my new table. Just pulled the consumables from the torch. Mostly cut 12, 16, and 18 ga mild steel, a little 3/8 and a little 3/16, too. Computer says 504 pierces and 39 min of run time(sure feels like way more! ). These still good?
Nozzle looks shot. Hard to tell from the picture, but the electrode probably has some more life in it. The black swirls indicate moisture in the air supply.
That nozzle has been begging to be replaced.
Bad nozzle will lead to an inconsistent flame causing bad cut quality and beveling even.
The cutting tip needs to be replaced if you plan on doing any fine work. If your going to replace the tip, replace the electrode as well. Don’t throw them out you can use them for brackets and stuff that does not need to be clean cuts.
Just my two cents here. I would never risk a $200 sheet of whatever on a set of consumables like that. Sheet of steel vs $10 consumable.
Just my opinion.
May I ask how/where you find this information?
Enquiring minds would like to know. ![]()
Bottom right of FireControl
Thank you sir!
Thanks everybody. I came to this same conclusion this afternoon as I was getting exponentially, progressively poor cuts and running out of metal. The scrap pile is much bigger now, lol.
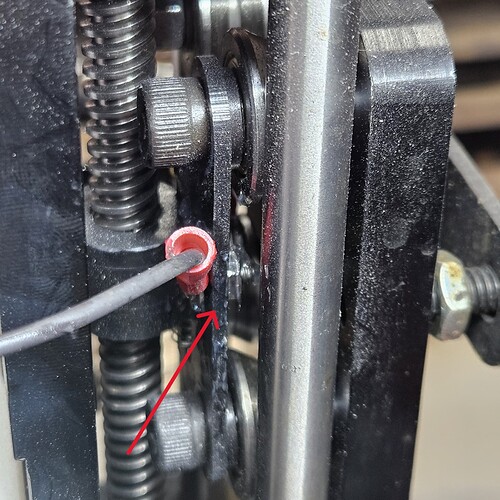
Also had a problem with the IHS ground coming loose from the little #8 machine screw and nut where the ring terminal attaches. Here’s a pic
Unfortunately, there’s no easy way to get to it without dismantling the Z carriage. Or maybe I’m missing something easy? Did my best to tighten it with my finger and tiny pliers and dialectic grease.
Might as well ask one last question: why does the slag not come off so easy on corners? Running a wire wheel down an edge flings it off no problem, but sometimes the slag on corners kind of folds down, and then the wire wheel just seems to burnish it. But it doesn’t take it off. Is this a bc of some variable I’m not controlling well, or is it just part plasma cutting?
I know any water is bad water, but can you also tell how wet the air is by looking at it? For instance, does it look like I have a little water or a lot? Or does it not work like that?
Super easy to disassemble -
And do you mean dross? Going around corners your feedrate will naturally slow down a tad, and you’ll have a tad more heat soak. Just look at the shape you cut and you’ll see what I mean.
But dross can be minimized if you dial in your setup. If you skip this step, you could be missing out on cleaner cut quality without realizing it.
Swirls/streaks on your consumables, you can tell you have moisture in your air.
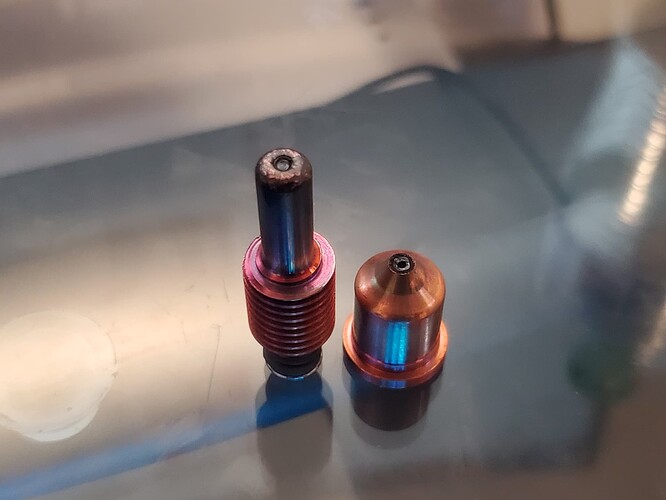
Here’s about 1,000 pierces on my set.
Yea, it was time to change them.
As KwikFab states, you want to really work on your cut quality in general. I found for me, it was finally fine tuning the actual cut height so that it was actually at 0.06 inches when I created my gcode. “0.06” was not even close to giving me that at the table.
If everything is perfect (cut height, speed, consumables, air supply, dry air) you should only be getting some ocasional dross that flicks or falls off easily with some perterbation on straight cuts and some extra dross in sharp corners and small curves/holes. It is likely you have set you gcode to slow down on quick changes of direction/small radiuses. If you don’t slow down then the plasma stream cannot keep up with the cut and you will get a major increase of bevel. If you slow down, you will have more dross.
You have to determine for yourself: will the bevel be a detriment with your part? Or will the extra dross that needs extra attention be the more desirable course?
My conclusion: If I am doing brackets and need the best possible holes cut then I will opt to have more dross to limit the bevel. If I am doing an artsy project, I might put up with more bevel for fear the the methods to remove dross may damage the piece.
Yes, I meant dross, sorry. Thanks for the vid! I’ll add this to the ever-growing list of things to do.
@ChelanJim, just re-read this post. Great info, thanks! Saw another thread you posted to a little over a year ago: Pro feeds and amperage
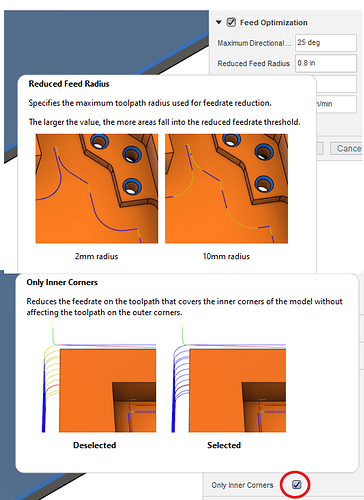
Is there “feed optimization” for the Crossfire? If so, is it in Fusion or FireControl?
Also. Razorweld sent me their cut sheet for the RazorCut45. For mild steel their speed is over 300 ipm for anything thinner than 16 ga. I just read that the Crossfire has a max speed of 300 imp.
Does that mean that when I’ve been cutting 18 ga at the RW recommended 45A//365 ipm, it hasn’t been going that fast? (Assuming there’s a place on FireControl where I can see live speed, which I intend to look at next time.)
Also, their pierce delays are super short, 0.0 for anything under 16 ga. In the thread I just referenced, @Simsworx stated a .5 sec pierce delay for 18 ga. Should I be bumping it up from the .001 sec I have it set at in my Fusion tool library?
And for a totally unrelated quesion, why do my pieces always stay attached? Assuming this has something to do with my lead in and (lack of) lead out? (or maybe pierce delay time, too?)
Sorry for all the questions.
The max speed for the Pro table is 300 IPM, so it won’t be going 365 IPM.
Yes, there is a place to see the torch speed in Firecontrol.
Langmuir has documentation that advises a minimum pierce delay of .5 seconds, regardless of the plasma manufacturers recommendations. This is due to the fact that Langmuir does not use an “OK to move” signal from the plasma cutter. Hypertherm and (apparently) Razorweld determine their pierce delays based on feedback from the cutter that the torch has fired and voltage is being read. Langmuir calculates the delay from the time that the signal to fire the torch is sent to the plasma cutter. That requires more time for the signal to the reach the machine and fire the torch.
Your pieces are probably still attached because your pierce delay is too short and the torch starts moving before piercing the material.
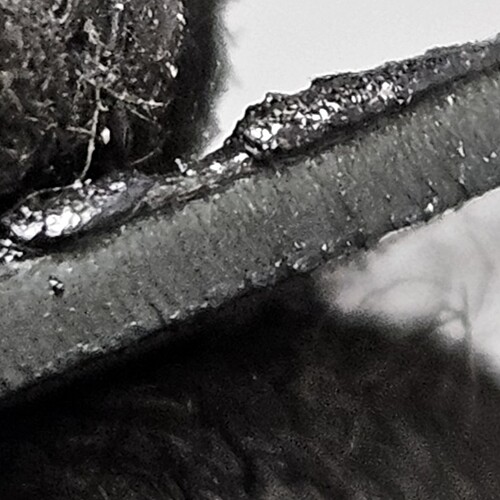
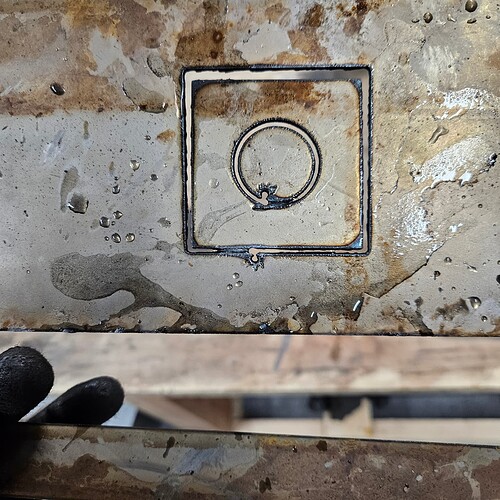
Just did a test coupon for 40A/200ipm for the 18 ga CRS. Here’s the edge, looks pretty good to me, (not that I’m an expert…)
Dross came off no problem.
I also upped the pierce time delay to .5 sec, and I still got the following.
Guess i should pierce longer?
That is in the toolpath in Fusion Manufacturing:
Now notice that by default Fusion will set this speed to 25% of your cut speed. That is way too slow. You want to set it to about 60% of your cut speed. You can insert your own formula or modify their 25% rule to be 60%. Then save it as your default and you never have to worry about it again.
That topside dross is indicating that your torch is too high or your speed is too fast or the nozzle/electrode needs to be replaced. In either case the torch is going to struggle to fully cut the metal. Make sure to check your actual cut height.
No comment from me on the pierce delay. David’s input is spot on.
Been messing around with the settings, and I’m still getting the same results.
First, checked torch height: it’s spot on at the thin shim. Tried moving the springback from .001" to 0", and the shim wouldn’t fit, so I put that back to .001"
Second, changed lead in speed to 80% of cut speed (200 for 18 ga at 40A).
Lead in radius is .063", 45 degree angle, with .1" distance.
I’m still getting the same as the pic above. Clear piereced hole, then it sweeps to the cut path and the first .25" or so doesn’t cut, then the rest of it cuts fine. This happens on both the inside cut and the outside cut. Pieces stay attached to the sheet.
Not sure why it’s piercing, cutting through the lead in, then not cutting for .25", then cutting fine the rest of the way.
