Why do I keep getting half cut or partially cut circles and bad pierces???
Primeweld cut 60 torch
130 IPM
55 PSI
45 amps
.060 shim
30 amp shielded tips
Doesn’t seem to matter where I set my torch height or speed I have the same thing it’s almost like the torches delaying too much pierce delay is
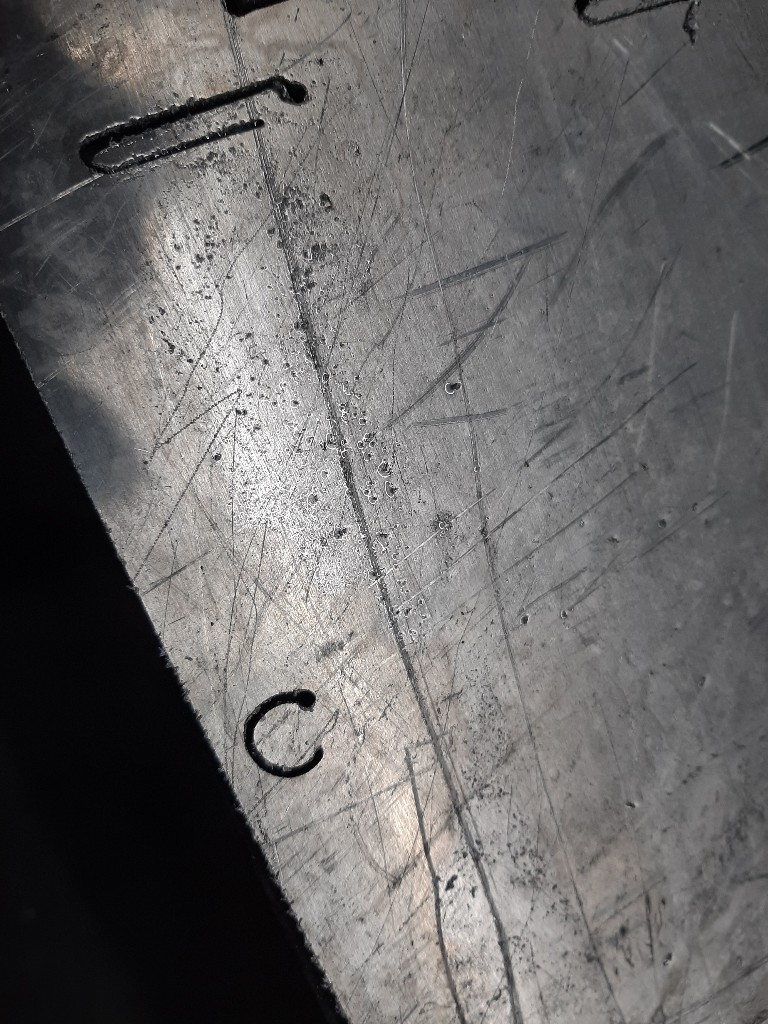
set at zero… Also getting a large booger at every Pierce on top my torch head keeps hitting on and knocking my material around on the table… Picture is bottom side of material
Search “milliseconds” in this forum and all your questions will be answered.
Spray some anti splatter welding spray on you torch tip and the slag will not stick to it and drag your piece around.
@ctgolfer
I already have Mach3 is set to milliseconds
What gauge material is this? Steel?
Is it possable your torch is not detecting the steel and shutting down? Torch too high? Does it always seems to run for the same amount of seconds and then quit?
Are you consumables and swirl ring installed correctly and tightened?
Seems like more of a delay at the start of the Pierce all the rest of the cut or cuts are fine nothing wrong with them just pierce
What is your lead-in value (doesn’t look like you’ve got a lead-out). Also what’s your pierce delay set to?
My material is ⅛" aluminum
Torch is at . 060 any lower it hits the booger left at every Pierce.
Everything tips electrodes shielded tip swirl ring are all tight and basically been. Have only been able to use this torch for test cutting. Haven’t been able to actually cut anything since I got it. Have wasted a assload of material though…
Everything is set per the Langmuir videos. Always has been cut better than this with the vipercut 30i that I used to have. Should have just kept it… At least I could make more than just scrap…
It looks like not enough pierce delay and no lead-in/lead-out defined. So you don’t get an initial cut until partway along the path when it finally pierces and then at the end you get the divot on the line because there’s no lead-out. Work on getting the pierce delay first - it should pierce and then move, not move and then pierce.
Way back up at the top you say “pierce delay is set at zero” so that’s wrong - try .5 or .8 seconds (or equivalent ms). You also have 55PSI for air - try 70-80 at the torch (not at the tank). You said you’ve using 30A shielded tips but you’ve got 45A for power - that’s also a bad idea. You’ll need 30A with 30A tips which means you’ll want to slow down.
1 Like
I will give it a try tomorrow and see thx
What should I set for lead in & lead out then?
Depends on how big the hole is. I usually start at about .12" (my kerf is about .06" so that’s 2 kerfs from the line). I also usually slope into the line vs a 90 degree straight-in lead-in because the torch starts, pierces, moves forward a bit to the line and then has to take a hard right. By using a slope 60 degrees or less, it slides into the cut line so there’s less abrupt change to the motion of the torch and a smoother transition. Same for lead-out.
If it won’t generate the toolpath, I’ll ditch the lead-out (since it should just shut off and not over burn) and if that still won’t generate, I’ll cut the lead-in to about .08 and start playing with the angle going to 90 ---- that’s the least room needed in the shape.
If I’m doing outside cuts then the lead-in/out values, distance and angles are a lot less of an issue because you’ve got a lot of room to make the cut. It’s usually just the inside cuts that take tweaking.
So, say you were cutting a hole in the middle of a part and the hole was . 4375 dia and you want it as close as possible to that dimension what would you put your settings at? Just trying to get a feel for what I need to do…
That’s a good sized hole so no issue with .12" lead-in & lead-out values plus a 60 degree angle.
What happens is the G-code will tell the torch to fire and then go up to .06" away (inside) the line so the outer edge of the kerf is on your line and you’ll get a .4375 hole. The piece that falls out will be .3175" (2 kerfs smaller). That’s approximate - my general purpose tip cuts a .06" kerf but the Hypertherm 45XP also has “fine” tips that will cut smaller (not sure how small, haven’t measured those). Larger nozzles will have a larger kerf. You should do a test cut on materials & nozzle combinations to figure out the exact kerf if it’s important to you. For me, if I want precision holes I’ll cut them slightly undersized and then chase them with a step bit in the drill press.
1 Like
Awesome thanks  will work on more tomorrow
I am thinking 55ipm with . 125 material think that would work?
Not sure - I have a Hypertherm and the speeds tend to be pretty specific to the cutter. There are other Primeweld users here but I don’t know if there is a cut chart on here that could help with that. It looks like you got decent penetration and the backside slag isn’t too bad but if the top has slag going on then you’ll want to slow it down from what you were using.
1 Like
i have the CUT60 and have cut 16 gauge CR and 14 gauge HR with no problems. you might wanna start with a scrap or either one to practice.
I use pretty much the same settings for both. Just a little lower IPM on14 gauge.
.9 unshielded tip (40amps max)
30 AMPS
55 PSI
110-130 IPM
.06 shim
1 Like