Switched Plasma Cutters - Bevel

The general consensus seems to be “use nominal voltage”.

Just implemented my new Hypertherm 45XP as a means of replacing my old PrimeWeld CUT60 with UPM-105.

Let me pre-face by saying, I’ve helped many dial in their setup which meant - figuring out my kerf width, followed by multiple test runs at different amps and speeds, as well as pierce delays.

The method is far from new for me and my work spoke for itself.

Now that I switched to the Hypertherm, I find I’ll have to do this all over again, but differently.

Book says for 3/16" to run 0.5 pierce delay, 85ipm, .059" kerf width, and 129 volts and I entered all figures to a T.

Background, I am using the Hypertherm CPC so everything is plug and play, as well as a machine torch.

Anyway, the drawn test piece is a 2.5" x 2.5" part with .75" center hole and it resulted in being 1.9755" x 1.9765" and the hole come out to .7230"

I decided to do another test cut using smart voltage, and found I needed a programmed cut height of .045" to achieve .06" physically. My kerf width also measured about .04"

Decided my next test piece would be 2" x 2" with a .625" center hole.

Entering these values and running smart voltage gave me a part measuring 1.9965" x 1.9985" and my center hole being .6235"

So what am I getting at?

Well, let’s add a rating of 1 through 10 for beveling with 10 being the worst and 1 being square.

When I cut my test piece using nominal voltage, I had the top edge with a “3” for bevel. The left, right, and bottom edges were between “0” and “1”.

When I cut my test piece using smart voltage, I had the right edge with at most, a “2” for bevel…closer to a 1, and the remaining sides at a “1”

I will spend Saturday dialing stuff in but I’m at an impasse if whether I should dial my stuff with smart voltage, or waste more steel using nominal and trying to figure out why all sides are nearly square with one side having a bevel.

I unmounted and remounted my torch multiple times and it was absolutely square to the table not to mention a lot of weight placed on my steel sheet to ensure it is flat against the slats. Doing this I’m removing as many variables as I can in order to best read back my cut results and adjust from there.

Just wondering if some of y’all said fuck it and went smart voltage and stuck with it.
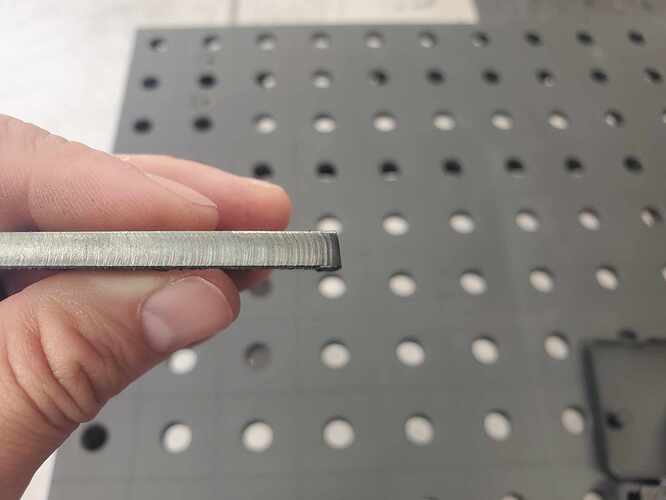
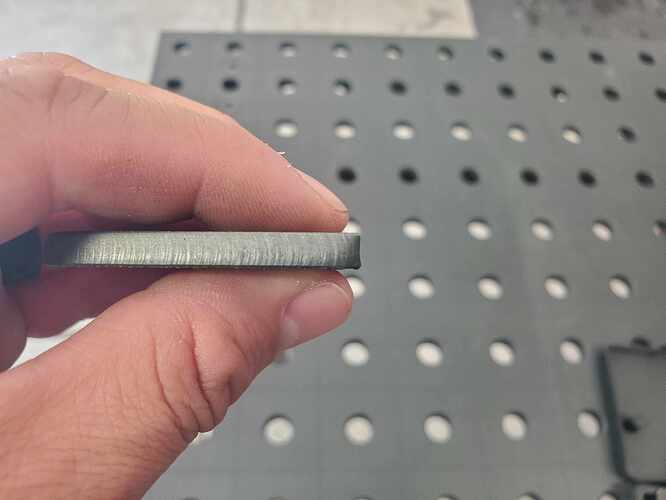
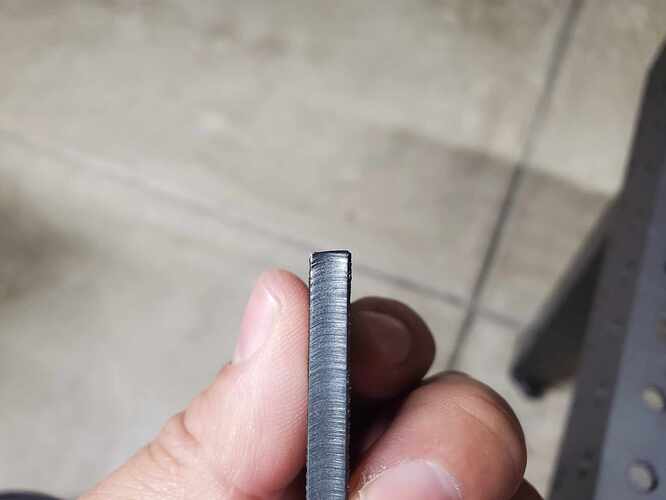
Here’s the worst edge, using smart voltage

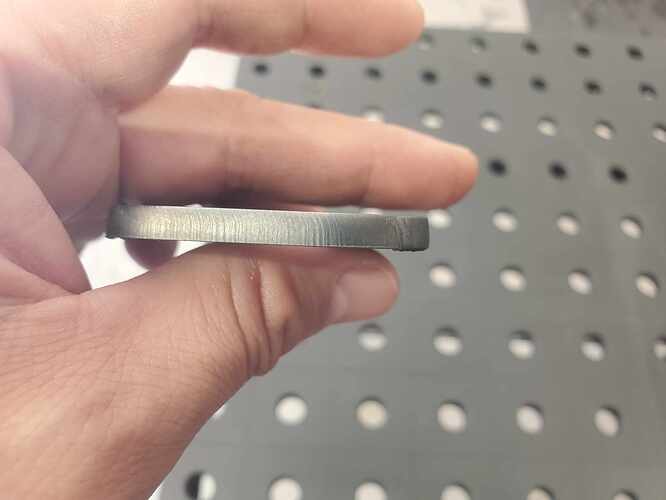
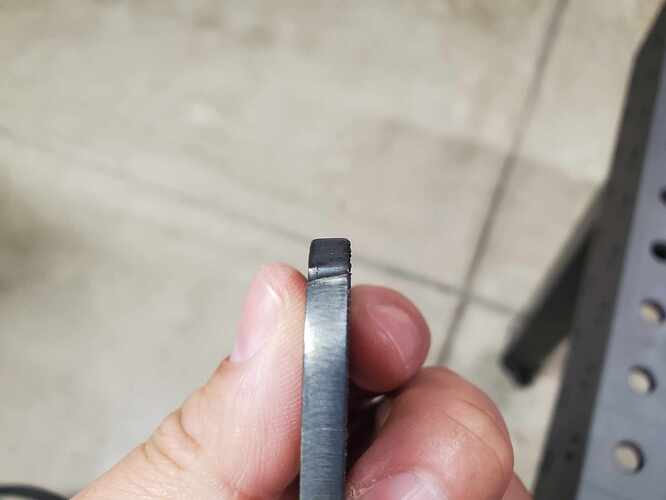
And the remaining sides

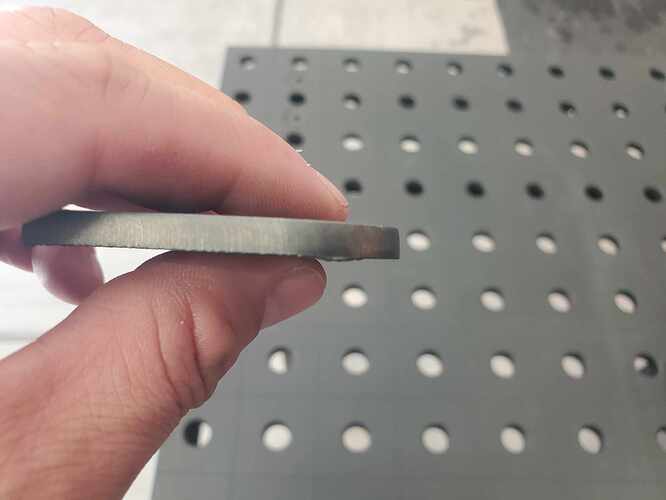
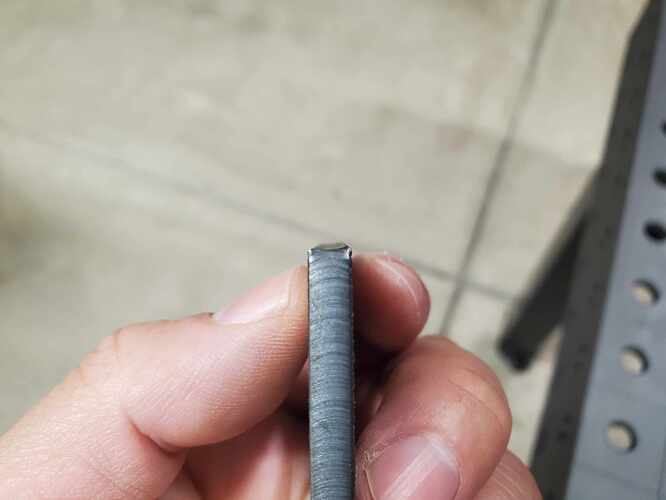
And here’s nominal voltage, on its worst side

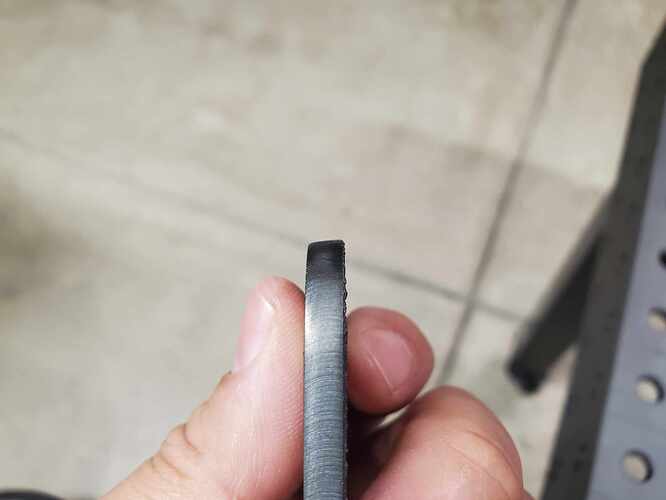
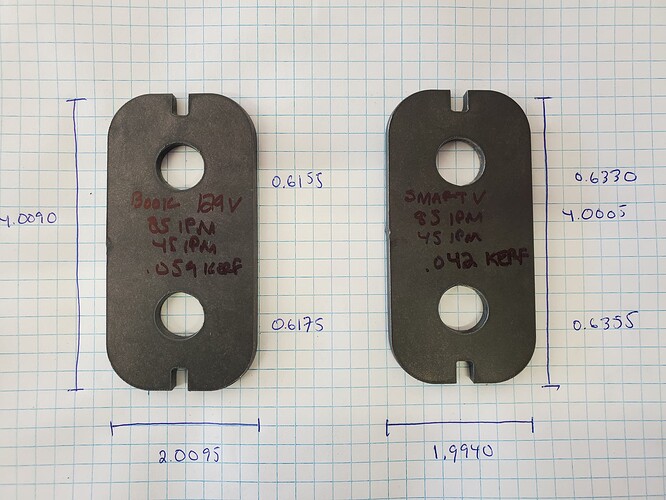
and the remaining sides

Here’s the “gotcha” moment - the worst bevel on the part cut out via nominal is the top edge.

For the part cut out via smart voltage, the worst bevel is on the right edge.

Had the bevel been on the SAME edge, that would lead me to look at my torch mounting again and refrain from having posted here. But no, the orientation of the part is the same for both cut outs yet the bevel moved and got worse with Hypertherm’s settings.

I have never used nominal voltage on my table with my 45xp. From 18 gauge to 3/8 mild steel. I have always left it on smart.

2 Likes

Uhh, I don’t know if you’re asking for help with this part but something else was definitely wrong if your programmed part was off by over .5”. Typo?

How much air are you giving it? Hypertherms are internally regulated, you should never need to touch it. Give it 100 and that’s that.

Your programmed cut height shouldn’t change from torch to torch because you measure from the shield on the hypertherm, not the nozzle.

The way I figure it, the cut chart is recommendations, that happen to be very good. THC works by sensing voltage and raising and lowering to hit the target voltage right? But at the same time we want a certain cut height. If I remember right, the potential voltage can change as consumables wear… so which it more important, target voltage or target height? May be a good debate.

4 Likes

Tin described that he uses nominal voltage when the consumables are good/new but once they show wear, he switched to smart.

That seems to reinforce what BrownFox is saying.

I generally have had really good results with book settings and nominal voltage.

I know you know this but I am just thinking out loud: “nominal voltage” basically works no matter your cut height since it is not basing the cut height on the voltage when the torch is at a prescribed height for that first 0.25 inches.

Since your cut is better with smart voltage, have you monitored what voltage it is deciding to like? It could be that could give a clue if it is significantly different. I suspect that the smart voltage is measuring a higher voltage.

My other thought was that it is likely your consumables are good: because you are very precise with all of your work. And the bevel is suggesting that the torch is a touch too high if it’s the left side (in your photo) is the top of the plate. THC could be not measuring the voltage accurately: it thinks it needs to raise the torch to reach the nominal setting.

If you set your nominal voltage to what the smart is registering, I would expect to see the same/consistent results for both.

2 Likes

I have a 65 not a 45 charts should be close. My chart says 135 on the best quality line.

I seldom use smart voltage until consumables wear.

Oh and I am being to think cut height difference can be a computer issue I think

Typo, but thank you for thoroughly reading through the entire thing.

I had done a 2" x 2" test piece as well and came out to the figures you quoted for 1.9755 x 1.9765, but the center hole for that pattern was .6340.

The .7230 cut piece versus .75 pattern was on a larger, 2.5" x 2.5" part. This information should be disregarded, I apologize!

As for air, I have it at exactly 100psi to my machine which is funny you suggested that.

I am aware how THC works, and was thinking it does a well enough job to stick with smart voltage which is what you seem to be doing. It’s how I ran my CUT60 for +2 years.

Interesting, regarding new & nominal vs used & smart. What does Tin consider to show “wear”. Maybe he has a picture as a loose reference? Or does he go by pierce count?

I hope the many pierces in my testing will give me a good indicator for consumable life. I do run a desiccant filter, water/air separator, refrigerated air dryer, and motor guard.

As for voltage, I do normally follow what Firecontrol measures when cutting via smart voltage, but I did not do so this time around. Huge mistake.

Thank you for reminding me to do so.

I will set up my camera to record my screen to see what my voltage reads when running smart. Then attempt to use it as nominal voltage.

Another test I was going to conduct, but didn’t, was to run nominal voltage for 129v (per book), then pause and measure physical torch height, just like I used to do. Then figure out how much my cut height changes per 10v (meaning, running at 119v and measuring). Wondering if I should skip this altogether.

The other item being the kerf value being drastically different. I understand that output voltage will change my kerf a bit (bigger vs smaller flame and slight height difference), but what’s interesting is how large the difference was between smart and nominal for the end result test piece.

Makes me wonder how big the difference is in voltage between the two.

1 Like

To me it looks like you need to up the ipm some this will also give you a little less kerf width. Are you cutting on the outside of the cut line or right on it?

2 Likes

I agree adjusting my speed is in order as part of my dialing in so I’m with you there.

I was more trying to see if I should go smart or nominal.

But I think the 2 responses alone might push me to smart, and I’ll work on speed next.

2 Likes

When the cut begins to deteriorate. I can’t really remember the details. I know with mine, I will see more bevel and definitely it has been the nozzle aperture to blame.

It is understandable because that small sample would be done very quickly. Can’t watch everything.

But I love more testing!!! Just ask Phillip. Especially when it is someone else doing the testing :rofl: :innocent:

1 Like

Yeah I was just thinking out loud to justify my own lack of exploration.

If you run a bunch of tests with nominal and what not and check heights, I’m super curious what comes of it.

I wonder how programmed cut height and target voltage would affect each other? With only a 5 volt window between 10 gauge and 3/8, how much of a difference would we really see?

2 Likes

The height changes (as volts increase/decrease) has me curious as well.

A part of me wants to test it, just because - the other part of me is like dammit, it’s 3/16" and it ain’t cheap.

But, I can justify doing 3 partial cut outs and perform the following -

129v, pause mid cut, and measure cut height and document here (straight line cut)

119v, pause mid cut, and measure cut height and document here (straight line cut)

Smart voltage, pause mid cut, and measure cut height and document here (along with the average voltage measured, straight line cut)

Smart voltage should technically give me .06" from metal surface to shield cap, but by gathering all 3 measurements, it should give me some good numbers to compare.

I would also perform all 3 tests a second time but allow the part to be fully cut out and compare the edges for beveling. All 3 will be cut at the same 85ipm speed utilizing the same 0.5 pierce delay and 45 amp setting.

1 Like

Yeah…Right up until the smart voltage will read 119v on the first coupon, then 133 on the second, followed by 102, 119…you get the idea.

If the plate warps, or is just not quite square to the torch, then it mostly compensates.

I just can’t trust something that can not seem to be consistent on the voltage it decides to run with.

4 Likes

And if I notice that, I will surely post about it here.

Everyone benefits from experience!

Today I was going to start performing some tests.

Unfortunately my wife’s family friend just got admitted to the ICU; prostate cancer.

He was being treated recently until they had to stop, but gave him 2 years to live.

In the last 2 days however, he suddenly became significantly ill.

I would go but children are not allowed so my wife left to see the family. More like, I forced her to go in the event that the worst happens. He was my FIL’s best friend and he’s been there for us when my FIL passed away last year.

With that said I did manage these cuts with a tidbit of info provided.

1 Like

So sorry to hear that news. My daughter’s FIL just got diagnosed with prostate cancer and is scheduled for surgery on the 20th.

Cancer absolutely sucks.

I lost my close friend to pancreatic cancer on January 10th of 2020.

My FIL passing away however, was not cancer related. They never figured out what it was.

Our family friend that’s in the ICU right now, did the barbecue and helped me cater our baby shower for our first (and only child) since we lost my FIL before our son was born. He wanted to do the best he could to fill that spot for us.

Now here he is fighting for his life.

Sorry to derail my own thread.

@Sticks your point was showcased right away as I did a few more open loop cuts, pausing each time to measure my cut height.

Using smart voltage, I had experienced one cut at 130.1v, a second at 129.8v, and a third at 129.2v.

This is on the same small piece of steel meaning, from one cut to the next, conditions are nearly identical.

I continued and set my voltage at 129v, and achieved a cut height of 0.075".

I performed a second cut at 119v, and achieved a cut height of 0.035".

When I measured my cut height at 130.1v, I measured a cut height of 0.080".

From this information I can deduce that on my setup, 1v equates to roughly .005".

Setting it at 126v, pausing and measuring for cut height, set me at 0.060".

Using this voltage, I will perform a second set of test cut outs and examine my bevel.

This will get done either later today, tomorrow, or sometime during the week when I have the chance.

1 Like

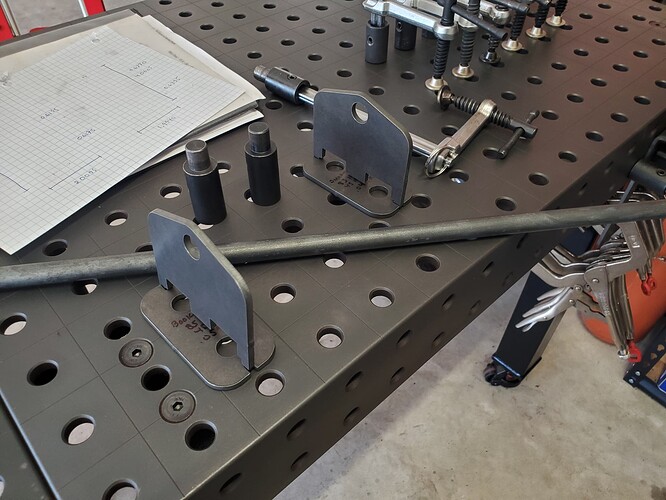
And since I’m not one to waste steel, the test cut outs shown on the above graph paper were mounts I drew up for a clamp holder.

Here’s the design.

I will be using the solid rod shown there as my bar for my clamps to hang on.

The mounts match that of the fixture table, and the tab itself is docked to allow clearance for a standard bolt head.

1 Like