Smart Voltage Issue?

The setup I have:
CrossFire Pro, with THC, IHS, limit switches
Everlast 62i with CNC torch. I have this connected to the CrossFire through the CNC port on the back of the Everlast.
A separate PC, monitor, mouse and keyboard. These are all mounted on wood with no connection to the machine except for the USB control.

The Issue
The torch cut height is too high some of the time, and on occasion will change with each new cut. I cut some 1/4" mild steel plate at 30 amps 80 ipm, cut height set to 0.06". It cut the first few cuts fine, but after that the cut height appeared to be closer to 3/8" and it cut the material with a large bevel if it cut through at all.

I then cut some 14 gauge mild steel for a small test sign, and it cut fine for the first sign. Then it changed the height again when I cut the second sign. I tried turning off THC and it cut fine. I noticed that when the cut height changed, it also changed the smart voltage. It seemed like when it was cutting properly the smart voltage was around 46 to 52 Volts. So I set the voltage to be 50 Volts and it cut fine with that.

When it cut the worst, the smart voltage was different for each new letter it had to cut. The first couple letters where fine, but it set one to be 180 volts where the torch was at 1 or 2 inches above the material, and another it was at 20 volts where the torch head was basically rubbing against the material. I’m confused as to how it didn’t trip an error during that run.

I have cleaned the Z axis and made sure the IHS switch was working. I checked some ground points to make sure the machine is not grounded with the electronics or the computer. I increased the sample size for the smart voltage. It cuts fine when THC is turned off. Not sure if its a coincidence but it seems to act worse the thinner the metal, I cut 5/8 mild steel and it worked great for several large cuts.

I could try hooking up the THC directly to the live voltage of the plasma cutter, but not sure if that would change anything as if that was an issue wouldn’t it affect both the smart voltage and the THC?

It does seem to work if I set the nominal voltage, but I would like to make sure their isn’t something else wrong with the machine. I’m assuming something is causing the issue with the smart voltage, and would like to make sure its not something major.

Any help appreciated

Thanks in advance
1 Like

THC needs to be wired direct to the lugs inside the Everlast not the CNC port. Only the trigger is wired to the CNC port.

3 Likes

The “smart voltage” is what the THC detects in the first 1/4" of each cut loop. It takes a voltage reading during that first 1/4" and then uses that reading for the rest of that cut loop.

If the voltage reading coming from the Everlast CNC port is fluctuating due to a failure of one of the components on the board, the smart voltage will not be correct.

For instance, if the Everlast voltage reading was 120v during the start of the cut, that will be the smart voltage value for that cut loop. If the voltage reading drops to 50v during the rest of the cut, the THC will keep raising the torch until it gets to 120v.

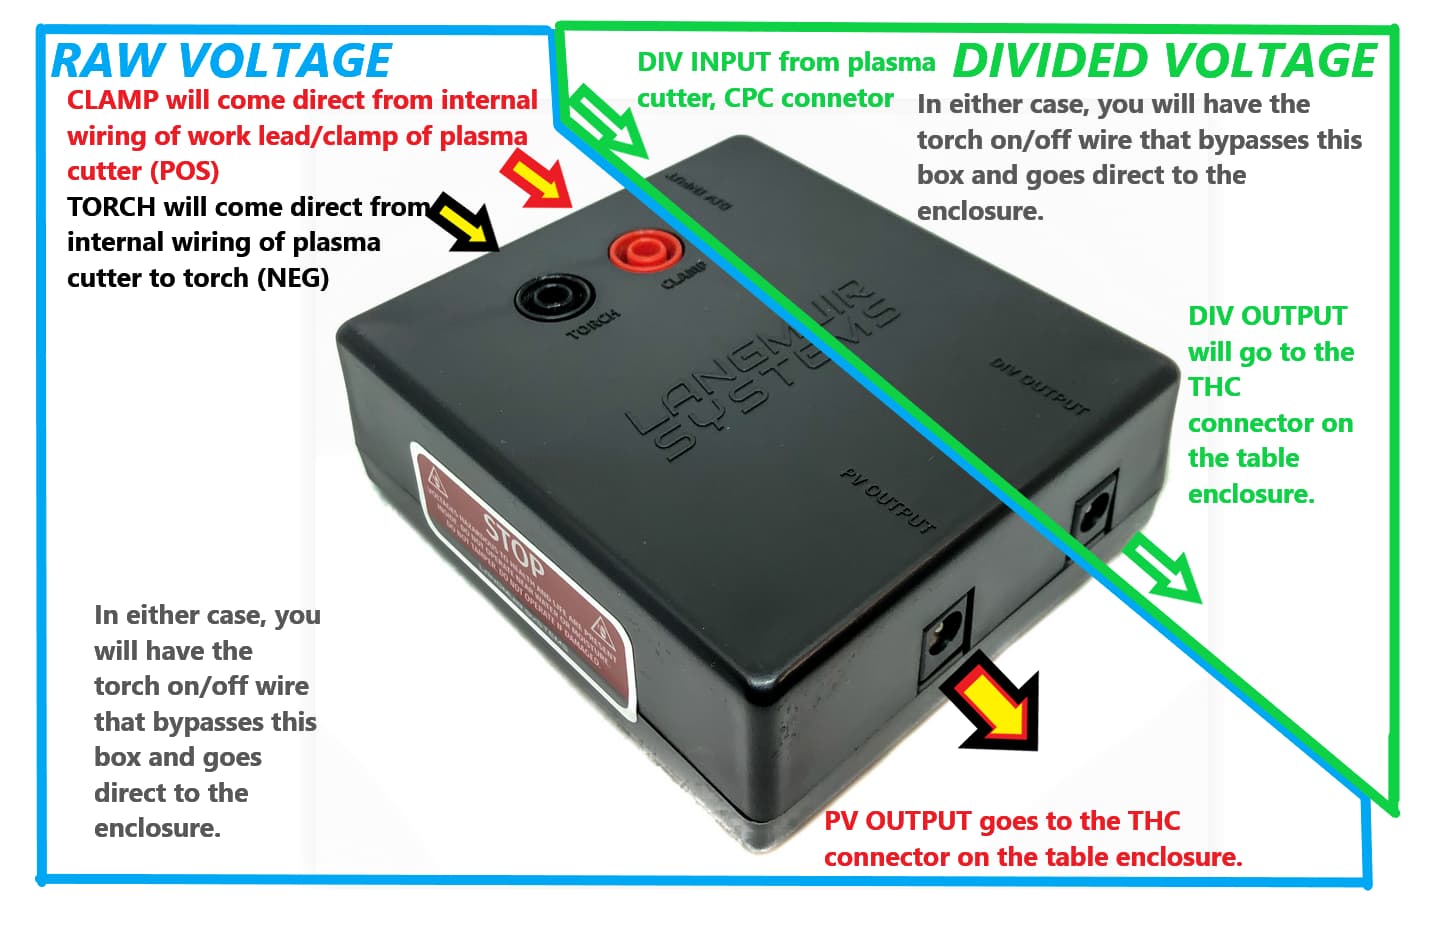
Open the machine and connect to raw voltage at the lugs behind the torch and clamp. Bad voltage readings through the CNC port is a well known issue with Everlast machines.

3 Likes

After you wire for the direct voltage, like David and George are saying, make sure those wires go to the VIM in the blue outlined section of the VIM module (“RAW VOLTAGE”):

2 Likes

Thanks for the replys

So do you think the voltage reading at the CNC port could be incorrect during the first 1/4 of cut for the smart voltage reading? Just wondering as the voltage does stabilize if I set the nominal voltage instead of using the smart voltage.

Either way, I’ll hook it up to the raw voltage and give it a try in the next couple days when I get a chance

1 Like

Yes, possibly. If your cut height gets set improperly, whether by mistake during post processing or your set up (computer/cables/?) is not reacting the expected way it will set the cut height wrong. At this point, all bets are off. With the cut height wrong, Smart Voltage will be making a determination of desired voltage off of a faulty situation. Bad data always results in bad conclusions.

Nominal voltage does not make any such determination. You tell it what the voltage needs to be and THC maintains that voltage the best it can. So even if your cut height is wrong, THC will put the torch at the height that results in the voltage reading that you set.

Now the kicker is: Divided or Raw voltage, which is better?
If you could trust all cutters to do this correctly, it shouldn’t matter. The more expensive brands tend to give an accurate divided voltage. The cheaper brands can be hit or miss: That is when they say “Go with Raw Voltage.”

2 Likes

Update:

So I went to cut something before I wired the THC directly to the Everlast, and the torch had intermittent igniting problems. I manually fired the torch and it would only fire every 3 or 4 time.
I then hooked up the THC to the Raw voltage directly to the torch and ground clamp of the Everlast. This didn’t fix the not firing issue, but it did bring the smart voltage up to about 85 volts instead of the 50 volts it was before.
I tried changing torch consumables and that didn’t help either. I’m thinking its something wrong with the machine, so I contacted Everlast support. Just waiting to hear back from them.

If you don’t hear back from Everlast call me.

3 Likes

As always George, you go above and beyond.

All of us who know you, appreciate you sharing your expertise so willingly. Thank you!

1 Like

First wanted to say a big thanks to George, I gave him a call and he gave me a lot of good tips and best practices to minimize EMI interference. I ended up switching to using my laptop and that gave me a much higher smart voltage reading compared to using a pc. Pc gave about 50v, and laptop was 95v. I will try a ground isolator plug for the pc eventually, but for now I’ll stick with using a laptop.

The torch firing issue ended up being an issue with the electrode sticking, as I got it to fire with some lubrication, but it was still a 1 or 2 second delayed fire and it wasn’t consistent. I ended up getting a replacement machine torch head from Everlast, and that seemed to fix the issue.
However, is the machine torch electrode supposed to move completely up when air is applied? The reason I ask is the hand torch when I manually apply air with the retaining cap removed, the electrode will move up and fully seat. But when I do the same with the machine torch, it doesn’t fully seat the electrode and I can still manually push the electrode up about another 1/16 inch or so. I do run the machine torch at a higher psi, but it didn’t seem to change anything.

Another odd thing is cutting 16 gauge mild steel. I can cut 1/8in or thicker fine, but when I cut 16 gauge it looses its pilot arc before it can start cutting. It happened every couple pierces at a pierce delay of 0.6s. I tried increasing the delay and decreasing it, and it only started to work when I set it to 0.3s. With that setting it only lost the pilot arc once when cutting a sign with about 20 pierces.
I have it set to 30 amps, 70 psi (also tried 65), pierce height 0.125" and cut height 0.035" in sheetcam as the machine adds another 0.025". I have verified with a feeler gauge the cut height is 0.06"
This happened with both the hand torch and machine torch, but it did seem to be slightly more often with the machine torch.
Looking at other posts it seems like a pierce delay of 0.3s is rather quick, which is odd as to why it only works with that.

Thanks again for all the help!

Where is your work clamp attached? To the part or to the table?

1 Like

The clamp is attached to the material.

Also forgot to mention I tried cutting it at 90 to 150 ipm by 10ipm intervals at the previously mentioned settings. This didn’t make a difference, except the quality of the cut got slightly worse around 140-150 ipm.

It is possible that too much material is being removed with the 16 gauge and that makes the plasma cutter loose connection. Try to speed up the plunge rate. David (DS690) has mentioned this before that SheetCAM has a slow default plunge rate that needs to be (or benefits from) increased speed.

1 Like

After using the machine on and off, I’ve been able to get it to cut to an acceptable level and wanted to give an update for anyone else with similar issues.

There was two main issues I found.

One was with my air setup. I found using the machine torch with anything under 65psi was not enough and it was causing the inconsistent pilot arc. So I redid my air line setup to remove any large bends or 90 degree connectors, and I added a large desiccant dryer and a motor guard filter.

I found the first 90 degree bend coming directly from the air tank and pressure switch caused the largest drop of about 7psi. I put a T in place so the main flow would come straight out of the tank and not flow through the pressure switch. The other 90 degree outlet of the T went to the pressure switch. After these changes the pressure at the machine maintained 70 psi during cutting, and I haven’t had any pilot arc issues since.

The second issue ended up being the THC nano chip which was causing the erratic changes in height during cutting. I contacted Langmuir and they sent me a warranty replacement

I will add though, every once and while when cutting with the THC turned off, it will still try to control the height of the torch. If I disable the THC then it doesn’t do it. The THC works when I have it turned on, and I am able to disable it when I cut thicker materials. So I’m still able to cut well, just figured I’d mention it as its kind of an odd thing to happen.