Slow down cut speed at end of cut

You should be able to set up your torch so that the outer edge of the nozzle touches the material, even though the center is off the part. If the nozzle is all the way off the piece, that may explain why your cut doesn’t go all the way through on the other end.

For what you are doing, I would just use the straight line cut utility in Firecontrol. Spend some time setting up and clamping a fence to the table, so the fence holds the part at the correct angle to the X or Y axis. Make some marks on each end of your piece and line up one mark with the torch at X/Y zero, then jog the torch to the other end and line up the mark on that end with the torch. It may take a few tries to get the piece aligned properly, but then you can use that as a reference to clamp a fence to the table. Once you have a fence set up, you can just push each new part against the fence, go back to X/Y zero and run the cut again. Involving a CAD drawing is making it more difficult than it needs to be.

1 Like

LOL I had those same thoughts and even did it…but as soon as my program went to another side of the part and the lead out did it’s whole routine and the IHC…I didn’t have the outside plate ‘staged’ there and had the issue all over again but this time in the middle of the program…uggghh…I will turn off the IHC for now. I am guessing that IHC can be turned off for good once I get my TCH installed?

I have the machine torch…I believe it is the Duramax. I am running the Hypertherm45XP plasma machine as well.

I can’t see a scenario where you can Edge start and use your torch height control. It would have to start reading the voltage after the plasma stream had entered the material.
In the settings section in fire control there is some options to adjust how the torch height control behaves. There might be some combination of settings in torch height control settings menu that could work in an edge start scenario.

I’ll screenshot this menu the next time I’m at the shop computer.

OK, I will wait on your screen shot…thank you! I am guessing that you can’t do any lead-ins any more then with THC?

Typically a lead-in is too short for the THC to figure out what voltage it wants to use and then apply it to the cut before the lead ends already done.

Using smart voltage you would have to have a lead in that was over a quarter inch long and into the material for it to register the voltage and then apply it.

I sure wish I had a spare electronics enclosure I could hook to my office computer so it trick fire control into thinking it was hooked up to a machine. Then I could explore and screenshot these options with ease and run dry runs.
@langmuirsystems you have any mostly working electronic enclosures you could sell a guy?

This goes into the how and why the THC works


This is the menu inside fire control

So if you set your smart offset long enough so it we’re sure the torch was in the material then you may be able to have it used torch height control from that point on.

I have a PowerMax 85 so it’s not often I get into Edge start territory.

I am finding out that not most people do not do what I am trying to do with my CNC ?? Where I have a piece of material that is just the size I need it to be, but yet I just need to cut a notch in one side of it…like you have seen in some of the other posts I have made. SO with that being said…If I have a 10" long piece of material and I just want to cut a 2" square out of one edge…you would not do a lead in but do a start with a pierce delay, even though you are starting on the edge? I do realize more now that it will be crucial to be able to line the piece up properly but…just wondering thoughts on how to best achieve a cut like this?
Edge Start

You could do a little bit of a lead in cuz you’re going to want to start off the piece.

The Pierce delay can just be set for .5 just enough to activate the torch. You don’t need a long pierce delay because it’s not plowing through any material to create a pierce.

Indexing is going to be your biggest challenge.
That’s why it’s typically best to cut out the entire part because it removes any issues that occur with indexing properly.

In your case you’re going to need to create some kind of datum on the table that you can bump your material into so you know for sure it’s in the correct position.

I’ve turned down some work like this for customers in the past because getting your indexing right is very very hard.

Ideally you want your torch to start off the material and finish off the material. This will give you the cleanest cut for Edge start.

Coming up with some sort of jig is going to be the answer for repeatability in this case.

I think you misunderstand what a lead in is used for. A lead in is used to keep the pierce hole from marring your finished piece. You use a lead in to make sure the pierce is on the waste material and then the cut moves from the waste material into your cut profile.

A pierce delay is not really needed for edge starts either. The reason for a delay is to give the torch time to pierce through the material before moving. For edge starts, a delay may cause the torch to flame out because it needs the arc to be in contact with the metal to complete the circuit.

Ok, I was kind of thinking that…so basically build a jig and with trial and error get it to fire right on the edge…I guess I would need to document the xy points at that time as well…that way I can put the same material in the jig and then manually type in the parameters for the xy axis to fire at the same spot?

Great information…how do I change the direction of the lead in…it seems that all of my leadins are off of the part…which I may not need to use them as much now, but would still like to be able to determine the placement of the leadin

This is the conundrum with this method.

How do you index?

How do you make it repeatable?

With the crossfire pro you have no homing , you have no limit switches so effectively you’re completely blind with orientation .

If I was doing this operation I would set up a jig by trial and error and cut out as many of those pieces as I could with that jig during that session.

Here is a topic that gets into some indexing.
Again all these attempts are because the original crossfire and the crossfire pro are blind in respect of the torch:s relationship table.

ok, thank you sir.

If you don’t mind sharing…wow did you get all of that aligned properly? Was it setting a piece of stock on the table then firing the torch and building/getting measurements from that pierce ? Just wondering because it seems like that approach could produce incorrect results to if the torch height is not the same for all cuts using that jig

Once you’ve set up the jig and zeroed your axis it will know where you’re at in relationship to the table. But this information won’t be saved for the next session after you power down your machine.

It’s not an ideal way of going about it.

But it is our only way of going about it.

Like I said before if you want an accurate part you cut the whole part out in one go.

Doing it how you want to do it, there’s going to be a lot of guesswork involved and trial and error.

With an XR you would have homing and limit switches so at least your torch would know where it’s at in relationship to the table every time after homing.

Indexing is a tough situation on the pro.

1 Like

ok, thank you

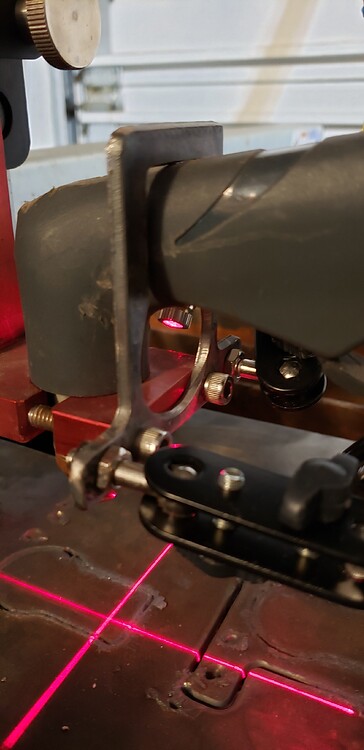
I ended up adding laser crosshairs to my rig so that I could speed up my pseudo-indexing workflow:

I’m still ready to send $$ to @langmuirsystems for the Crossfire home/limit switch upgrade kit :slight_smile:

2 Likes

I do have a laser installed on my machine…mind sharing any tips you may have or your workflow on how to get things lined up consistently with indexing ?

The key for me is that, as of now, there are only two available absolute positions I can consistently send the machine to. They are at max left on the X axis (up against the rail), and at either end of the Y axis travel (up against the ends of the leadscrew.)

I position the machine hard up against the forward and left stops and think of that as ‘home’. My laser cross hairs now show me that location and provide visual guides for the X and Y axis travel. Frequently I will position the workpiece, if possible into this angle, zero the axes in FireControl, and cut. Often, due to workpiece constraints, I will execute a jog on the X and/or Y axes, rezero in FireControl and cut from there.

So three things make a big difference for me; 1) the position directly below the cutting orifice (which represents the origin position in my CAM tool,) 2) the line of travel in the X axis, and 3) the line of travel in the Y axis. These allow me to position the workpiece such that I can get pretty close to millimeter accuracy in the positioning vs cut. Without the lines of travel, it’s too easy to get things out of alignment once travel starts. No biggie if you’ve got margin on the workpiece, but for recutting or for close cuts (I often cut on things like circular saws,) it’s essential.

I would prefer not to run my machine hard against the end stops, so home switches would be awesome.

1 Like

Great idea…thanks alot!

I would cut in a little bit on your finish end then go to your start end then you should have a nice cut all the way through