Hi I’m new to everything and purchased a crossfire XR in December we’ve been cutting pieces out in thin metal but when it comes to 3/4 inch plates can’t get it to pierce. If anyone has any recommendations on the settings to set the torch at it would be really helpful thanks. We’re using the hypertherm 85 plasma cutter
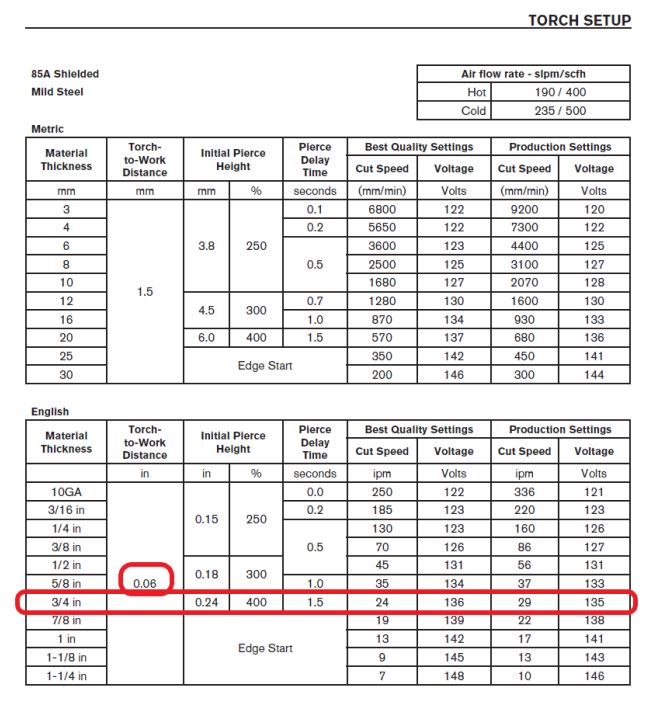
Here is the cut chart for nonSYNC:
But some things to think about:
- Use new consumables. Your nozzle is already probably destroyed if you made a first attempt that did not go well. The additional spray back at the nozzle will widen the orifice and from then on, the stream will not be concentrated enough to cut well for that thick of plate.
- You have not really tested your settings perhaps as the thinner metal surrender more easily. What is really important is that you are at the right height for the cut. You might want to do a test cut and interrupt the cut to measure the distance to the plate. And notice that your pierce height should be 4X the cut height so you should be starting at around 0.25 inches.
- Use the nominal voltage instead of relying on the THC readings. (Ask if you don’t know how to set this).
- You should not have any springback set in the CAM. Are you using Fusion 360 or SheetCAM?
Full Cut Sheet settings:
Powermax65-85CutSheet.pdf (537.3 KB)
This is for SYNC:
Powermax 65 85 105 Sync Cut Charts.pdf (2.2 MB)
5 Likes
I never had any luck with 3/4 A36 steel. The only way I could cut it was to pre-drill a small hole or edge start. Once it pierces it cuts fine. It’s an excellent way to destroy your torch. That’s just my experience. 5/8 no problem. 3/4 is a tough nut to crack. I use an Everlast 82i. The Hypertherm 85 is a much more powerful machine. I guess it could work.
3 Likes
@Elsierdguez1 welcome to The forum
I’ve cut a little bit of three quarter inch with my Hypertherm PowerMax 85 and I use the book settings.
Here’s the results of that cut.
These were all pierced starts.
Also make sure that you are using the 85 amp consumables with the 85 amp charts.
3 Likes
Thank you I appreciate it I’ll keep y’all updated
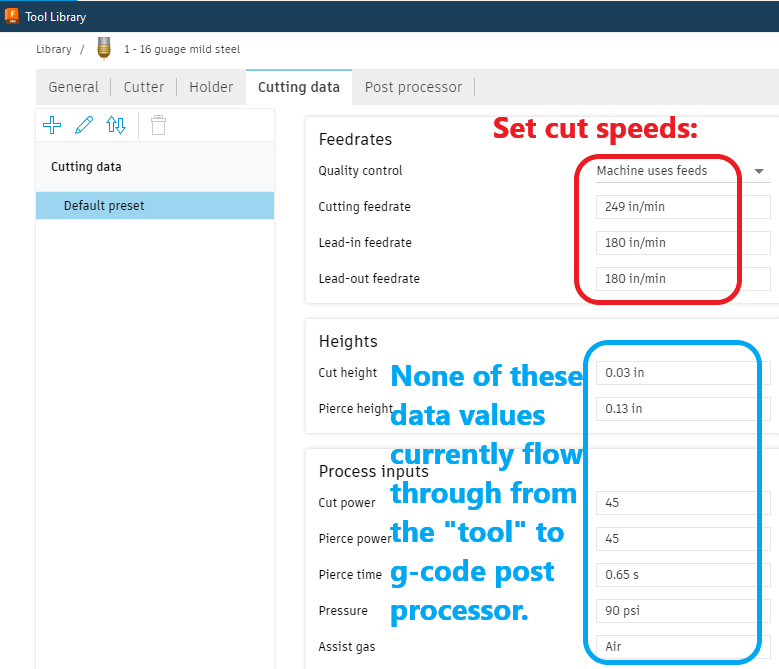
I am using fusion 360 and need to set my tool to the right settings first so I hope the chart helps.
I saw this in a Video too if I can’t get it to pierce I will have to do this thank you
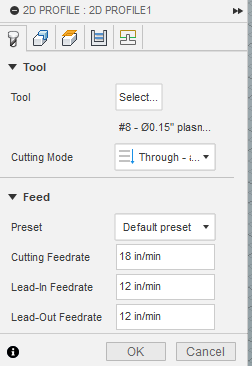
So keep in mind the following:
But keep those values in mind because when you get to the post processing screen, you will need to enter them:
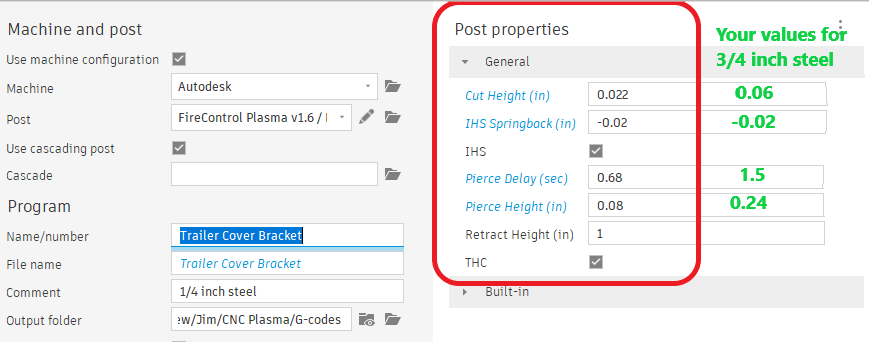
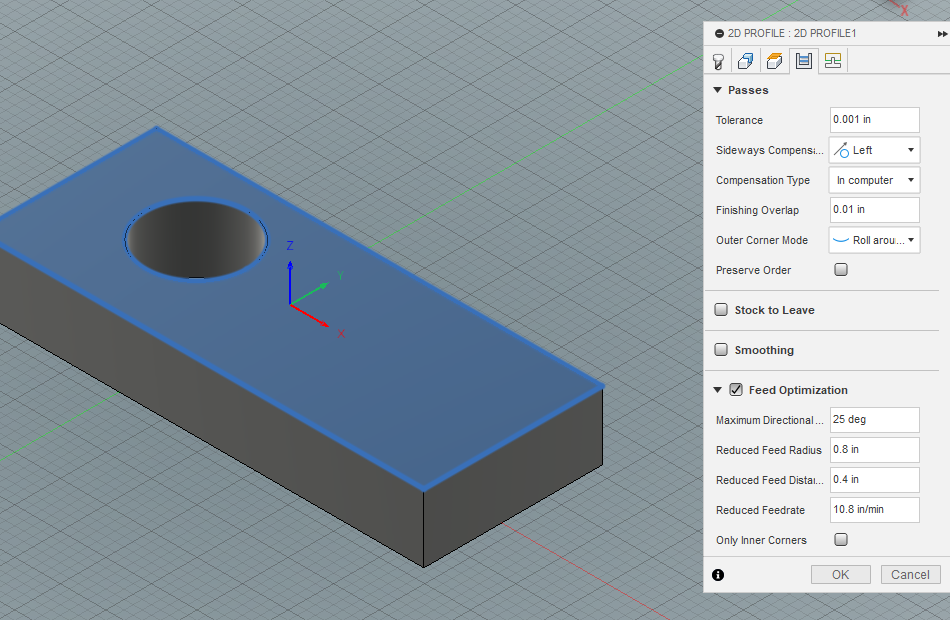
That is assuming that your system is deciding on the correct heights. Trust me on the springback setting. Fusion will be adding 0.02 inches whether you want it or not. Entering -0.02 will effectively remove it.
3 Likes
I’ve done a lot of 3/4" and 1" in the last couple of months. It is a whole nother animal as compared to anything under .250. Dross behavior changes, bevel gets exaggerated if your are off (torch perpendicular to media - not table, cut speed, and cut height) even a tiny bit that would not matter much on thin.
The speeds they list in the book are really ambitious, at least they are for my Hypertherm 1650 G3 (100a).
Verify your kerf width and have that set correctly in F360 (tool library?)
Square up your steel to the torch. If your table is nuts on level, and torch is indeed square to the table in X and Y, then all you have to do is level the plate and verify square to torch.
Run this file and make sure you are at the listed cut height.
cut height test.tap (224 Bytes)
No really, do it. It matters to cut quality and consumable life. Once that nozzle gets even a little bias, the bevel it leaves is horrific
All is does is goes to a point and lowers to the .06 cut height and ends. Measure with feeler gauges and what ever difference you have make the adjustments to your correct cut height.
As stated above, either edge start, or pre drill holes (.060ish) at each pierce point. Dry run the program, press pause at the the cut start (it will do everything but move the Z axis, so pierce delay). Use a sharpie to mark where the pierce point is. In Fire control, go to the next rapid move to the next pierce point, click on that line in the progress view, then down below in the gcode list, click on Run From LINE. Then you can map out the next point. Rinse and repeat. When you are doen, reload the cut program, set your orientation if needed but DO NOT zero any of your axis again, or all your mapping will be for naught.
Slow your cutting speed down 15-20% from what the chart lists and inspect for cut quality and adjust as needed.
I had a lot of trials and tribulations in this thread to get mine dialed in for thick metal. ; $2000 later, upgraded plasma . Starts to wander off topic around Mar 28.
Good luck!
5 Likes
You can edit that file and change the G4 P0.5 to a much longer time to check the Pierce Height too…
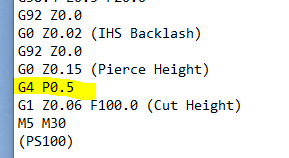
Change it to
G4 P10.0 (gives you 10 seconds to check the height)
4 Likes
I just paused or stopped the program in Fire Control when it lowered.
1 Like
Never thought of it but one could also delete the G1 line below and have a pierce height test file.
2 Likes
This is a good time to put in a important reminder that these cut height tests are really directed at using smart voltage.
Doing this cut height test and using nominal voltage together is not the way. You’re cut height is determined after the torch is fired and is based on the resistance of the circuit not what’s programmed into the G-Code.
Obviously you want to have a program height that is within reason of your expected height but once that torch starts nominal voltage takes control of the height.
5 Likes
Except for the case when one slows the feed rate to the point fire control turns THC off. On my long burns I cut approximately 1000 plus 5/8 holes with no THC because of feed rate reduction
2 Likes
I can see this scenario coming up with hole cutting depending on how the parameters are entered. But when you’re cutting a hole you’re not really using your nominal voltage at all.
(Edit: which now when I reread, this is the point that @Phillipw is making)
True but in most cases the cut height has already been determined by the nominal voltage before a slowdown and THC off command for a feed optimized feature. In rare instance to start a program out with a feed rate reduction. What would be important is making sure your lead in feed rate is the same as your cutting speed feed rate.
The one scenario I can see it messing with the height would be if you had a modified from cut speed lead in going right into a feed optimized feature (like a hole) . But as soon as the next time it went back to the standard feed rate at the chart cut speed it would correct its height and the next feature would be fine.
3 Likes
This brings up a thought I should check whether radius lead-ins have feed rate optimization applied to them. I don’t think they do but I think it’s worth checking.
2 Likes
I will definitely agree people using nominal voltage don’t really have to worry so much about the cut height. I even have a path rules to slow my lead ins . It seems to work well but I can’t really say it make a difference. Except when consumables start to age some.
3 Likes
Then it’s time to switch over to smart voltage, adjust your nominal voltage setting or install new consumables.
2 Likes
It doesn’t appear so. Since it gives the option to set the feedrate here:
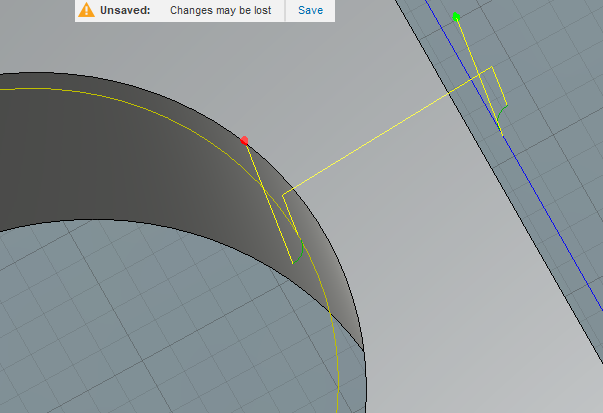
It is showing a green lead-in suggesting that it is not slowing down even with a very tight radius when feed optimization is checked (obviously it is slowing to the feedrate set for lead-in):
Toolpath with .03 inch radius:
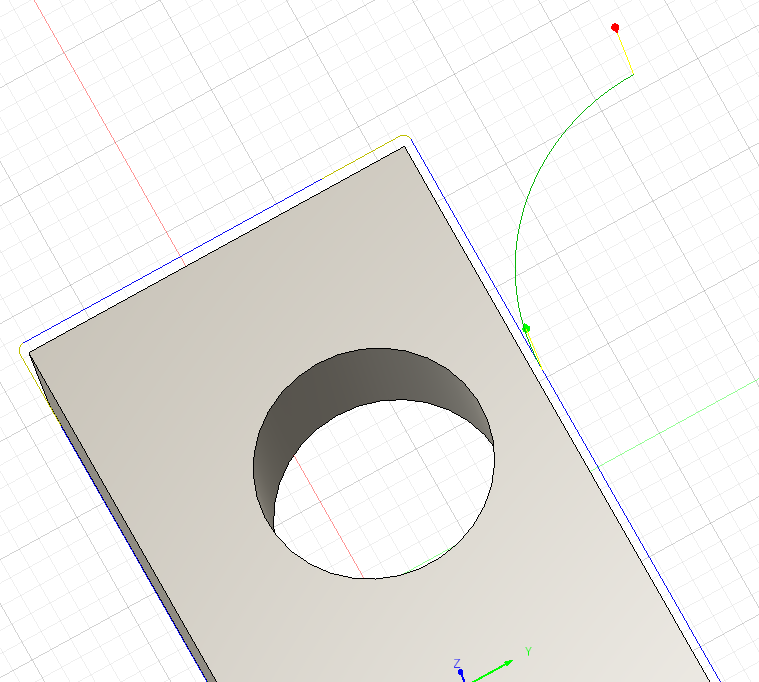
Toolpath with 1.00 inch radius:
4 Likes
Absolutely, reduce that to 60%. Ask me how I know.
2 Likes