Pro Table Improvement Suggestions

A one piece water table. The two piece water table was a horrible idea. The drains for the two piece are terrible too. Way too small and they stick up too high.

1 Like

I was considering just making my next round of slate 1/2” shorter. I fill the water table all the way up and have water splashing out constantly.

Two pieces is probably way cheaper to ship. Like enough cheaper so as not to double the cost of the water table.

The original drain was too high for me - left an eighth to quarter inch of water when draining it. That’s why I dimpled them before assembly. Now there below the surface of the rest of the tray and it drains to where there’s only a film of water left that evaporates in hours.

If they could dimple them before shipping it would be great. For folks without a dimple die (I got mine for about $25 on Amazon) a golf ball or a trailer hitch towing ball would work as well.

4 Likes

Wasn’t familiar with these so I had to look them up and I see people using those bottle jack H frame presses from them. I have a 20T press but I don’t think the water table would fit. How did you go about pressing the dies?

I plan on using gasket material on the water tray seam. Gasket material is water tight under pressure in your automobile engine. Sure, I will have to cut my own but being an ex-automobile mechanic it should not be a big deal.

This is the die I got from Amazon.

https://www.amazon.com/gp/product/B0785RTG4S/ref=ppx_yo_dt_b_asin_title_o00_s00?ie=UTF8&psc=1

I then supported each tray by 2x8s on either side of the hole. I slid the female piece underneath and lined up with the hole. I sprayed both halves of the die with some oil to lubricate as it forms the dimple. I dropped the male side into the bottom piece and then used a 4lb sledge type hammer to pound the top. Not quite as elegant as a press (I have a 20T HF press too but as you noted, the tray is too wide in both dimensions to fit…need the 50T press for that :slight_smile: ). I think it took a half-dozen or so firm hits to form the dimple. It’s easy to see that it’s getting equal pressure from the blows by looking at the dimple as it forms in case you’re off-center with your hits. Only took a minute or two for each hole.

The Langmuir fittings fit nicely into the dimple from the 1" die I got.

2 Likes

They also sell dimple dies with a through hole so you can bolt them together to form the dimple

2 Likes

My plan is to use 3M 4200 on the seam, it is made to be under water and take torsional twists of a boat

2 Likes

I couldn’t find any in the 1" size on Amazon (they have the 3/4" ones for Dzu fasteners) and needed it rather quickly so I went with the standard press version. Figured I was only doing 2 holes. I also didn’t want to buy a whole set because it would just end up being another tool getting dusty once I did this one :grin:

1 Like

Good enough for me! I will most likely be doing that if I can’t find one with a through hole. On second thought I might end up milling or turning one… Idk. I know I might never use them again…

I just looked up some drawings. If anyone down the road is interested in that route, it looks like it’s just a .005" clearance between the bore/boss of the male/female pieces and 45° taper. I like the idea of making one with a through hole so I can use my 1/2" impact gun to bolt them together…

1 Like

Good tip. Has the seam been an issue on the on the Pros that have been assembled already?

It has on mine. It keeps leaking. Tried resiliconing it 2 times now

Check out 3M 4200 it takes 24/36 to cure…I would say 3M 5200 BUT it takes 7 days to cure and it doesnt come apart

1 Like

Still waiting for my machine but someone with one and a lathe could machine a simple one. Then just pass it around for shipping is all. For a 1-2 time use per person, why not?

It seems a simple enough part.

1 Like

I like the idea of sending it around. I have an engine lathe that I had to wire up to a VFD and I’m rushing to finish the PLC wiring before my table comes. More than likely I’ll just interpolate one on my mill. I’ll for sure report back and see if anyone could use it if I do.

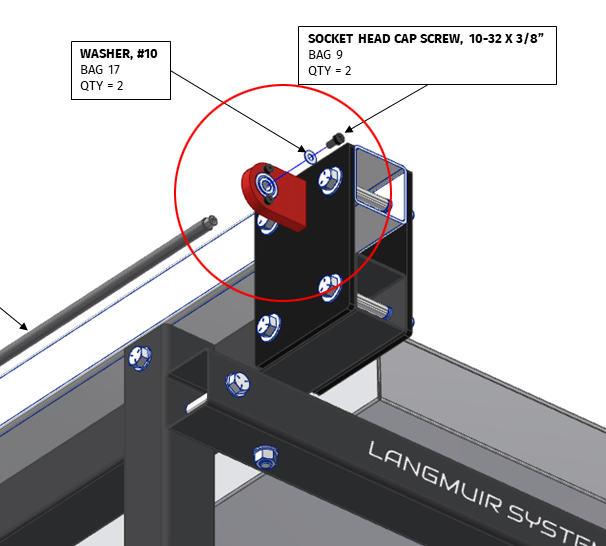
So I’ve noticed since I set this machine up when jogging the X axis I got a whirring(?) noise. I just chalked it up as the X axis lead screw not being perfectly straight so the vibration so to speak was making a noise. Well I noticed today it started on the right side of my Y axis. Further investigation shows the threads on all the lead screws are not deep enough where they connect to the bearings. So the screws that go through the bearings into the lead screws are too long. There was some slight slop on the bearings due to not being able to tighten the screws enough and that was the noises I was hearing. I tried tightening them more but did not feel comfortable, like they were going to snap. So what I did was add an extra washer on each screw and now the bearings have no slop and noises are completely gone. I dont know if everyones is like this but mine was. Heres an image of the washers Im talking about.

6 Likes

My threads were deep enough, but the issue I had was getting the lead screw to stay still enough to fully tighten the socket head cap screw in all the way. With some advise of another fourm member I took a set of lock jaw pliers, put a rag on the lead screw and then clamped on and tightened the cap screws in all the way. Worked like a charm and no more chatter/noise issues.

3 Likes

Hey all old thread, but found this:

Sheet Metal Flared Hole Dimple Dies (speedwaymotors.com)

It’s a 1 inch bolt through dimple die for 36.99. I think it my be more cost effective then throwing down $$ for a set you may only use once.

The 3D printed dimple die seems to be working for folks now. The print file is available for download for folks who have a 3D printer at home. There are also a couple being shipped around for folks who don’t have a printer - just pay for shipping. There’s a sign-up spreadsheet here to get on the list.

I have a couple I printed and can send to anyone who wants to go that route.

The first time I went to drain the water table I realized that wasn’t going to work – it was annoying and it left too much standing water.

I bought a couple flanges and some fittings from HD and mounted flanges underneath the drain holes (removing the factory drain plugs) and used barbs to connect some random 1/4" ID hose I had laying around and then flange:barb fittings to connect the hose to the table. All that runs to another flange and 1/4-turn fitting mounted to the right rear gusset of the table. Now when I drain the water all I have to do is put a bucket there and turn a lever; it evacuates all but a thin layer of water (which wouldn’t flow out anyway) and is much, much easier to use.

Total cost was about $30.