After 18 months using my Pro table with a Thermal Dynamics Cutmaster 42 without any real problems, I decided to upgrade to an Everlast 82i with CNC package when they were on sale in November (and also to make it easy to use the hand torch again). Last week I got this installed, and while everything “works” I now have a serious problem with cut accuracy that I did not have previously.
As a note I hadn’t used the machine since October (I needed to do some manual cutting outside my shop so had disconnected the Cutmaster), and prior to installing the Everlast I also updated Firecontrol, all firmware, and Fusion360 to the current versions. So theoretically the problem could also be there rather than with the hardware itself.
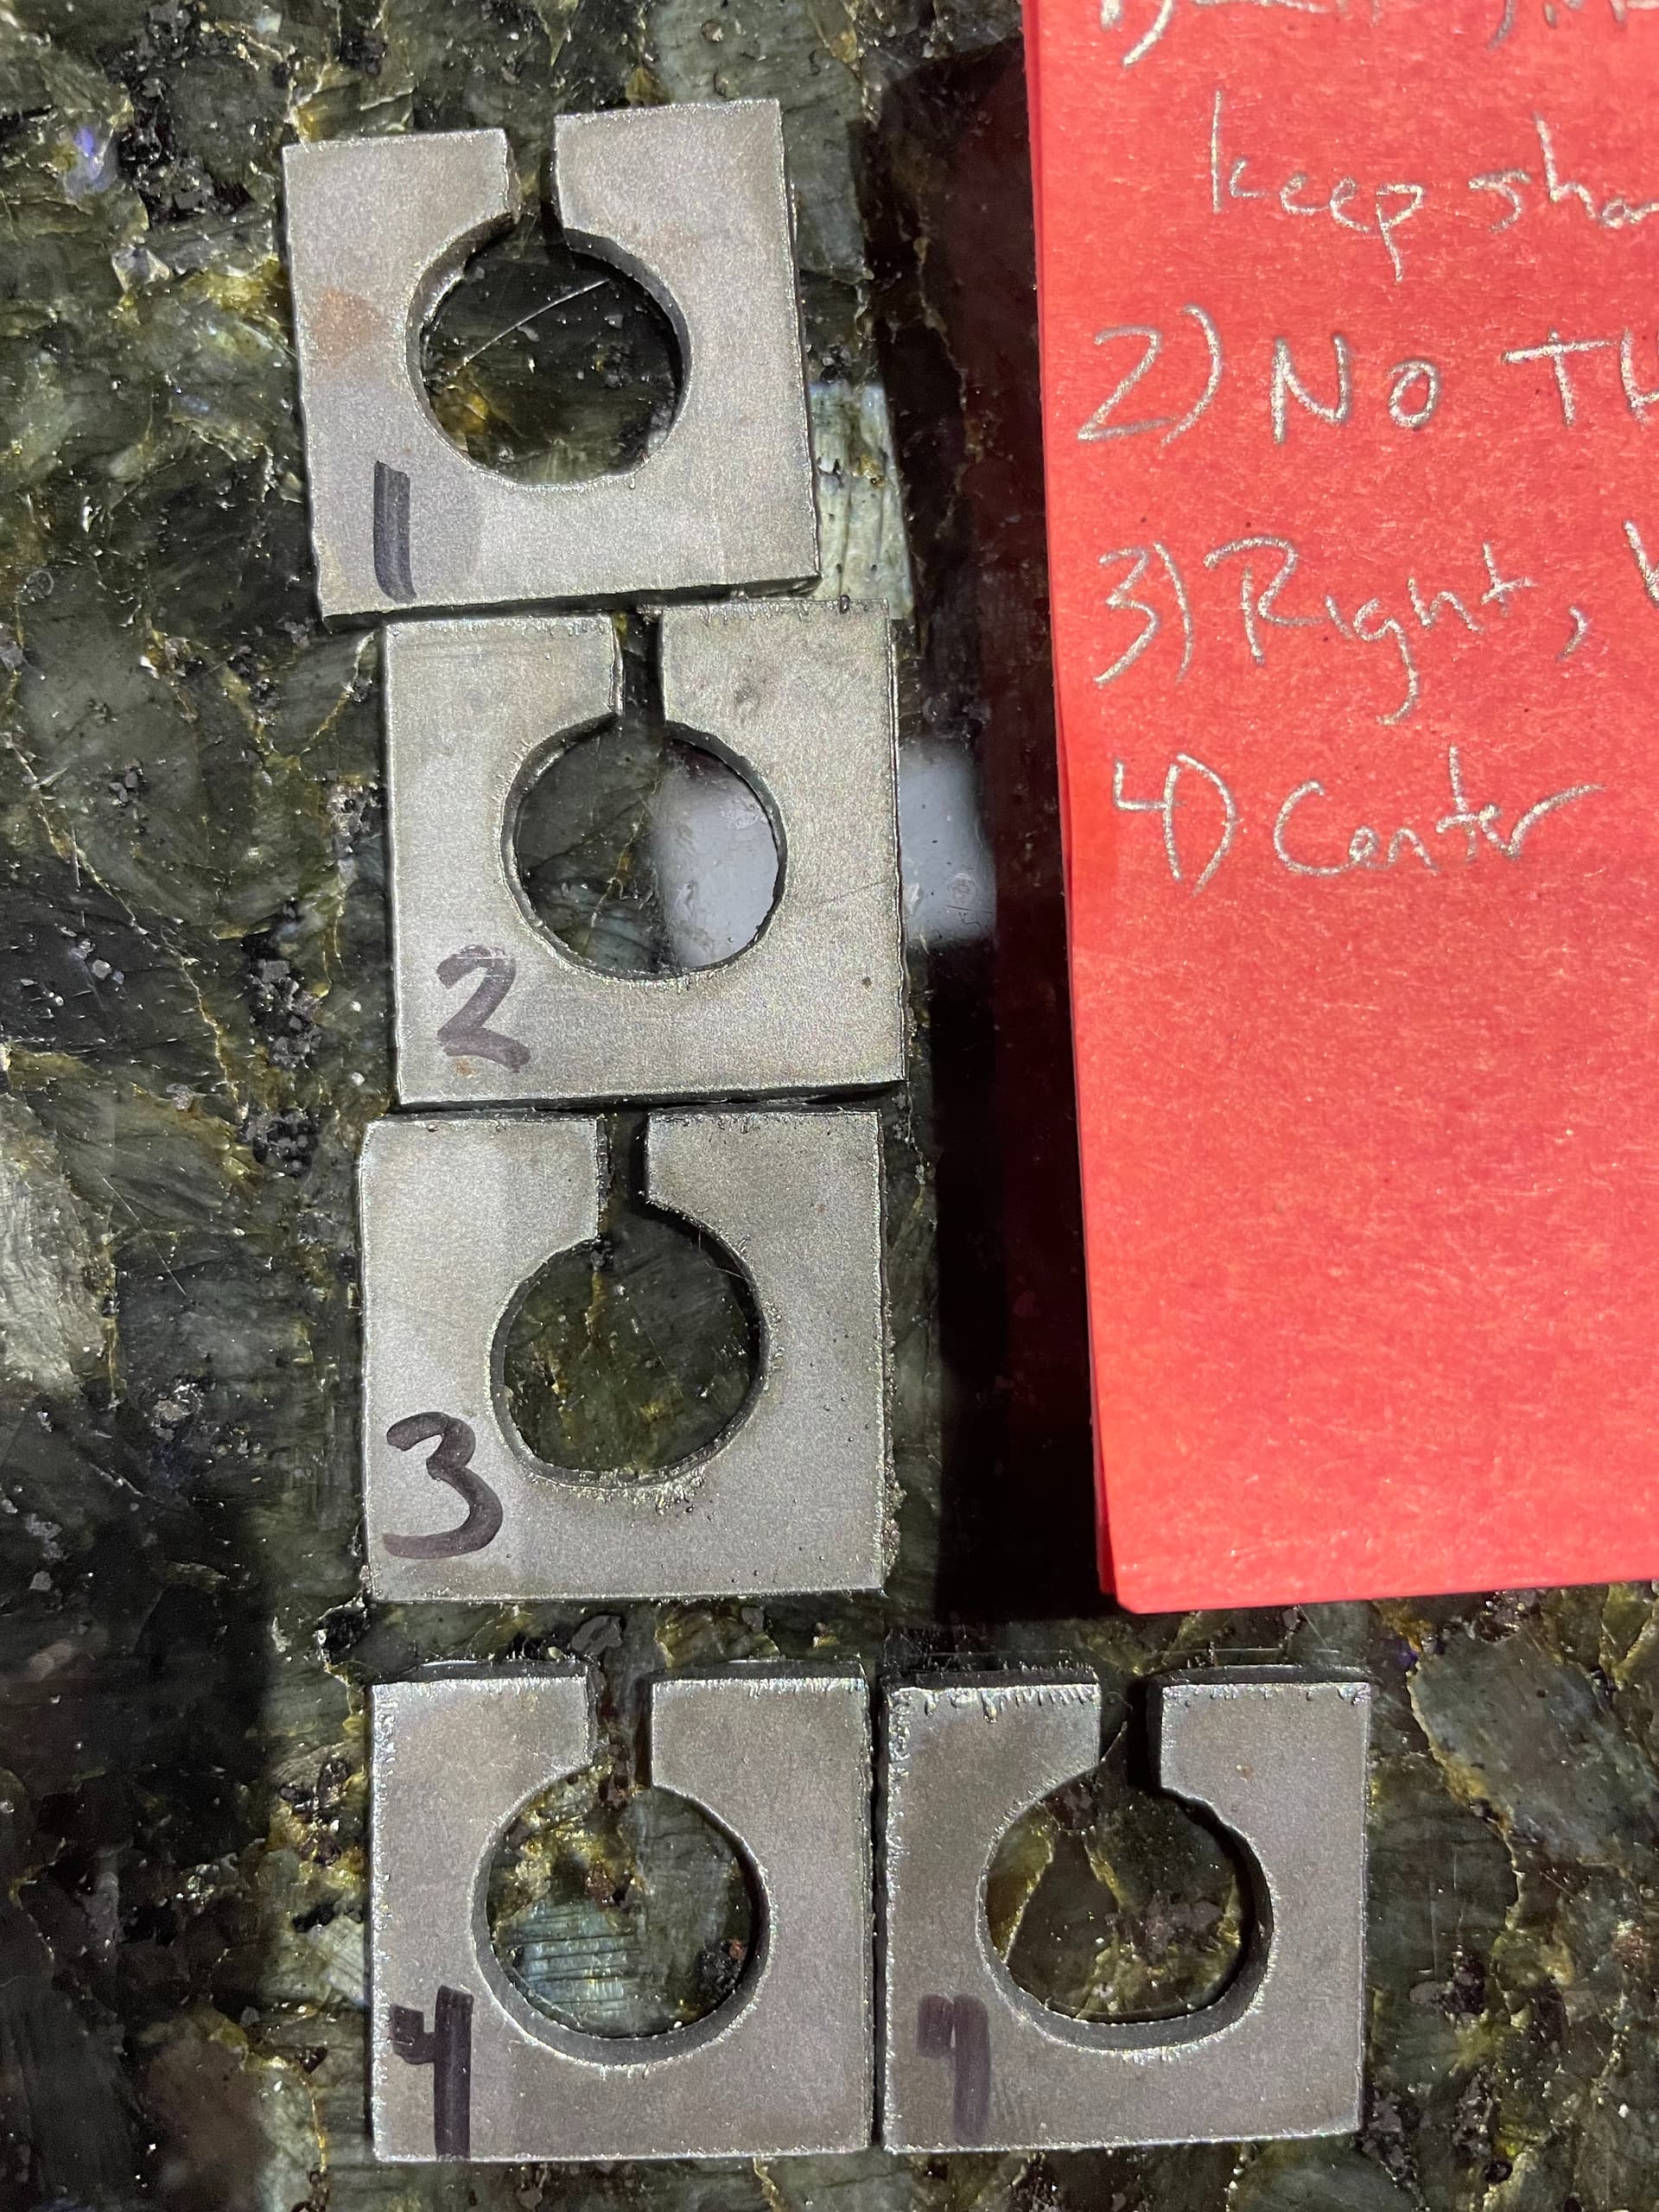
I updated my tool library in Fusion 360, and while the cuts appear clean enough the problem is that they are no longer accurate, which is most obvious when small circles. Initially I tried adjusting various cut settings (left vs center vs right compensation, with and without THC, etc) but didn’t get any clear improvement there (see photo, this is a 1" square with a 5" circle and a slot sized to fit the material, I use this to calibrate settings when cutting something that needs to be super accurate). From measurements I found that while dimensionally it was correct along the X-axis, but along the Y-axis the 1" squares were off by as much as 0.07". This didn’t seem to scale with the size of the cut, so larger rectangles were still only off by that amount.
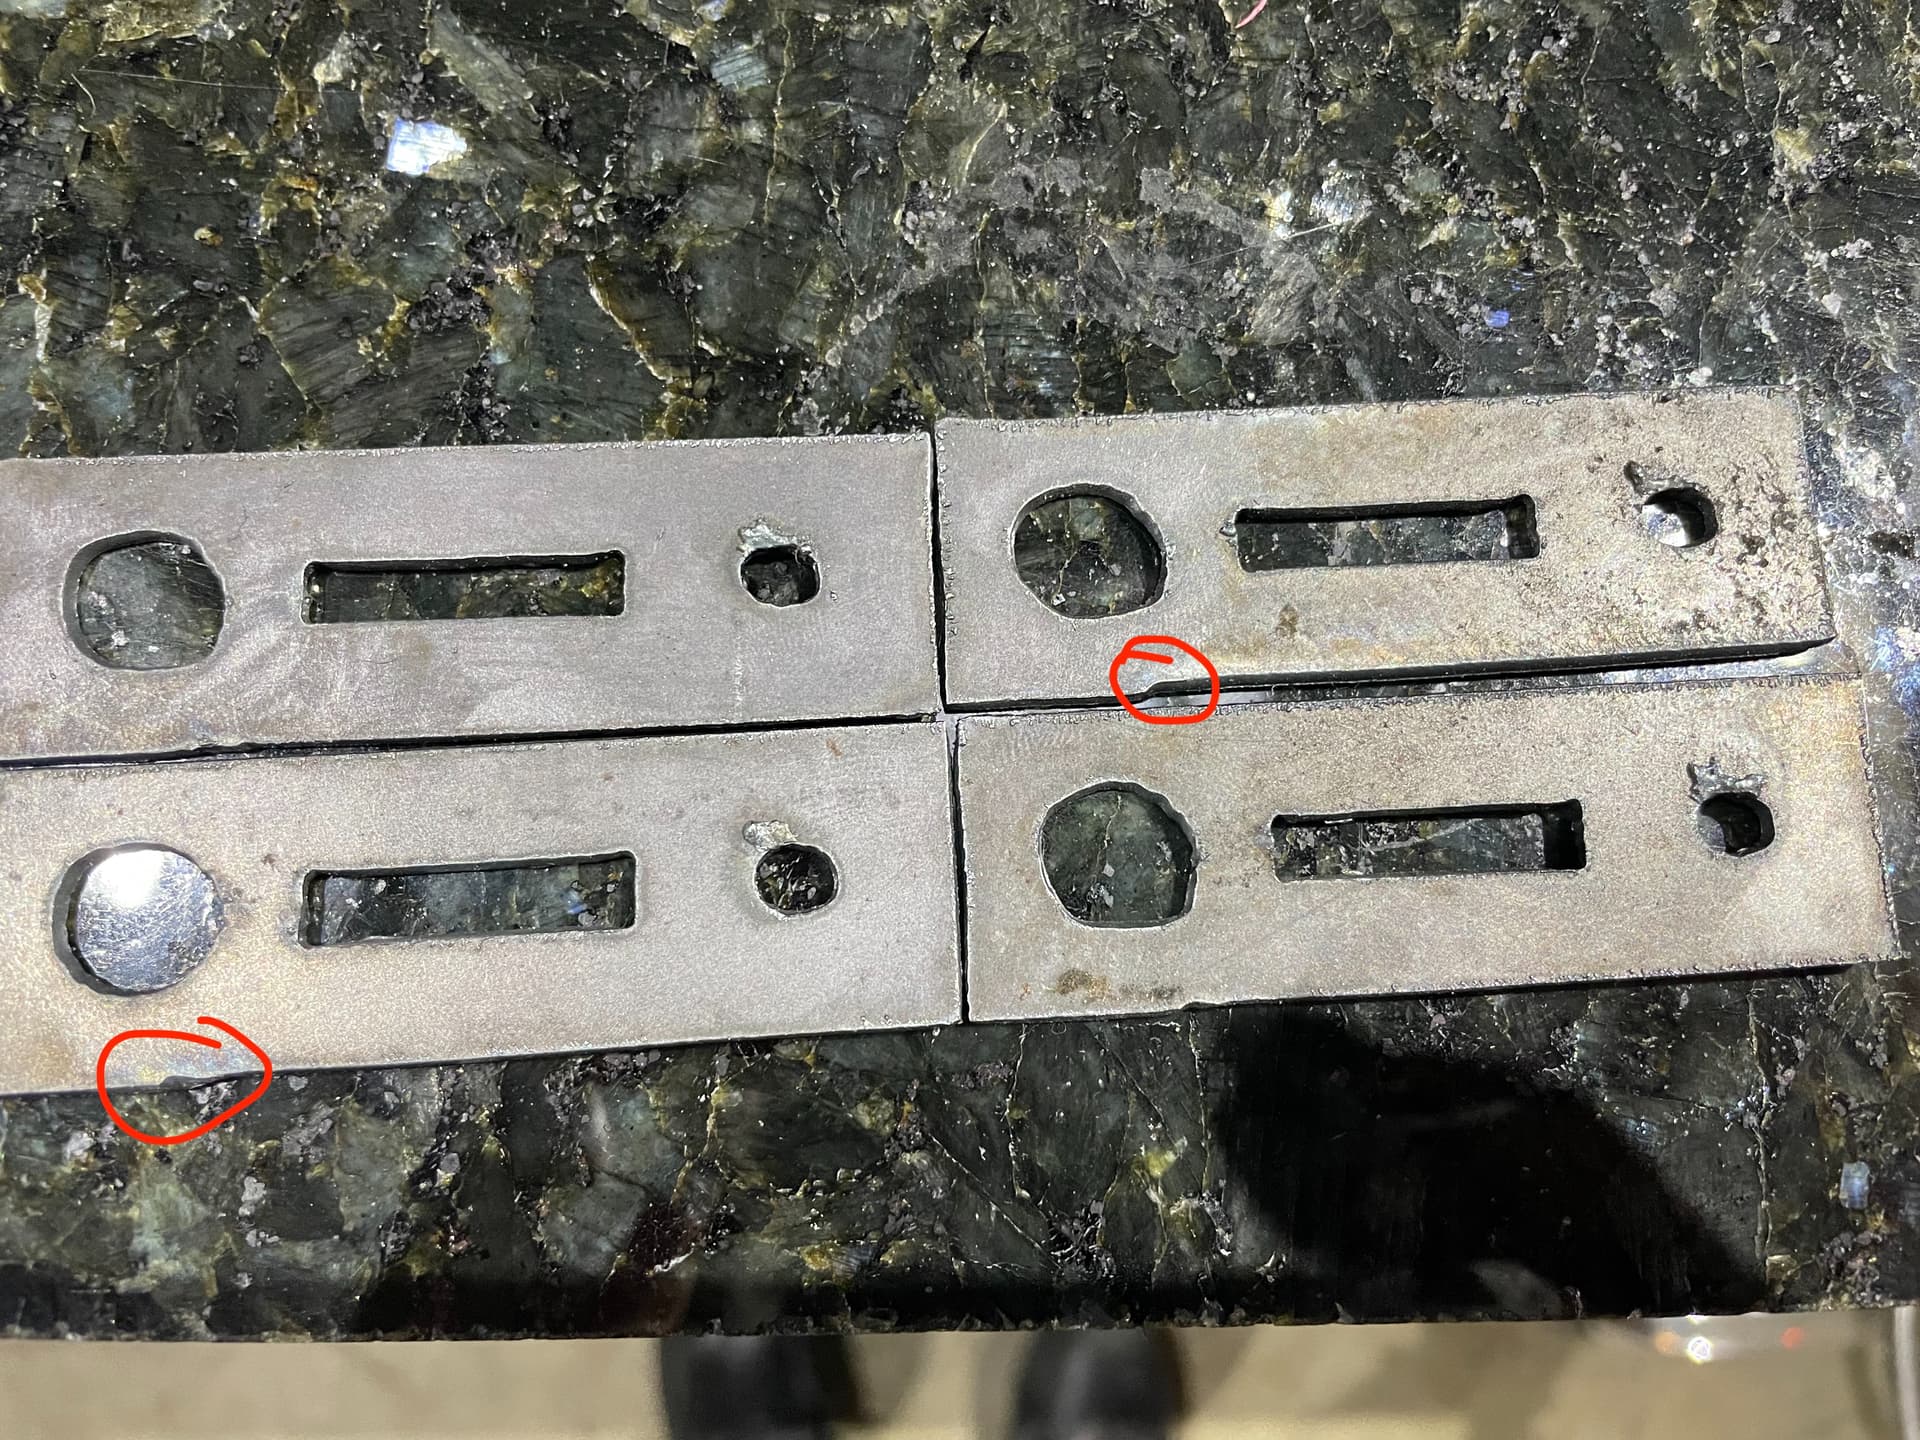
I then tried a new test pattern, a 3"x1" rectangle with two circles and slot, and noticed here that the starting and ending point for the cut didn’t always perfectly match and were off by a similar ~0.05" offset (see photos).
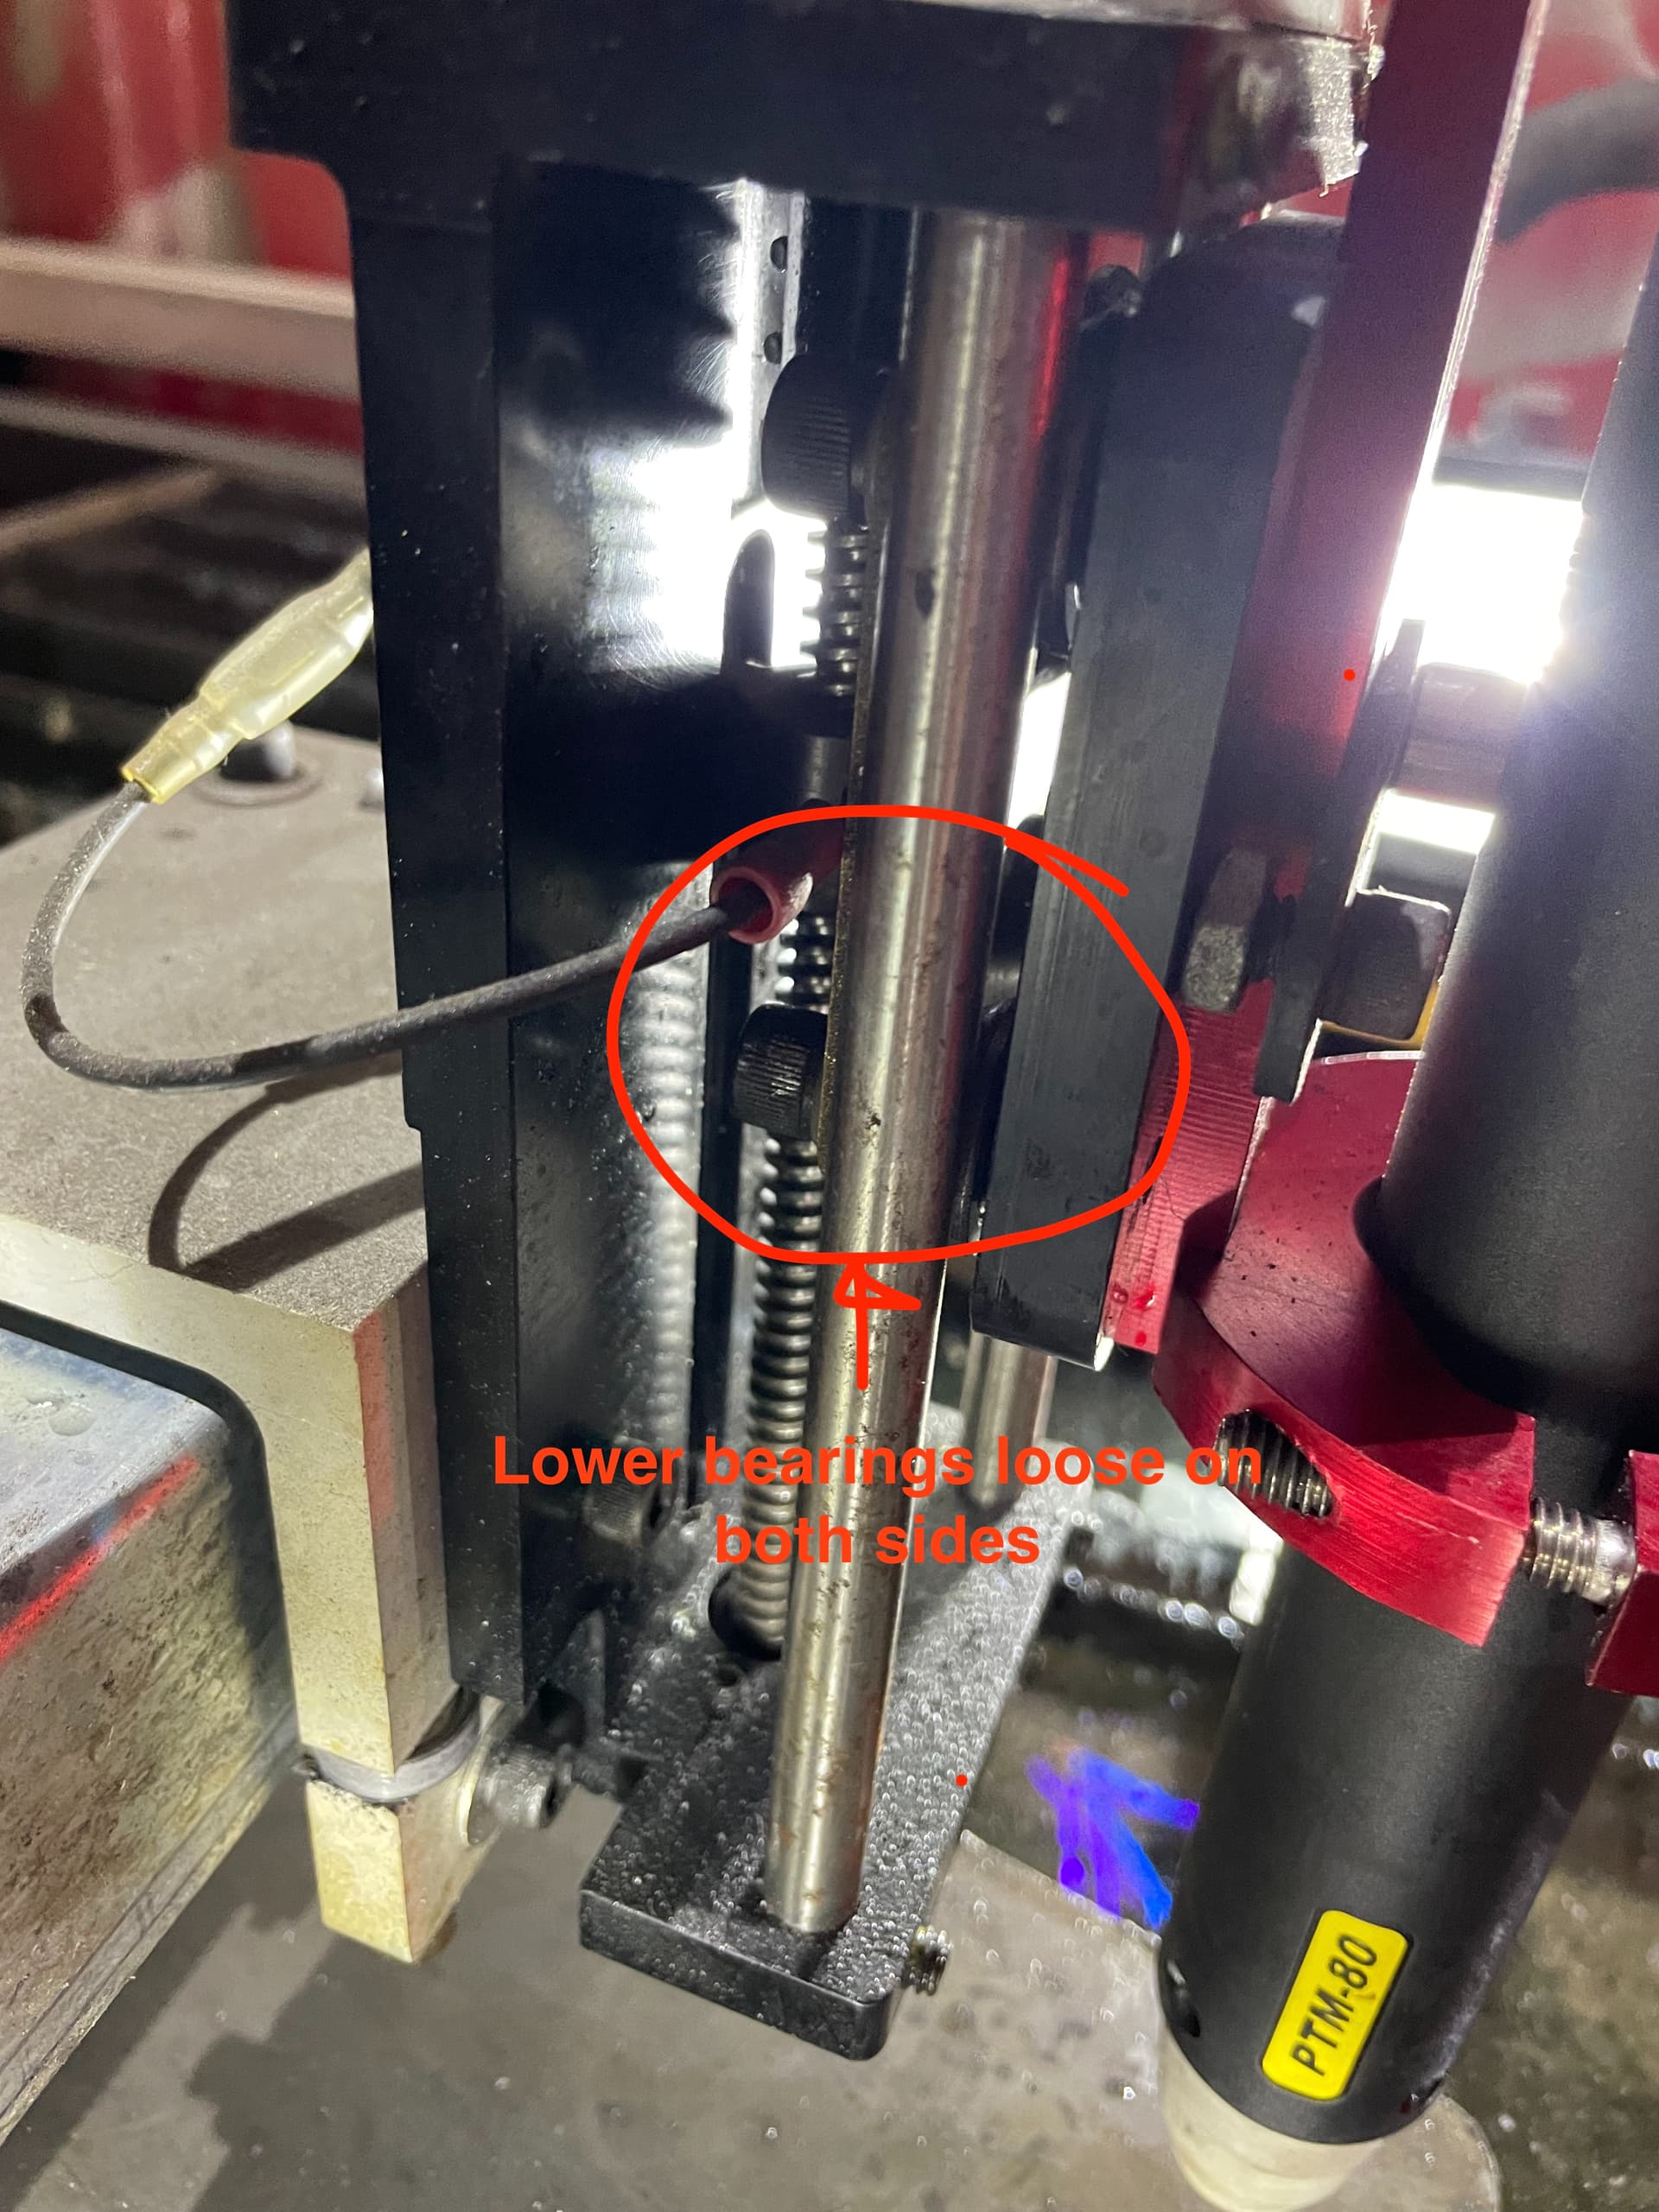
After seeing this I examined the CNC torch mount and discovered that there was a wobble on the Y-axis that could be demonstrated by moving the torch cable, and I now suspect that this wobble could be the cause. While the upper bearings seem to have no play on them, the lower bearing were not as tight, and I tried tightening the bearing screws but this didn’t eliminate the wobble. This could have always been present, but with the previous hand torch there would always be downward pressure in the negative Y direction from the torch and the cable coming out the end, possibly masking the issue.
Has anyone else had this problem? Any ideas for a solution? I’d really rather not reinstall my old torch but I’ve got jobs that need to get done with this soon which require the accuracy I’ve come to expect.
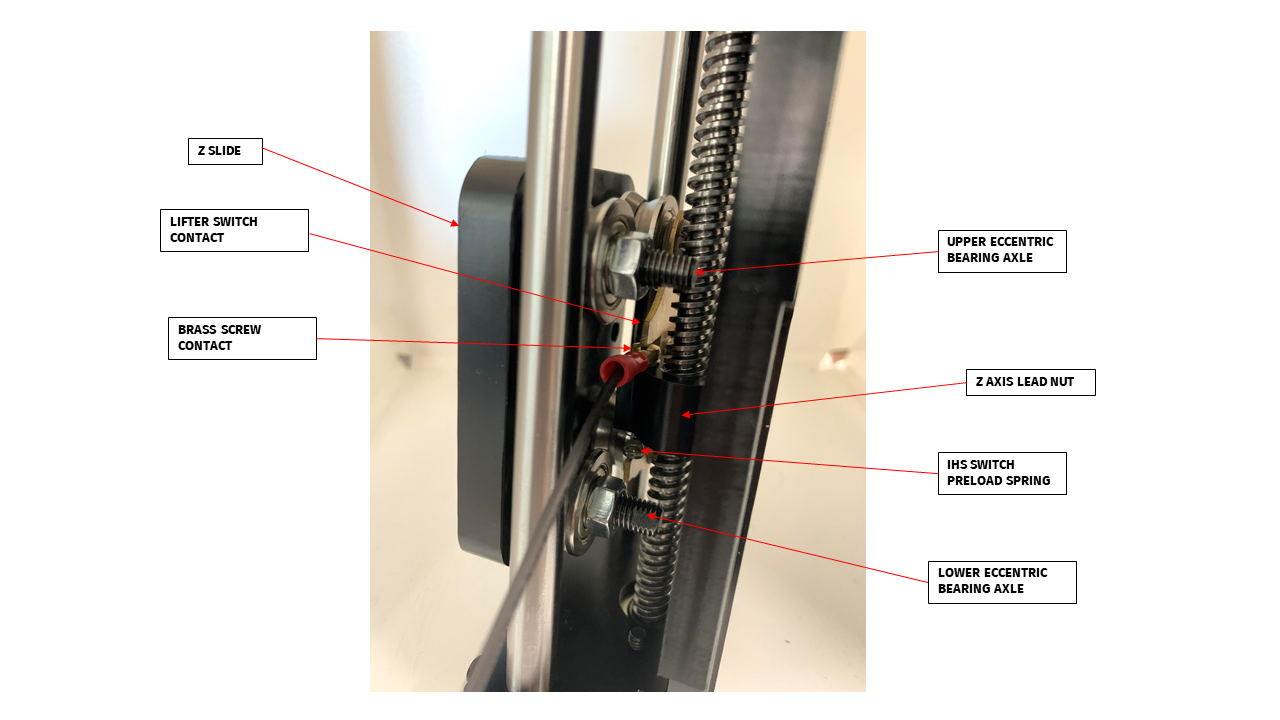
There are eccentric axles on the bearings on the right side. Use the flat on the axle to hold it and loosen the nut. Then rotate the axle until the play is gone and tighten the nut again.
I had the same problem you’re experiencing when I upgraded from the hand torch to machine torch. Follow @mechanic416 directions and it will take care of it. I think you’re right. I think the cantelevered loading of the hand torch hid the play I had in my z axis bearings. The machine torch is a more balanced load on the assembly.
Thanks folk, I’ll give this a try when I’m in my shop later this week. Now that I know the word to look for (ie eccentric) I see other posts about this and found this image in Langmuir’s setup guide: https://assets.langmuirsystems.com/img/pro-assembly/elec/ihs.png
If I understand this correctly, I need to loosen the nut on the lower right bearing, then rotate the actual axle until the play is gone, then tighten that nut again?
I spent ~6 hours today adjusting things and trying to get good cuts, and while I’ve eliminated most of the wobble (*) now I’m just getting consistent but not right cuts. Things I’ve adjusted:
Tightened both z-axis eccentric axles until they are tight and don’t bind
Tightened one loose nut between Z-axis assemble and X-axis carriage
Adjusted some loose bearings on the X-axis carriage
Switched to using much larger sheet of 16g rather than scrap, weighted it down
Tried with and without THC, the cuts without THC were substantially worse quality
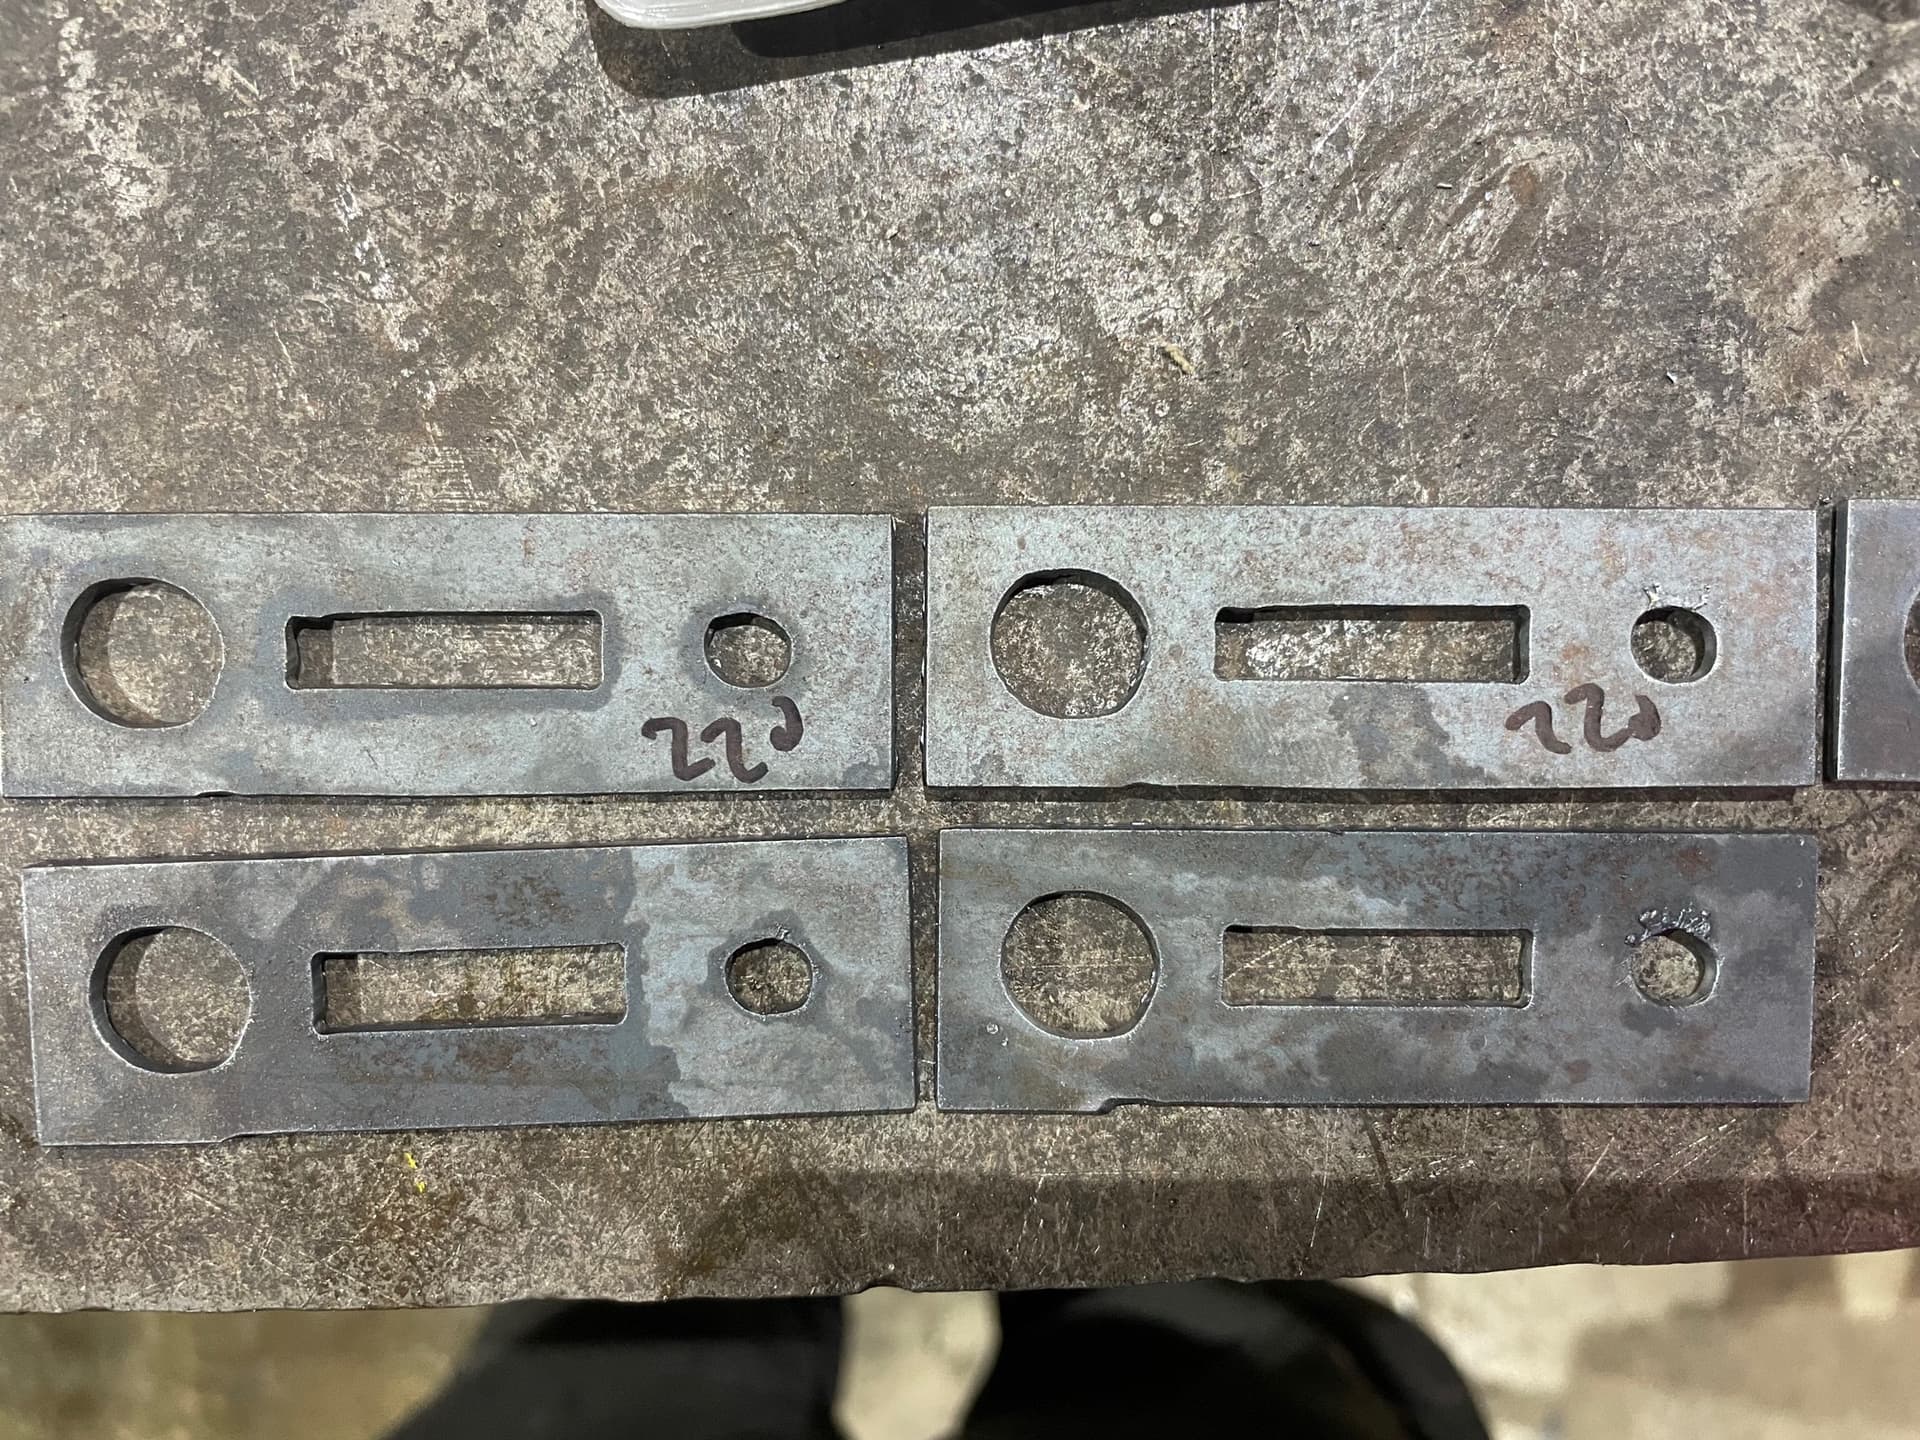
But after all of that I’m still not getting round holes and my 1" squares are off by 0.04" in the Y-direction. The its most obvious for the larger hole and where it is not quite matching up on the outer rectangle at the start/end point under the larger hole:
The only thing I still have on my list to try involved switching my THC from using the “raw” voltage pin on the CNC port to direct connections inside the machine, as the pin is reading 65-70V which seems to be common, although Langmuir’s help says thats fine. Any other thoughts on things to check?
*) Under 1/32" movement at the tip which is a lot better than I had last week, and the remaining movement seems to be in the assembly itself rather than bearings or carriages.
Those pictures show the signs of coupler slip between the motor and lead screw. If it is in the X direction, it could also be the small bracket that hold the X axis lead nut on the back of the X axis carriage. The two bolts that hold that bracket need to be tight, so there is no loss of motion when the X axis changes direction.
Thanks folk, looks like it was loose screws on the lead screw bracket on the X-axis carriage. I keep the couplers tight but hadn’t looked at that since setting this up almost two years ago. I’ve gone and tightened everything related to all three axis, and there were definitely some slightly loose screw elsewhere.
Out of curiosity has anyone written a decent regular maintenance guide for these tables? Mine isn’t exactly high-use (probably 40-50 hours of total cutting) but still seems to have shaken quite a few things loose during that time.
I agree that this would be helpful. There are a few posts where Langmuir refers to “routine maintenance” but there is no “guide” that I am aware of. They don’t even discuss lubrication in the assembly manual which most folks here swear by. FWIW, I am really liking the WD40 silicone spray on my X/Y screws.
