Langmuir Machine and 3D Print Assembly Challenge! 🛠️🔩

Langmuir Machine and 3D Print Assembly Challenge! :hammer_and_wrench::nut_and_bolt:

Calling all creators and innovators! It’s time to combine the power of technology in our exciting Langmuir Machine and 3D Print Assembly Challenge. Get ready to craft a multi-part assembly where at least one part is created using a Langmuir Machine for metal, and another part is 3D printed in plastic.

Here’s the blueprint for this thrilling challenge:
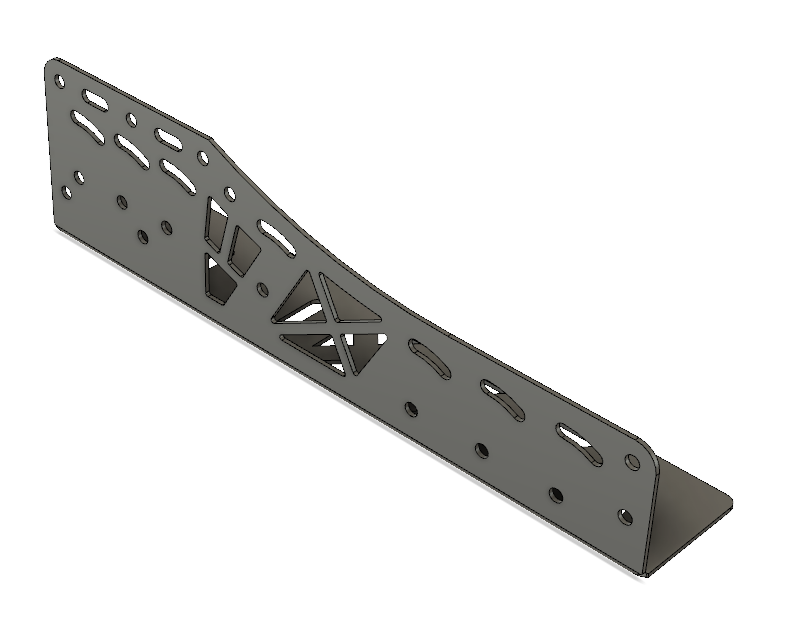
:wrench: Design and fabricate an assembly consisting of two or more parts. One part to be manufactured using the Langmuir Machine, crafting the precision of metal, while another part is to be 3D printed in plastic.

:wrench: Whether you’re devising entirely new assemblies or enhancing existing ones, let your imagination soar! Feel free to submit multiple innovative assemblies.

:wrench: Present your technical marvel by uploading project files to Langmuir’s FireShare platform and/or post to this topic. You may provide a breakdown of your assembly’s components and functionalities, showcasing the Langmuir Machine and 3D printing technology at their finest.

:wrench: Show support for your fellow participants by engaging with their entries, offering constructive feedback, and appreciating the amalgamation of technology and creativity.

:wrench: Additionally, while not mandatory, we encourage participants to document and present their design methodologies. This documentation could include the conceptualization process, iterative design steps, integration of the Langmuir Machine and 3D printing technology, testing procedures, and insights gained throughout the design journey.

:gear: While official awards won’t be granted, the real reward lies in the knowledge-sharing and technological advancements we can witness through each other’s creations.

If you find yourself lacking access to a 3D printer or a CNC machine for your project, fear not! This challenge also encourages a community build exercise. Reach out within our community, and we’re confident that fellow members might assist with design or even provide help in manufacturing a part. Let’s embody collaboration and support each other’s creative endeavors!

If you decide to materialize any of these groundbreaking assemblies, capture the process and final assembly, and share the journey with our community. We’re eager to witness your innovative fusion of metal precision and 3D printed ingenuity!

Remember, the focus is on crafting multi-part assemblies where at least one component is fashioned with the Langmuir Machine for metal, and another is 3D printed in plastic. Let your inventive prowess guide you as you leverage these cutting-edge technologies.

Should queries or suggestions spark your innovation, feel free to share them in the comments section.

Let’s embark on this technological odyssey together, celebrating the marriage of precision metalwork and 3D printing wizardry!" :star2::wrench::printer:

GPT helped me write this

9 Likes

Here is my entry. I am a volunteer ski patroller at our local mountain. Interestingly our patrol is one of the largest all-volunteer ski patrols in the US, and is one of the few all-volunteer patrols still around. We built our patrol building (which is one of the nicest patrol facilities out west) 100% with donated materials and labor and arranged transfer of the land the building sits on from the State of Utah to the Ski Patrol. I don’t understand all the legal stuff here, but it was the only way we could build the facility with donated funds.

One of the lifts requires snowmobile transfer of patients from the bottom of the lift to the base patrol building. We have been lapping our ski equipment or leaving it at the lift when accompanying patients to the patrol building. To avoid this hassle, I decided to design a ski rack for our patrol snowmobile.

It is super simple and nothing earth shattering and is a work in progress. I will have to outsource the 3d printed parts. I confirmed with the boss(wife) over the weekend that a 3d printer is not in my near future. My coworker has a 3d printer and I think I have negotiated a trade for a ski pass to print the parts.

The rack will consist of two bent plates connected by 6 round rods and bolted to the tunnel of the snowmobile with existing holes. I am planning to eventually use aluminum but will probably do a prototype with steel for testing. I included several different angle adjustable mounting locations to test out which position best locates the skis out of the way. It will double as a rack to transport gear as well, so I included several tiedown locations for bungies and straps etc.

The ski holder is a 3d printed plastic part that will be wrapped with a 1"x3/4" channel welded together in a U-shape.

The skis and bords will be strapped down inside the holder using snowboard style binding straps that should be here tomorrow.

I have had fun working on this and am excited to see it implemented into service this winter. I will get a pic when it is mounted on the sled and post it here.

Meanwhile here is a pic from last Saturday 12/9 I am the ugly one up front

6 Likes

Who do you think reads these post? I can barely use the most basic words and you throw this out there. Now I have to look it up to see what it means. Man things are getting way to hard for me :rofl::rofl::rofl::rofl::rofl:

6 Likes

Your post reminds me I have a old Burton kids board in my pole barn that needs one of these straps. They make a few different ones and I didn’t have luck finding it years ago. Thanks

What filament do you plan to use?

1 Like

I haven’t really researched the different filament types. Do you have a suggestion? I am planning on the channel frame providing the structure and the plastic just being an interface between the skis and the channel. I have considered using a plasma cut face to add some rigidity to the holder. Like I said still a work in progress.

4 Likes

Really not sure. I’ll have to do some testing.

TPU would be ideal, but it’s expensive and a bit finicky to print. PETG would probably be a good choice, since it’s a bit softer and more flexible than PLA.

4 Likes

Have you ever mixed PETG and TPU?

No. It would be interesting to see if TPU would stick to PETG as a top surface.

2 Likes

ASA filament is suppose to be extremely UV resistant and strong like ABS. Would it be a reasonable option?

ASA requires an enclosure and the fumes are toxic. I’ve printed a few things with it and the smell is awful.

The claims of PLA breaking down from UV are greatly exaggerated. Heat is more of a concern and that is only if some deformation would be a problem.

I’ve had a phone holder printed from Black PLA+ on the dash of my truck for a couple of years with no sign of breaking down or melting.

3 Likes

Did you see the sale on Amazon for the PLA+?
https://a.co/d/35Q9wvH

I don’t know what you usually pay but $17 per roll sounds pretty good?!

1 Like

I’d be concerned about the plastics becoming brittle at cold temps. I have no experience here in southern CA, but you might take some pieces of filament and put them in the freezer and see how brittle they become. Just a thought…

1 Like

I just read where a recommendation for removing threads on PLA+ prints was to put the item in the freezer, thus making those threads easier to fracture. So you make a good point.

The other point I want to make: Daniel, WHERE HAVE YOU BEEN? I still remember your post about piercing the centers of holes for a lead-in and I still use the method you came up with. By the way and FYI, there is a group of individuals working on a new Post Processor for Fusion 360 that includes a number of great features such as carrying tool settings to the post processor and it will potentially include a feature for pecking the center of holes. But that is way off this topic. If you are interested, send me a message if you want a link to that topic.

1 Like

Huge life changes that last year. My mom passed away December last year (I was taking care of her here at home), and my son is off to college the past few years. I’m alone in the house for the first time in 25 years. So 2023 was a year for me to get used to life in a different way. I played, bought a Van and I’m converting it to a camper, stuck my nose into some different social stuff. All part of the process of moving forward :slight_smile: Thanks for asking!

Message sent BTW

4 Likes

I made a swaging die for a 3.5" kitchen sink basket. I wanted some nice big drains that sat well below flush. I installed X4 in my XR and i am sure the die could do many more.

The dies were design in Fusion, exported as a step file to Bambu Studio and Print with 100% infill ABS on a X1C. The backing plates for also design in Fusion and cut on the XR from 1/4 mild steel.


7 Likes

Awesome!! I have been doing something similar on a little smaller scale. I designed a ski boot shelf for my locker at the patrol building. I cut the shelf out saturday. The shelf will be on a 5° slope so the melting snow drains to the front. I 3d printed the die for the 1/2” drain hole lastnight. I just did 20% infill on the prototype
And decided to make a couple of changes. Printed another one this evening at 100% and plan to try it out tomorrow. I designed the shelf bracket to be 3d printed also. I haven’t printed one yet. Might make some changes to reduce the filament use and print time.

3 Likes

I never would have thought plastic could persuade metal like that. Glad you proved it could!

That new table looks good on you. :wink: I almost caught a reflection of you on the rim of the sink drain…just kidding.

2 Likes

mirror-mirror-bear

8 Likes

Laughed out loud! Thanks!!

And my 18 mo old loved it!

2 Likes