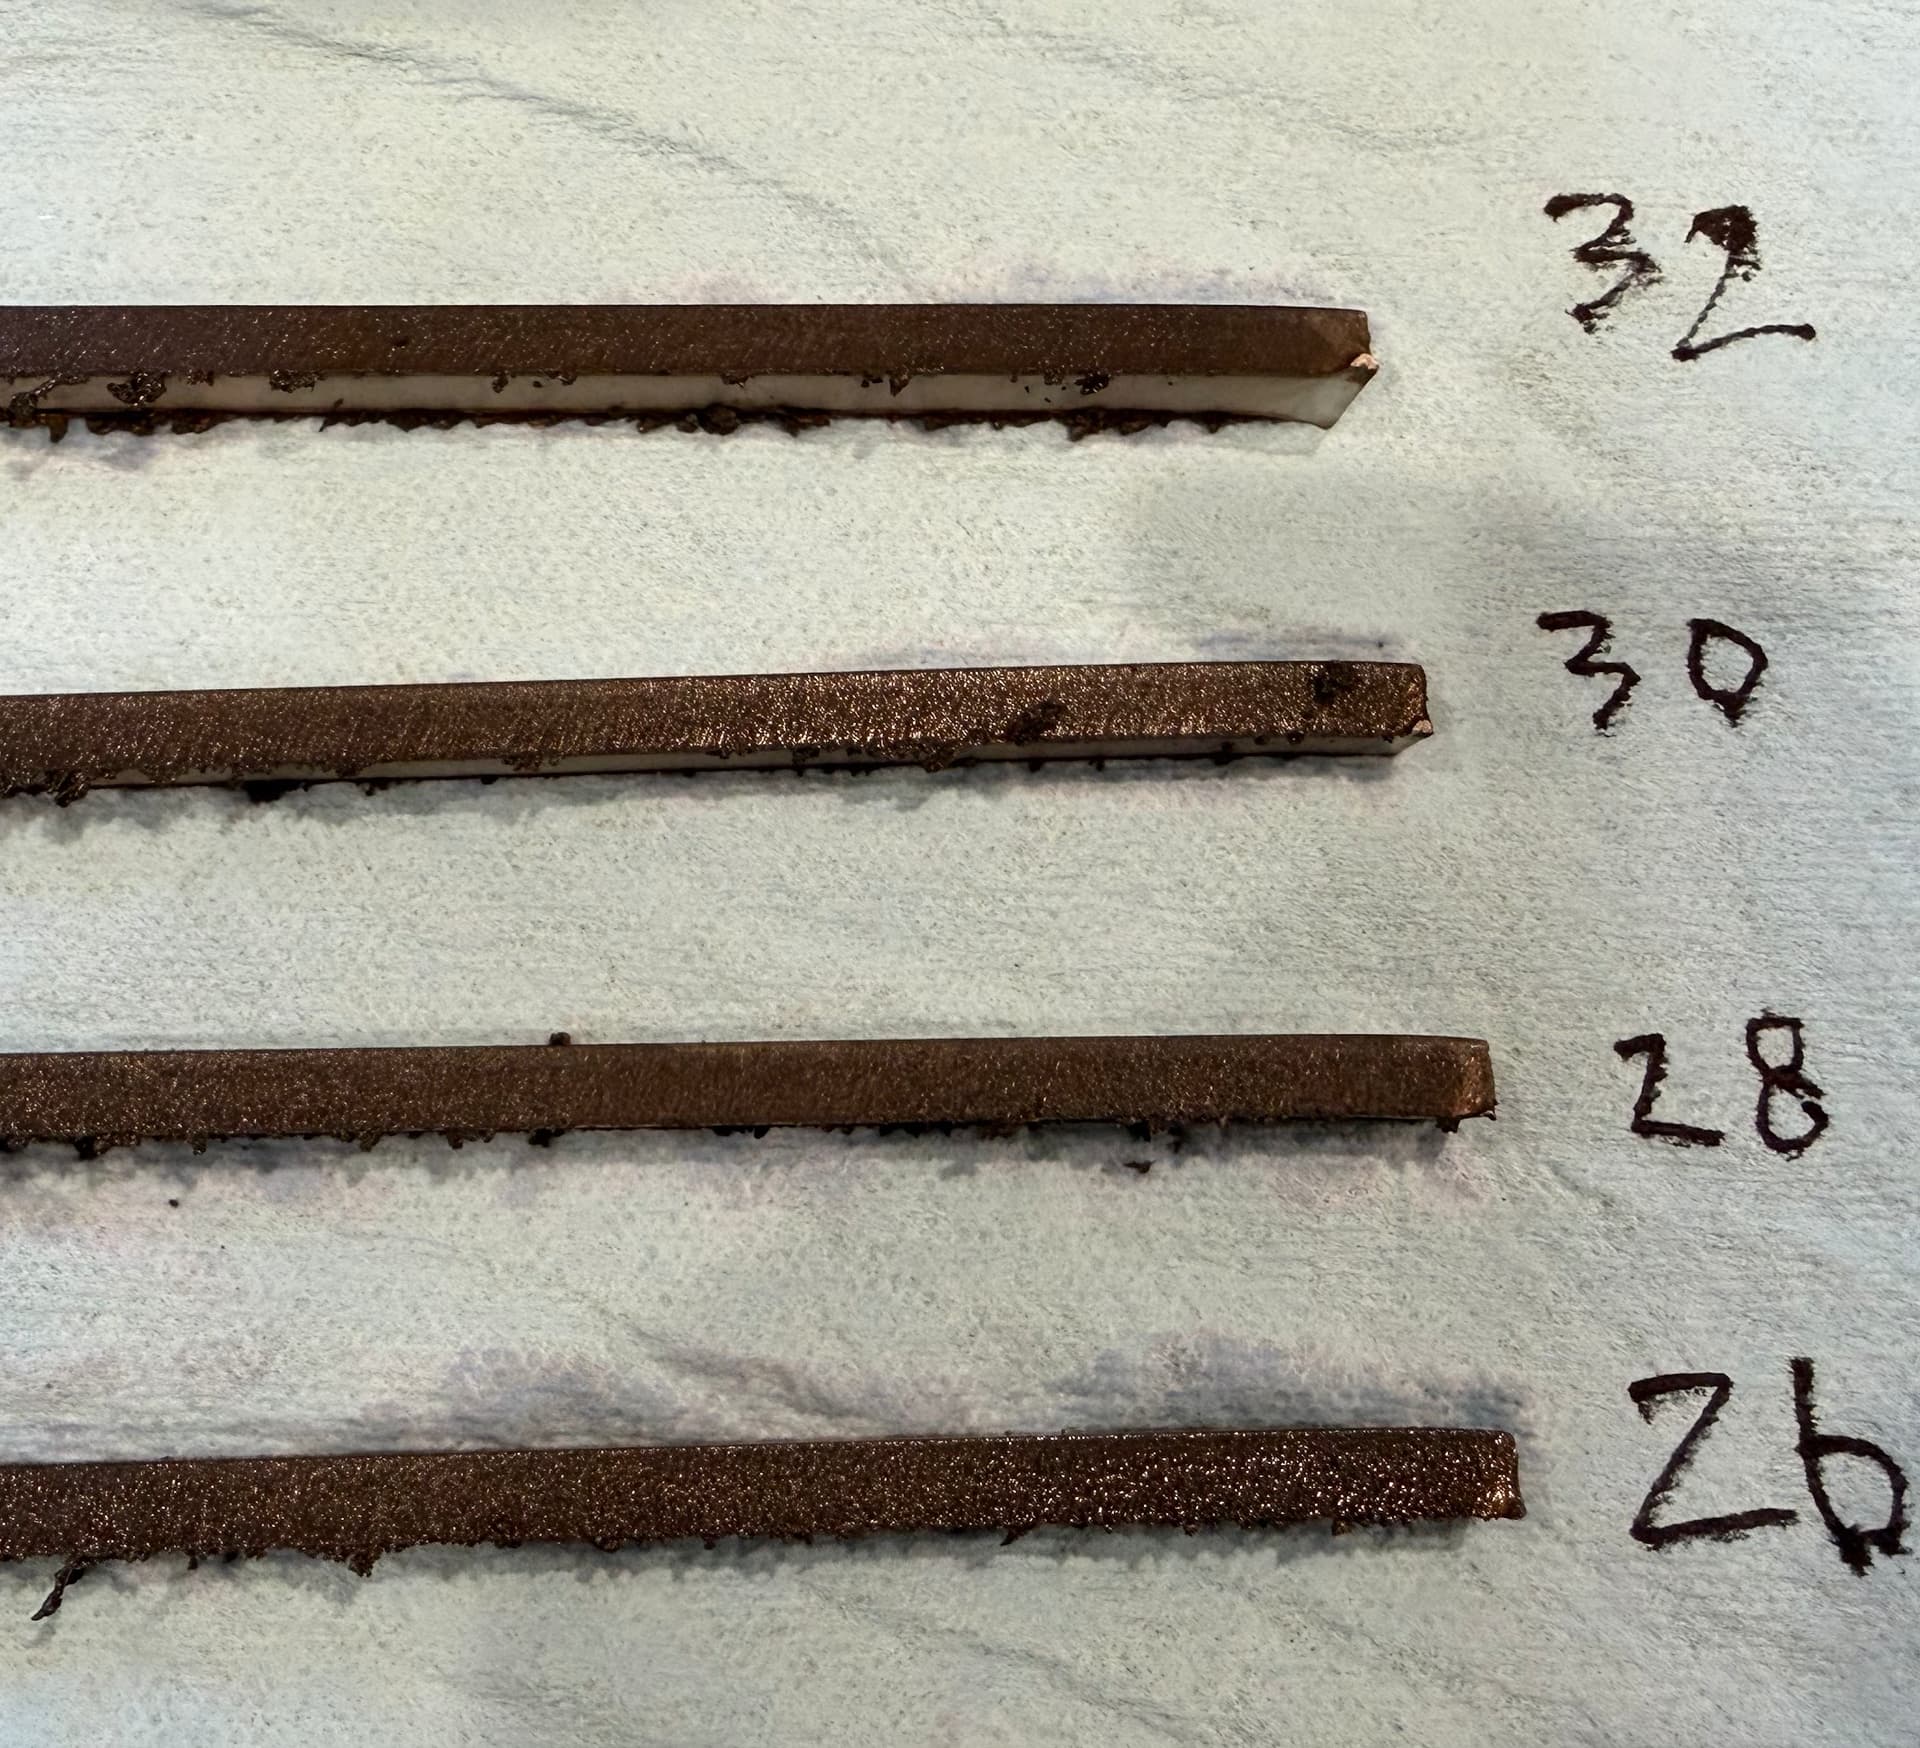
Running the torch off the sheet is hard on nozzles. It’s hard to tell if this nozzle has a reducing shelf in it or it’s now out of round.
From this picture though it does not look like it is round anymore.
Running the torch off the sheet is hard on nozzles. It’s hard to tell if this nozzle has a reducing shelf in it or it’s now out of round.
From this picture though it does not look like it is round anymore.
I replaced the tip. it was definitely a bit larger than the new ones.. I feel like a kid learning to drive stick and grinding the gears on dad’s car.. (joke for old people who remember what manual transmissions are)
It didn’t seem to make a ton of difference, so I just made a few sample cuts and reduced the speed without changing other parameters. The dross certainly improved with the slower speeds to a point.. And the tail attachment also improved, but never completely released without a little wiggle by me at the end.
Another issue. The plasma cutter and x axis don’t appear to be plumb. I have done the alignment but looks like it is off again. And the end points still are not getting cut. Still using 0.25” overlap on end, but not working ???
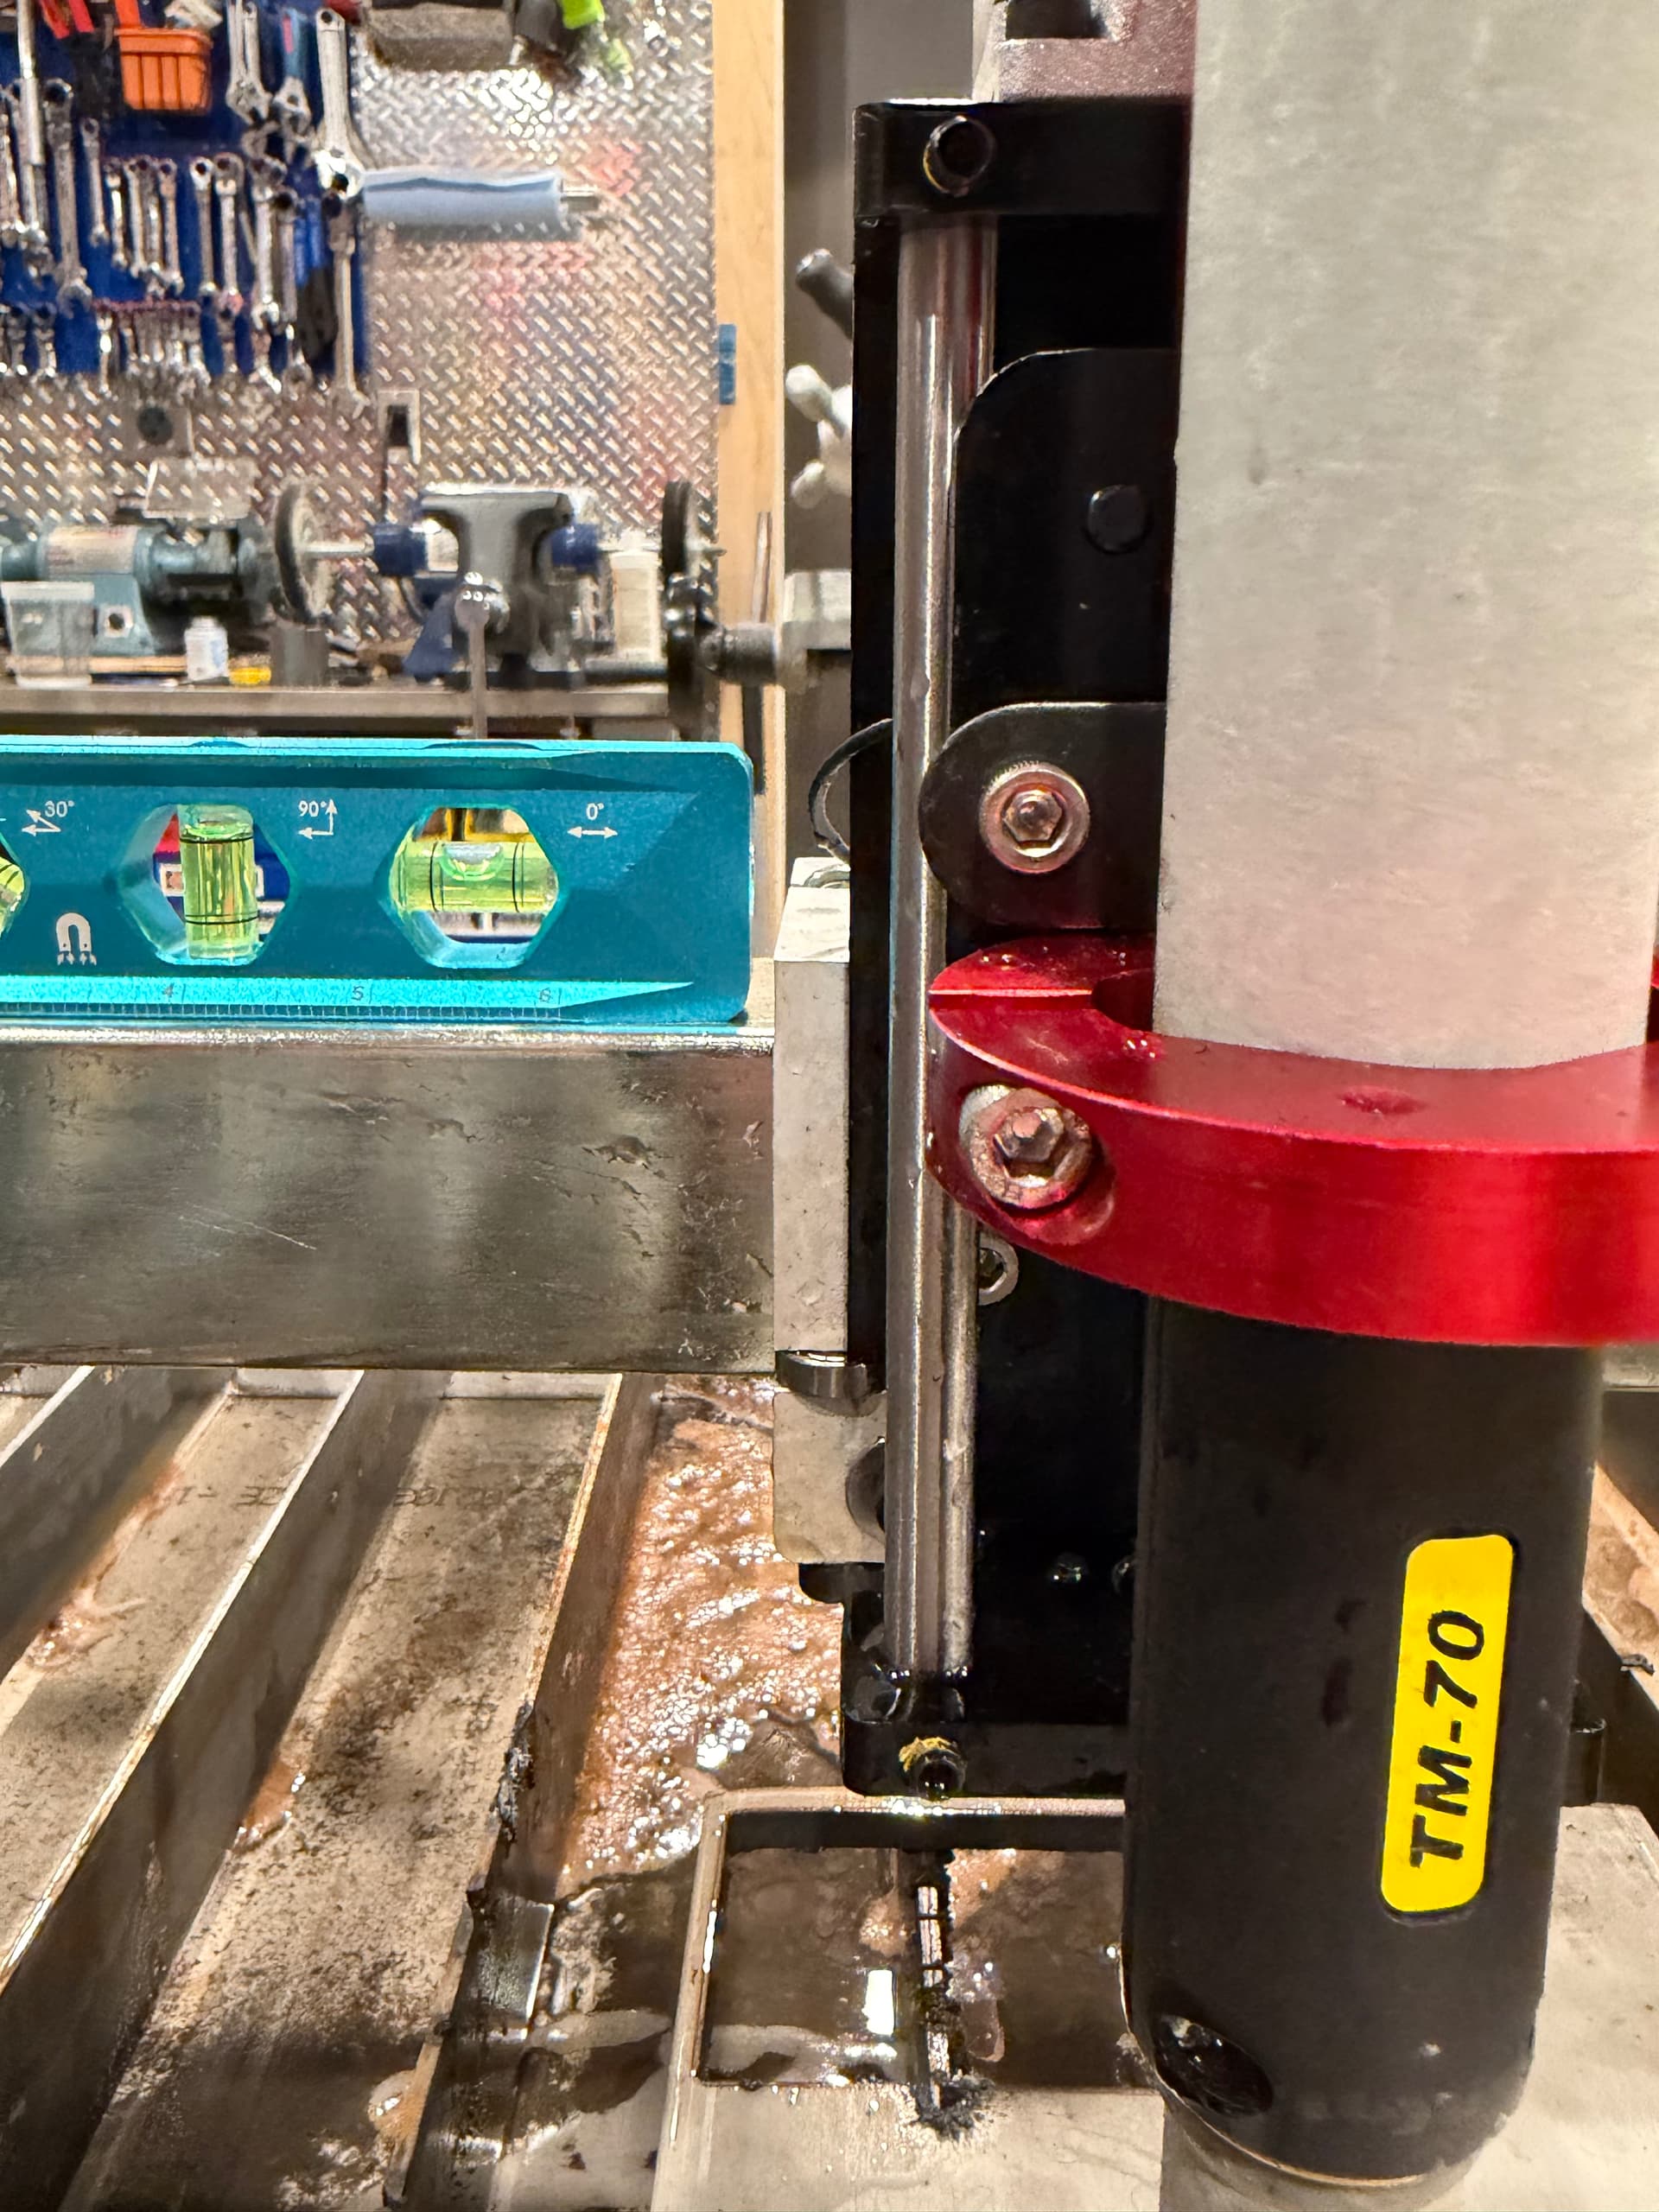
To tram the torch use a square. make sure you dont have any crap on top of you slats and lay a 4’x4’ sheet on the table and use a square to check and see how square it is. check in both x and y
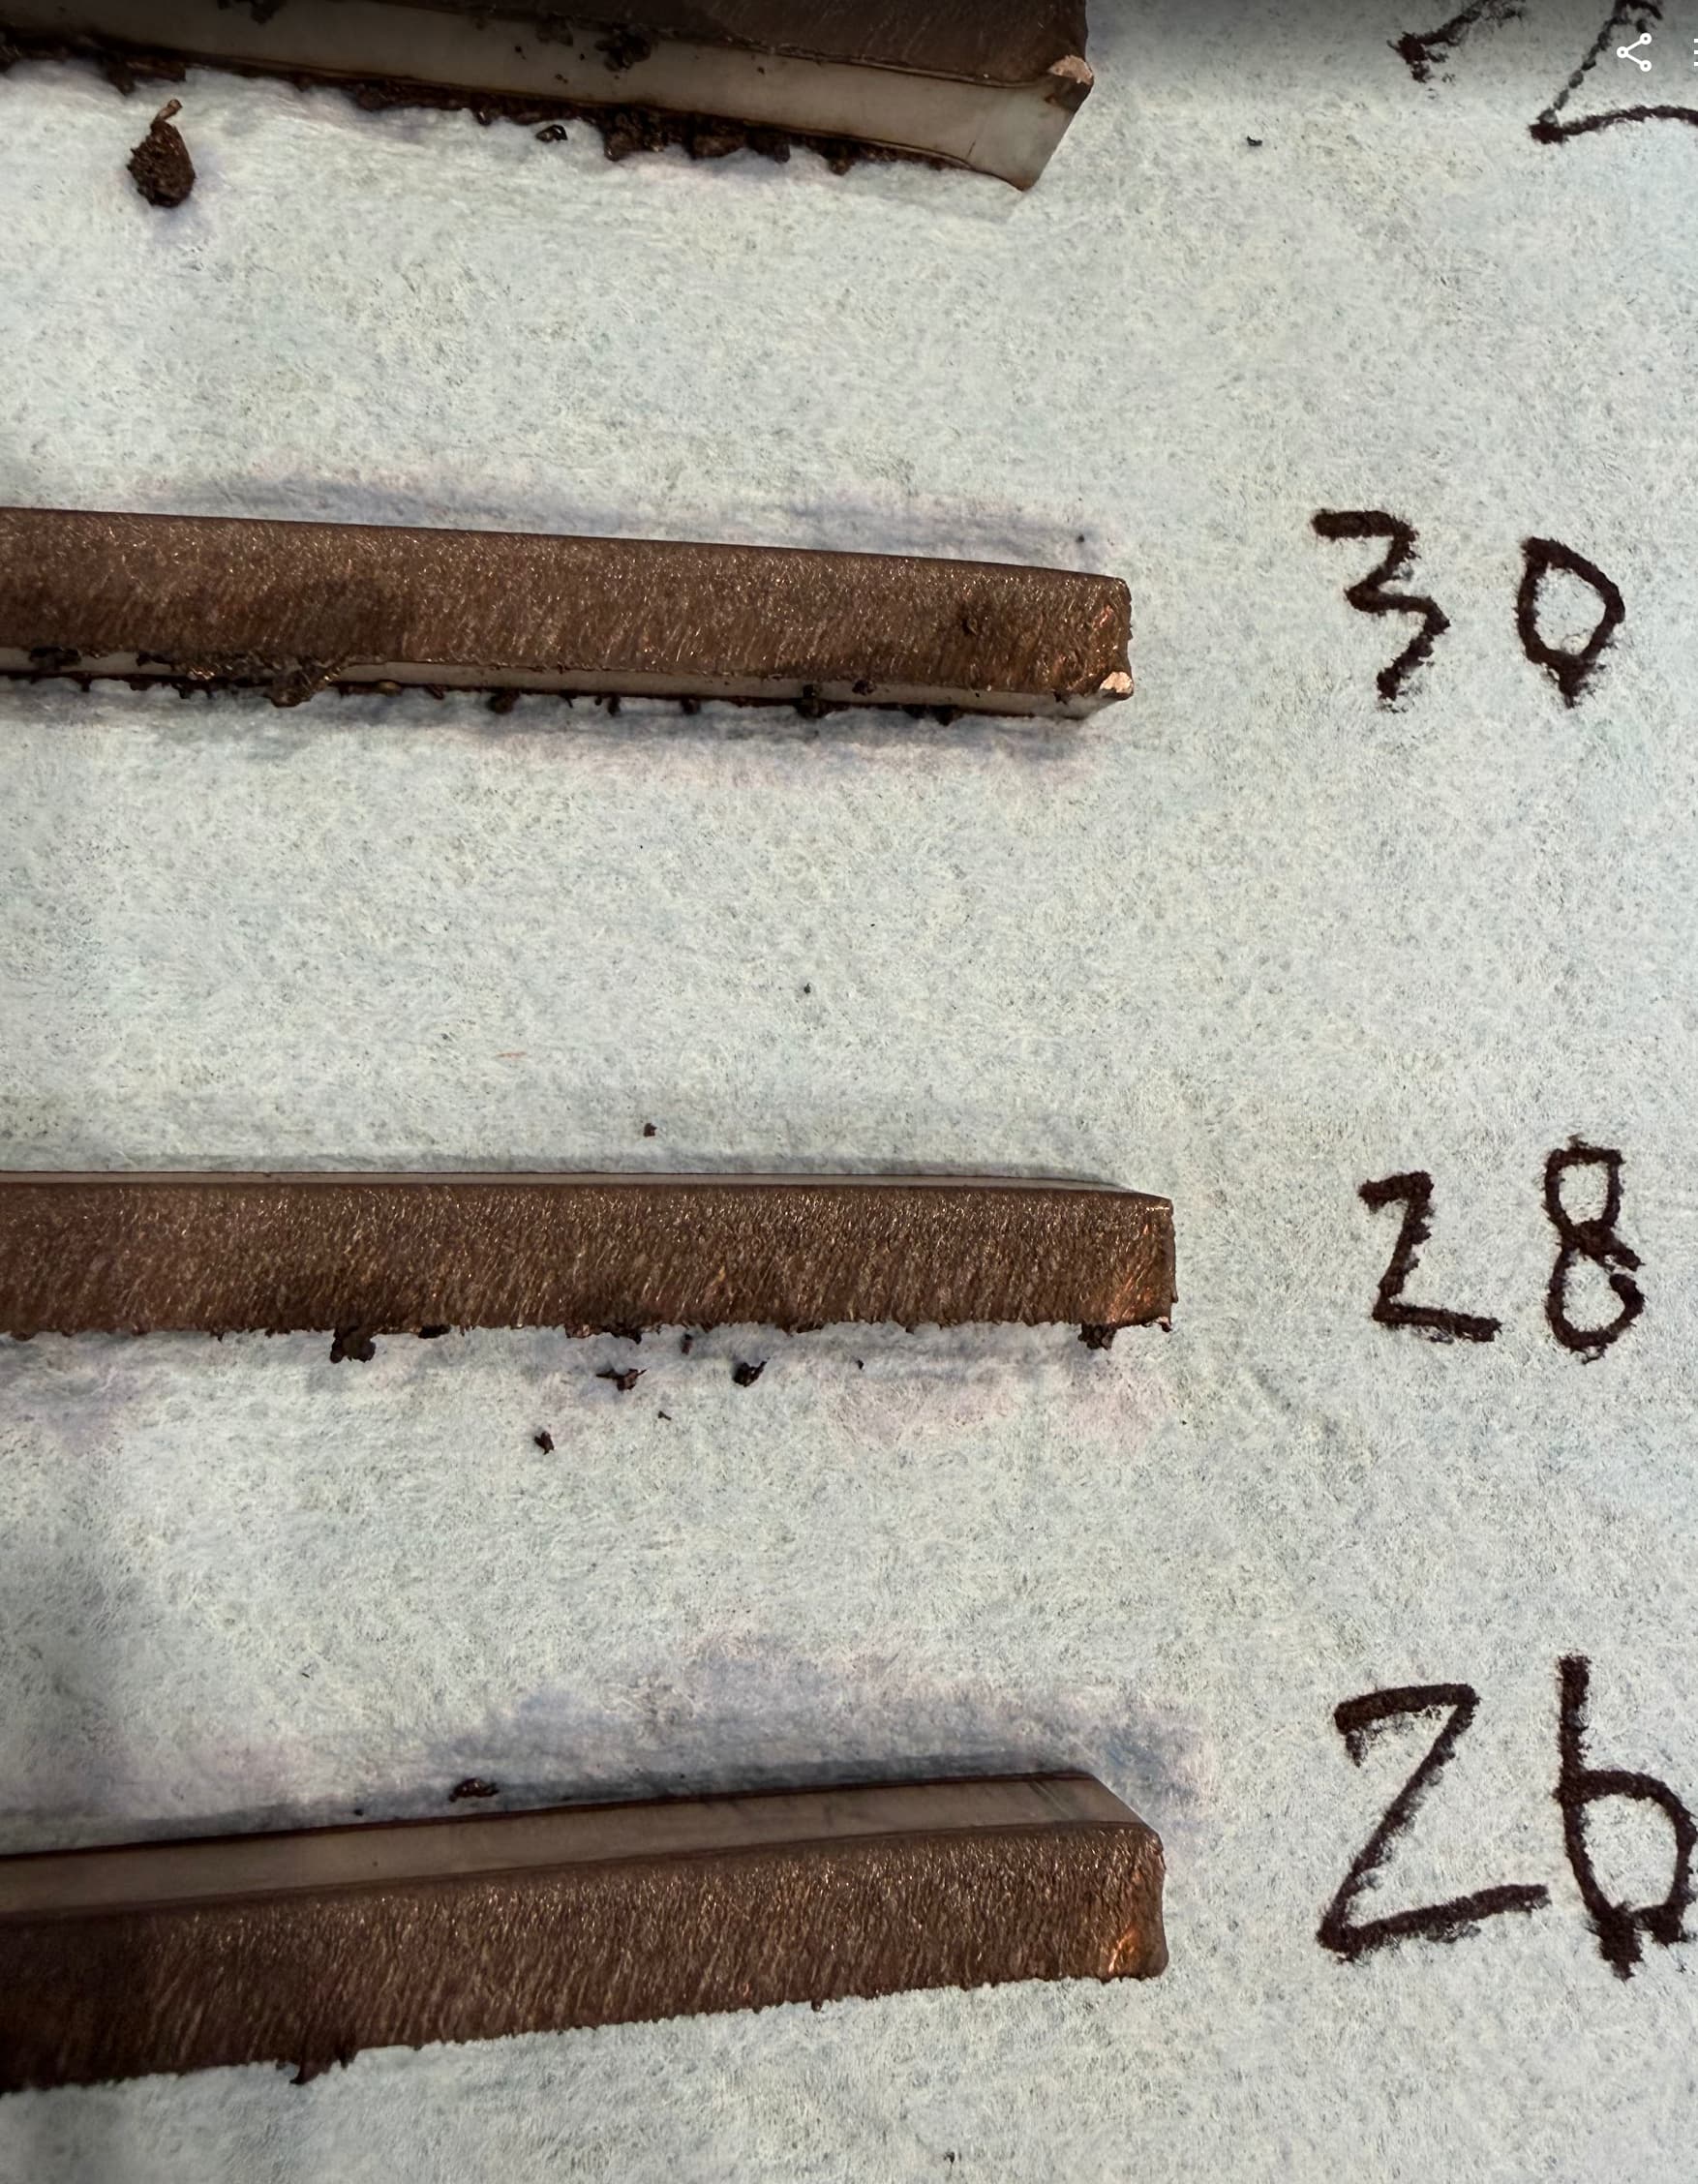
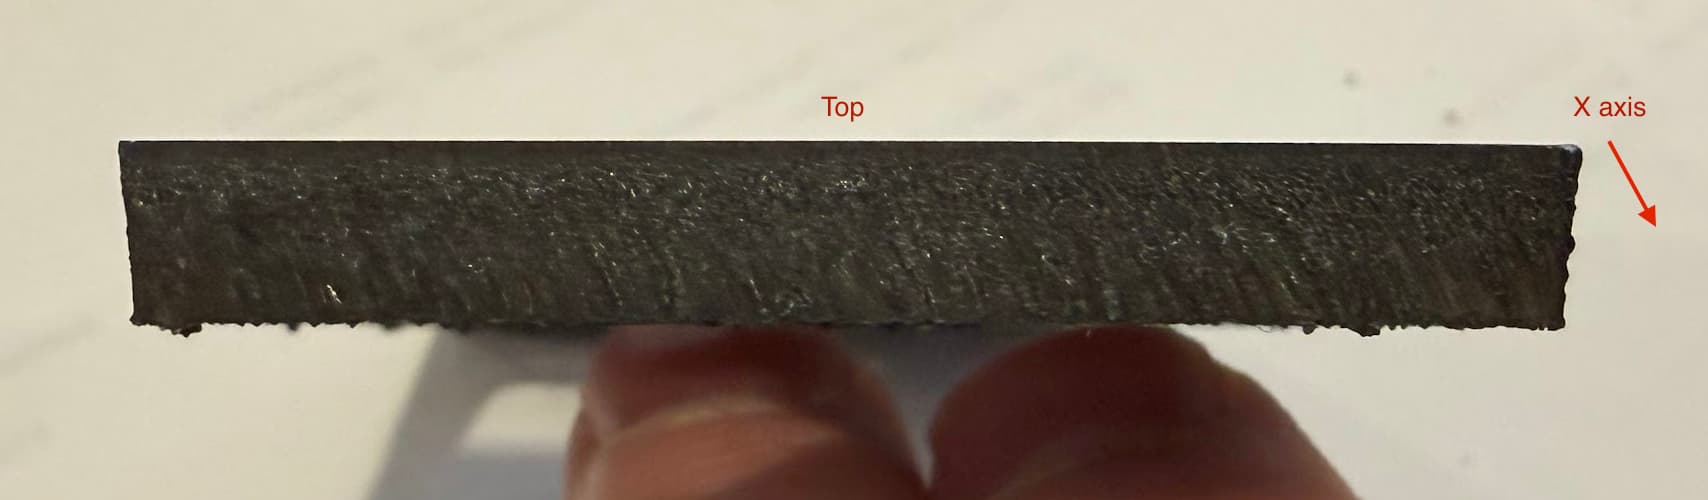
looks like a lot of taper in that last pic. cutting 1/4”?
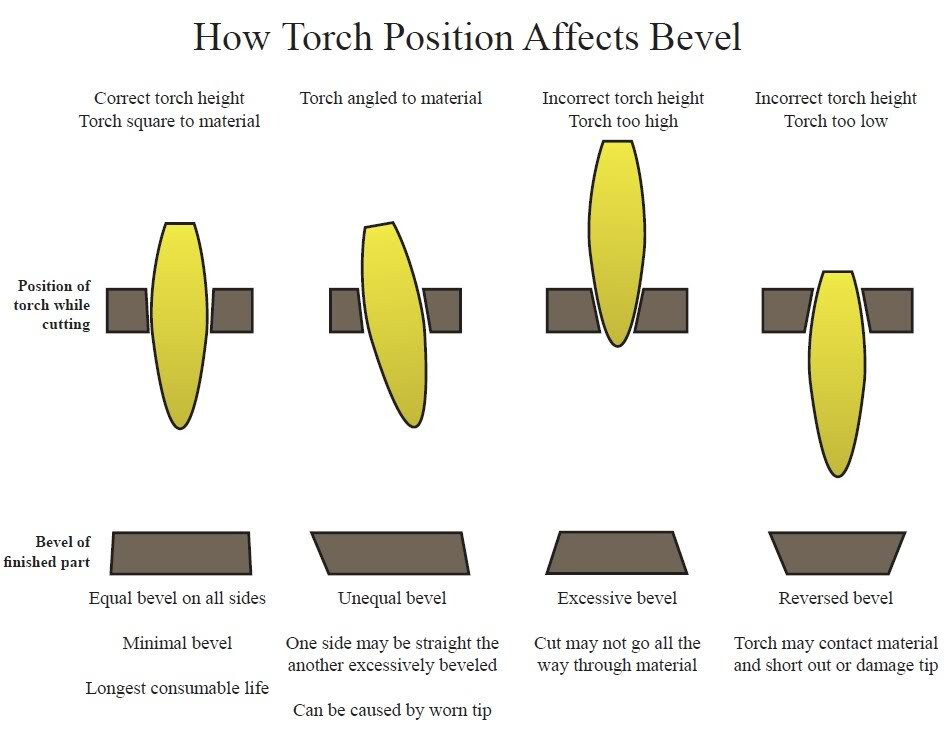
Your cut height can also add bevel to your edges, so you may be getting bevel from both the lack of a perpendicular torch and incorrect cutting height.
I may have a combination at play.. but this is a bit counter-intuitive. The pattern I am seeing on the part looks most like the 2nd image, with the same orientation, where the L + R side cuts are beveled as in your image..and the top/bottom show the forth image with reverse bevel, where the top is maybe a bit more reverse-beveled than the bottom..
The counter-intuitive part is that when I threw the level on the torch and x-axis, AND table.., along that axis - the table was flat.. and the X axis was pitched down at the free-end (right on crossfire), so I would expect the bevel seen to be in the opposite direction than it is?? There’s a stumper in need of some “sage” advice?
Confused Dog look.
Definitely physically measure your cut height. I also use a level to level the torch that isn’t what the directions call for. I also level the plate as well with a level.
Here is a .tap file you can use. It won’t fire the torch. Be sure to run it on material that doesn’t give a great deal in touch off. When the program end you can measure your cut height.
cut height test.tap (224 Bytes)
ok will do all and report back.. but shouldn’t this theoretically be taken care of with the IHS/THC and the torch height setting in the CAM? If I find it is off, is this tunable?
Another thought? The torch has a shield which extends beyond the cutting tip.. I am assuming that this is factored into the calculations.. so if it calls for a cutting height of 0.06”, than that means the distance to the shield and not the cutting tip which is recessed probably at least 0.06”. It appears if anything I have the torch set too low based on the trapezoidal appearance of the sides both tapering inward.
It is a known problem to have to alter your cut height. I believe it is computer related. You will just off set your cut height in your cam.
Are you leveling your piece before cutting as well?
I was not leveling the piece.. the test cuts I am making are < 6 inches and the slats were level and new (without dross, etc) so I expected the THC to accommodate any minute variances.. this is the point of a dynamic z-axis, right? Plus piercing accommodation?
I will definitely verify level on the workpiece as I fine tune the height.. and continue with basic straight cuts in x/y directions to dial in plumb. Will report back with results in a few hours.
If this test piece was cut without changing the position of your metal, it is showing equal but opposite beveling on opposing sides. That would say the torch is mounted correctly in that plane and it is likely too close to the plate.
Your shield should not be extending past your torch tip unless you are using a drag shield. In that case, you might have the wrong shield. I am not familiar with the shield you are using. I will need to do a bit more research. I see that in your case it is extending.
Edit: I see that is the shield that is often shipped with your particular torch but it doesn’t make sense to me how that is going to use IHS (Initial Height Sensing) and put the torch in the correct position. I saw some photos on Ebay where the torch is assembled using a more typical shield that is used with the Hypertherm torch. I wonder if that would work better. I don’t know. @TinWhisperer @mechanic416 or someone else with more experience with this might wiegh in.
@zargnut Stop messing around with the stainless and get some mild steel to play with so you can get your setting close. The consumables you have are the right ones for the plasma cutter and torch you have. If the table is level then square up your torch to the table not off the mounts off the torch. Make sure you cut height is around 0.060” by manually checking it with feller gauges. Pierce height should be .150”, pierce delay should be .7 sec.
Also you should be using nitrogen or tri gas cutting stainless.
First I went back and confirmed that the x axis beam is parallel to the table slats.. this is the case, within 1/16 over travel.
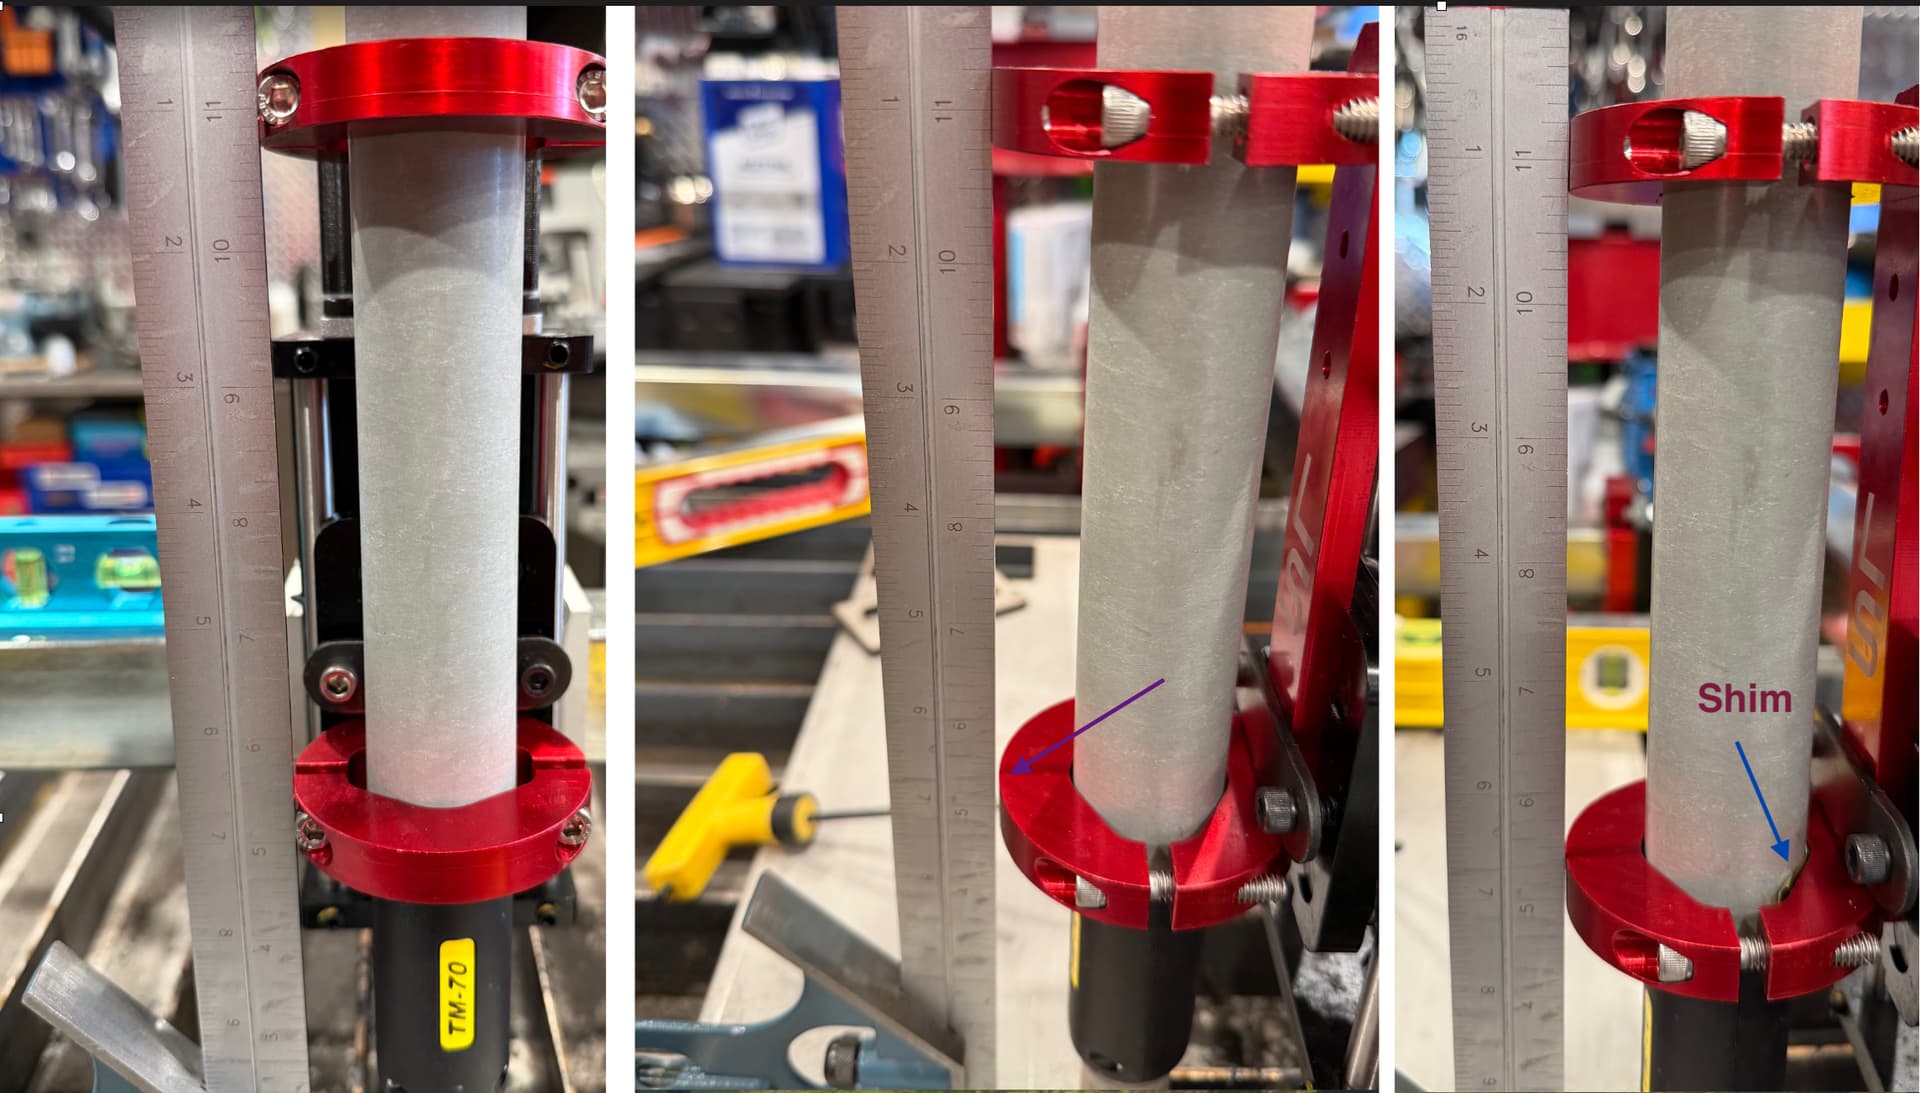
I took square and looked at torch compared with workpiece.. In the x axis, it was plumb. But in the Y axis, it was not.. I verified the Z-axis assembly was fully seated in the channel and the holder was seated in the z axis. (2 channels). Then I loosened and tried to see if there was any play in the x-axis gantry (8 bolts used to address sag of x axis). There was a tiny bit of play, so I closed gap about 1/64. Then I used brass shim stock .017” to get as plumb as I was able.
I still have issue with torch height being too low based on the trapezoid shape. I will elevate incrementally to find ideal height. but overall this did seem to address the poor slanting cuts.
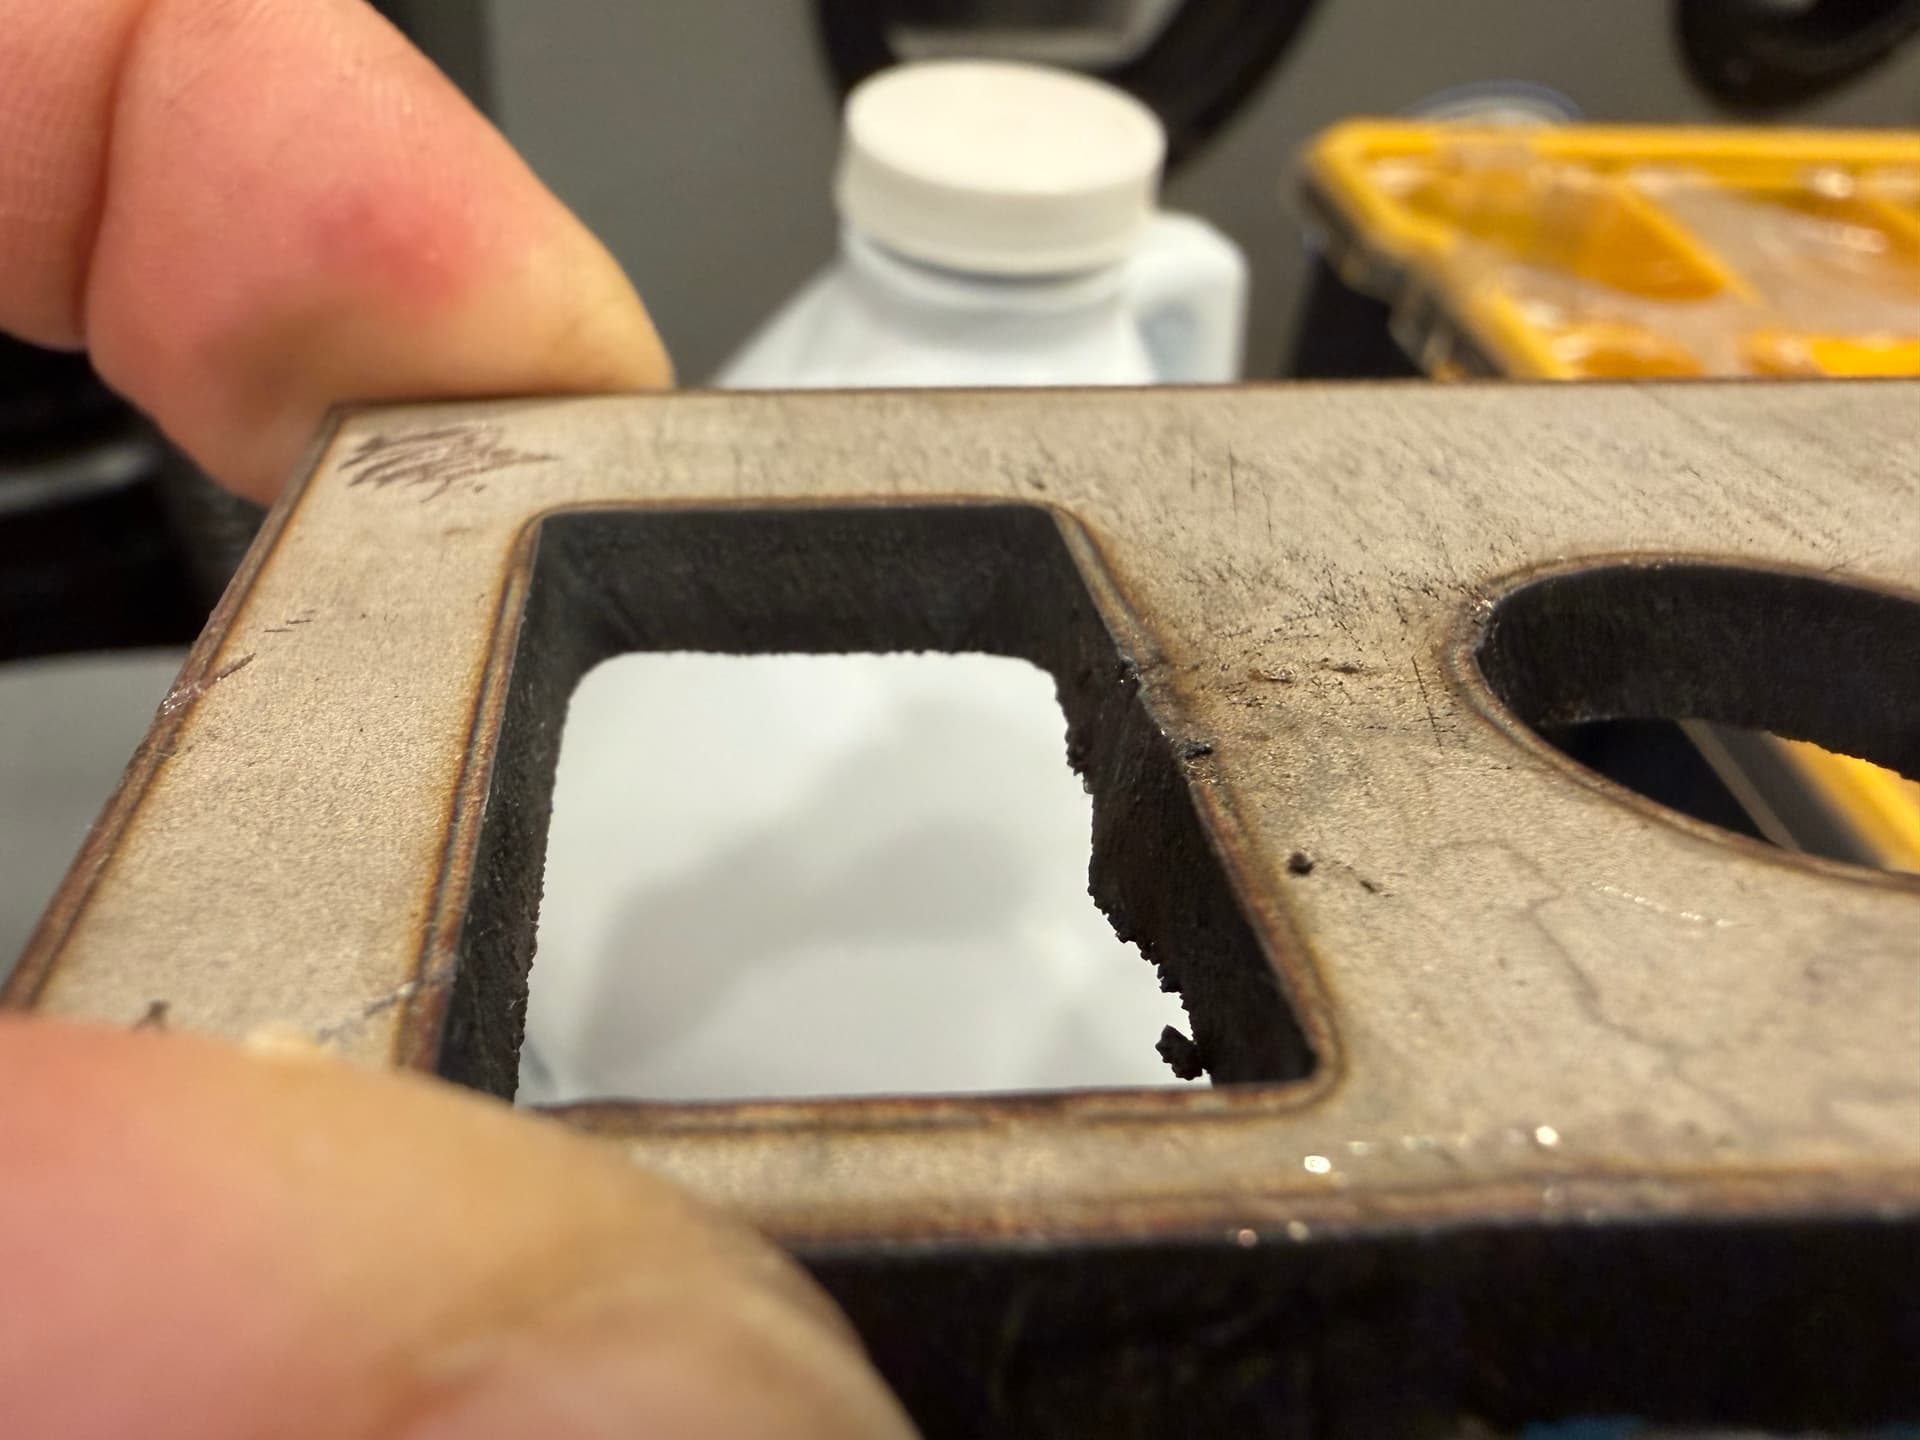
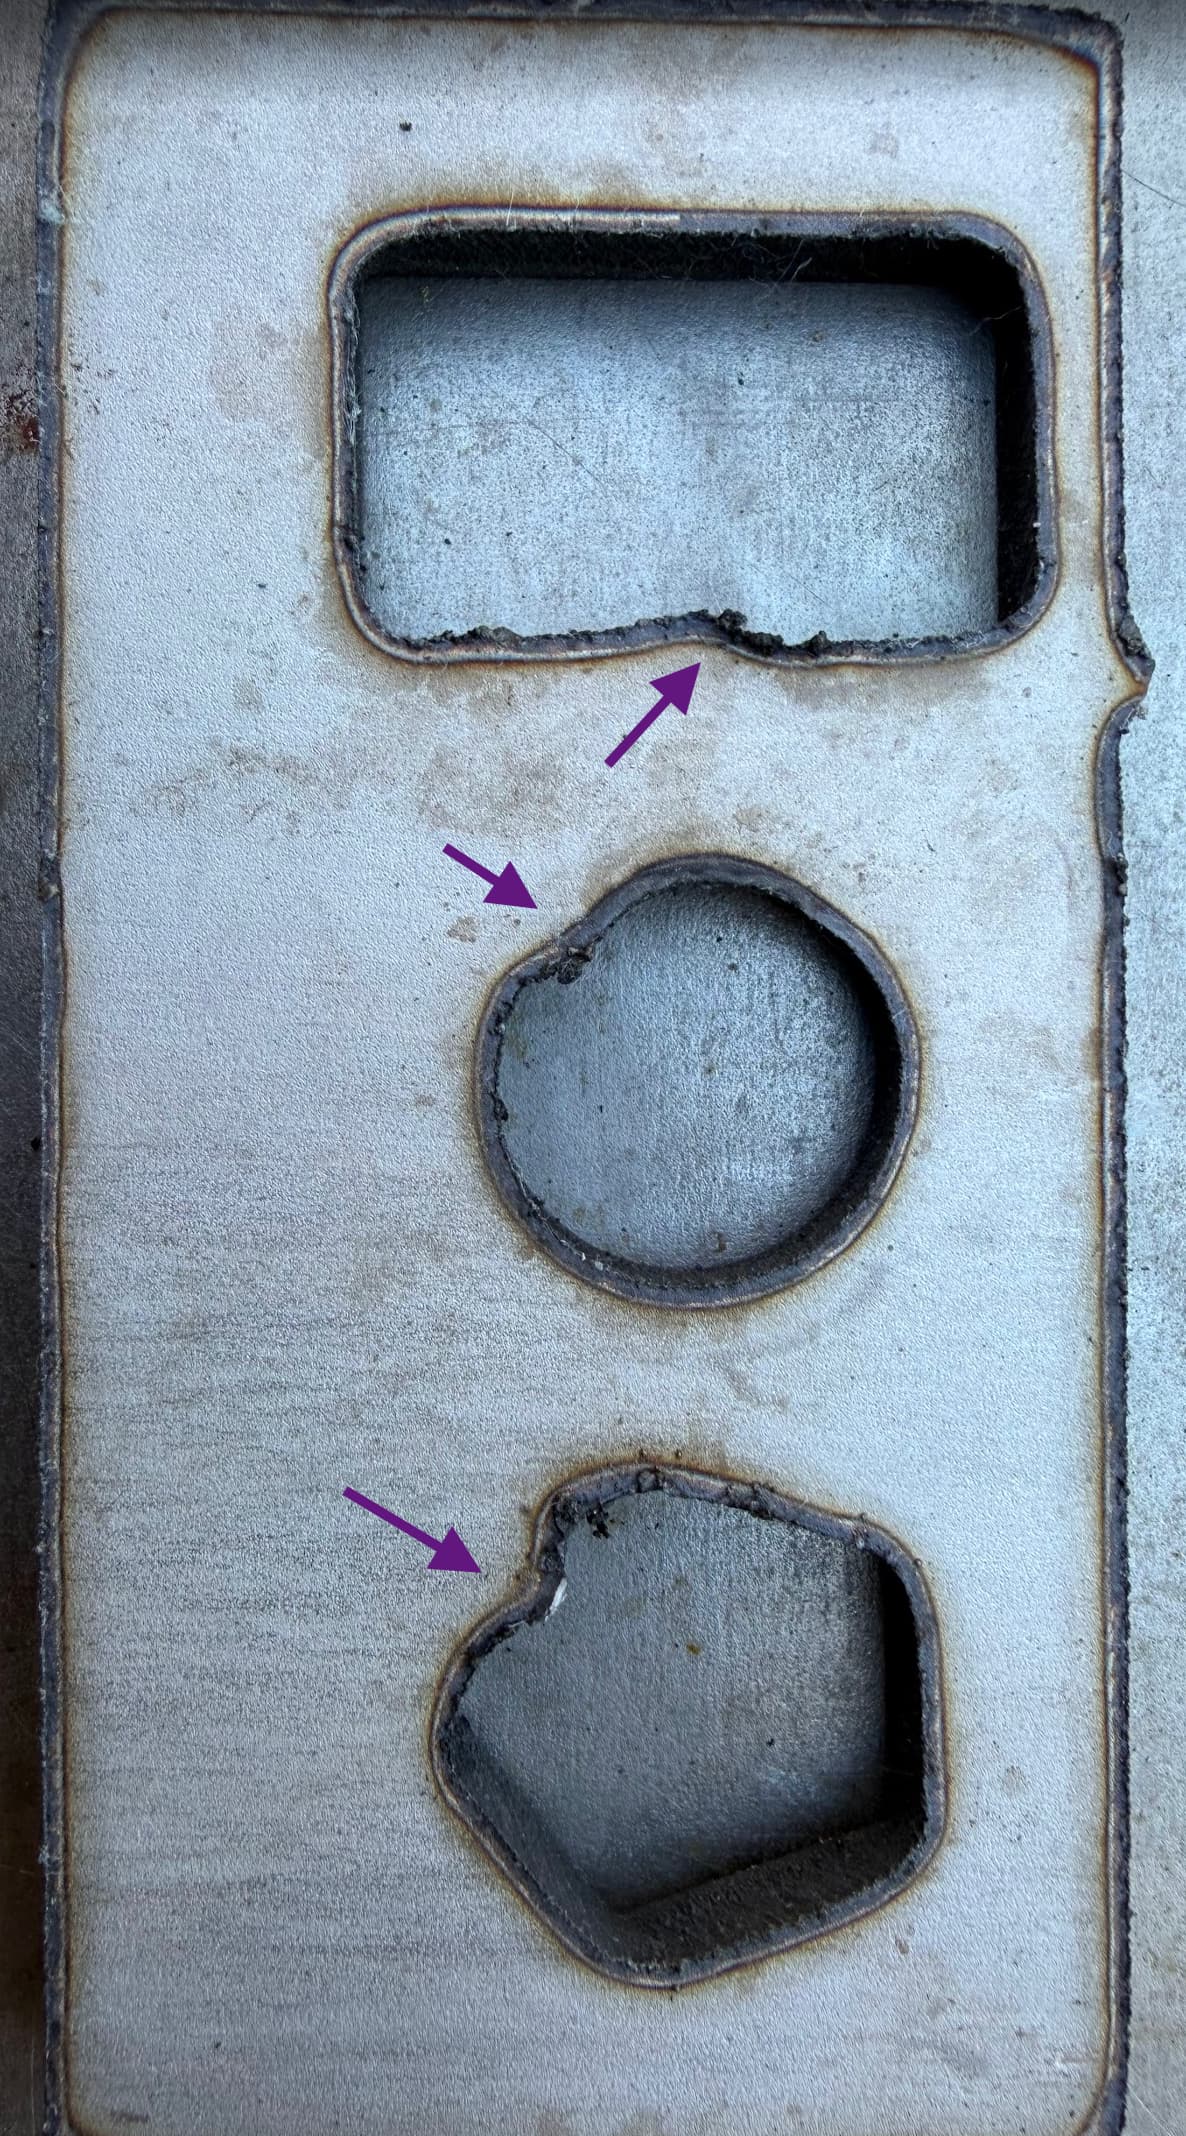
The one remaining major issue is that at the end of each contour, even with 0.3” Overlap setting, and a very conservative 26 IPM cut speed at 45A for SS304 0.25” - it is not penetrating the end of each cut, resulting in these bulges and the inner pieces hanging on.. Any advice on this issue.. it has plagued me since the first cut.
thanks all for your patience and continued help.. dan
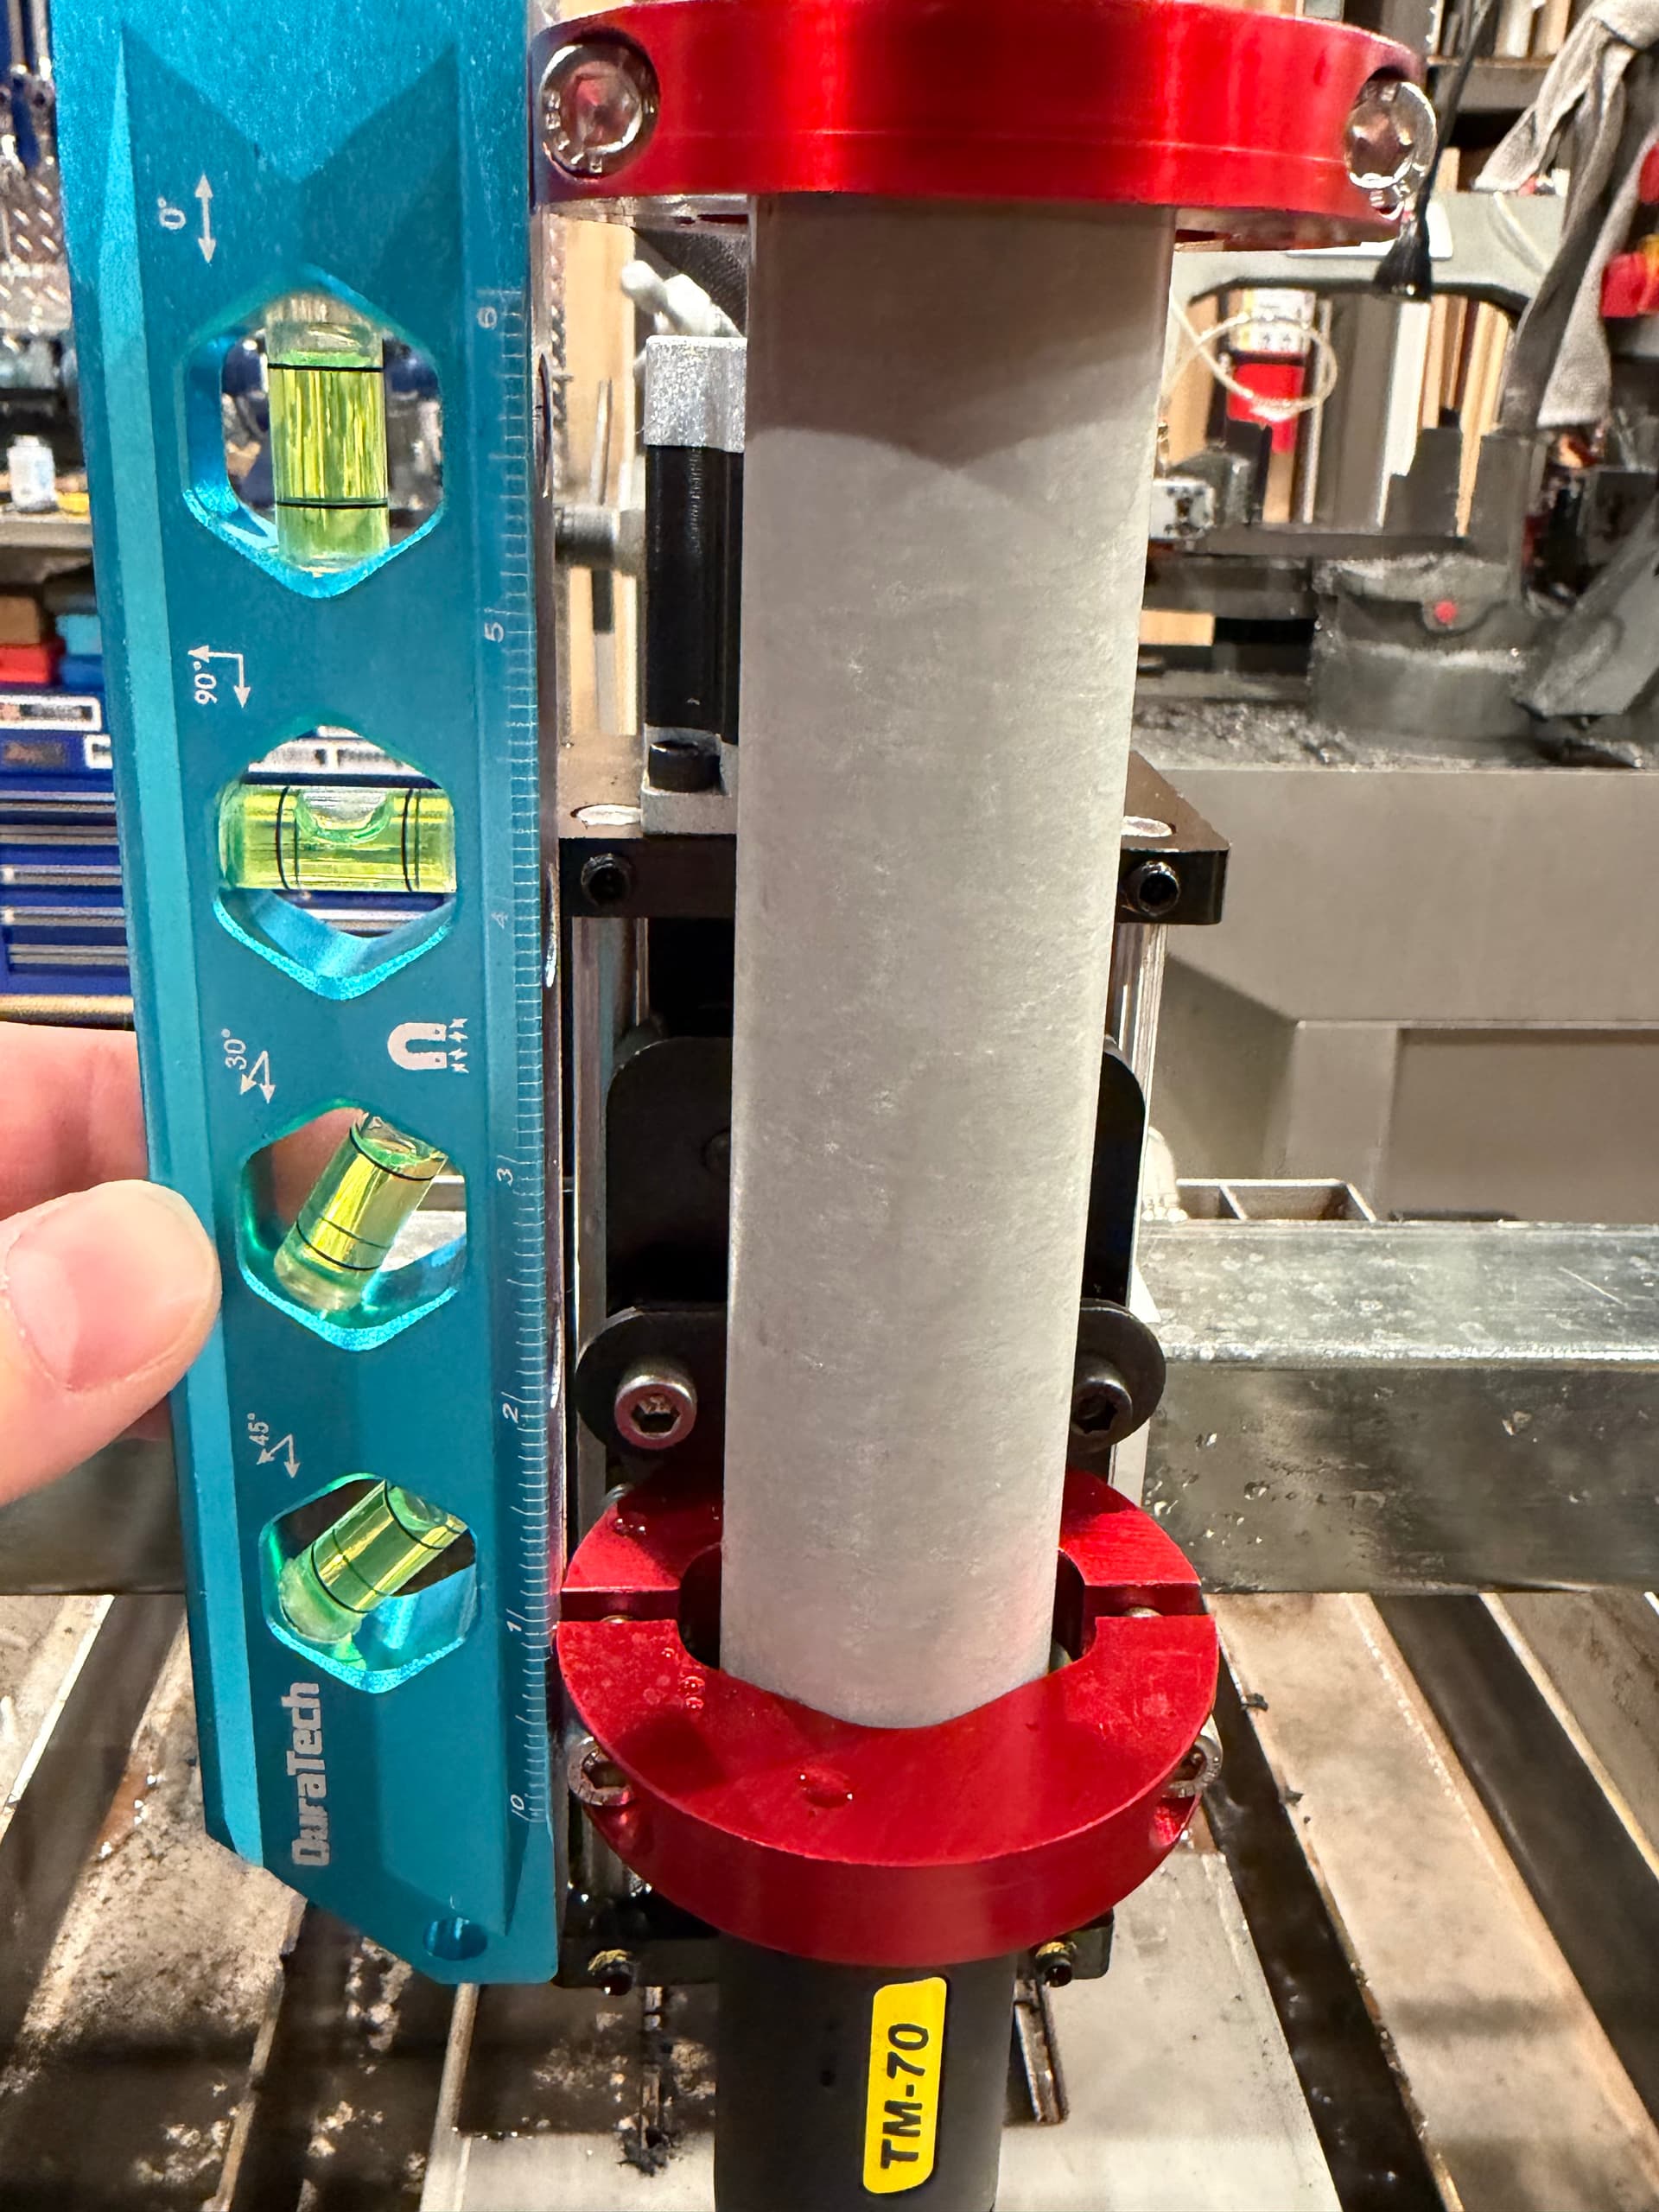
You’re holding your torch mount so close to the bottom it could be tilting side to side. Could you clamp more in the center of the spine?
If I understand you correctly, I don’t think I have much room to move. I read on another threat that I should not clamp the torch on the black part with the lower clamp.. and if I lower there red clamp I will end up running out of travel on the z-axis..
Your torch is mounted fine. just make sure there in no movement in the z from side to side or front to back.
Yeah, you shouldn’t clamp on the lower part if you have a “v-block” style clamp like that. I was just wondering if there was room to move the entire thing down a tiny bit to ensure you’re using the full slot and reduce the leverage from the cable. Just double check the cam rollers to make sure there is not play. It is what it is.
It looks like we are getting closer.. and I suppose I just need to keep fine tuning, and playing with it.
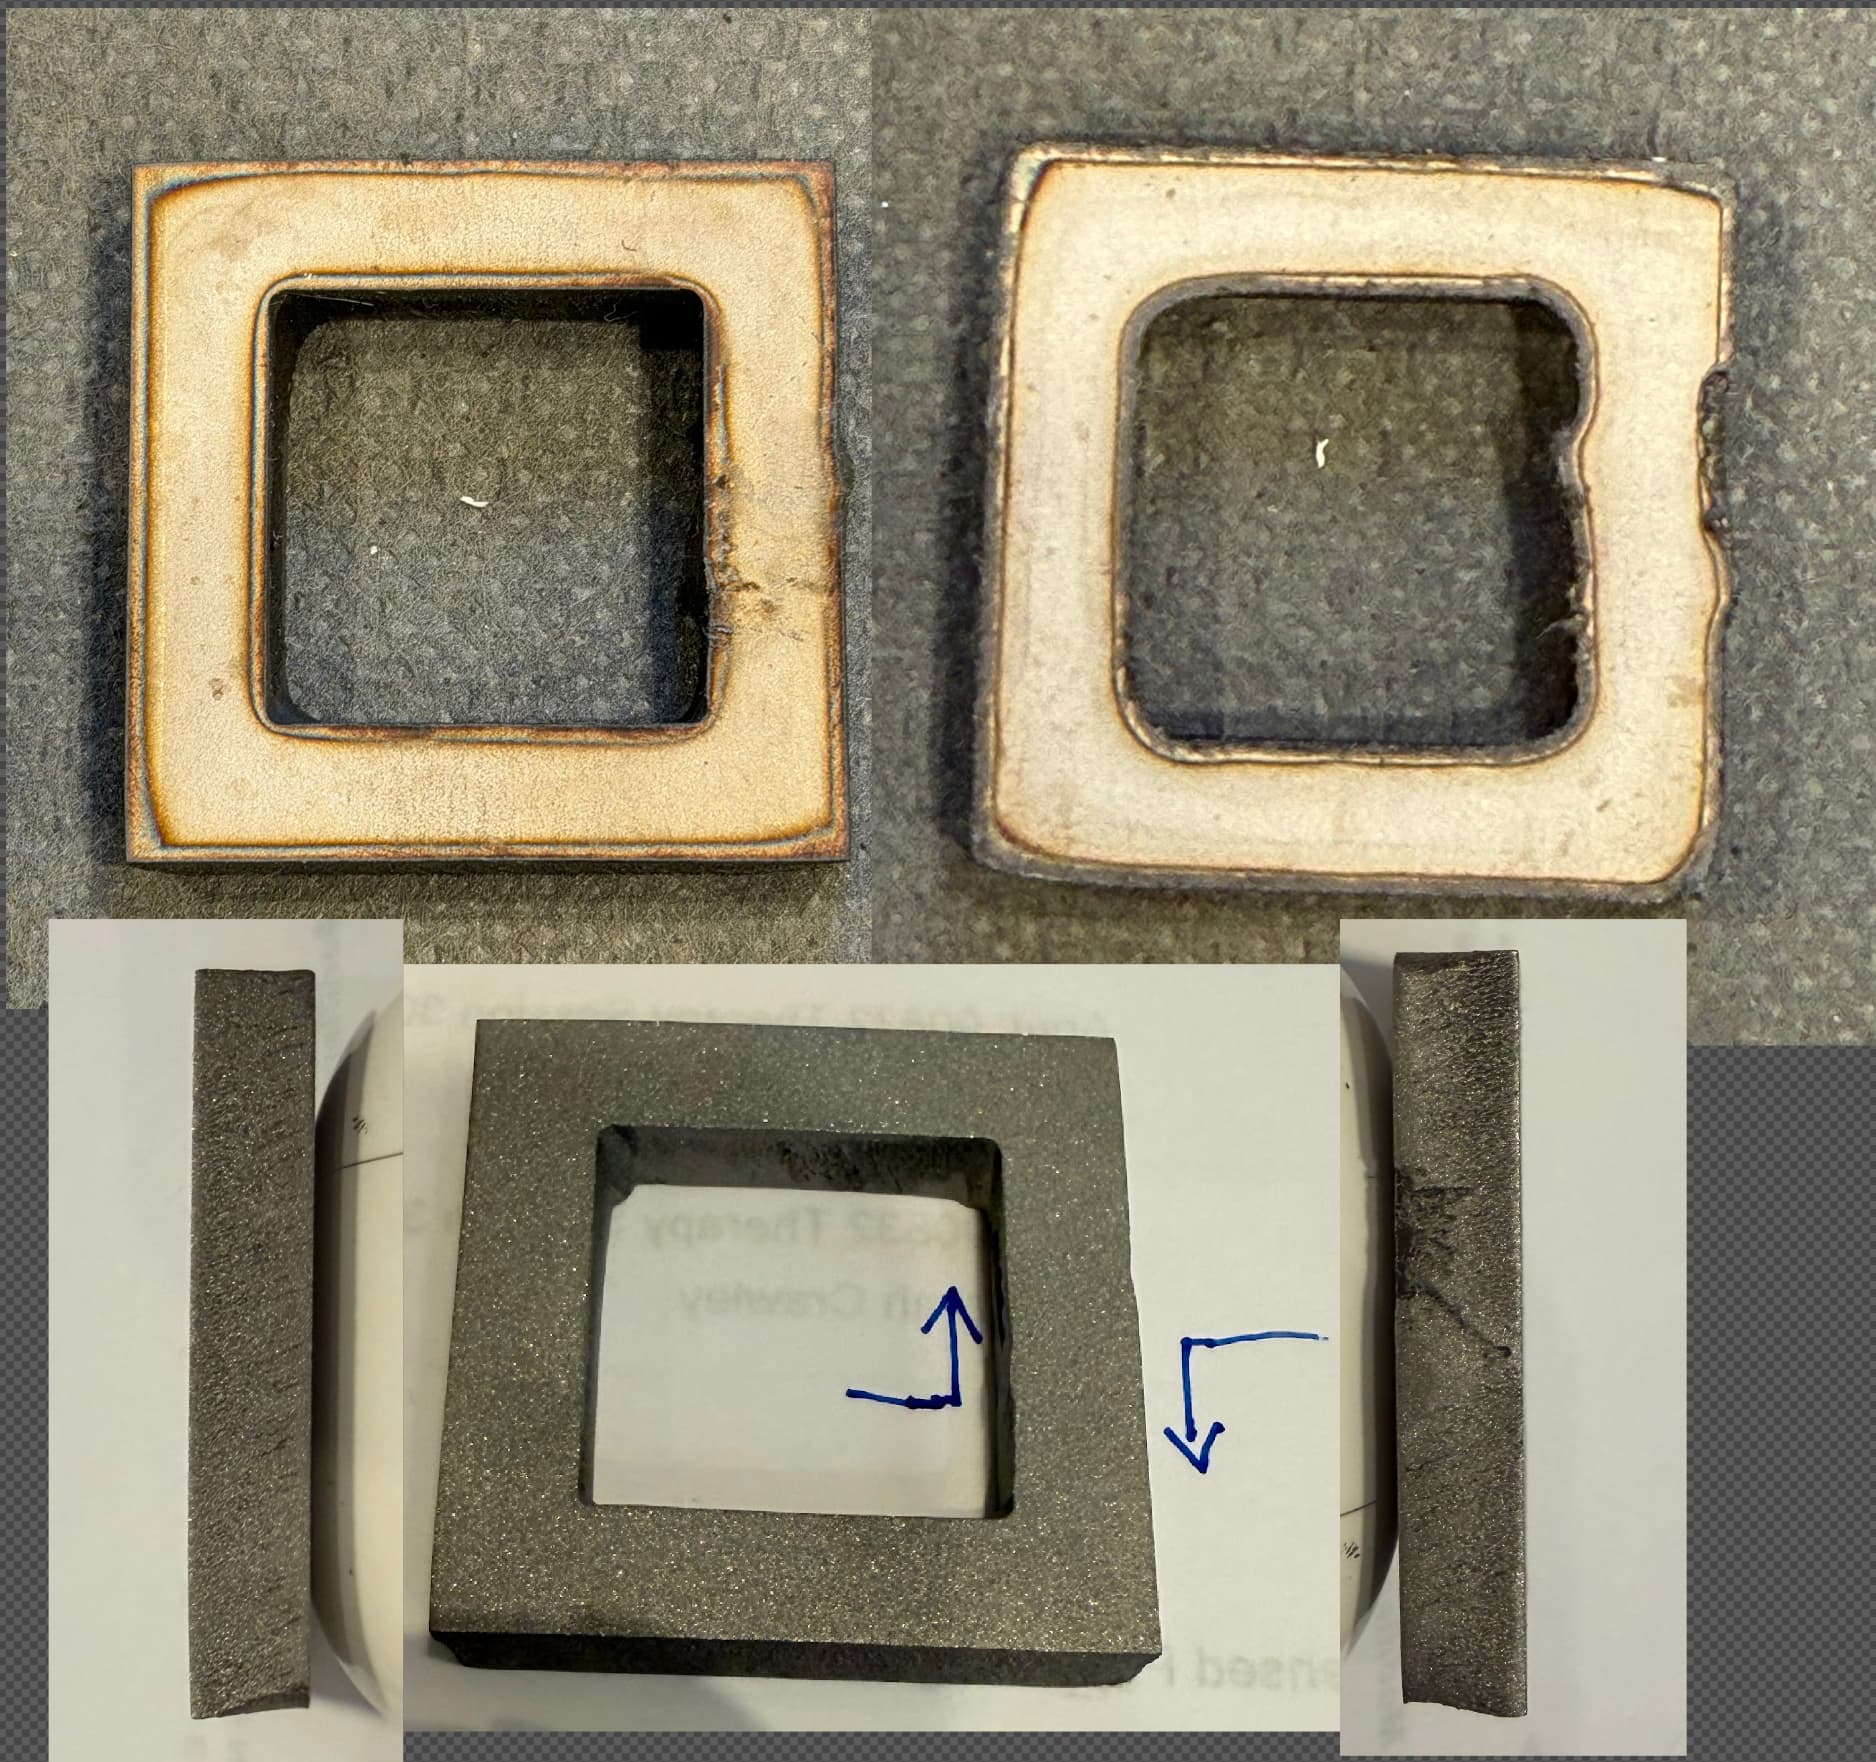
This is with height set at 0.07 and piercing set at 0.2. Counter-intuitive since the drag shield would make the distance higher, but it does appear to have the beveling of an arch that is too close, carving out the bottom. I will move it. up/down and see what happens.
for the first time the waste did fall away. ![]() and the leftover at the start/end point was better if not perfect.. I would still love to know any tricks to remedy this issue.. but I also recognize this is not a water jet and at some point my OCD is the issue.
and the leftover at the start/end point was better if not perfect.. I would still love to know any tricks to remedy this issue.. but I also recognize this is not a water jet and at some point my OCD is the issue.
Pics of raw with just had wiping away dross and then after a bit of surface grinding with medium scotchbrite disk and sand blasting.
I will spare everyone and consider this thread retired ![]() Thanks all.
Thanks all.
did you apply any feed rate optimization to these cuts. Feed rate optimization set it about 50% of standard feed rate will slow the torch down before it makes any of those corners so the trailing lower edge of the arc can catch up before you change direction. It should help making those shapes a little bit more distinct on the backside.