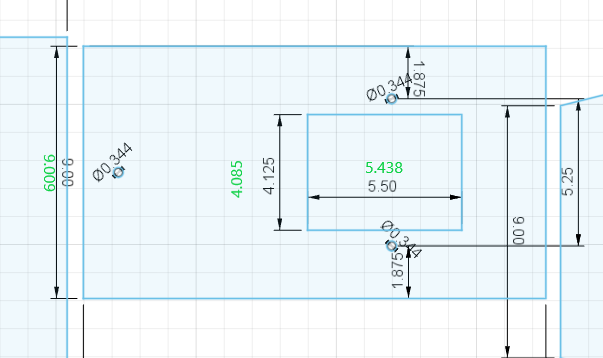
Actual dimensions are in green. In this overall project, all of my exterior dimensions have a much tighter tolerance than expected…so I am good with those. But this interior cutout is a bit undersized. 1/4" material, but taper is very minimal. Saying that it is “very minimal,” I havent measured the taper, but without taking those measurements, what would you say is the reason for this variance? It is a counterclockwise cut. Thanks!

Interesting because my first thought was line compensation and direction but your saying cut was counterclockwise. Post your f3d with cut path.
The amount of variance that you’re illustrating is pretty negligible in plasma.
Being we don’t have your cut file info yet my best guess would be your kerf with setting.
Have you done a kerf with test for that material to see what your actual kerf width is?
The method I like to use for determining this is cutting a 2x2 square with a 1-in hole in it.
When I set up the cam I make sure I do a center line cut for all the geometry. You can change this from left to center in the sideways compensation setting.
Once you’ve cut your piece measure the dimensions of the square and the inner circle.
Now take 2x2 and deduct the measurements you took for the outside of the 2x2 and the answer should be your kerf width.
And you can double check with the hole in the middle. Measure the actual dimension of the hole in the middle now deduct 1-in from it and the answer should be your kerf width.
Now both answers should be very close and should be your actual kerf width.
It appears that my kerf width was set to .08" in my tool library. But that seems like that would put the kerf width at over 2mm. I will run the test soon. I did verify the cut direction, counterclockwise, left compensation.
Using Left compensation;
The holes and the rectangle in the interior of the piece will be cut counterclockwise.
The outside rectangle will be cut clockwise
Really best to post the f3d file with cut paths so everyone can see what your doing and if something stands out.
understand that you should actually measure the kerf width that the plasma actually cuts and enter that into your CAM software…
changing the kerf setting in the CAM software does not actually change the kerf…it only makes the software thinks it is different…
Kerf is kerf…it is what the plasma takes out when it cuts…
Performed the test indicating that the actual kerf is 1.01mm / .039" . It seems as if the value in the kerf width of my tool was set to almost double this value, .08"
Will try to post the f3d.
keypad_ChelanRevision (1).f3d (127.9 KB)
Have you tried the cut again width the actually Kerf width used in the code?
Things are actually starting to “click” with me regarding F360 cam. Thanks to you and this forum.
I didnt personally take those measurements, but fully trust the one that did. Starting down the path of fine tuning cut height due to a slight taper evident in some 3/8 i recently cut.
Maybe i am going about it wrong, but feel like i need to get the taper to an acceptable level for plasma cutting first.
Trying to understand Smart/Nominal voltage at the moment. Excessive cut height with Smart (.110 measured during paused cut.) Test cut at manual cut height is 92.0v, so working on those adjustments first depending on gauge used.
Great to hear you are making progress
I wrote this a couple years ago , I think it sums up the voltage question decently.
what are you entering for smart voltage for these quarter inch parts you provided the f3d for?
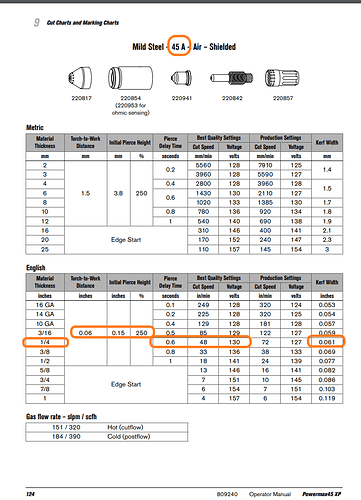
Are you using these parameters ?
Using a Cut60.
