I don’t remember if I checked what speeds it was binding at. Binding at any speed is bad.
I think you should do like you said above and first verify that the table is still square, then remove the X lead screw and redo the bearing adjustment and squaring of the Z to table. Make sure that the Z moves freely on the X rail when moved by hand. When you have the screw out verify it isn’t warped, turn it on a flat surface.
I have done each item you (and others) recommended and saw very minor improvement. I have now removed the lead screw several times, swapped motors, trammed the Z axis carriage 4 times, checked measurements of the table for squareness, lubed the screws, replaced the X axis lead nut and mounting bracket with new ones, checked the gantry for level and any irregularities and a few other minor adjustments. I have made custom shims to measure before and after X axis travel. All to achieve the same results. The X axis will lock up/bind at 300 ipm every time left or right. I was able to get it to work for less than 30 seconds (in 10 sec intervals) and it stopped again. I have been on the phone with a Langmuir tech many times for several WEEKS! I have over 45 years of working with machines and fabricating machinery but this has me frazzled. My best guess is the X axis carriage is adjusted to specs UNTIL it moves either way at 300 ipm whereby it “twists” ever so slightly. No problem at any other speed. So to conclude - No rapids - No machine - No revenues - Not much more time to be put into this! Any suggestions are requested and GREATLY appreciated 24/7! Thank you!
I could modify the Sheetcam post processor so that it will do rapids as feeds and we could limit it to 200 (editable). Note this would be a temporary work around until you have Langmuir sort you out, either with new lead screw, X tube, X gantry… to fix your problem. As you will really want to run at higher speeds, especially when cutting thin material.
have you doublechecked to make sure the correct motor/bearing mounts are on the correct axis? the Y axis ones are slightly longer than the x axis. even though i knew this beforehand, i still managed to swap out one of the x axis bearing mounts with a y and it bound up towards the end of travel and sometimes in between on the x axis.
Hi Greg - YES! Since I can’t see how to slow down rapids in Fire Control this option would, for now, have me up and running. How do you go about such a task in Sheetcam? Thank you for trying something even if temporary!
Do as @nicaDd suggests and double check that.
If the bearing mounts check out, I’ve attached a modified post that will you can use to set your rapid speeds. Note this is a work around!
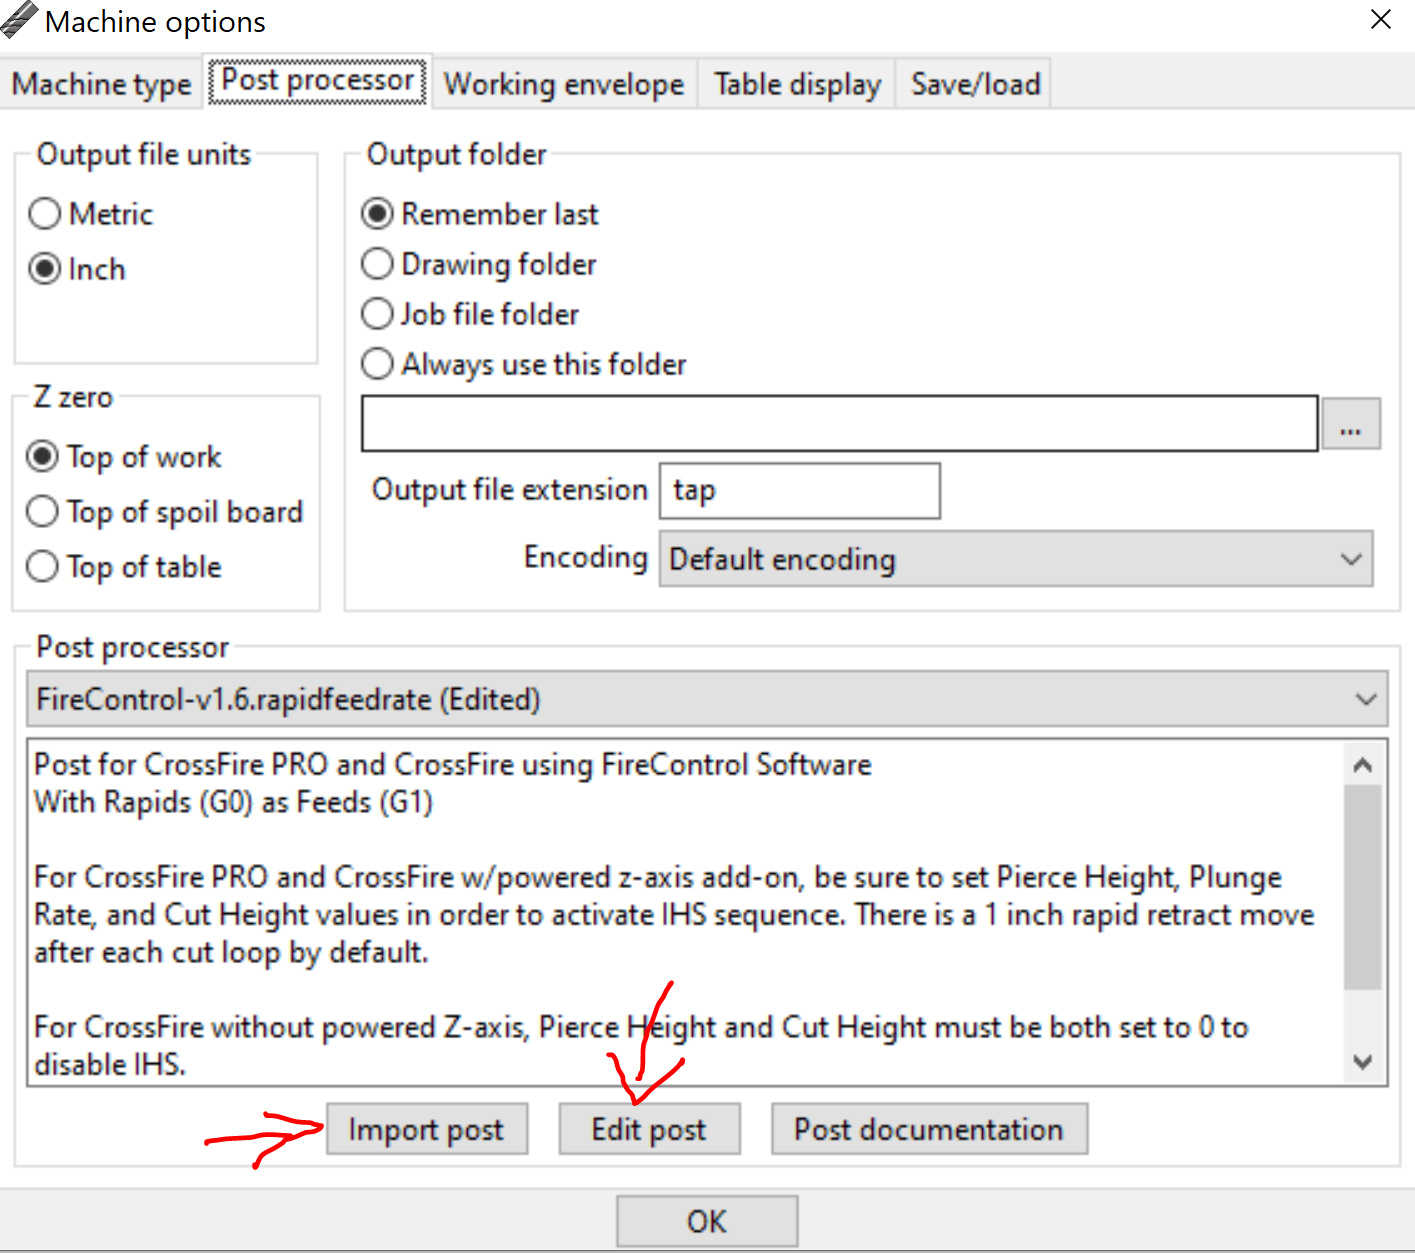
Import this post to Sheetcam (Main menu Options | Machine | Post Processor tab then select the import Post button). Right now it is set to 200 ipm.
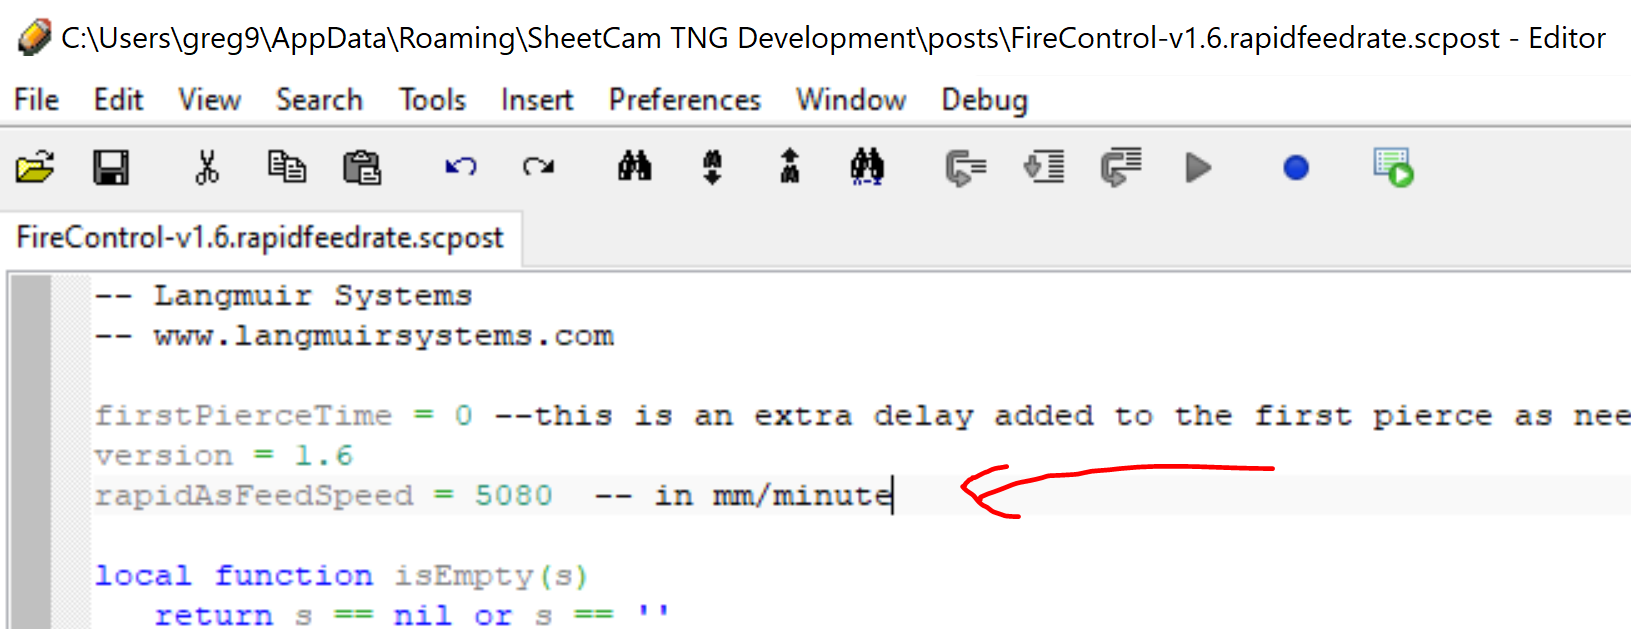
If you want to change it, got to main menu Options | Machine | Post Processor then select the Edit Post button. And change this line, note it is in mm/minute in the file 5080 = 200 inch/min
Hello! I haven’t read every post but in the first picture that was posted it looks like the Ball Nut is very dirty and dry. Have the Ball Screws been lubed? If not use some air to clean the Ball Nuts then use some fine oil like 3-N-1 or some sewing machine oil and lube the Ball Screws. I use the 3-N-1 oil.
The work around you put together actually worked!! Perfect over 24" every time. I will be using the altered post processor until Langmuir (and me) get this figured out.
You mentioned wanting to have 300 ipm functioning properly (agreed!) for those cuts on thinner material. Since most of my cuts are presently in the 75 - 150 ipm range when are you using a cut rate of >220 ipm? Not rapids but actual material that would see such hi speed torch movement?
Anyway, thank you very much for editing the code as a temporary work around - it’s very much appreciated!! (I have a note hanging on the machine called Greg’s NOTE to remember to change back to the original post processor if/when this gets resolved)
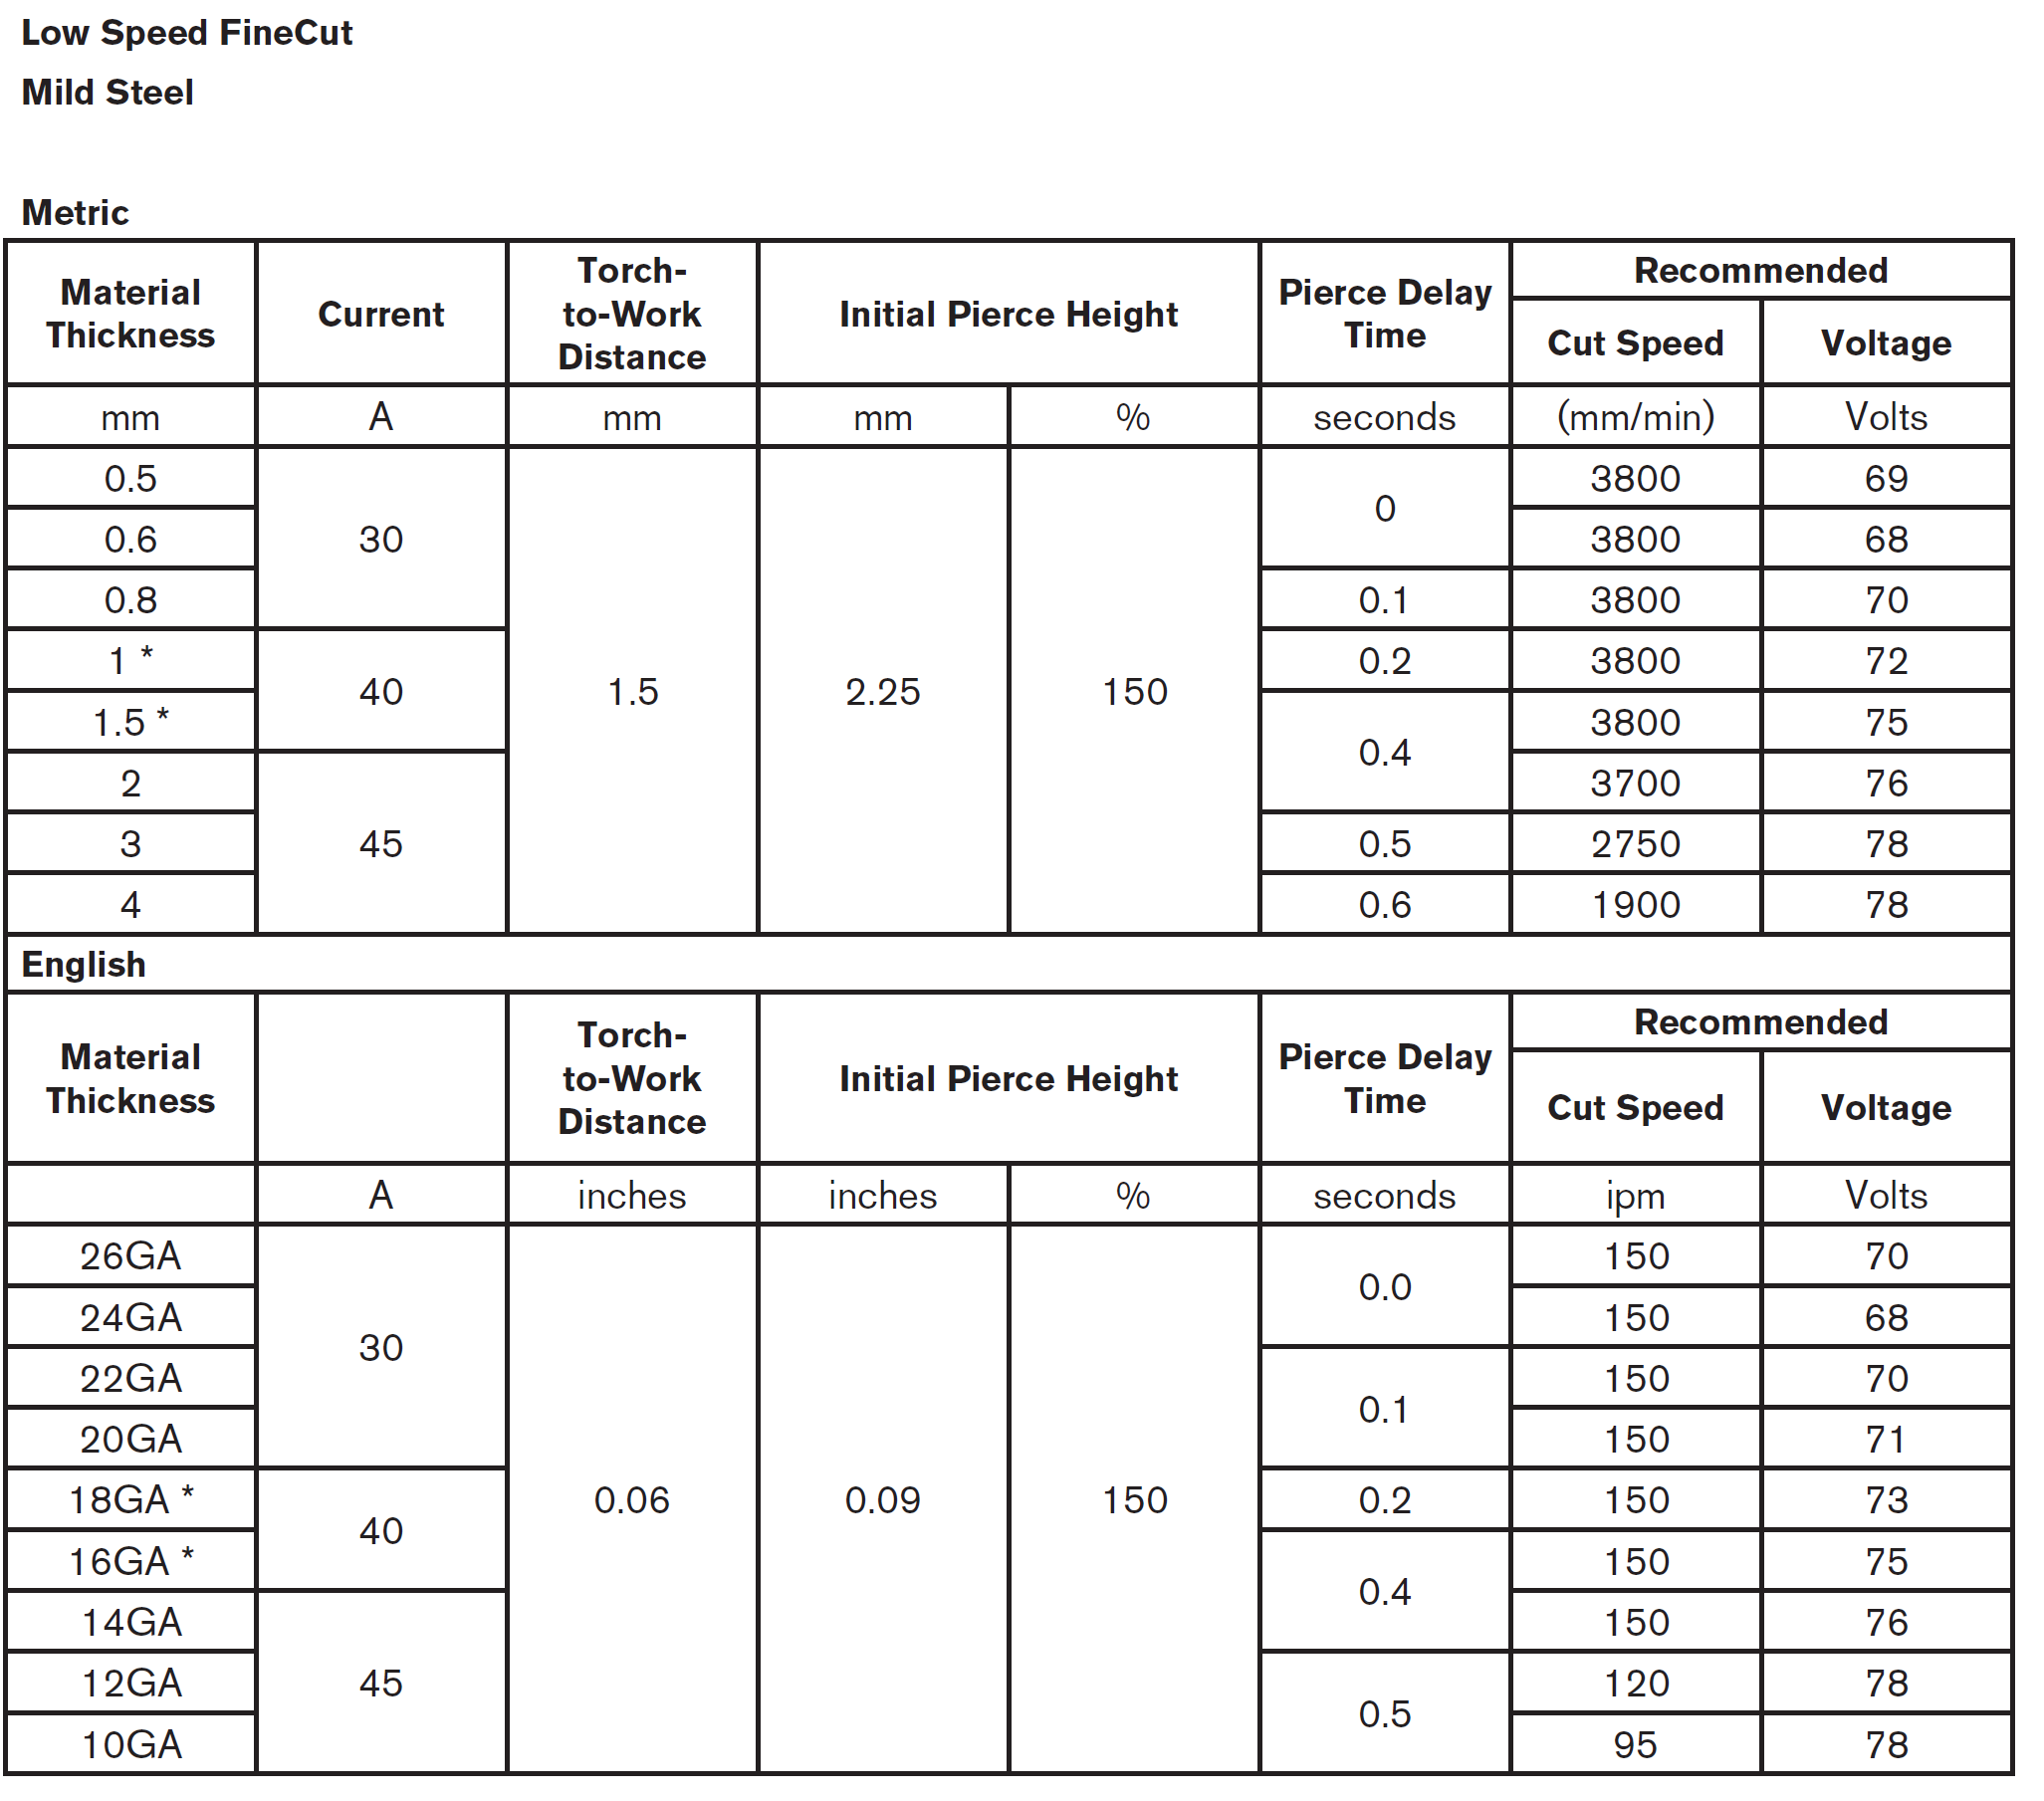
the reasoning you can read here on plasmaspider TLDR the higher speeds will give better cut. Slower speeds published for lower cost machines that can’t go that fast.
Cutting at 325 ipm! Not happening here. I’m using the Razor Cut 45 for now and will go with the slow fine cuts. Thanks for sharing these charts. I’m learning everyday!
I just seen this thread and was wondering if you resolved your issue. Looking at your lead nut it appears the white spring load isn’t seated all the way on the lead nut. It appears from the picture there is close to 1/4" showing of the nut. Mine is 1/8" maybe showing. during assembly of mine I noticed the spring would hang up and not allow the white washer extend completely. If that is the case I believe it won’t put enough pressure on the nut to keep up with the screw. Sorry if this is a waste of time but I just noticed
Croworyx - I replaced the spring/nut assembly after those pics were taken but it didn’t help. When the X axis would bind it caused the spring/nut assembly to twist slightly and after a while the plastic fractured. My issues were almost fully resolved by replacing the control box board but what keeps it running properly was reducing rapid speed from 300 ipm to 200 ipm max. Seems to be the ticket.