I received and installed my limit switch kit for the Crossfire Pro. Easy install and great instructions!
I was under the impression that I would be able to “home” my machine to (0,0) then “set” my work zero to say (13,-13) and have the machine jog itself to that coordinate then run my program. Maybe I’m missing something? anybody out there try doing that? It seems to me that would be the biggest benefit to having a machine coordinate system… otherwise the limit switch upgrade is kinda lack luster… IMO.
I suppose this is more of a question for the XR community guys since the pro is just now gaining those extra functions the XR came with.
I type in the work coordinates in the Work DRO then hit Go to Work Zero and the error pops up in FireControl and machine obviously doesn’t jog at that point.
(the error pertains to hitting limits in (X,Y) ) ill have to go get the correct verbiage…
I feel like I’m commanding the machine in the correct (x,y )directions which would be (+X, -Y), right?
My machine homes correctly and my soft limits seem to be set correctly…
I have the limit switches on my pro, why does the machine home to back left corner but work zero always starts front left corner in setup, very new to this so confused.
Fun fact they never ended up on the pro, ended up with an XR. I had to use those limit switches to fix my XR limit switches. So I only have one left in the original kit.
It’s okay, @TomWS. If the TinMan is using limit switches, he must be working on a large project. He would also not need assistance understanding why they aren’t functioning.
I understand I can set work zero anywhere on table but will only cut left to right and front to back, instead from home left to right and back to front from limits.
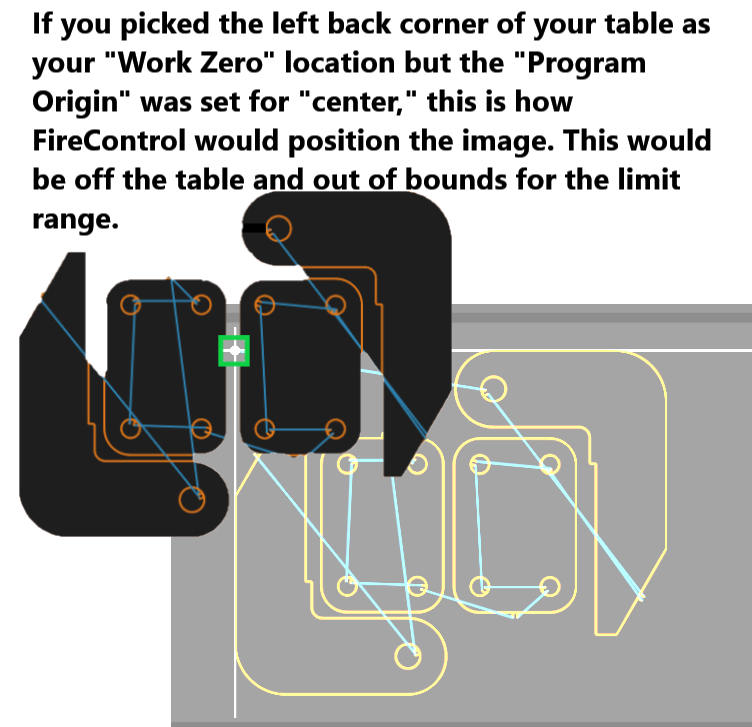
If you want home to be your starting point, zero the work axis there. You’ll have to set your origin point in the drawing to the upper left corner, though. Otherwise it will be outside the table limits.
I suggest just disabling the limit switches until you learn how to use the table. They are a huge source of confusion for new users.
Edit: I think what you’re referring to is the corner where the program starts on your design. That is the origin point that is set in your CAM program. You can also change that in Firecontrol by clicking on the “set program origin” button. That will bring up 5 green squares on your drawing. One at each corner and one in the center. Click on the one where you want the origin to be.
Wherever you set that origin(I think it’s called something else in Fusion) is where your torch will be when you zero it in Firecontrol.
Don’t get hung up on the home position being in the upper left. You will not be starting most of your cutting from the home position.
Once you have things cut out of your metal sheet, you will have to zero your torch in a spot where your design can fit on the metal that is left on the sheet.
For most of us, it’s easiest to position your part on the metal when the origin is in the lower left.
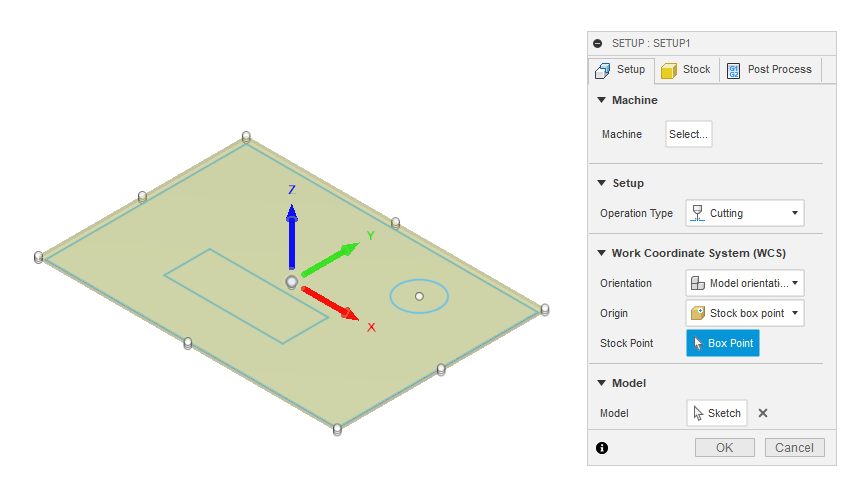
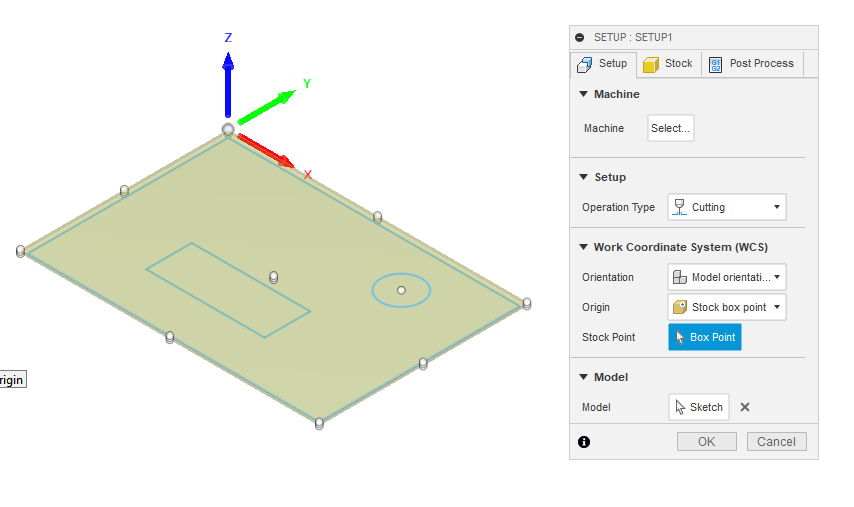
But I agree with David. Don’t get hung up on that. Pay attention to FireControl and the table. If you always start your design by picking the “program origin”, it won’t matter what Fusion set for the “Stock Box Point.” By setting the ‘program origin’ after loading the gcode file, you will be over-riding Fusion’s Stock Box Point.
What David and I are trying to say is that you need to pick spot on the metal where you want your design cut out. Position the torch at an estimation of a corner or middle of the design and “zero all axes” (which sets “Work Zero”) with the torch in the location. Then confirm by pressing ‘program origin’ that the chosen green box represents that same relative position of your design.
So, in answer to your question:
Yes. But you need to confirm that in FireControl until you are consistent. It is a good habit to get into just so you don’t mess up a piece of metal.
The other thing…before pressing [Start], is to press “Go to Work Zero”. That way you will know that everything is ready because the torch is going where you expected it.
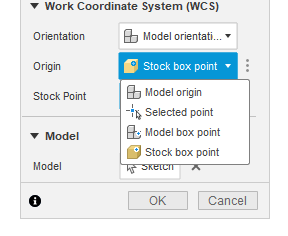
Edit: For clarity sake, Fusion is still calling it the “Origin” but you can specify the origin by a number of ways. “Stock Box Point” is set as the default “origin” and that can be changed to a number of different options/pointers:
Thanks for clarifying that for me, only and main reason for wanting to start in back is loading metal on table, the way my shop is setup loading from front and leaving extra in front of table (4x8) sheets is much easier…