Just built a full 1” Copper Air Dryer system for my plasma and made a video about it. Figured maybe someone here would find it useful for making or planning their own system down the line. It’s a long video showing basically the full process, although it was my first time ever doing something with copper and solder so I’m probably slower than others lol
I made mine out of black pipe from HD and it’s working well. I get a little mist when I drain the input leg but never anything when I drain the output leg.
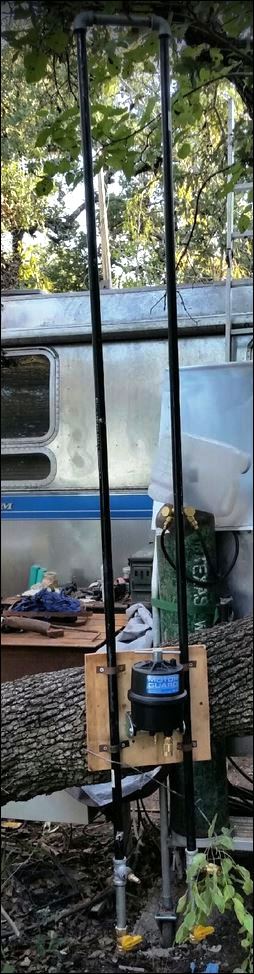
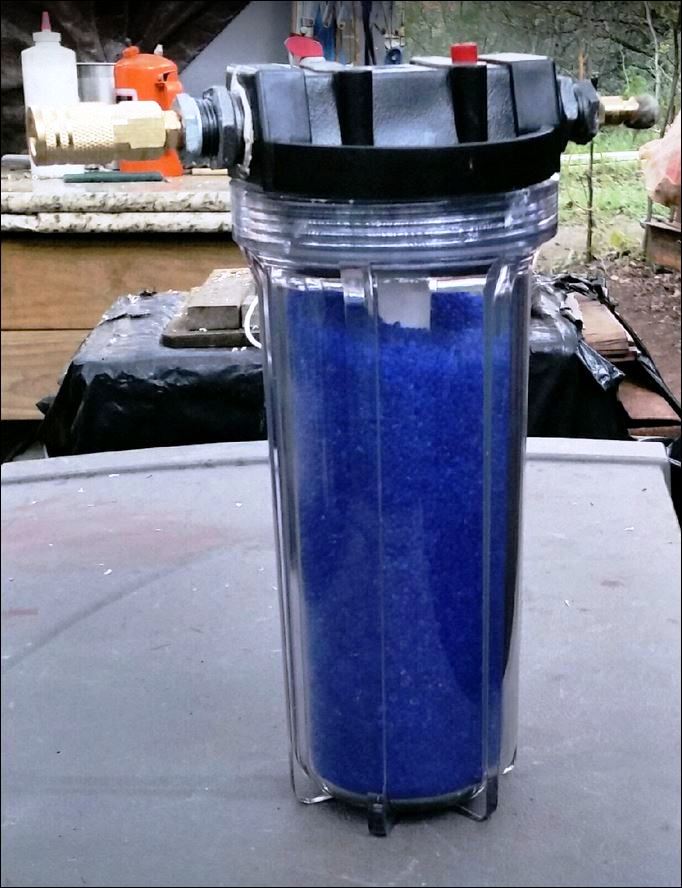
I also built a huge dessicant drier that goes onto the back of my plasma cutter using a water filter housing and a piece of pvc pipe. After several days of cutting I’m starting to see some pink at the top of the dessicant but there’s pounds below it that are as blue as new. I added a piece of Scotchbrite on top of the beads to keep them from dancing.
Nice setup and that’s definitely a nice desiccant system too, I’m in NJ where summer is just 100% humidity for 4+ months so my old setup before having the plasma always built up water, so I tried to go as “all out” as I could.
Still thinking of doing an aftercooler on the compressor but gonna wait and see how it goes
For those of you who have made these copper air dryers how much are you spending? I priced the parts locally and was over $600. That being the case what is the benefit of going this route over just buying a HF dryer?
A refrigerated air dryer has a maximum input temperature.
In many cases the air temperature has to be brought down before entering a refrigerated air dryer.
For a refrigerated air dryer to properly work it has a very specific temperature range it will run in.
That is the main reason for having an aftercooler.
My refrigerated air dryer has a maximum inlet temperature of 120° f or 49° c.
The after cooler also has the added benefits of condensing quite a bit of the water vapor reducing the load for the refrigerated air dryer.
I made mine from 50 feet of 3/4" copper with 4 ball valves and various fittings to put it all together and I think I was just over $300 in materials.
For me, it was preferable to finding a place to put the refrigerated air dryer in a shop where all of the wall space is already being used for benches, cabinets or machine tools. I made my system to go up and over all of those obstructions and drop down on the sides of 2 doorways on the way to the table.
It removes some of the moisture, but I still have to use a dessicant dryer and a motorguard next to the table. The dessicant beads start turning pink after a few hours of cutting, so I know moisture is still getting through the copper pipes.
With the 1” tubing and me buying all the other stuff needed to build it I was in it for about that much. Can do it cheaper with smaller tubing but you’d want to do a few more legs. But a 1” 90 deg is like 7$, a 3/4” is maybe 2-3$ and a 3/8 is 0.80$. Each of those 1" ball valves was ~$20, if you do a reducer setup to a 3/8" valve you could save probably $15 on each valve. So it still works out cheaper.
I decided to start with this tubing system because, as someone else mentioned, it helps get the temps down if you use a refrigerated system down the line. I also have seen mixed reviews of the HF cooler and the better units are $600+.
Basically this system is possibly a first step in a larger system. After this if I have water issues I’ll install an aftercooler between the pump and tank. If there’s still water I’ll get a refrigerated unit and at that point with the 3 systems working together I’ll have the best air possible.
oh and for why i went with a short 1" system vs a large 3/8-3/4" system… wall space. my 6 48" 1" runs have a pretty large surface area of the pipes compared to if i did 6 48" 3/8" runs or even 3/4" runs, but theyd require just about the same amount of space. The surface area is important because it’s what cools that hot air and causes the condensation to occur. Going from a small 3/8 line to a large 1" pipe also lowers the velocity of the air which should allow the water to more easily drop out of the run. If you stay close to the 3/8" size of your feed/discharge hoses then the velocity inside the legs doesnt change as much allowing a better chance of the water flying thru the system. So since i was limited in room horizontally and vertically i went with the biggest pipe for best performance in my situation.
MytCut,
The tubes can be any size. Make it fit your shop. But the more surface area (longer the runs, pipe size, number of runs) the better the system preforms (I.e. the cooler your air gets). So if you have a long short space do more short runs. If you have a tall narrow space do fewer long runs. and you can stack the runs (one behind the other). but if you stack them you might want to offset them so they still get good airflow because in the end you’re taking the heat out of the compressed air and putting it into the room the pipes are located.
20 feet of black iron is what some manufacturers recommend for the moisture to condensate on the pipe. I have black pipe in a U shape with the inlet and outlet at the top and valve for a drain at the bottom.
thanks guys.
if i was to use black pipe wouldnt that hurt the system in the long run? i think that the black pipe would rust from the inside in the long run?
Black pipe has been used for years, but I quit using it because it will rust on the inside. Once that rust builds up it breaks loose and will go through air tool motors and plug things up. I use the max air 3/4" airline, is a great system, no rust or crud due to being aluminum and it is Teflon coated outside.
I did the U shaped run of black pipe right out of my compressor and then into my refrigerated dryer then into a motorguard filter and everything downstream of that is PVC never had a problem with it.