next time let me know were racing. I wont proof read till after I post it! lol
I derailed another thread. We need a way to mark a post somehow, so that after the post is marked solved someone like @TomWS with power could zap all the non relevant post.
If that happens I might only have 4-5 posts that would not get deleted
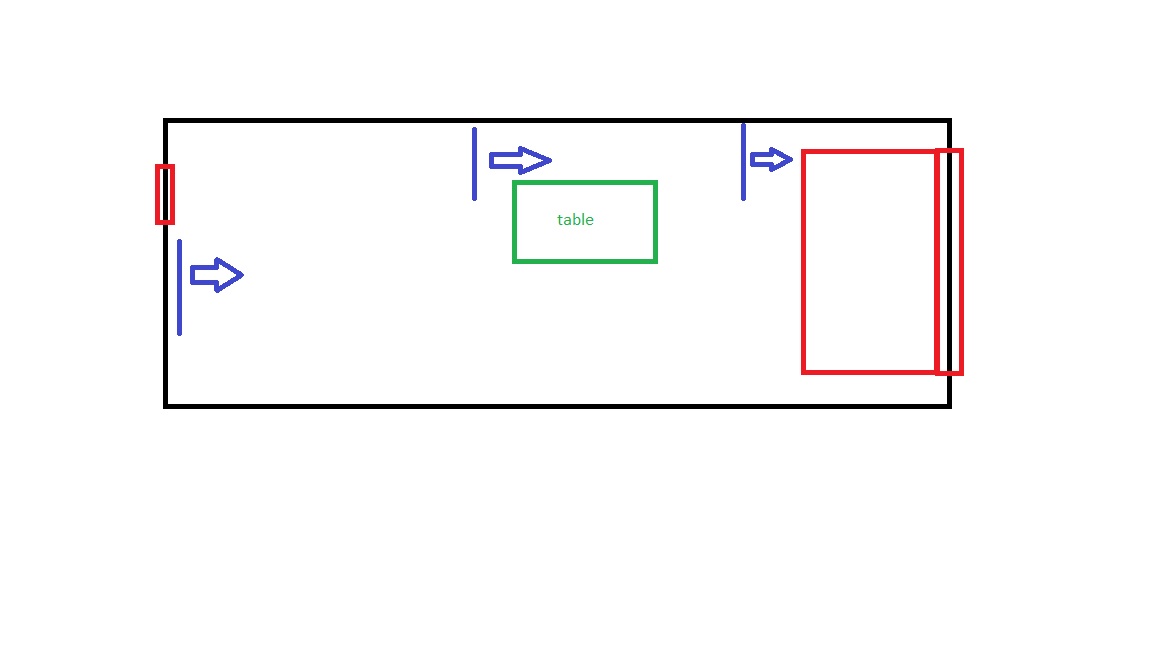
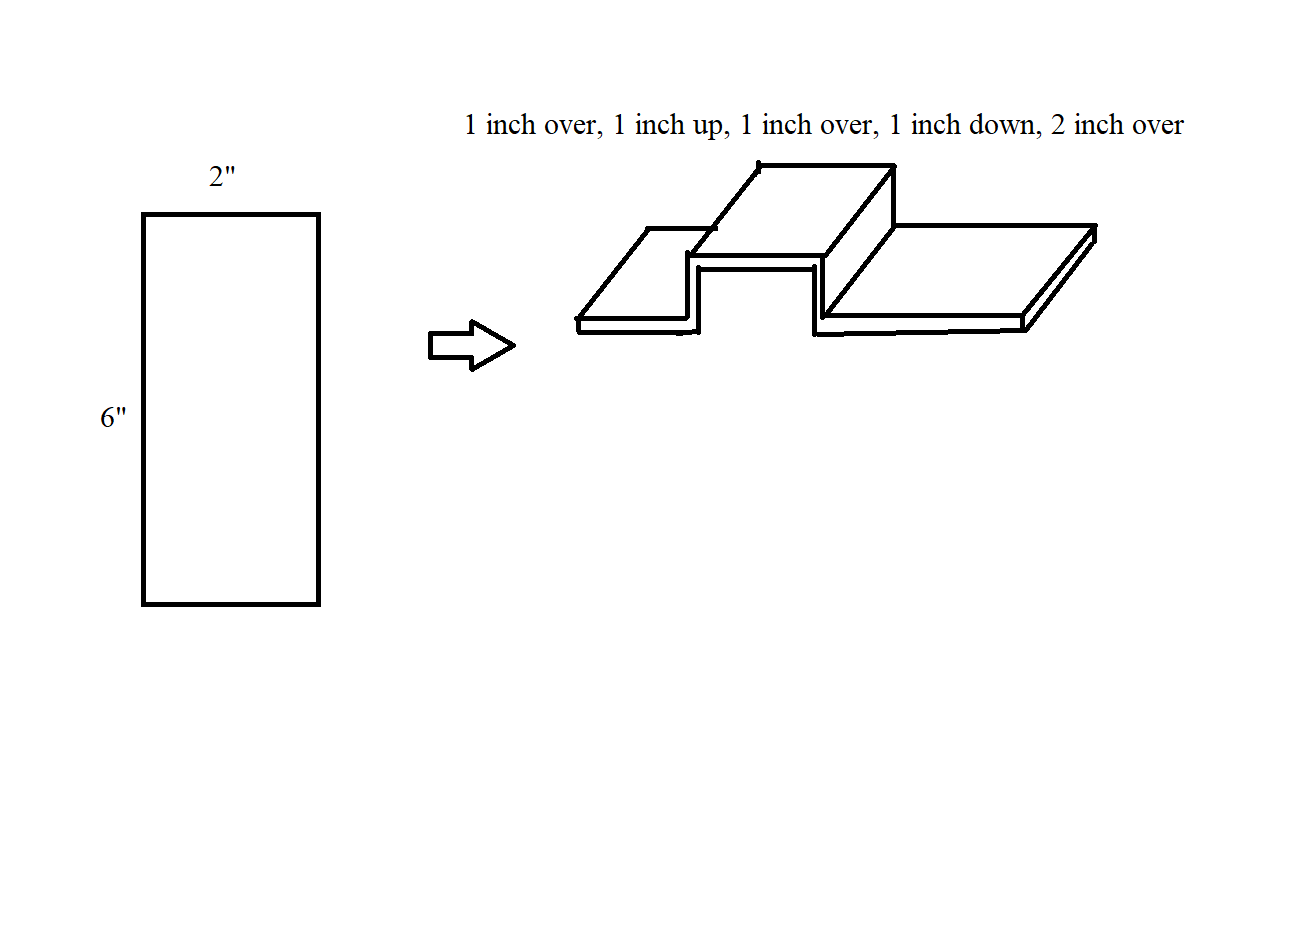
@ChelanJim@Knick noted on first two questions. On the air circulation, basically having the door open at the back and then putting a fan that blows out the garage door at the front would do a good enough job getting the air to flow? Would this workout you think? assume door (left) and garage (right) are open
Another question: I remember the previous owner mentioning something about certain wires couldn’t touch or be close together. Are there certain wires/cables that should absolutely be isolated? I think he had said something about possibly the usb cable interfering with something at one point? It seemed like it was an electric frequency crazy interference not simply the problem of your x or y axis cables getting hung up. Something not as visually obvious??
It looks like you have good cross ventilation. Might work just fine. If you have a smoke detector, it will definitely trigger, however. When it happens, I just spray smoke detector with the air nozzle.
As for the wires, I have not had any trouble so I can’t really say for sure about your situation. But, yes: the cable from the computer to the enclosure should not come near the torch cable. The torch cable should be isolated (as best you can) from the other cables. Again, I have not had any issues even when they are touching but, I still try to keep them apart.
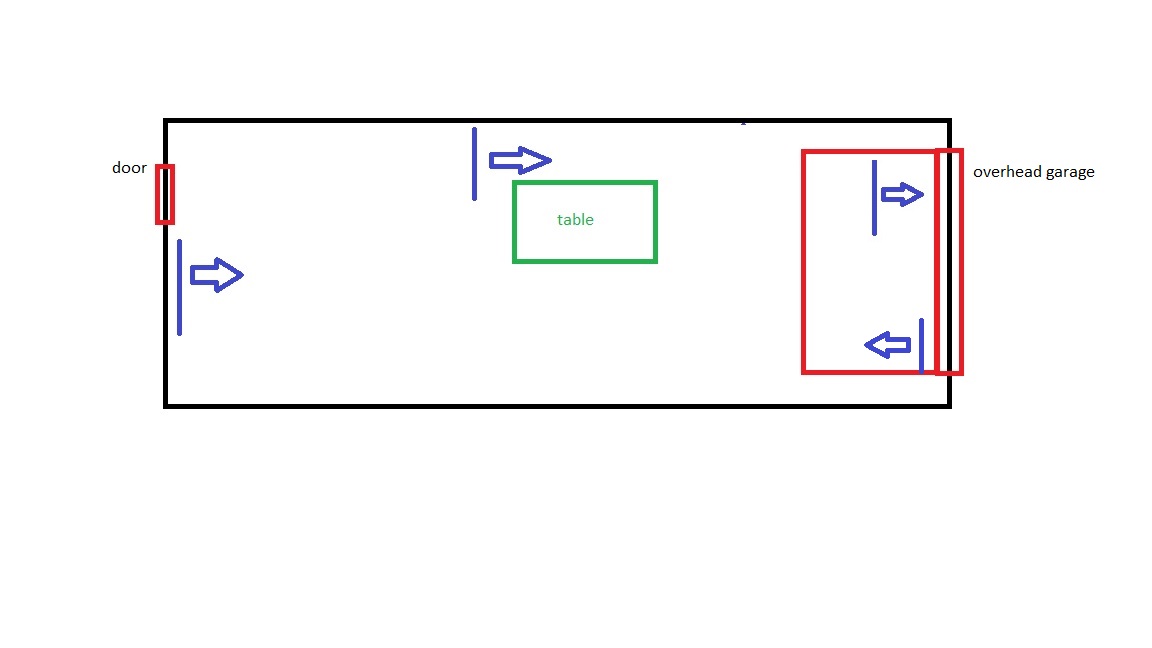
I don’t have any windows, only a man door and overhead garage door…
I went ahead and got an additional fan today for better ventilation - one that will pull more air in and get a little rotation going. I also moved the last fan off the wall and instead put it right at the foot of the garage to force the air flowing from the (image top) side out and the new air from the bottom right fan could mix in.
This made a big difference. Where as with the first arrangement of fans, I was wondering if it would be enough, I can physically feel the air moving around with just the garage door opened up 1-2 feet and when I open the rear man door along with the garage door all the way, it is like a jet stream in there now! ha
The obvious answer seems to be leave the door and garage door open during use but in situations where it is raining or other bad weather, I want to be prepared to have circulation/ventilation without having them wide open. Of course, the garage will always need to be at least partially open or I’m only circulating smoky air but in theory, I am happy with this setup.
All in, I have about $100-$120 in fans now and with all the other purchases above, if this works, it will be money well spent.
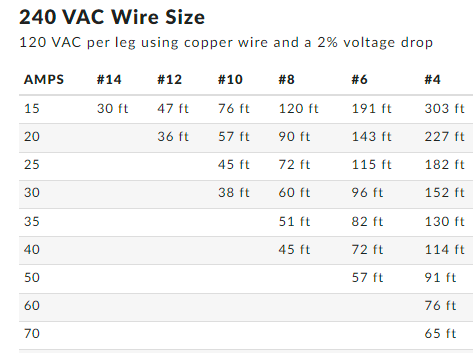
I also grabbed two milk crates to set the plasma cutter up on. Lined all of my wires up so there is no coiling and the plasma torch line is untouched from the front of the cutter to the top of the table minus one intersection where the langmuir box has to go by to connect to the wall outlet. Having it all set up is very exciting. Looks pretty heavy duty but alas, my 220V wall outlet does not match the prongs of the plasma cutter so I have to swap out the wall outlet, confirm wire gauge, and potentially swap breakers.
Currently, the outlet is set up with 8GA wire and a 40A breaker but I may go to 4GA wire and a 60A breaker… Is this overkill? It seems like this is technically correct if I am going to use the full 60A on the cutter but I have also been told that maybe I can get by with what I have? I am not an electrician so I am not too sure on this part… The two options in my opinion are:
Keep the 40A breaker/8GA wiring to outlet
Upgrade to 60A breaker/4GA wiring to outlet
Changing just the wire would still cause the breaker to trip if I pull too much amperage
Changing just the breaker could melt the wiring if I pull too much amperage
I have also read that 8GA wiring with the 60A breaker could technically get by in most cases but not sure if I want to risk that… Better safe than sorry. Thoughts?
Let’s talk electricity first. You never want to put a breaker that is sized more than the wire could handle. Here is a chart to use: (and notice this is for copper wire, aluminum carries less)
Air flow: If you create an airflow in one direction going out, the incoming air will find its way. You won’t need a fan pushing in. I would have three fans lined up with the plasma table all pushing out. You may need to make ventilation through the wall if that doesn’t create the right affect.
I have tried doing this in my shop. It doesn’t work all that well and is more dependent on the natural air flow than the minimal contribution from the fans. It’s most likely to work if the fans are sealed in an opening of some type. No matter how hard I blow the air out the big door it just wants to come back in from where it came. My shop is long and narrow (16x60) so that could be part of my problem. There is allot of space and things to interrupt the flow. Also the shop has a steep vaulted roof so the dust cloud tends to get stuck up in the vault of the roof where the air isn’t moving.
You need a 50 amp breaker to run the CUT60 at full power.
If you have doubts about your ventilation, be sure to wear a good respirator mask. There is lots of discussion on this site that no one really knows what you are breathing with a plasma torch hitting metal with potentially all sorts of coatings and the fluid in the table with various compounds atomizing into the air.
You get enough of that stuff in your lungs and you will regret that you ever had dreams of success with plasma cutting. I work in healthcare and have had numerous patients that worked in industry jobs and suffered severe breathing ailments that shortened their life and made the last years a living hell.
So Erik pointed it out pretty well that you really need to upgrade you current electrical supply to at least 50A. The breakers are relatively the same price so what you are looking at is the cost of running the wire. If you are looking for resale or a larger plasma cutter once you start making it big, perhaps go for the 60A. But man alive, the cost of wire is incredible.
@ChelanJim@72Pony Great feedback as always. Noted on the 50A/6GA setup. Think this will be the best way to proceed and will knock that out tomorrow.
We’ll see how this ventilation works… At least I have a starting point and can refine from here.
Separate thought: What does everyone use for bending steel? I’m not sure how immediately I will get to it but may want to do some bending on 1/8-1/4" steel. Anything budget friendly you guys use to get by with on that? Seems like all the entry level stuff goes up to about 16GA steel and anything past that gets exponentially more expensive. I can always take the pieces over to a machine shop but would like to be able to play around with this on my own. Think 8" by 2" pieces of 1/8-1/4" steel… how would you bend a 90 in it?
I bought it in stages: 20 ton press, then the finger brake and then the air assist jack and finally a foot activate valve. Don’t ask me how much all of this costs.
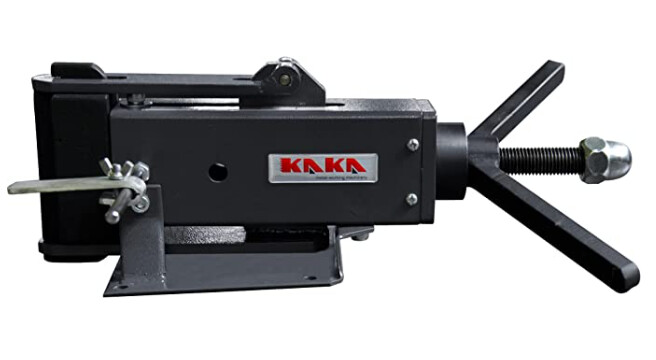
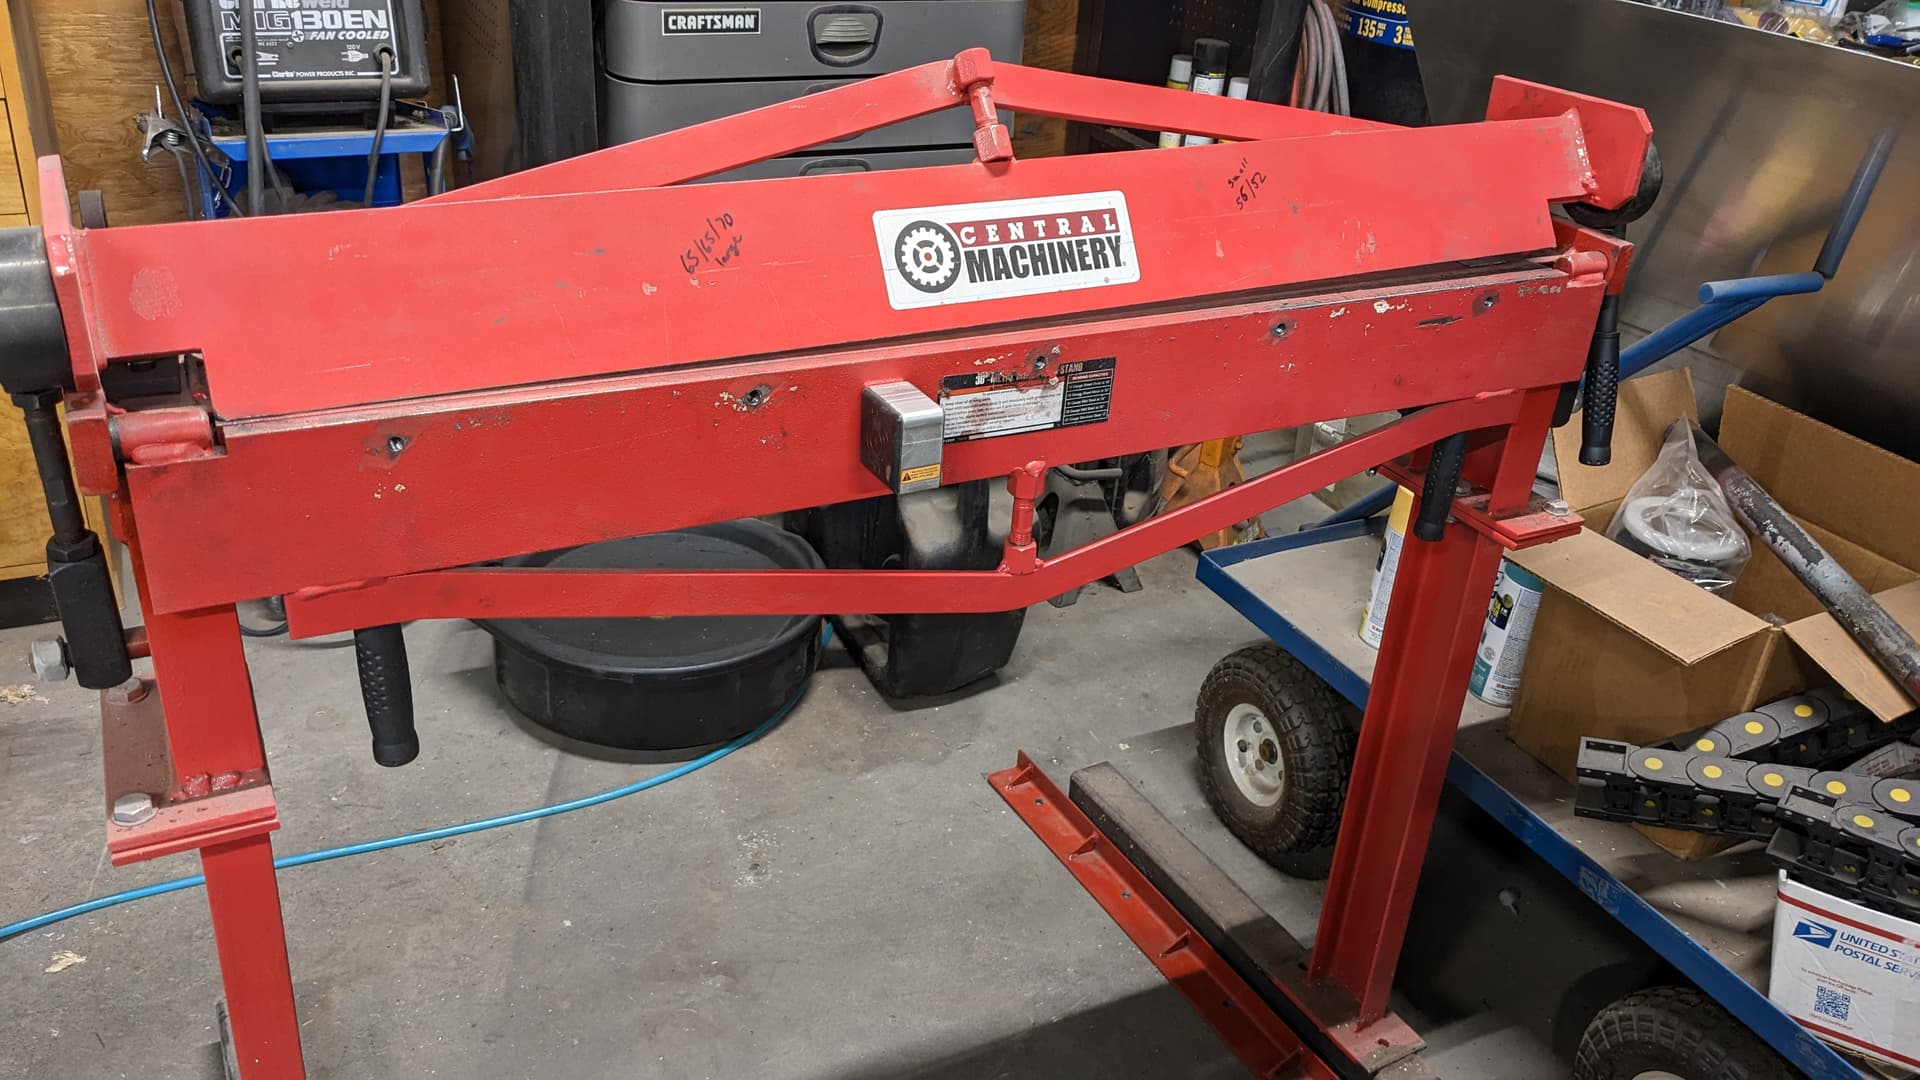
I have a small 4 inch bender for up to 1/4 inch metal but it will wear to out and very difficult to get a very tight bend with 1/4 inch material.
Budget friendly would be to cut slots in the metal and bend in a vice. Weld the slots closed.
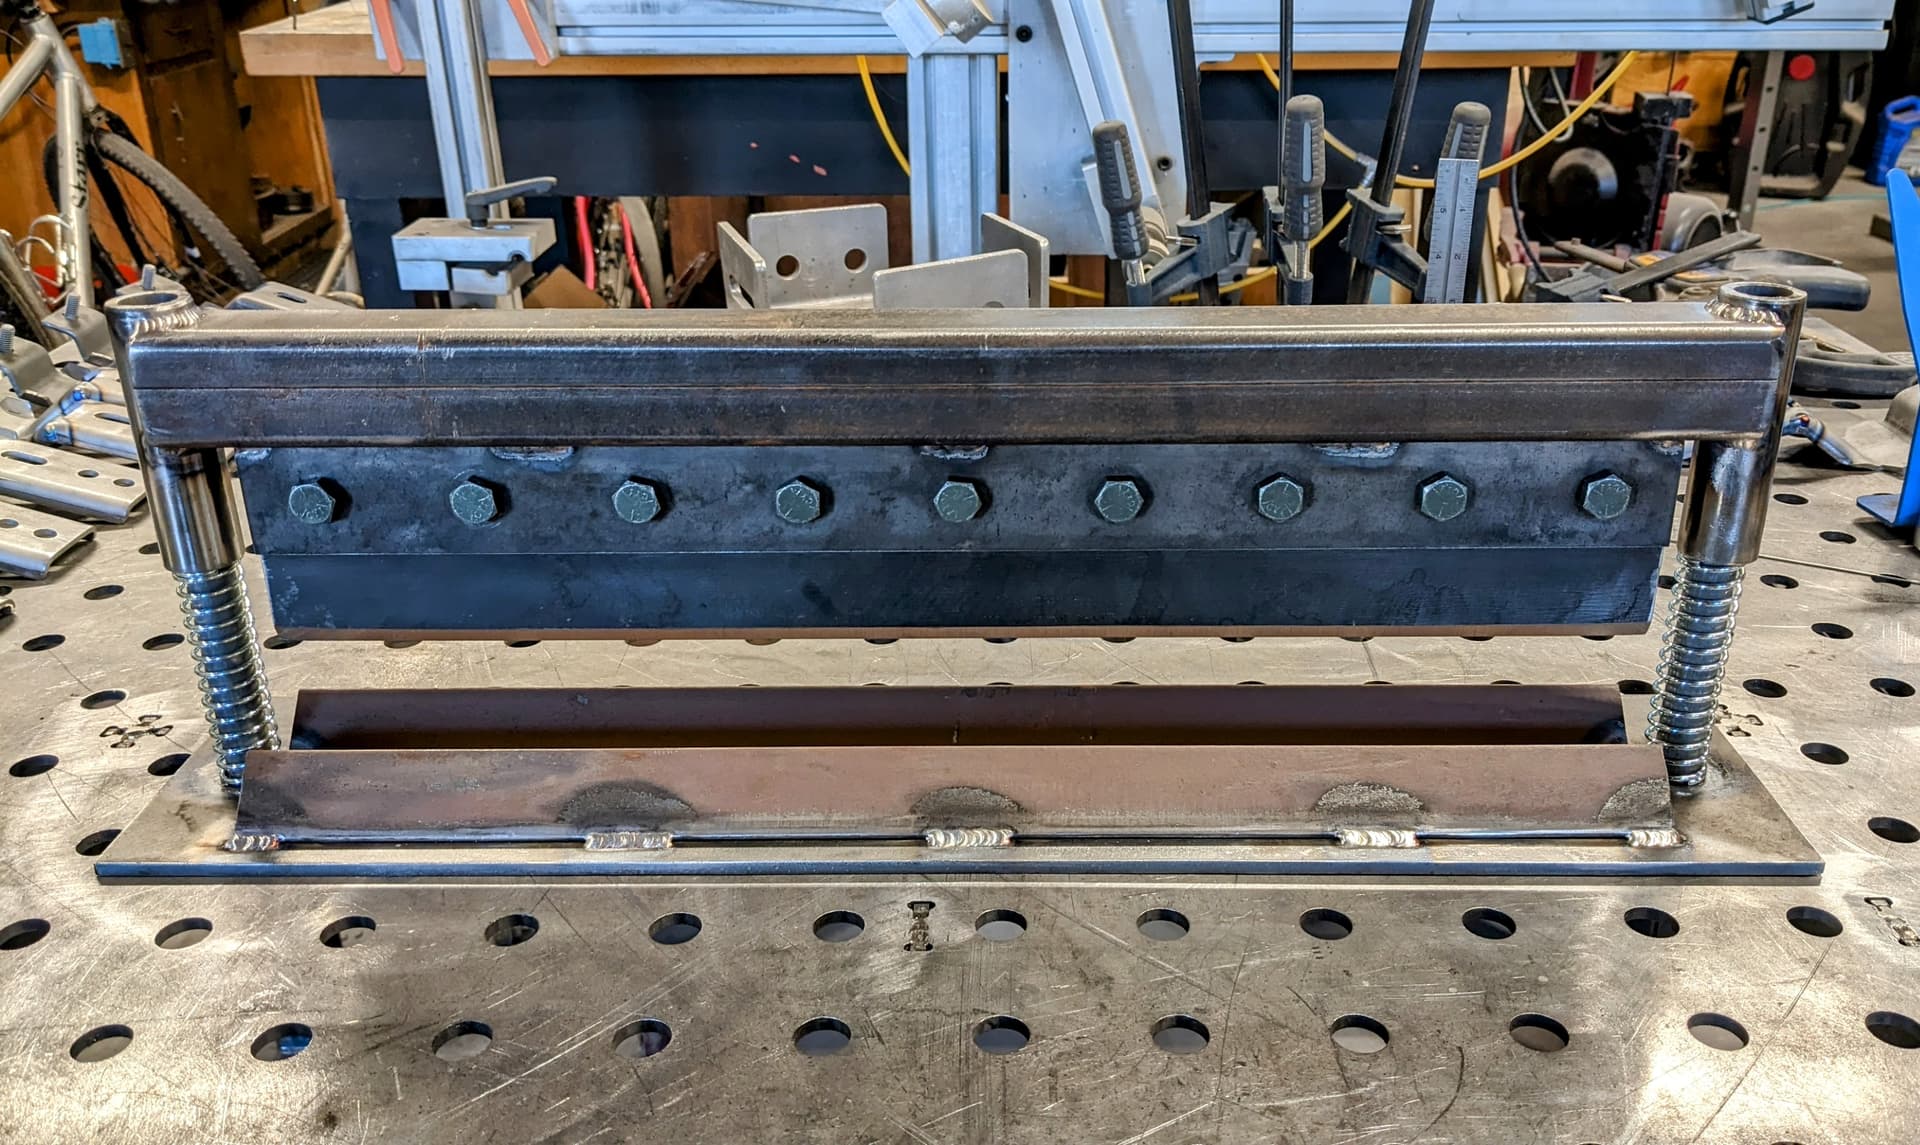
For the thin stuff I have an improvised bending brake that I made out of some scraps. It works okay… at some point I need to make or buy a better option. I am always looking on classifieds, but they don’t come available very often and they are expensive.
For the thicker stuff I also have the swag finger brake. I had compiled some scrap steel to make one… but considering the time it would take me to make it, the swag one is a bargain. I am still pumping the hydraulic ram by hand but would someday like to upgrade the ram to an air powered one. I had to make an adapter to hookup the swag brake with the press I have. The ram end is too large for the coupler swag provides.
Depends on how nice of a bend you need. If you just looking to bend 90’s on bracketry or something try on of these.
I have bent 1/4" plate 4" wide with out any trouble but nothing wider.
There are a lot of companies that make these.
you also need a pump to run it, I used a air over hydraulic pump from a porta-power.
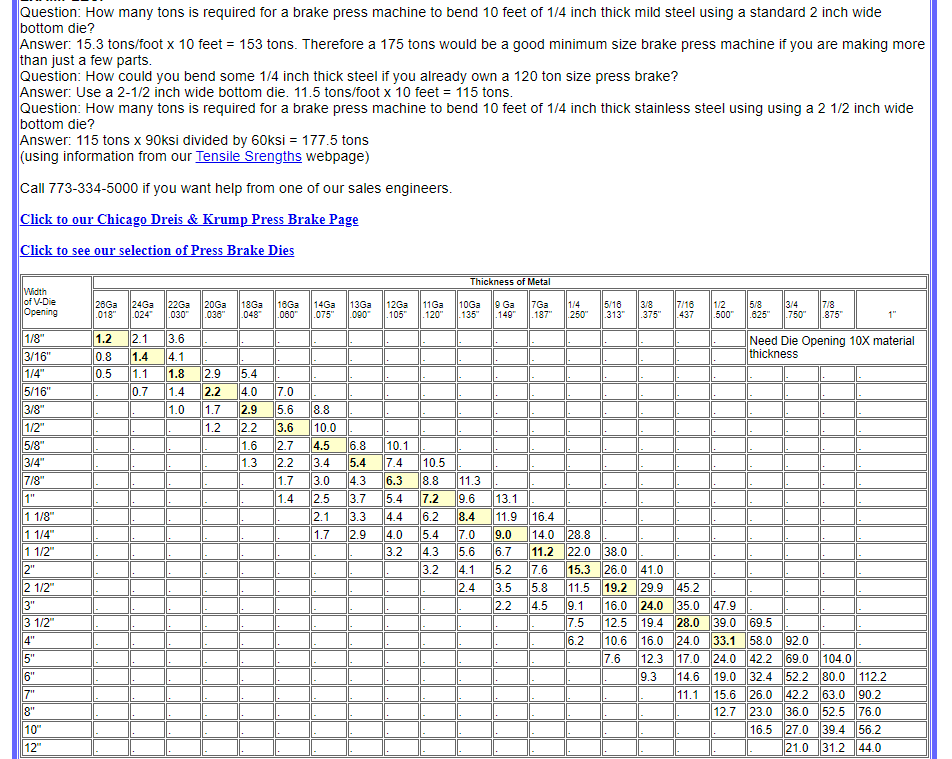
if you look at a tonnage chart you can see what it takes to bend different thickness at different widths.
Keep in mind this bender was designed to bend copper and aluminum
It claims you can bend 1/4 inch but I have 18 inch pipe extension on the “handles” and I feel at anytime it is going to break with any width more the 2 inches (of 1/4 inch plate).
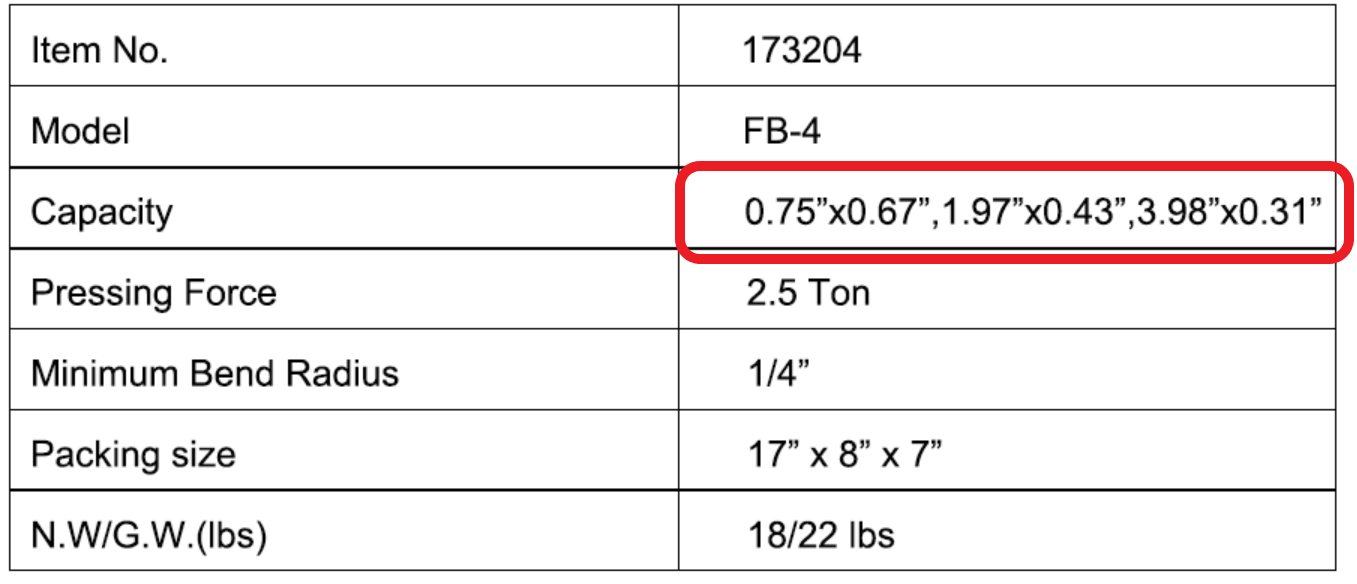
These stats are waaayyyy too optimistic. I almost think something was lost in the metric to imperial translation. When I bought mine, it specifically stated that the max capacity was 0.25 inches x 4 inches. I have done that a few times.
This thing has been well worth the money and modifications that I made to it.
I bend a lot of 1/8" parts on this and occasionally a 2" wide piece of 3/16". It won’t do full width 1/8" bends, but I’ve done at least 6" width bends.
That is definitely a worthy consideration. And I see it sells for $300 at Harbor Freight Tools. I would dearly love to have one of those!
But it will likely be damaged if 1/4" is attempted.
Here is an interesting chart showing the forces necessary for a press brake that is 2 inches wide to bend steel plate. The numbers shown reflect the tons needed per foot to bend. 1/4" steel plate that is 12 inches wide would take 15.3 tons of force. 1/4" x 4 inches would require 1/3rd of that: 15.3/3 = 5.1 tons.
Great ideas all on the press breaks. I think the proline or the (presumably) harbor freight version are probably the ones I will look into first. Maybe I can get by with going thinner material for more bending. I do like the idea of the option that allows for bending full sheets if necessary but really don’t see myself needing to bend something more than a few inches long so could maybe get some more push out of the proline version.
Some more thoughts on this before a separate post of my FIRST CUTS!
I have not messed with bending steel so this part is all still new to me. If I wanted to bend something like this, how would y’all do it? Assume 18-20GA sheet metal. Thickness is not as important, more just the bending concept: