Adventures in metal cutting

I do. Except for light gauge material where that would warp the crap out of it. By leaving it at max power I just need to alter speed to get good cuts. And highest power gives me the fastest speeds. Fascinating as it is to watch the cutter tracing paths, I’ve got limited life minutes so am willing to watch fast cuts instead :blush:

2 Likes

On the drain setup, I’ve decided to buy a stainless steel 1/2" nipple at Lowes and cut it in half on bandsaw. Each half will be tig welded to the pan and I’ll run some piping from that to some buckets while I figure out a longer term plan with some sort of pump. Lots of great ideas and builds on the forum I’ll borrow from for sure! But I did like the post I read a while back about someone simply draining to some 5gal buckets and pouring it back in. Simple good.

I really see a need for a bottom shelf - so many great builds on here. I’ll have to figure out something for that - it really seems like a necessity at this point.

Edit - after measuring some things and looking at what I have on hand, I may try to braze on a 3/4" copper fitting to the 1" hole (I thought it was 1/2" - it’s not). I’ll have to trim the fitting on the bandsaw, but it looks like it will fit - and I’ve got some 3/4 copper I need to use up so it may get used on this project.

1 Like

Glad you got it fixed, in that first picture, “Me” didn’t look like any James that I have ever seen. lol

1 Like

Here’s what I’ve settled on for the water table drain. Turns out a 3/4" threaded fitting fits nicely into the water table hole and I’ve got some 3/4" fittings sitting around in scrap bin from other projects. Trying to use them if possible vs buying new stuff.

You could go in either way depending on how close you want your piping to run to bottom of pan. If you want to run very close flip the fitting around and cut off the side you put the tube in leaving the threaded part pointing down to attach piping to. I’m adding about an inch of drop.

Once these are brazed in, I think I’m going to connect PVC piping in case I need to separate the halves of the table. I may use some left over copper if I can find a cheap fitting to thread on to the nipple on the water table.

That’s plan for now…will update this thread once I get it done.

1 Like

Well, that plan didn’t last long. Think I’m going scrap the copper extension and just go close. Simpler.

To do this, I’m just cutting off pipe end not the threaded end. I’ll sand down any stick up on other side once installed. The slight lip helps to center in hole and I’ll probably wrap the brazing metal around it.

Nice fit.

Plan is to cut a ring of stay-silv 45 or 56, flux with white paste and evenly heat around the fitting and it should bond nicely.

You can use other brazing materials as well (like coated bronze rods) - but ideally have some silver content to help flow. Silicon Bronze braze would also work well - either tig or gas braze - maybe mig. You could solder it on as well, but you need the right flux to join to stainless - an acid based flux would work.

@KSiegel Pro Table Build Pics - #148 by KSiegel did something similar with a 1" Stainless nipple and tig welded it - that is probably the most reliable method of doing this. This braze method could be done with propane if no tig setup. You just need to make sure you have correct braze metal and flux.

1 Like

Found a setting called “Pause at End of Cut” in Sheetcam looks like it might workaround torch pierce timing issue I’ve been having. Don’t know yet if possible to do a similar pause in Fusion360.

Pause%20End%20of%20Cut

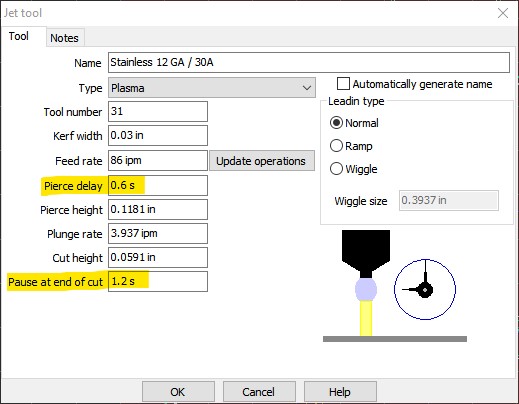
This lets you set a pause after cut. It inserts G4 P1.2 code after every section of cut - so if you’ve got a piece with lots of pierces, you could start cut with normal .5 or .6 pierce delay (based on material thickness) so you don’t blow too big a hole and it will wait for 1.2 secs (in this example) when done so the torch can do it’s reset for next fire. This may prevent the guessing on pierce delay.

I’m going to test this in my next cut run, but hoping this will make for more accurate pierce delays. If anyone knows how to do this in Fusion360, much appreciated!

2 Likes

Still playing around with pause settings…I decided to look into the F360 post and see if something jumped out…hmmm…

Looks like I can add an aftercutdelay property around line 56

// user-defined properties
properties = {
ihsToggle: true,
thcToggle: true,
pierceDelay: 0.5, // specifies the delay to pierce in seconds

:white_check_mark: afterCutDelay: 1.2, // pause after a cut is made to allow torch to cool/reset

pierceHeight: 0.15, // specifies the pierce height
cutHeight: 0.063, // toggle between using G0 or G1 with a high Feedrate for rapid movements
retractHeight: 1, // the retract distance
ihsSpringback: 0.020,
};

// user-defined property definitions
propertyDefinitions = {
ihsToggle: {title:“IHS”, description:“Toggles Initial Height Sensing ON or OFF”, type:“boolean”},
thcToggle: {title:“THC”, description:“Toggles Auto Torch Height Control ON or OFF”, type:“boolean”},
ihsSpringback: {title:“IHS Springback (in)”, description:“Account for material springback in IHS switch.”, type:“number”},
pierceDelay: {title:“Pierce Delay (sec)”, description:“Specifies the delay to pierce in seconds.”, type:“number”},

:white_check_mark: afterCutDelay: {title:"Pause at End of Cut (sec)", description:"Specifies a pause time in seconds after the torch is shut off.", type:"number"},

pierceHeight: {title:“Pierce Height (in)”, description:“Height at which to pierce material.”, type:“number”},
cutHeight: {title:“Cut Height (in)”, description:“Height at which to cut material.”, type:“number”},
retractHeight: {title:“Retract Height (in)”, description:“Height at which to retract above material.”, type:“number”},
};


and use it around line 432:

//----------- After M5

// New Retract Height
writeBlock(gFormat.format(0), “Z” + xyzFormat.format(properties.retractHeight * (unit == MM ? 25.4 : 1)));

:white_check_mark: // AfterCutDelay
:white_check_mark: onDwell(properties.afterCutDelay);
:white_check_mark: writeBlock(" (After Cut Delay)");

writeln(“”);


That should write out a G4 P1.2 after every M5 (torch off) section.

Assuming LS comes up with a supported solution sometime soon (perhaps even using the Arc Ok as previously hinted at) this could be a decent stopgap.

Hope it helps someone…just know if a new post is published, you’d have to make the changes again as they will be written over. Also - my 1.2 value is arbitrary - I haven’t figured out the optimal setting yet for my plasma. I’ll be testing this over next few days to see how well it works with my setup.

1 Like

Well - the post seems to work - haven’t tried on table, but see no reason it shouldn’t work.

The modifications to the post create a new property in the post screen of Fusion360 where you can set the value if you want. Perfect!

The post looks like:

G0 Z0.15 (Pierce Height)
M3
G4 P0.5 <- Pause time for pierce
G0 Z0.063 (Cut Height)
H1

… cut some stuff…

H0
M5 <- Torch off
G0 Z1. <- Retract
G4 P1.1 <- Delay further processing for 1.1 seconds
(After Cut Delay)

…end or cut more stuff… each torch on / off section will have a pause at end.

I made a copy of 1.5 post, called it 1.5.1 and keep it in same folder as the 1.5. That way I can flip back and forth between them. Nice clean temporary solution. :+1::grin:

Here’s a copy of my 1.5.1 post (Remove the .tap extension).
FireControl-v1.5.1.cps.tap (18.8 KB)

Here’s more recent 1.5.2 post (remove the .tap extension). This adds the pre cut delay property discussed in another thread about 1.9 THC firmware. Both are defaulted to zero, so this acts just like the original 1.5 post with two additional options for pre/post delay times.
FireControl-v1.5.2.cps.tap (19.0 KB)

Latest Post- 1.5.3 - incorporates the M0 stop function before every cut - true / false property.

Remove .tap extension before using!
FireControl-v1.5.3.cps.tap (19.7 KB)

1 Like

Awesome. Good Job.

Hypertherm machines with a RS-485 serial interface port have the ability to send diagnostic information to the CNC, and allows the CNC to control air pressure and amperage. Unfortunately, they’re just a tease for most of us because only high end sophisticated CNC machines have the ability to use it. Maybe some day sigh

Nice thread, keep up the progress.

2 Likes

Good to know! Thanks for info!

Oh boy. I just saw that I can put an RS 485 serial port on my HTPM 85. Thanks ORDD. Now I have got to go spend some more damn money. :stuck_out_tongue_winking_eye:

3 Likes

Yeah… was starting to wonder when I saw the first meme. :rofl: Thanks for a good laugh!

1 Like

Getting a few things plumbed up today.

Adding a small 1/4" regulator at the table. Plan is to keep tank regulator at 110-120psi and this one around 90-100psi. Feed into the regulator is 50’ 3/8" hose from 1/2" tank regulator/filter and an M60 upstream. The black push to connect line is 3/8od (1/4" id) for good flow.

Added two quick connects at the M30 so I can have shop air handy as well as feed the plasma.

Off to the home despot to get some water table drain fittings…

3 Likes

Got the drain fittings brazed on! Not my finest work, but I don’t braze very often. Falls into the ‘good enough for homegamer’ category. They are strong and will hold well. Don’t anticipate any issues. Be warned of warping the stainless with too much heat.

My little oxy rig - using some mapp / oxy mix.

It’s on!

Cleaned up and sanded down flush

On to plumbing next!

5 Likes

Well, that should drain most of the water! Did you do both sides the same?

1 Like

Yep - both are identical.

Finished up plumbing. Some pics:

Threaded fitting to slip fit 3/4"

With check valve and ball valve. Check valve will be for the filling line. The ball valve is for draining.

Tested for leaks and it’s working great. I did find one pin hole leak in my braze job…fixed it with some regular solder - just a little heat and a touch of solder and it’s filled and good.

Overall…pretty pleased with this setup. Next up is finding a small cheap pump on Amazon and maybe some type of filter for the fill… And a tank that’s not a bucket. But for now, a few buckets will work well for me. I’ll just pour them back in to fill.

1 Like

Here is the one that I purchased. Check it out and see if it would work for you and within your budget.

It comes with 1 inline filter and I bought a 2nd one. I’m gonna use 1 between the tank and pump and the 2nd one between the table and tank. Hopefully this will help keep my water clean. I also came up with the idea of putting magnets around the drain holes so to catch more of the fine particles. Your setup came out really nice. I’m gonna be plumbing mine pretty much the same way controlled with a check valve and 1 on/off ball value. Been working so much that I don’t have time to start putting my CrossFire Pro together. It’s been sitting in the shop for almost 2 months (Batch 1). Oh well at least I still have my original CrossFire going.

1 Like

Thanks for the info! That looks like what I need!