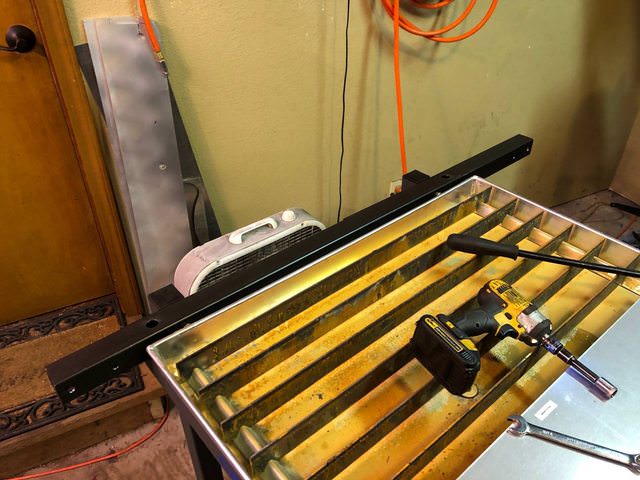
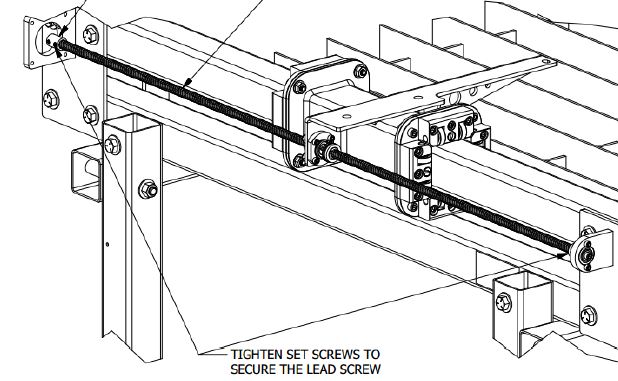
I finished expanding the Y axis on my Crossfire to match the water table size. This means extended the axis 1.5" towards the torch side and 9" toward the motor side. I used 2x2 .0625 wall 316L SS tubing cut to 52" overall length for the new Y axis gantry and 52" 2x2 .090" wall tubing for the new frame brace/gantry mount. I used a 3 axis manual mill to drill the holes and I highly recommend using this method. It took under 3 hours to drill all the holes in both tubes. I tried using my standing drill press and it’s just not accurate enough.
I will post CAD models and drawings if Langmuir Systems approves. I know LS is making an extension kit so I don’t want to step on their toes by releasing models and drawings for this mod. I did have to slot one hole for adjustment but that can be eliminated by using your existing LS frame tube and new gantry tube as templates when making your new frame tube.
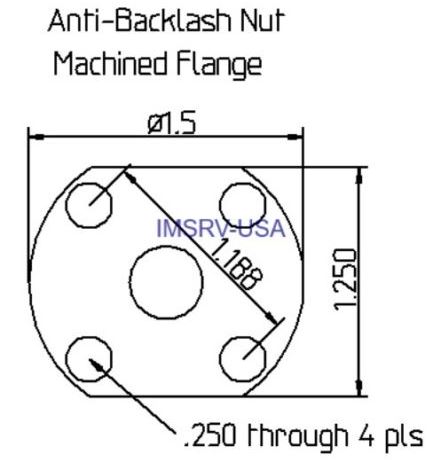
I used 1/2-10 5 start ACME lead screws and nuts from eBay. The links are below, you need 1 nut and at least 47" of lead screw. You can use the factory 3/8-8 4 start lead screw nuts and just order a replacement lead screw from McMaster if you’d like. I noticed a small amount of whip on my table so I upgraded. It is not necessary though.
Fire away with questions until I get the CAD models and drawings approved for release from LS. I’ll run the first test cuts tonight after I dial out .020" height difference on the rail.
-Trevin
UPDATE 11/20/18
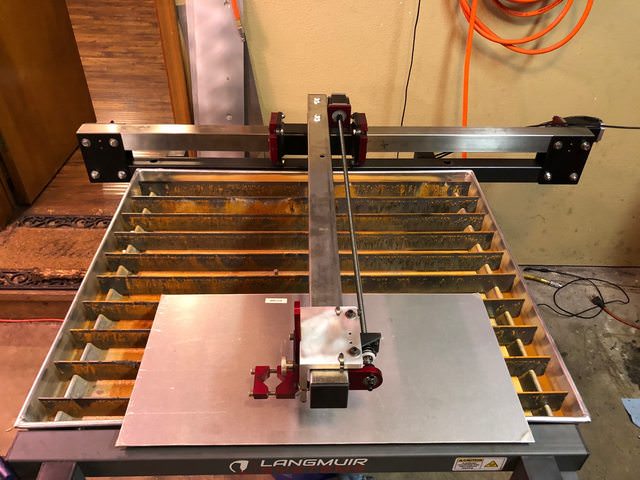
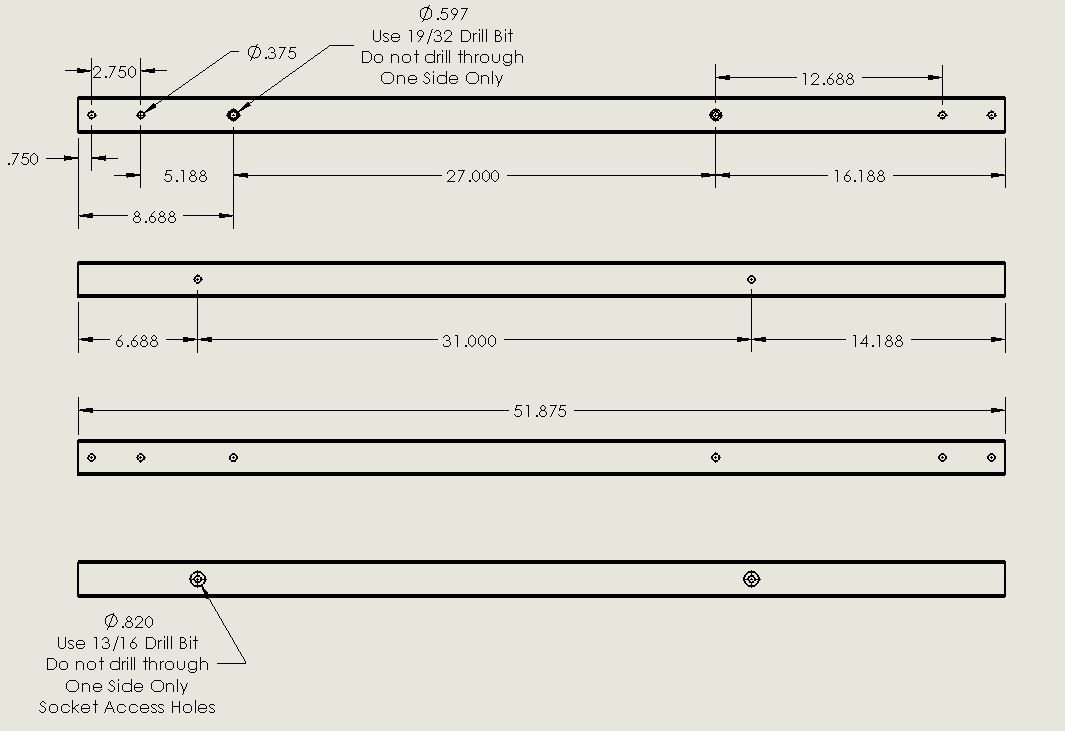
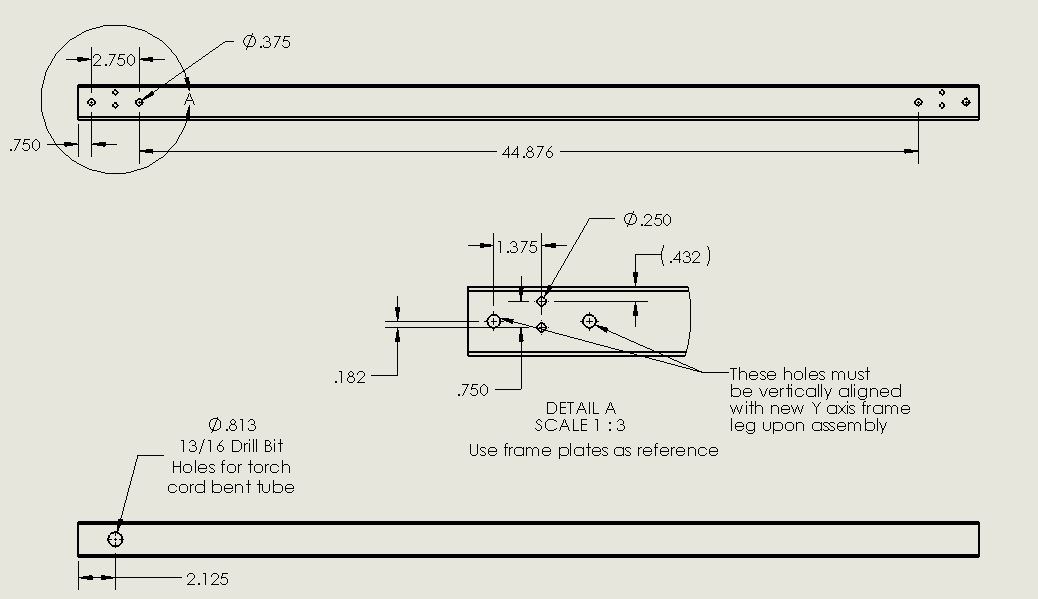
Dimensions for the New Y Axis Frame Leg and Gantry for those that want to extend their Crossfire to the same size as the water table/frame. This layout makes it possible to get VERY close or even on top of the water table edges so you must take precautions to clear the edge. You can put spacers on the Y axis rail or lead screw to stop the travel if you are worried.
Keep in mind, these are not 100% accurate for EVERY table and you need to review these and compare to your table’s dimensions prior to cutting/milling. These are 99% there, the 1% variance comes from small changes and imperfections when manufacturing then assembling.
Take these as guidelines and DOUBLE CHECK your own dimensions and work. I cannot guarantee everything will line up perfectly and accurately. The method you use to machine these parts is more important than anything else involved. I messed up my first frame leg with an inaccurate drill press - check your tools and dimensions! Then double check based on your own math and existing frame leg and gantry. Good luck!
Hey Richard - what do you mean for water table? This matches the Langmuir water table perfectly and I don’t have room in my shop to go bigger than this. I love this table for it’s size and now it’s perfect for me. I’d do a 4x4 or 4x8 if I had room but this is actually a better setup for the type of fabrication I like to do on my Jeep.
The ACME nuts are the same bolt pattern, you do not need to modify anything else on the Y axis. I used 1/4-20 socket head bolts instead of the smaller 10-24 so there is zero slop.
I forgot to mention - I had a machine shop make the bearing mount and motor coupler. You can find the motor couplers in aluminum on ebay but I wanted stainless steel. This is why I mentioned that you can use the 3/8-4 4 start lead screws from McMaster and keep everything else the same. This step was a bit more expensive than keeping the factory 3/8 sized components but I don’t want ANY whip and now there is absolutely zero. I only use 200in rapids instead of 300 so that helps as well.
No, it’s the same size as the water table. If you’re not dry running your program to ensure you’re not crashing or running over a close edge, you should probably start. It’s good practice to dry run every program.
The water table is symmetrical to the assembly and the Y axis. The X axis (gantry) in centered in that assembly but then the torch is offset to one side with the X axis lead screw on the other side. If I run mt Y axis all the way to the stop I still have 8" 5/16" remaining before I run out of table.
Totally obvious but the way I have may table situated I never rally noticed. basically am leaving over 10" of available table space.
Yes, Y axis is offset due to torch offset. This layout makes it possible to get VERY close or even on top of the water table edges so you must take precautions to clear the edge. You can put spacers on the Y axis rail or lead screw to stop the travel if you are worried.
I’ll update the drawings and post them soon. Keep in mind, these are not 100% accurate for EVERY table and you need to review these and compare to your table’s dimensions prior to cutting/milling.
BrooklynBravest - Thanks! I think a mag drill would work if you align everything with 321 blocks. They’re $16 on Amazon, get some.
Original post has been updated with a snip of the drawings for dimensions. Take these as guidelines and DOUBLE CHECK your own dimensions and work. I cannot guarantee everything will line up perfectly and accurately. The method you use to machine these parts is more important than anything else involved. I messed up my first frame leg with an inaccurate drill press - check your tools and dimensions! Then double check based on your own math and existing frame leg and gantry. Good luck!
Very nice. Looks like $100 of square tubing from my local guy, $35 for the lead screw and $32 for the nuts. Under $200 I think if I can find a local machine shop that can drill the tube (having neither the mill nor mag drill myself) to get this upgrade an 10" of additional Y travel.
If you’re good with aligning tubes together and shimming them to make sure they’re centered, you could use your existing tubes as drill guides if you’re very patient and have a good drill or drill press. Even a $75 Wen bench top drill press could do the job, just be patient and go slow. Buy the 321 blocks I mentioned to help with the clamping. I used this method for a couple of the frame leg holes to make sure the new tube was exactly the same as the old tube.
Thanks fellas. Yes, you can cut the full X Axis which I believe is 25.5” and the extended Y axis is roughly 34”. I’ll get a precise measurement for you soon.
Looks like I need to get going on this. I had most of the hardware picked up but dropped the ball. Did a couple projects right at limits and would have like to cut them larger. I have a couple projects Just over 31 maybe a strong 32".
Someone should have kitted this up and saved me the trouble