Here are my test cuts, any advice.
Primeweld Cut 60 on Crossfire.
40amp shielded tips,

What material and gauge
Amps?
Speed?
Psi?
Just to give you an idea, I run my cut 60 using the following for 18g cold rolled steel using the 40 amp Shields
220ipm
30amps
65psi
.15 Pierce delay
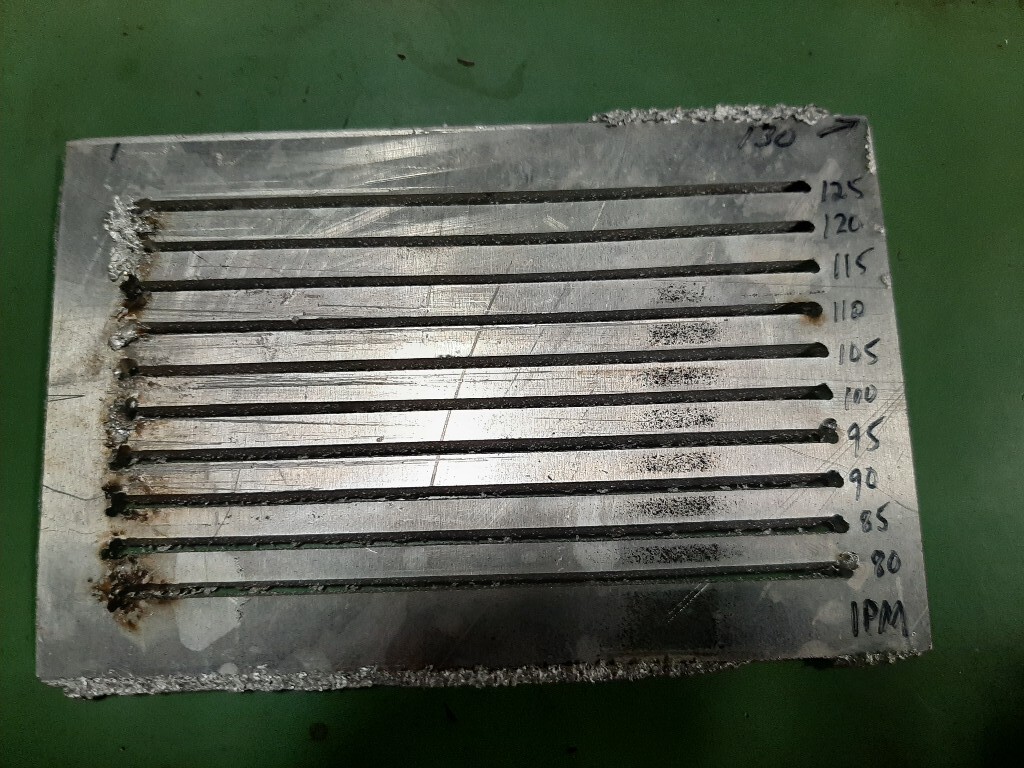
5052 aluminum 11 gauge ( .125")
40 Amps
Speed - marked on the test piece
120 PSI @compressor
75 PSI @torch
60 Psi @cut
40 amp shielded tips from George
1 Like
Not going to be able to help you on that, I’ve only cut one piece of aluminum and it was a paper thin license plate blank that I cut for my torch shield and it was not a good cut but cleaned up for what I needed.
1 Like
From your test results (and consistent with my setup on a different cutter) 100-105 IPM is about right. Looks like you need a bit more pierce dwell delay as well. I use 600ms for AL. Your outside cut looks to be too fast. My test code selects the mid-range for the outside cut. I also use a lower air pressure, but I have a bigger nozzle (50A) then you’re using (not by choice, it’s the only size I have).
2 Likes
115 looks pretty decent on the bottom? You should write down the amps and air pressure on the test plate as well. And I prefer writing the notes on the bottom of the plate, as I am looking at the amount of slag on each cut.
2 Likes
Hello Tom, I’d be interested in a copy of your G code for selecting the mid range cut speed for the outside cut.
You can get the set of files I’ve loaded on to github at CrossFire/Lotos LTD5500D/CalibrationG-Code at master · TomWS1/CrossFire · GitHub
I’ve added one or two more since then, but haven’t posted to github. I’m traveling this coming week so won’t be able to update until Feb.
Is there something I need to do to the code to make it repeat the cuts. I saved off the text as a .tap file and loaded it into Mach3. When I run it, it cuts the first line then the outline. It isn’t making multiple passes.
Any assistance would be appreciated.
Dale
Variable #105 controls the number of lines that are cut. However, you need to be specific on which gcode file you’re using.
When I was first writing the program I had that problem, and read that Mach3 wants a blank line at the start and end of the program. Make sure you have those blank lines, extra ones will not hurt either.
1 Like
The #105 variable is set to 10. I am using the TomWS posted named CalSteel16b.tap file. I added empty lines at the beginning of the file and at the end, still no luck.
Does it go over the first cut 10 times? Is the cutout profile large enough for all 10 cuts?
I figured it out. I used a Mac to edit the file and forgot to tell it to use Window line terminations. I converted them over and it worked as expected.
Thanks for all the assistance!
1 Like
Thanks for posting your solution, maybe it will help someone else later on.
The ghosts of early 1980s still haunt us!
Test cut program modified to cut a single straight line.
Mike, I have used your test cut program to test my plasma cutter and it worked very well.
Recently I thought it would be useful to have a simple G code program to cut sheets on the crossfire. I wanted to be able to cut a straight line in the Y axis of a set length, so I modified you test cut program. I tested it last night and it seems to do what I wanted, in dry run mode at least. I would appreciated it if you could look this code over and see if any of it is redundant and could be removed to clean it up. The text at the top describes what to do before running the program. This version is for 1/8" mild steel and a Hypertherm 45 XP.
I’m now thinking that I will just have one version and go into it in notepad, set the variables for what I want to cut save it and run it.
(Langmuir Crossfire forum base file from Mike C)
(this program will cut material in the Y direction for a specified distance.)
(It can be used to cut larger pieces of material or cut off scrap)
(to use this program, set the cut length #104, feed rate #100 and pierce time #120 for the material to be cut)
(position the torch head at the start point, zero both X & Y and run the program.)
(1/8" steel 6 inch cut)
#100 = 120 (Feed rate)
#102 = 0 (Y starting position)
#104 = 6 (length of cut in inches)
#120 = 0.7 (Pierce Delay on seconds)
G90
G70
#102 = 0 (cut starts at Y zero position)
G0 x0 Y0
M3
G4 P[#120] (Starting Pierce)
G1 Y[#104] F[#100] (cut 6 inches in Y direction at a speed of 120 ipm)
M5
M30
%
1 Like
Your variable Y position didn’t affect the actual start position, as you called out G0 X0Y0 without using the variable 104. I also added x start, and x length so you can also use this program along the x axis.
1 Like
I’ll also make the observation that Mach3 will round up pierce delay (Dwell) seconds to nearest integer. If you want finer control, you should set your Mach3 Dwell configuration to milliseconds and then #120=700.
If you simply want a program that will cut X & Y lengths from the current torch position, then I would recommend using G91 (Incremental Mode), which will make the program much simpler:
(Langmuir Crossfire forum base file from Mike C)
(this program will cut material in the Y direction for a specified distance.)
(It can be used to cut larger pieces of material or cut off scrap)
(to use this program, set the cut length #104, feed rate #100 and pierce time #120 for the material to be cut)
(position the torch head at the start point, zero both X & Y and run the program.)
(1/8" steel 6 inch cut)
#100 = 120 (Feed rate)
#101 = 0 (X starting Position - not necessary)
#102 = 0 (Y starting position - not necessary)
#103 = 0 (X axis length of cut in inches)
#104 = 6 (Y axis length of cut in inches)
#120 = 700 (Pierce Delay in milliseconds)
G90
G70
G91 (switch to incremental move mode)
M3
G4 P[#120] (Starting Pierce)
G1 X[#103] Y[#104] F[#100] (cut 6 inches in Y direction at a speed of 120 ipm)
M5
G90 (Switch back to absolute mode)
M30
%
3 Likes