I have been on-again, off-again trying to learn for the past month or so when time is available and most recently with the help of some on here who’ve sent me some known good G-code files (shout out to Scott Dube!) I’ve seen my table running very nicely so I know it is (or was) set up correctly.
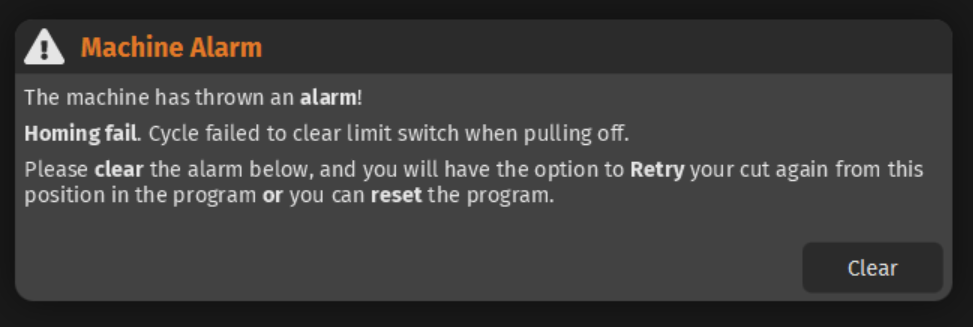
Most recently I’ve been going back & forth between Qcad and SheetCam trying to get use to and absorb the steps needed to create useable G-code on my own. I WAS able to create the code to see my table run through one fairly simple cut (a set of three basic shapes). But now as I’ve continued to work on something like that (a basic gusset plate for welding) my table threw an error whenever I homed it.
I see that a number of people have run into problems with the limit switches so I went back through the limit switch installation manual and verified that they’re positioned correctly and that I have the right firmware (even though it WAS working up to now) etc. I don’t recall any way to tweak the homing pull off travel. Is there some place to adjust that… SHOULD I adjust that if there is?
Generally I’m looking for a fix or work-around … where do I go from here?
I wondered if either switch had shifted so I went back through the limit switch installation instructions and verified that they both still comply with the directions regarding when they operate relative to something that WOULD be an actual hard stop (the X axis switch vs the switch mounting bolt and the Y axis gantry bearings vs the gantry mounting plate).
There is no debris to interfere with either switch’s operation.
So, if I understand correctly there is no accessible adjustment in the homing command to set / adjust the back off distance and, regardless of their placement being OK per the limit switch installation instructions, my only option is to ‘fudge it’ by adjusting the switch positions ?
Do the table’s soft limits effect this in any way? I have those enabled and I noted those settings when I set the table up and could reenter or tweak them.
No, it is totally controlled by CutControl. It happens to me every once in a while.
Hopefully it will be fixed in the next released version of CutControl.
Will it work some times or not at all?
If I clear the error and either disable the limit switches and drive the cutter away from the switch or kill the power to the controller them move it manually, it will resume working. But if I tell it to go to machine home it goes into the same error condition.
Should I try tweaking the switch positions or just always start from the work home position while I’m playing around trying to learn?
Try moving the limit switch plunger out a turn.
This will stop the carriage a couple thousands from the motor support. Maybe the carriage is contacting the motor support bracket?
Limit switch plunger? The limit switches I have are micro-switches with little lever arms so there are no plungers.
I have checked and there is no physical interference to create a real hard limit at the position where the cradle comes to rest after parking. This really does seem like a software bug.
I just disabled the limited switches and successfully cut a small job, a little 2" triangular gusset with a 1/4 hole in the middle. It’s just a small, simple piece but this is the first time I’ve gone all the way through from drawing something in Qcad, to setting it up in sheetcam and then actually running it, so that feels like progress.
For the time being I’m going to run jobs without using the limit switches I guess. Unless you or anyone can suggest a better idea.
I understand what you’re referring to if it existed, but it doesn’t. The microswitches are operated by the body of the torch transporter (for the X axis) and the gantry transporter (for the Y axis). It sounds like your table must have some different style switches than those I got from Langmuir a couple months ago. There are no additional, adjustable parts to vary how / when that contact happens. In the switch installation instructions I got they say to make what adjustments you can by loosening the switch mounting hardware (for X) and gantry mounting plates (for Y) and moving them slightly. That’s kind of crude, but it’s all I have to physically tweak them. If I had a picture handy I’d post one.
The only advantage that the limit switches have added is the convenience at the end of the day to press “Home” and it travels to that position and raises the torch. All without the risk of slamming against the bolts. Outside of that, the switches (and soft limits) even when set perfectly, are causing you to lose about a 1/4 to 3/16 of an inch of cutting room.
While you are learning the other aspects of the table, I agree with @Bigdaddy2166: stop using the limit switches. You don’t need to take them off, you can just go into the settings and tell FireControl that you don’t have them. Note: If you slam into those fragile limit switches once the software is not aware they are there, you could damage them. That would be a reason to “remove them” so you could install later.
I get an error from the limit switches in one way or the other nearly every time I turn on the machine. I am likely to remove them since I now have less that 48 inches of X travel due to its offset from the switch.
Thanks for the detailed reply. While I don’t anticipate needing every available inch of the table for the kind of stuff I’d like to do with it (now at least, who knows in the future) I had kind of come to the same conclusion.
When I was ordering my table, knowing very little about them, I assumed that the added switches were there for a good reason. Now that I’ve run into this problem and played with it some I think I’ll leave them disabled and as I set up a cut I’ll drive the table to a safe location and declare that to be the WORK ZERO then position the material to match that. I’m not going to push the limits, but it looks to me like the table would hit a hard limit (mounting bolt or mounting plate) before it went far enough to damage a switch. But just to keep things aligned I don’t want it banging into those limits. Hopefully that makes sense. If not please tell me what I’m missing.
Agreed. Besides, if you damaged those switches, they are not that expensive. You could fabricate something with a simple piece of spring steel, chewing gum and duct tape (just threw in the gum and tape for fun!).
You will be happier without the switches.
Edit: I am glad to hear that you are up and running with your table. I didn’t hear or see any evidence of you after your initial posts. Glad your table is no longer a virgin!
I think the advice of shutting them off for now is good advice. If the stuff you are cutting fits well inside the work envelope of the machine it just adds another layer of complexity while you are figuring out the machine. As you’ve heard me say, I recommend simplifying your stuff as much as possible until you start to see what normal looks like. The limit switches aren’t necessary so shut them off for now would be my advice.