I must adore the insanity that is my 'project life" cause I keep making new projects

Elon Musk said something to the effect, “It’s difficult being me, because I can’t stop the ideas from flowing in my head”…

Well Elon…from one “Thousandaire” to another, [image]…I can relate. Clinking beer mugs :beers:

They (my ideas) just flow non stop and they propagate new project “must haves”…it is a little crazy…

Now if I could only make money like he does…

Ahh well, here we go.

So this CNC plasma cutter has spawned a whole new world of “project ideas” and sign making seems to be blossoming. Here is one for my granddaughter that is in the works.

IMG_3538.JPG

One problem is that painting them has a few “glitchs” in its process.

I have some safety wire strung from the ceiling, but then I have to walk around them, constantly bumping into them, and the “paint smell” is getting annoying, to say the least.

So it’s time to convert the “Bio-Dome” to a “spray booth”.

( the “Bio-Dome” is a small room that I sectioned off and sealed so that I/we could drink, smoke cigars, and play video games until the wee hours, …many moons ago)

So I decide that I need a “spray rack” and with my newly developed, beginner CAD skillset, I draw one up.

Man its very cool to be able to draw this stuff and have the computer calculate everything, then print it out, all nice and neat.

Much better than my “bar napkin” sketchs.

IMG_3531.JPG

My SIL just gave me a lead on some 1x1 cold rolled steel, so I decide to use that.

IMG_3526.JPG

This also reminds me that I still need to make some “roller guides” for when I cut long pieces…but for now (and the past 30 years) a “makeshift stand” like this Gorilla step ladder with a shim, will have to suffice.

BTW I love that little horizontal Bandsaw…It is one of my oldest tools and man I get a ton of use out of it.

I’ll bet that I paid about $149 for it, 25’ish years ago. Money well spent.

IMG_3527.JPG

It especially nice for those “angled cuts”.

IMG_3528.JPG

Time to lay it out, and tack it together. Sometimes I wish I would get a small El’Cheapo MIG gun for downstairs tacking…Maybe one day…but for now its all done with the TIG machine.

IMG_3533.JPG

As I go to do the second one…DAMN IT ALL TO HELL!!!

There is my first F-up. I must have checked that thing 20 times before I cut it, and I’ll be damned if I didn’t cut one an inch short.

Good thing I have about 400 more feet…hahahahh
IMG_3532.JPG

1 Like

So I cut a new piece and then its off to the “Langmuir” to cut out some “corner braces.”

When I first started using that CAD program, It would have taken me 3 hours to make a stupid triangle, but now its just a few seconds.

I can’t tell you how much of a time saver the Langmuir is. I love that damn thing.

IMG_3536.JPG

After I hit “start”, it takes about 15 seconds to cut 2 triangles out.

IMG_3535.JPG

I’m running out of time for the day, the kids are coming over for dinner, so I get to feeling a little “rushed” (never a good thing)

I “quickie tack” them on, but I am not “loving them”…Something is not sitting well with me about the “look” of them.

My wife yells something unintelligible down the stairs and I give my “Arthur Spooner” inspired response by yelling “I’ll be there in a minute!!!”

1745932259345.png

I know in my “heart of hearts” I need to stop…put down the tools…and walk away…

But I can’t.

I gotta “at least” get the holes drilled!!!

Then, just as I start “hogging out holes” by hand, I hear something drop in the kitchen, and Mrs. RWS goes on an expletive filled rant that would have made “Chesty Puller” blush.

Now the pressure is really begining to build…and Build…and BUILD

FINALLY!!!..I get them done…and as I look at them, they look like total shit!!!

They are all “off center” and I get a little mad/embarrassed at my work…

I decided to " drop the tools, and step away from the project"…

You can see the remnants of my “disgruntled handiwork” below in the pic. They are the side holes…The pics do not do them “justice”…

IMG_3568.JPG

1 Like

Reflecting on it the next day at work, I decide that the “triangle’s” I cut out out were “sub-par” and I decide to take some time and make a ‘nicer set’.

So I open up Alibre and get to work.

The new ones are much, much nicer.

I am real glad that I only “tacked” them on.

A few seconds with a cutting wheel makes short work of them.

IMG_3544.JPG

Now that I have done all this extra work I don’t wanna screw it up by drilling the holes by hand.

So what to do???

Then it hits me.

I remember… “Back in the day” when I was an A@P mechanic, my primary job was doing sheet metal and structural repairs, and we would locate holes by using something called a “drill bushing”.

I decide to make a “custom one” for this project. Although I think the ones I used back then were “hardened”, I am only going to drill 12 holes, so thats not necessary.

So its off to the “scrape pile” to find a “donor”…and out pops this former impeller shaft off an old boat motor that I screwed up 15 years ago.

IMG_3546.JPG

I chuck it up, and its “off to the races” to make my “custom drill bushing”

IMG_3548.JPG

After a few passes, it “fits like a glove”,

IMG_3550.JPG

so after center drilling it, I break out my “new favorite tool”…the upside down parting tool.

IMG_3553.JPG

Perfect…Now I feel much better.

The hole drilling goes perfect, and they look nice.

IMG_3554.JPG

IMG_3566.JPG

Now I go back to the Langmuir, and after a few minutes of set-up, I blast out 4 nice looking “caster pads”

IMG_3582.JPG

Then I fire up the “TIG machine” and its “off to the races”

Welding went “just average” …For some reason I could not find my “Mojo”…I made a few stupid mistakes, but overall, it work just fine.

Here is a “vertical up” attempt…pathetic, but this ain’t going on the space shuttle, …its a paint rack… so it will have to do.

IMG_3586.JPG

Not horrible, but I gotta learn how to “turn the corner” better.

IMG_3587.JPG

3 Likes

hree last parting thoughts for those of you considering a CNC plasma cutter.

  1. It’s awesome, but now you have become “the sign guy”

  2. You better be prepared to get “decent” at using a computer to draw with…and for me it was/is not easy nor intuitive. Be prepared for some frustrating computer sessions. Although once you “get it”, it’s pretty cool.

  3. You should wear a respirator. I did not wear one for this session, and my throat feels like I “swallowed lava”. After this last session, I bought one and will use it from now on.

IMG_3601.JPG

And here she is, in the “Bio Dome”, all dressed up, and no where to go!!!

IMG_3600.JPG

The End!

4 Likes

Dam-it @RunsWithScissors, I thought my scroll wheel was screwed up.HaHa. Looks great, it must be tough being you?

3 Likes

I know the welds aren’t for “space shuttles”

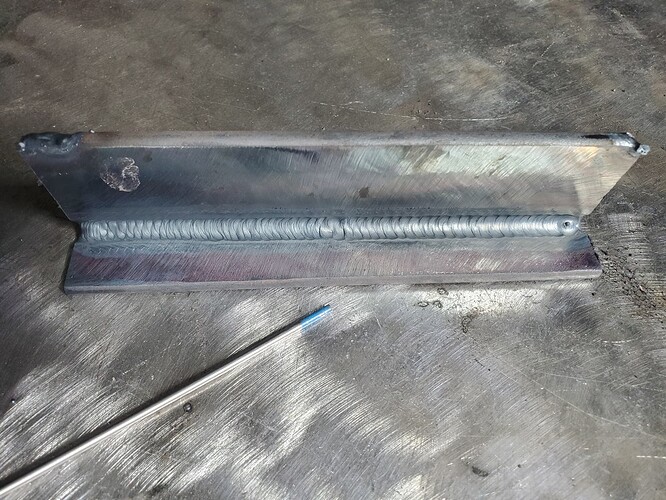
You should put a nice little blob of filler when you tack it at each end. Let’s you get away with dabbing less when finishing your weld. Don’t go too big of a filler either, or too slow, as it’ll puddle up like you saw in your first pic.

Again I know not space shuttle, but establish good habits. If you establish bad ones, it’ll be hard to break.

Second or third attempt ever, lanthanated on mild

4 Likes

Thanks for the advice. I will try the “end blob” trick next time for sure.

I also think that you are correct about my choice of diameter of filler rod being too big.

I think I will have to “stock up” on a few different diameters so that I will have better choices.

BTW, that is an amazing looking bead!!! :beers:

2 Likes

@Bigdaddy2166 Hahah…Thank you sir…Nothing wrong with your mouse though, just an “overactive story teller” with unlimited “film” for his camera.

BTW, I remember the days when you took a picture, you had to wait a week to see the results…hahahahahah

2 Likes

The blob is less a blob really, just a little emphasis I’m trying to place :sweat_smile:

But that’s just in case you’re not used to ending your beads. When you do so using TIG, you normally want to dab a little more to finish the weld which by itself takes time to do right.

And that also depends if you’re using high-frequency, scratch start, or lift arc. If using either of the last two methods, a flick of the wrist to kill your arc but hovering over your weld to provide post-flow is important.

It’ll come in due time, especially with all your projects!

3 Likes