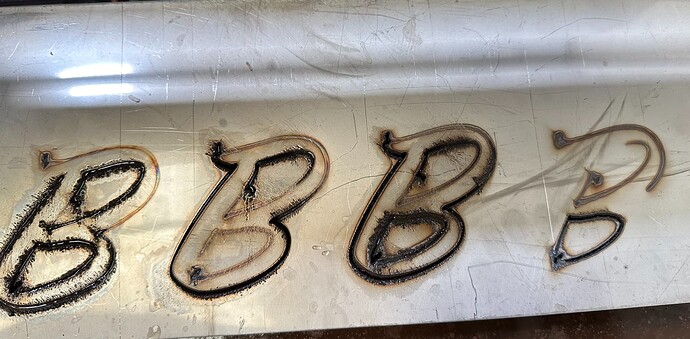
Hey y’all first time posting on here in hopes that someone can help me.
I have a newly set up table & plasma cutter and I can’t seem to get my machine to cut correctly or consistently. Every once in a while it will cut fine making me think i fixed the problem, but most of the time it doesn’t cut the way it should be.
Sometimes it cuts parts of the file or even half the line but not the full line. One thing that happens often is that a line will pierce, stops firing then ceases to cut the line after pierce. This often leads to the “Cutting Voltage Lost During Cut” warning to pop up when all of the sudden my voltage spikes up to 300V… For what ever reason this feels like a slew of problems and not just one.
Thing I have done to address:
- I’ve changed how the torch mount is holding the torch, making sure its not on the lower part of the torch
- I’ve adjusted air regulator on the inside of my razorweld so air flow is optimal
- I’ve changed out the consumables in the torch
- I got Razorweld to send me their cut chart incase the one in this forum was off (RW’s doesn’t seem accurate btw)
- I’ve talked with Langmuir support, they thought it may be the copper ground behind the torch mount, it’s not. I have since left them a couple voicemails with no call back.
- I’ve changed metals with different thickness feeds/speeds/amps/etc to see if that changes anything, nothing.
- I do have an moisture filter system on my air compressor
- I have an electrician come out to check my outlet for optimal voltage/amperage
Feeling stumped and very irritated… I have client projects with deadlines creeping up on me and am beginning to sweat that I won’ be able to make them. Any help would be amazing. Thank you.
Attached is a photo of 16G Stainless Steel. Same G code (on all 4), air pressure (same pressure on first then then lessened slightly on fourth)
After whats pictured, I did another cut on a new piece of stainless, which did not cut the inner two holes of the “B”, but pierced the initial cut, and then it fully cut out the perimeter line, which seemed me the settings look correct based on the amount address on the backside… Idk… HELP! > <
