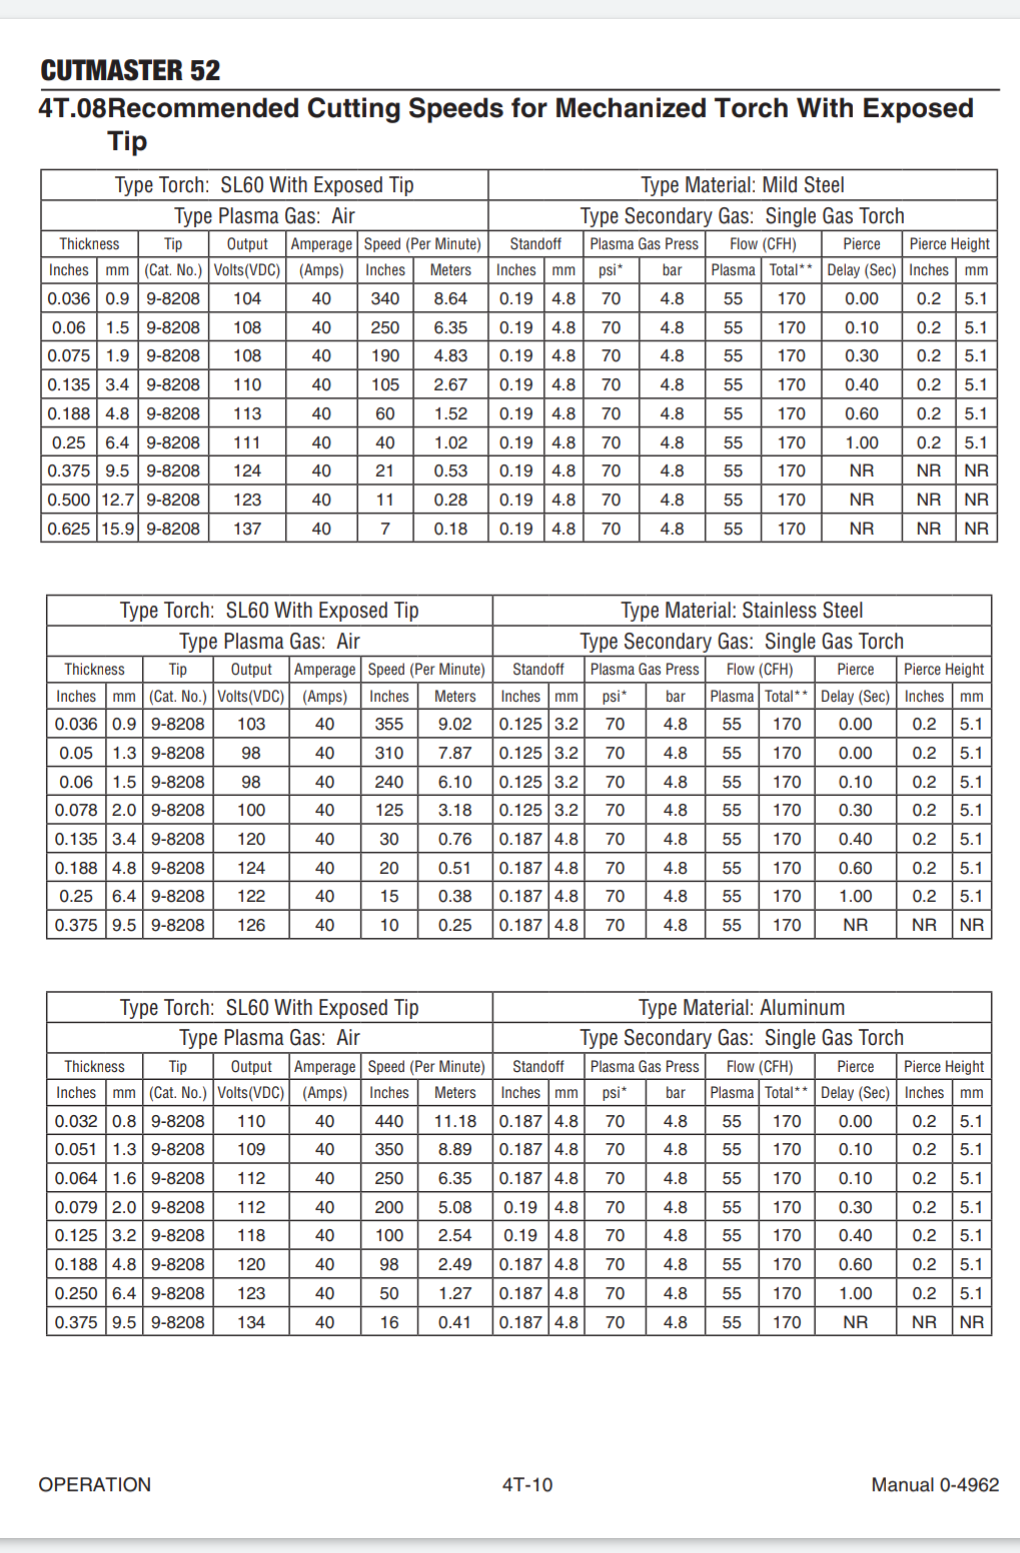
I bought a Crossfire Pro a couple months ago and have really been struggling to get my setup cutting properly. I have a Thermal Dynamics Cutmaster 58 hooked up to the table. I have been working with 1/8" mild steel trying to get my settings dialed in. I currently have a Miller inline filter, as well as a moisture filter from Home Depot. Today I added a decadent air dryer from Harbor Freight to see if it helped with the cut quality. Originally I was running my machine at 60 amps with the 60 amp tips and the cuts looked pretty good, there was just excessive bevel at the top of the cuts. I tried adjusting speed up and down as well as cut height up and down. I found that cutting at at 170 to 180 IPM was producing the least amount of dross. Pierce height was .2 and cut height was .19. Those are the settings straight from my manual. I could not get the bevel to clean up. I have checked adjustments on all the bearings on all axis and they seem to be correct. I was looking around online for some info and some were saying to adjust torch height down or run lower amperage and slow the cut speed down. Lowering didn’t really effect the bevel. I contacted ESAB and they advised that I should be trying to adjust the cut height up, that did nothing and eventually got to be too high and would not cut properly. I did try changing consumables at multiple points and that never did anything. I ordered some 40 amp tips to try that. I tried the same things, adjusting cut height anywhere from .13 to .19 and adjusting speeds from 60 to 85 IPM. The manual calls for .19 cut height and .2 pierce height at 75 IPM for .135" mild steel and air pressure at 75 PSI. The higher I went, the harder of a time it had cutting all the way through, and at the lower heights it had the least dross at about 60 IPM. It had less bevel traveling -x and +y but still had excessive bevel in other directions. I was also getting wavy cuts mostly only traveling -x. I have been working on trying to get this machine cutting properly for a few weeks now. I have been on the phone with tech support for a few hours in total over a couple days to get this resolved and no luck. I am getting really overwhelmed with how much of a pain this has been to get functioning properly. To the point that I am about to order a different plasma cutter and see if that resolves the issue. Another reason being that the delay in firing the torch on the first cut makes it a little annoying when you have multiple cuts to do and it has the long delay on each pierce when its really only needed on the first cut. The torch head itself seems to be pretty heavy for the setup on the table, I have considered getting the machine torch to not have so much weight hanging off the z axis, but don’t want to spend the $700 on that if that won’t resolve the issue. I did notice this evening that even with the air pressure set to 75 PSI or 80 PSI while idling, the air pressure says 60 PSI while cutting. Is it suppose to be adjusted up so while cutting it is at the required pressure? If anyone has some insight on where I could be going wrong or what to check, it would be really appreciated! I can also provide pictures as needed!
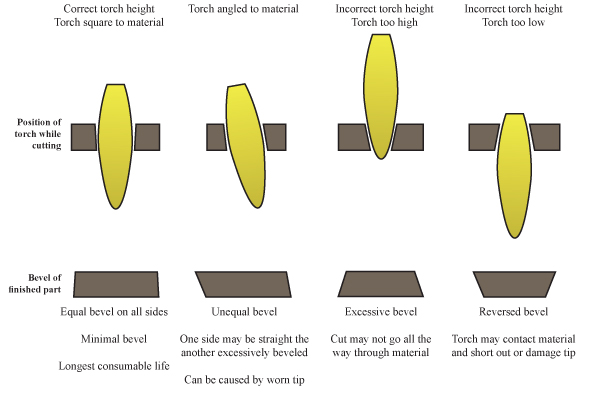
.19” is way too high for a cut height. I use .06” which seems to be (around) the standard for most plasma cutters. You should add pictures of the bevel you’re getting - there are pictures available that show what happens when the torch is high, low, or not square. And yes, air pressure should be set while cutting, not at idle. Bump that up for sure.
From what it states in my manual and what ESAB told me when I contacted them, that is the recommended height. I can try going down even further, what would you recommend for a pierce height? I will get some pictures later today of the bevels I’ve been getting. Thank you!
Yes compared to what I have seen for everything else, it is really high in the manual. That almost identical for my machine in the manual. It is using a shielded tip. The cut speeds are a little faster on that sheet though. I will turn the air pressure up and height down this evening and give it a shot. I am starting to think my compressor might not be powerful enough. It is a 30 gallon 175 PSI Husky compressor with 5.1 SCFM @ 90 PSI.
You air pressure should be 70-75 psi. at torch when machine is cutting. What is your shop air supply to plasma machine? Itt should be 110psi. minimum
Definitely set cut height to .06
Thr compressor has 175 PSI max. I have the pressure set to 90 PSI because the decadent filter says it has a max pressure rating of 90 PSI. I could possibly just remove that and keep the other 2 filters and turn the pressure up.
I removed the decadent air filter and it was holding at 75 PSI while cutting. I tried to adjust the height around and mess with the speeds to fix the cuts. Some cuts were looking a little better but some where even more aggressive. I noticed on a couple cuts that when it would go to touch down, it wasn’t traveling all the way down to touch off. I’ve been having issues with the z axis freezing when it gets close to the material. So it’s not getting a true zero. I have had to adjust the eccentric bearings almost every time I remove the torch and put it back on. Then before I called it a night, I adjusted it to make sure it wasn’t freezing, then raised the z axis up all the way and wiggled it and the bearings on bottom had a bit of play. I lowered it back down and it was snug. Not sure why it keeps coming out of adjustment when the torch is removed and why there would be play at the top but not at the bottom of the z axis movement.
This sounds a lot like the issue I had with a Cutmaster 45 years ago. I did as you have done changing consumables multiple times and I finally found that I had a bad batch of the iridium tips; they were off center just ever so slightly and caused the bevel cut. I finally got a good set of tips and the machine cut beautifully. Hope it helps.
Finally found someone else with a cutmaster 58!! I feel ya brother man. I’ve been playing a similar game. I found to totally ignore what the book says on all those settings. Nowhere close to what works.
I’m still going through the trial and error stage too but here’s what I have found helpful.
program with a normal Pierce delay. Before running the program, manually move Z a few inches off the work piece. Manually fire torch. Turn off torch, and while air is still blowing, hit start. These cutmasters have a long initial fire sequence.
circle holes: run circle holes at a slower speed then exterior profiles. Right now I’m testing on 1/4 steel, 1" Dia hole, using 20ipm @ 60A. Not perfect yet but getting closer.
circle holes # 2: I can only speak to using Fusion360 but as others have suggested in other posts, create 2 setups. One for exterior profiles and one for interior holes. When you run the post, have to be sure you first click on the “setups” in the design tree. Otherwise only one of the setups will post.
Circle holes # 3: general rule of thumb is hole diameter should never be less than 1-1.5 times the material thickness.
cut height: I do suggest getting feeler gages. Have found that a programmed .06 cut height is not actual cut height. Run a test cut line, hit stop, verify height. Compare actual vs. Programmed and edit your “tool” cut height. I’m still playing with cut heights to reduce bevels.
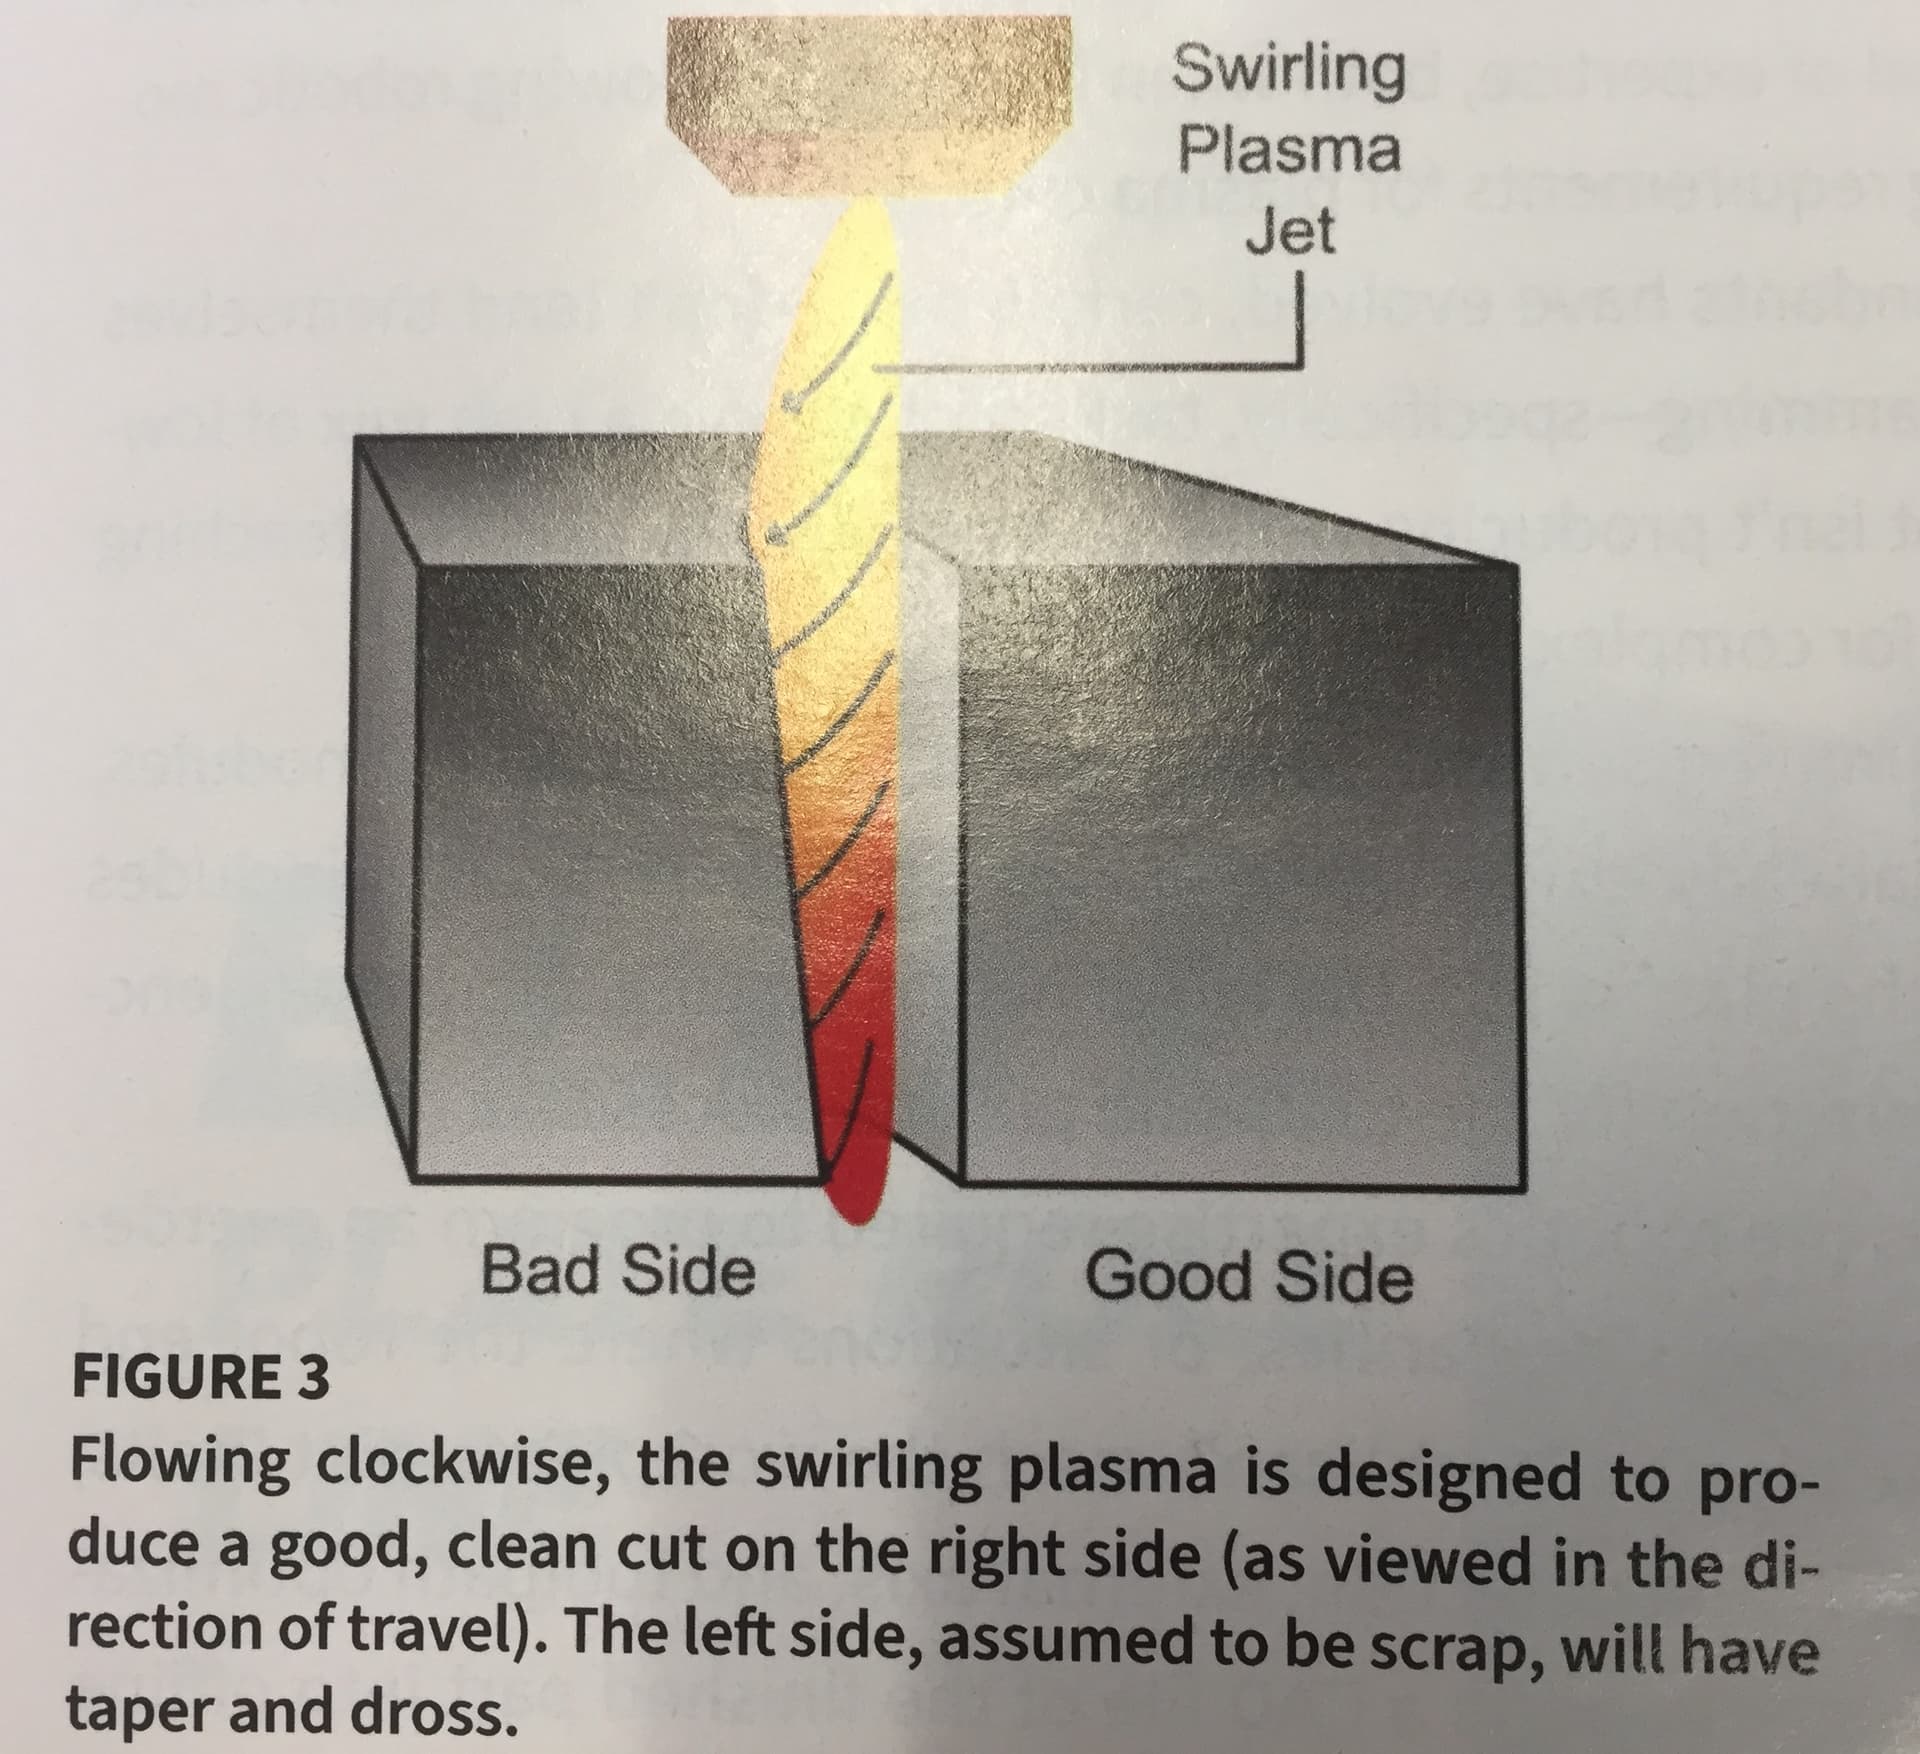
Trying to find all the papers i had with my Hypertherm 1000G3 wich was 12 or more years ago. The factory rep cam here because of cutting problems on our plasma table. To make a long story short If you want to cut straight with no bevel, It all in the swirl ring. He measured each one with an inside mic. I did have the measurement papers but have to find them . Just a few microns of water will hamper the ring from spinnng a fraction of a second and it would take a second or more to recover. We then went with ingersoll rand rotart screw compressor and a refrigerated dryer. That took the water out of the equasion. But it still comes down to the itty bitty swirl ring. Most of the Chinese plasma machines today do not show what is a go and no go size in the inside dia, Also the height of it. The rep spent hours here and yes the other parts are important but nothing inside the torch head was dependent on a good cut as much as the swril ring. He has a tool to smooth the inside dia. after measuring them. was almost like a scotch brite pad. after he left the cuts were smooth and perfect as long as I had the codes right that the moves of the torch were always on the right of the part I was keeping. Also almost forgot he would measure the holes in the ring with gauge pins for dia. and correct radius. Like he said to me you can have shitty consumables and a perfect swirl ring and you will get almost perfect cuts.