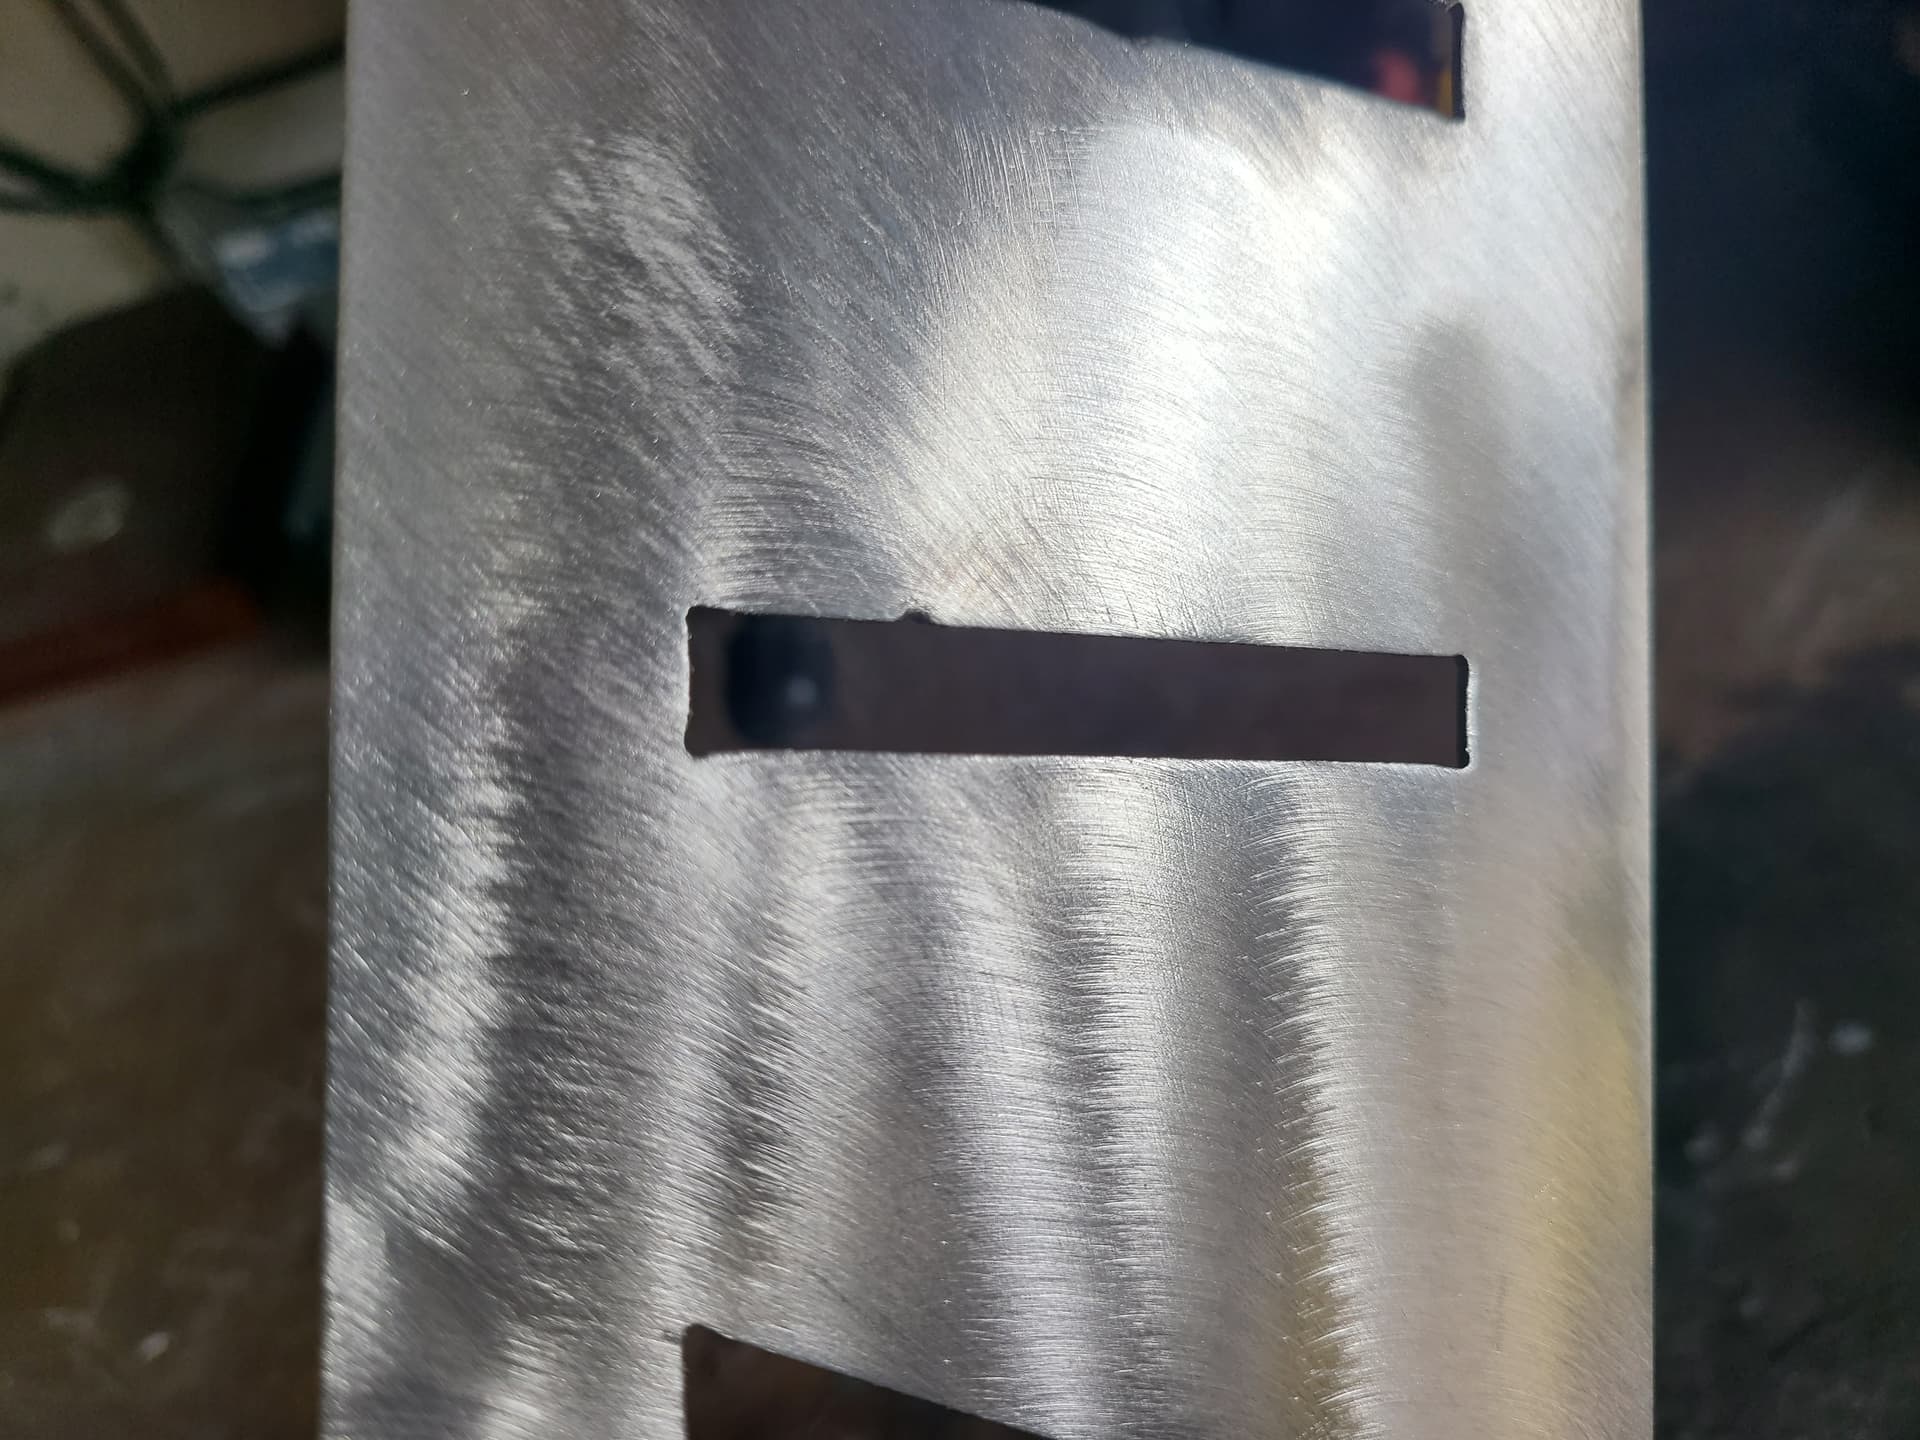
Hey guys, ive tried a few different settings and am still getting divots in every cut where it leads in and out. Ive tried doing an over cut and itll just make 2 smaller divots next to each other. I usually use a .15 lead in/lead out and adjust as necessary. Here is an example of .15 lead in lead out, no overcut on .80 aluminum with a hypertherm 45xp , standard consumables, hypertherm cut settings (besides increased pierce delay) at 45 amp. Let me know what im doing wrong, thank you
Are you using a sweep radius or just the angle approach? You might get better results with sweep radius.
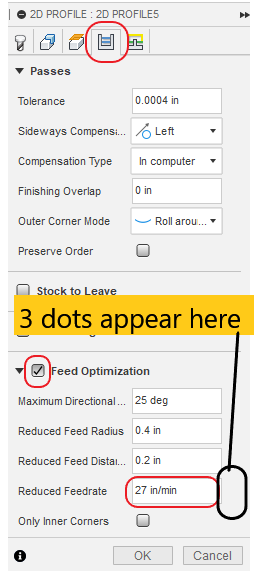
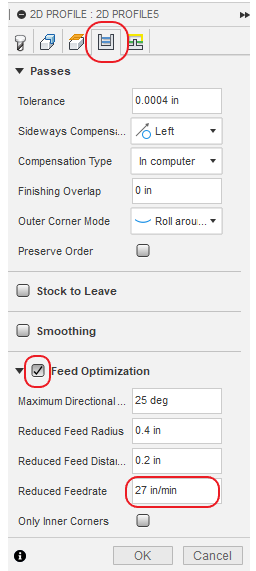
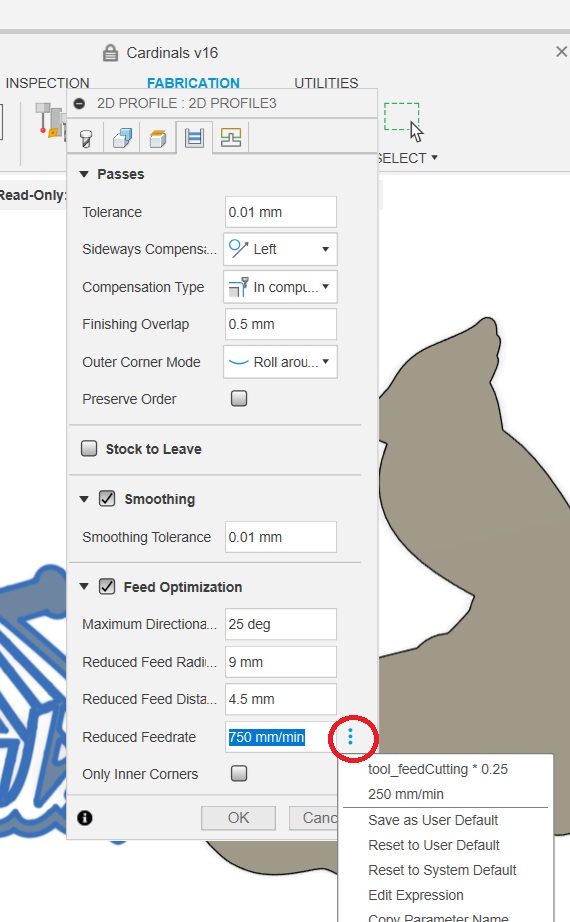
You might also increase your speed with optimization. The default in Fusion 360 is too low. If you click on the three dots next to the speed setting, you can set it to be 60% of your feedrate by default. Fusion is set up for 25%. Notice your corners are doing the same thing.
Here is the actual menu you change:

1 Like
Nice tip, thanks.
1 Like
Thank you so much for that tip! I’ll have to try it out tomorrow.
I use 60 or 90 approach, ill try sweep as well.
Should I alter any of the other feed optimization settings or just the feed rate?
Also I havent messed with lowering the amps on the plasma cutter, ive left it at 45. Would lowering it for thinner material help or its fine to leave?
Thanks again
I have not so I would just make one or two changes initially, just so you can see what is happening.
Higher up in the menu, you might change the tolerance to thousands place 0.004 vs 0.0004 but that won’t change the the divot but may make the contour selections easier.
Again, don’t change too many things at once. 45 amps is good and that is what I cut at mostly. Unless you are doing intricate designs or thin metal, stay with 45 amps for now.
Only other reason to reduce the amperage is if you are using consumables, like fine-cut that are not designed for 45 amps. Then you need to reduce or you destroy the nozzle too quickly.
2 Likes
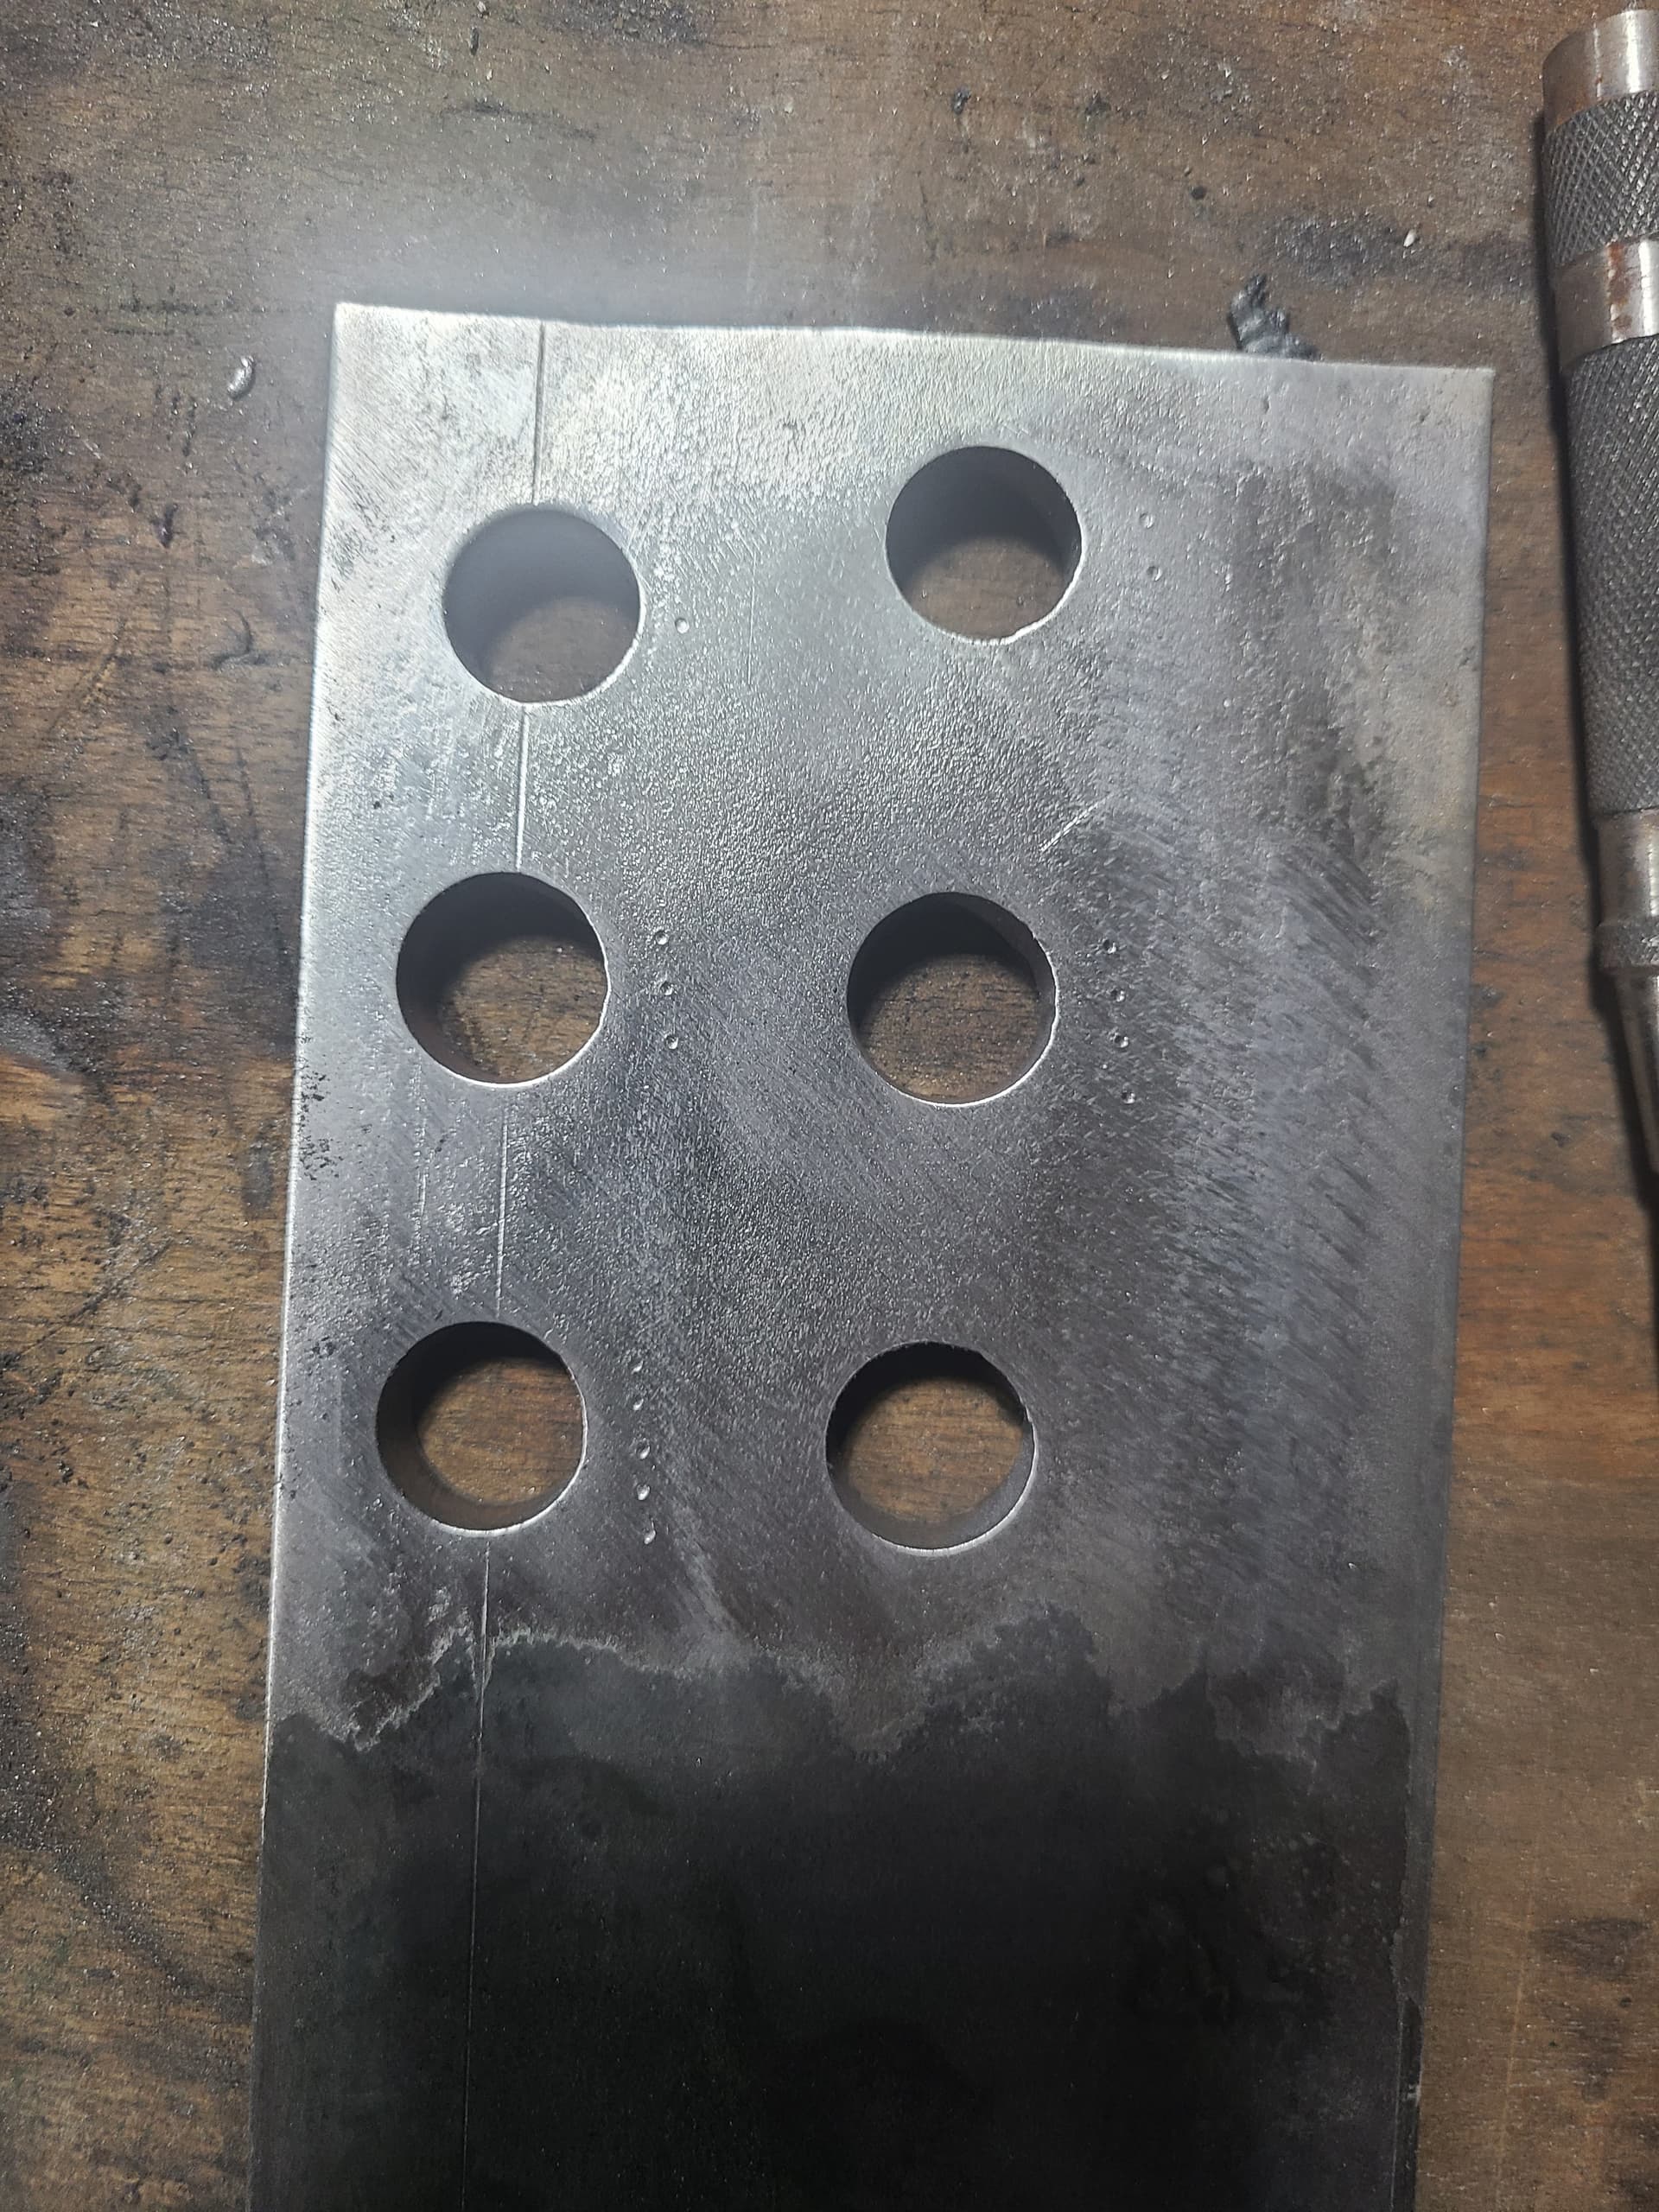
Thanks man, i tested a few circle cuts on 3/8" today the circles are looking better but still look like they could use a little improvement. I increased the reduced feed rate to 60% on all of them, messed with different cut speeds, lead in radius, and overlap.
Anything else i should try? Im pretty happy with how it turned out but if i can improve it at all that would be great. Hardly any dross, and only off by about 5-6% from front to back hole size
2 Likes
I am glad it is working better. That looks great.
At the end of the day, spray down and wipe down the lead screws, nuts and the rails with silicone spray (learned that from TinWhisperer). That will help to minimize the resistance to movement that might be encountered. If there is any gummy residue or dirt in the screws don’t be afraid to wash them down but when dry, give a good coat of silicone spray.
Give the z-axis the same attention but be careful on the z-screw. You need to protect the contacts for the IHS circuit (try to keep the silicone spray off the contact surfaces).
3 Likes

Still having trouble with getting (now less) divots in each cut. It happens on both lead in and lead out. I can get it to where the face of the material looks decent but you can see the edge having a ripple effect. I checked for any play in the machine, the torch height from material (.06) pierce height (.15) , im at a loss for what else to check. Ive probably cut 20 of these little 2x2 squares and cant find the perfect setting
Back off your pierce delay to the minimum: you still want the metal to be pierced completely before the torch starts to move but you don’t want the error that says “torch moved before voltage sensed.” This will eliminate some of the extra material removed during the lead-in.
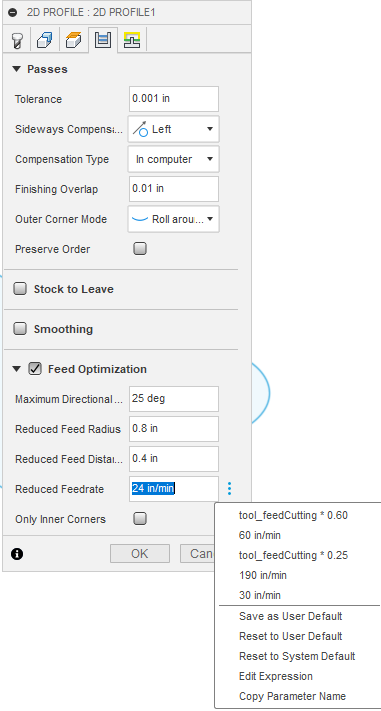
You might need to speed up your “reduced feedrate” for lead-in/lead-out. If you are entering a feedrate that is reduced in the “tool” in Fusion, remember, that is not translating into the tool path. The tool path by default, is setting this reduced rate at 25% your feedrate when you pick “feed optimization.” You can set your default to 60% in the tool path. If you find that, indeed, is the issue (25% feed rate) then stick with the 60% but make sure that is what is ending up in the toolpath.
2 Likes
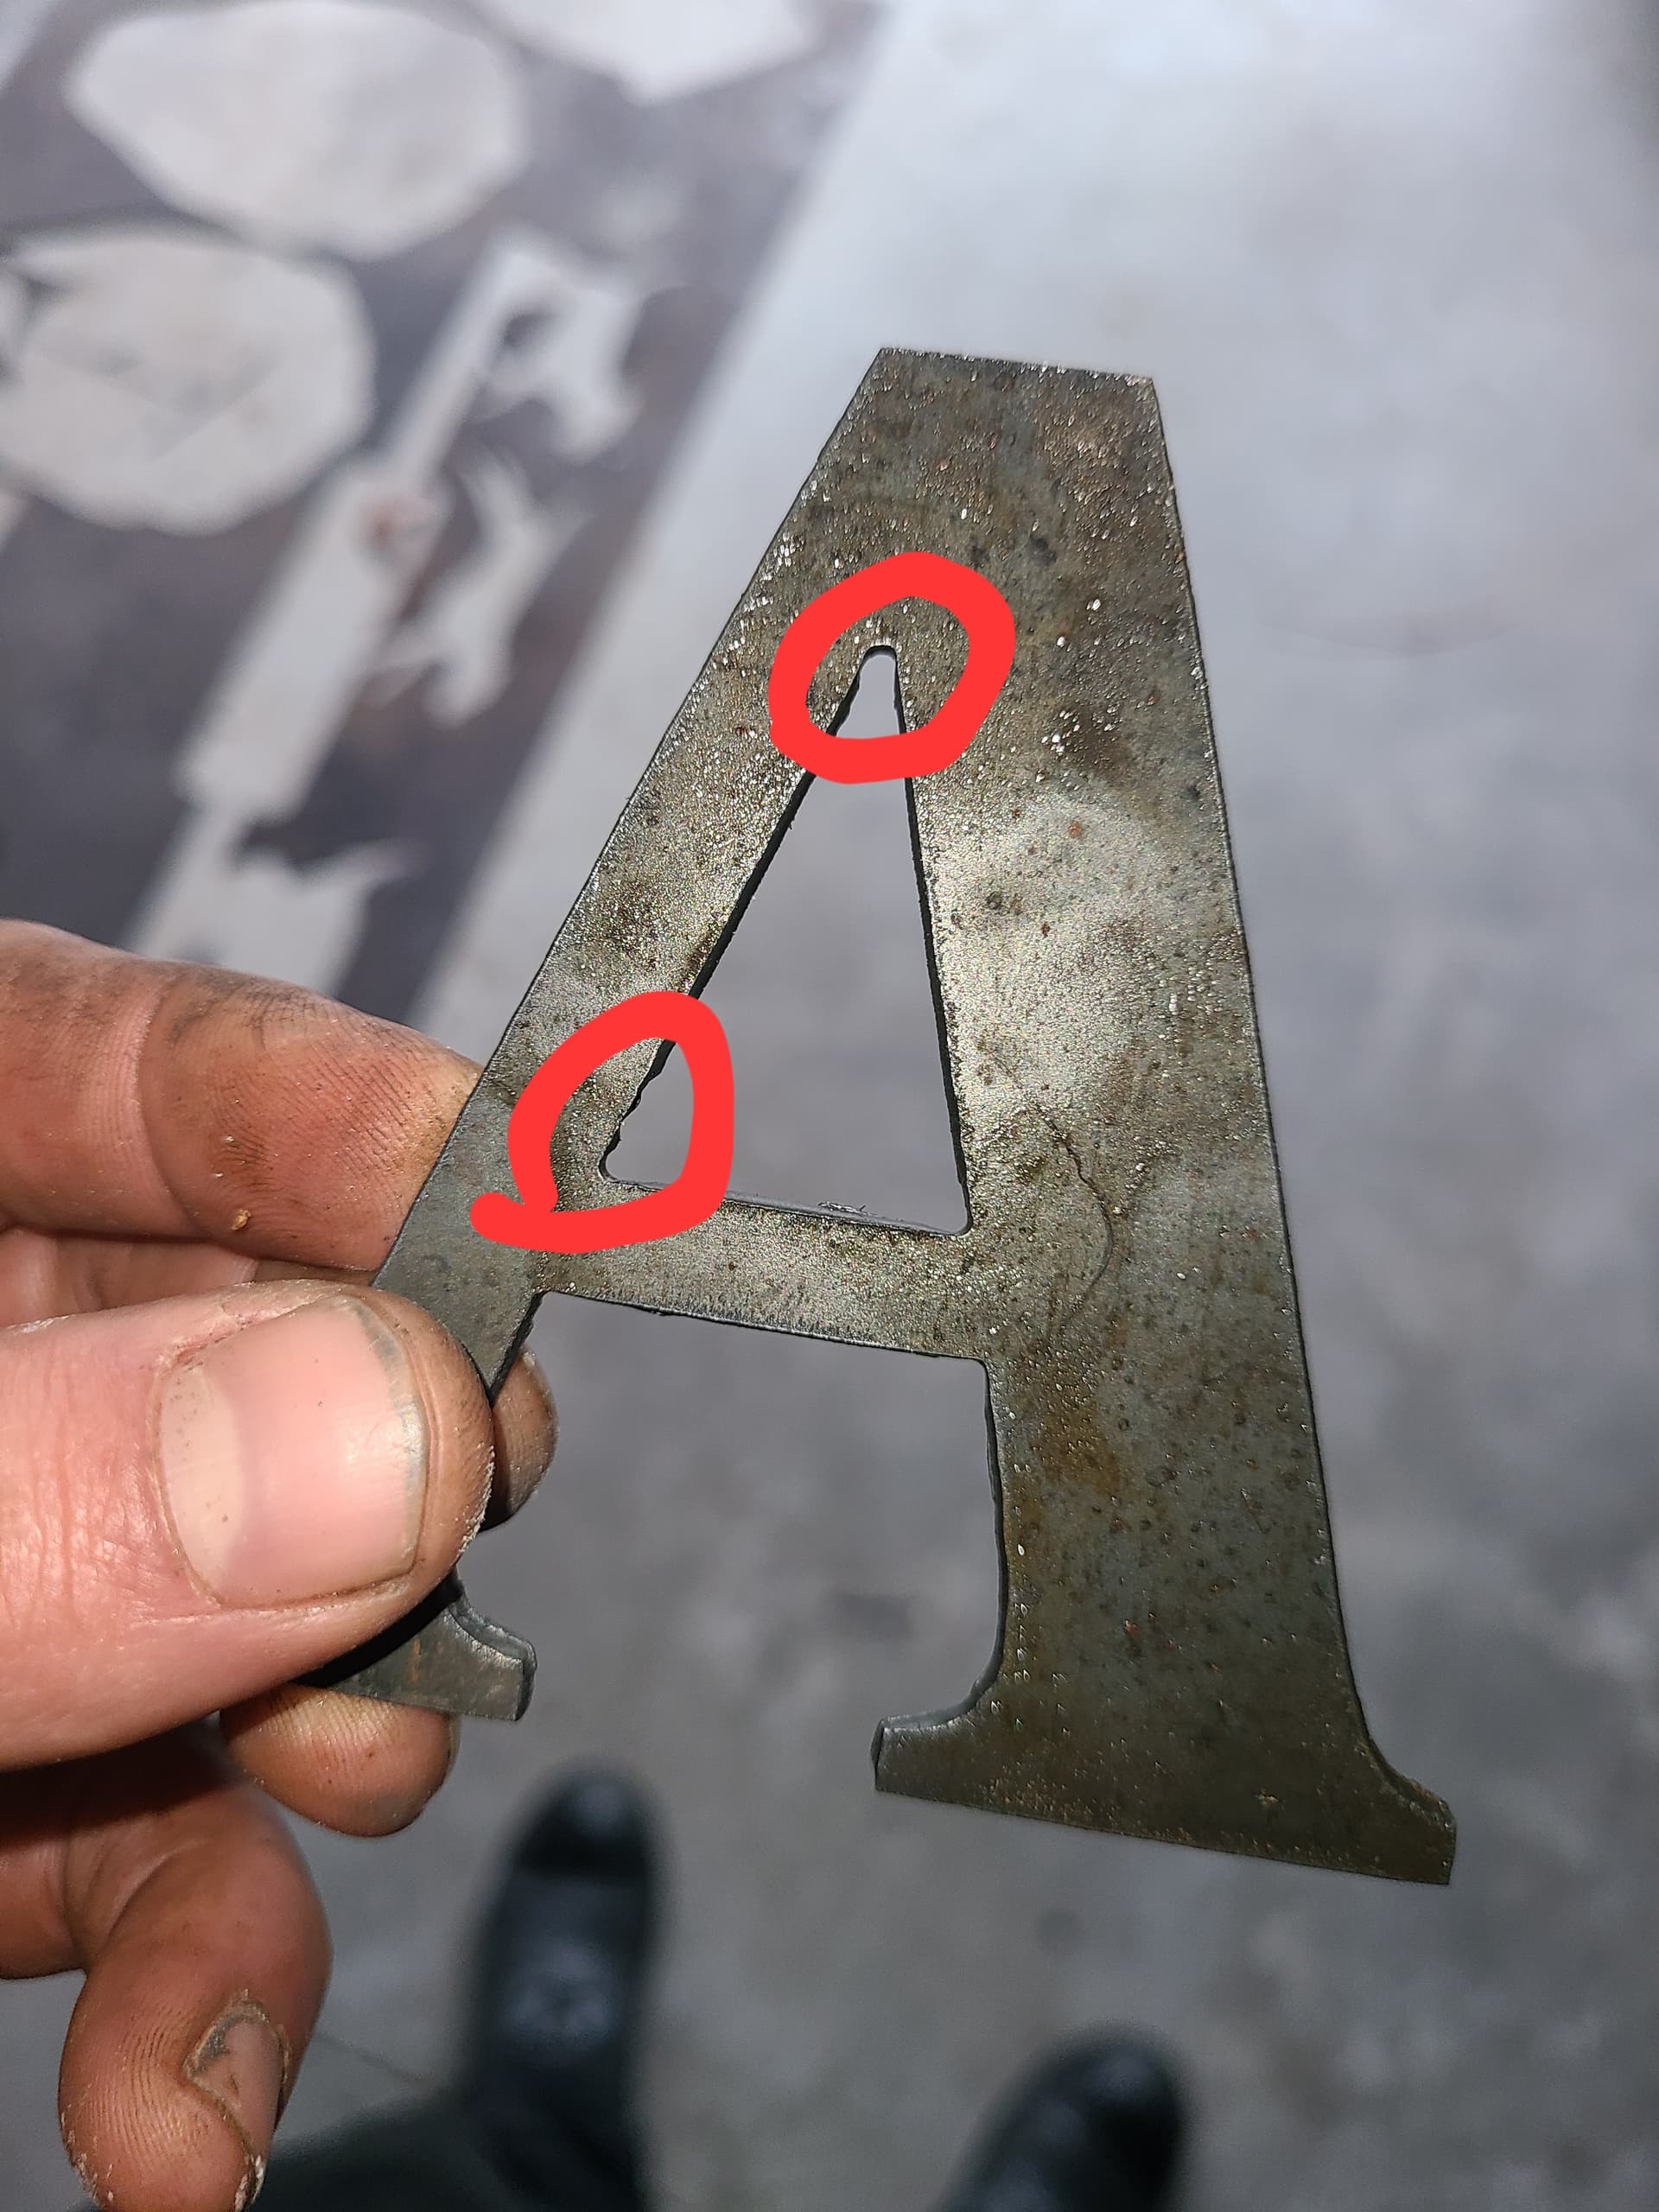
Still getting divots on lead in, lead out , and sharp corners are rounded.
Heres what i have checked:
-Speed optimization , set different percentages for slow down as well as no slow down
-
checked for any play on plasma cutter , everything seems nice and tight
-
tried new consumables
-changed pierce delays
-lead in angles
-different amps
-Checked air dryer
-checked that the torch is square to material
What else am i missing? Its driving me nuts because i want to produce high quality work.
The only other thing that i still have yet to check that i can think of is that the table is on casters but i would think if the whole table moves as a unit it shouldnt effect anything but im going to put back on the stabilizers next to try and rule that out
Inside corners will always be rounded, since you’re cutting them with a round plasma stream. It looks like it either slowed down too much on the inside cut at the top of the A or the Z axis has some play and allowed the torch to move when it changed directions.
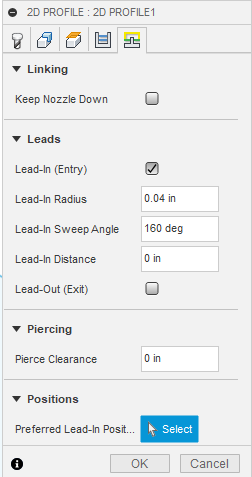
I’m pretty sure Fusion allows an arc or radius lead in. That is less likely to leave a mark where it changes direction from the lead in to the cut path. (Again, if the Z axis has any play in it, it will allow the torch to wobble when it changes direction)
2 Likes
Yes, David is correct about the lead-in radius. It is on the 5th tab of the toolpath. I often pick 160 degree radius as this gets past that initial pierce and then the torch comes sweeping in. I can’t say that I never see a little divot but it can be tuned from there with lead-in speed and distance that you have available.
If you are picking “Feed Optimization” the default speed, unless you have changed it, will be 25% of the cut speed: Way too slow! Change that to 60% of your cut speed. If to hover to the right of the entry box you will see 3 vertical dots then the drop down menu appears. In this drop down menu you can set your own default. Once you set your own default, open this up again and pick “Save as User Default” and you will never have to think of it again.
1 Like
Thanks for the reply. Yeah the corners are usually like the upper A inside cut where its more than just round, its widened out.
The way im checking for play is physically grabbing the torch and trying to move it side to side and back and forth , is there another way to check for play? Theres absolutely no play when i do this.
Also i tried with no slowdown rules for corners as well as played with different lead in sweeps
The most likely ways for there to be play is in the rollers that the Z axis rides on and the X axis carriage.
Run the Z down to cut height and check for play in the Z rollers. It may be tight at the retract height of 1" and looser at cut height.
Check the X axis carriage by trying to rock the carriage forward and back.
If there is nothing loose, I’d start checking the drawing for a reason why the torch is dwelling in that corner.
2 Likes
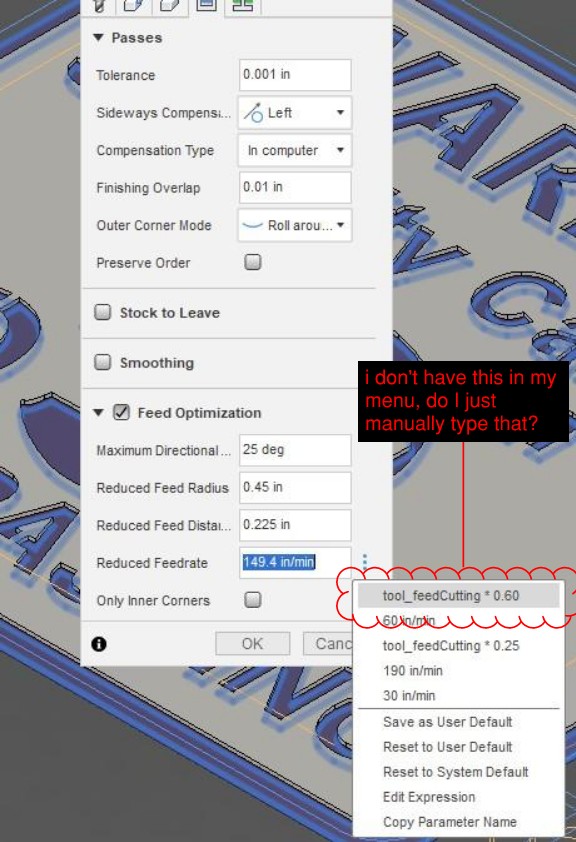
You can type it exactly and enter it yourself but what I did was grab the “tool_feedCutting * 0.25” and just modify it to whatever percentage you want.
Once you have it they way you want, open that menu up again and click on “Save as User Default” and it will remain there.
3 Likes
I think you have to select “Edit Expression” first.
2 Likes
thank you! I didnt realize I had to click “edit expression” never heard that term before Haha
You might be right. It has been awhile since I have actually done it. Good tip!
Another fun fact, no matter what I do, I cannot get a formula to stick in the value for Lead-in/Lead-out feedrate:
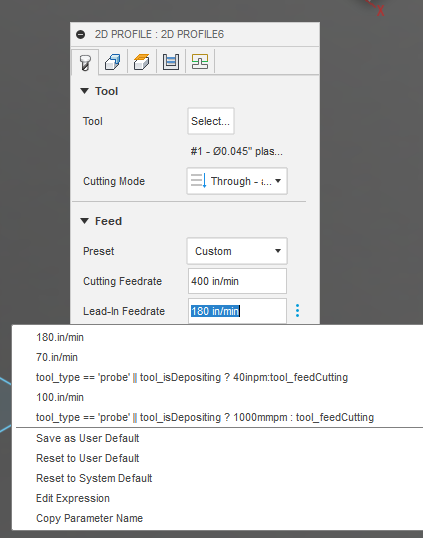
I can add the similar formula as we are using in the Feed Optimization and it will work within the given tool path to change based on changing the “Cutting Feedrate” but once you move to a new tool path, the formula is lost in the new tool path. Even when saving the “User Default”
2 Likes