Suddenly, after many successful cuts, my system is experiencing a strange problem.
When I start the cut, the torch begins moving as if cutting but does not fire. After about 3 seconds the torch fires and quickly stops firing after 2 seconds, the air continues to flow and the cut pattern keeps going but with no firing.
I get no errors. I have plenty of air flow. New, clean air filters and new nozzle and electrode.
I’ve tried everything i know to try with no success.
no THC. Have never been able to make it work. This is the most recent file but I have tried old fies too that have always been successful and now all of the sudden this problem crops up no matter what file I use.
Also, I have regenerated the NC file in Autodesk Fusion 360 many, many times hoping it was just a glitch but to no avail. RRCC Hat 3-3-2022 V4.nc (104.2 KB)
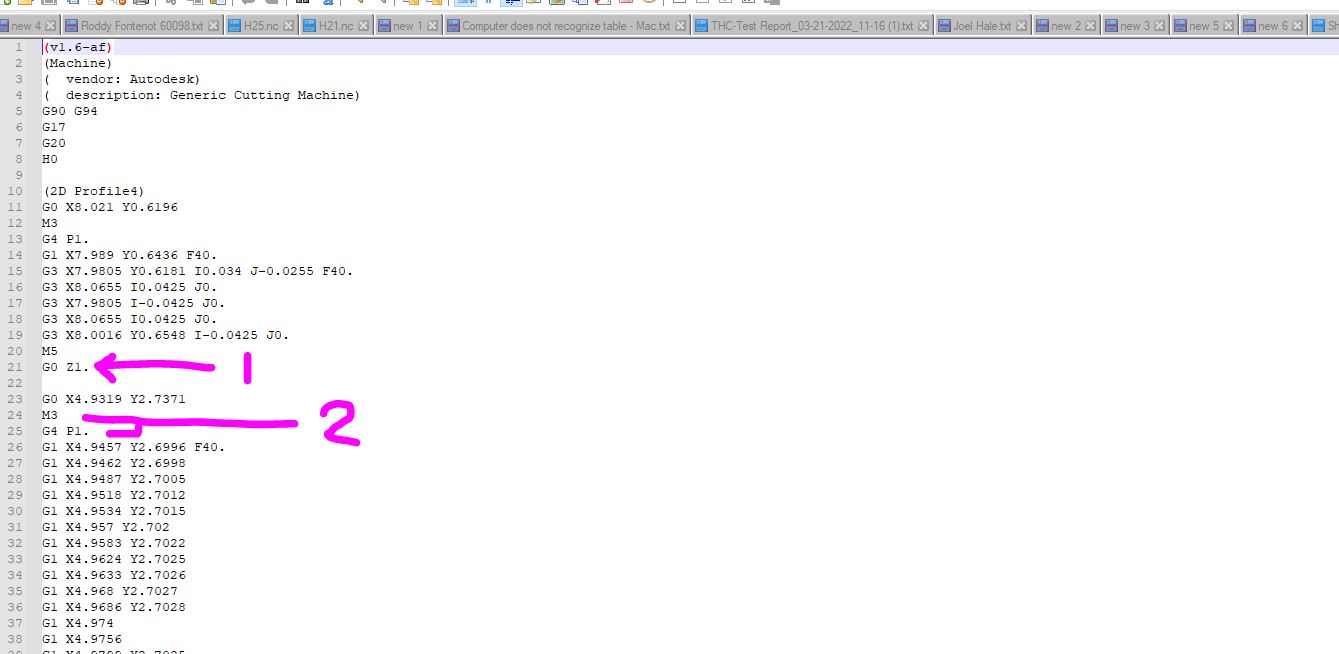
I looked at RRC Hat … nc file. I did not see anything that would suggest: torch move, 3 seconds later torch fires for 2 seconds then torch stops. I did find it odd that there is a rapid move to Z 1 but nothing to return the torch to pierce height or cut height. I assume you do not have Initial Height Sensing (IHS) because I did not see G code for that. (This move to Z 1 could make sense if the cut height was 1" to start with.)
Have you tried making a dashed line cut to see whether the problem occurs. You mentioned not seeing the problem when using FireControl’s straight cut feature. Maybe post file is corrupt and post processing the dashed line tool path would recreate the failure.
Do you have an old file to try? Maybe the problem will not occur with an old file.
We haven’t really determined if this machine has a powered Z axis yet. He said he doesn’t have a THC and then said he was never able to get it to work. Does that mean he has a Z axis and just has the THC turned off? That doesn’t mean the IHS won’t function and he should be putting values in the Pierce Height and Cut Height fields and using the IHS function.
The file shown does not have any IHS functions, so the cut height has to be set manually. If there is not powered Z axis, then that G0 Z1 doesn’t mean anything, because the Z axis can’t raise.
If there is a powered Z axis, that G0 Z1 will raise the Z to 1" and it will never go back down again.
The Z axis is installed but is not connected to the control box. Also, I deselect IHS and THC in the post. This has always worked until a few days ago when suddenly this new issue arrived. After I installed Z axis it it never worked so I disabled it and just set the height manually and never had any problems. I have tried old files that worked perfectly originally, now all the files do the same thing.
I did a straight cut by turning the torch on and using the arrow key to drive the y axis for a clean cut without any problems.
Thanks for replying. Any new ideas to try?
DG
How do you set the height manually? Do you turn the lead screw by hand? I know its a different problem, but you should get that working.
On the torch firing issue, do you hear the relay click and the air start to flow before the torch moves? Maybe your torch firing wire is damaged and making intermittent contact.
I set the height by manually adjusting the chuck that holds the torch.
With my setup… after turning the torch to the green position (meaning it is on and waiting for a trigger to begin firing).
Then, within Fire Control, I click the torch fire button… it sputters a few quick puffs of air to indicate it is ready. Then I hit start to begin the cut.
The problem is that after the torch moves to the first cut, the torch is moving correctly but it does not fire.
Then, after about 3 seconds, it begins to fire (in the middle of a path) and only fires for about 2-3 seconds then stops. Air flow continues, motion continues but no fire.
Thanks!
DG
When you hit the torch fire button in Firecontrol, the torch is supposed to fire. Its not supposed to puff air to let you know its ready to fire. You are not supposed to hit that button before starting your program.
You should be zeroing the torch over the spot where you want the origin of the part and then hit start.
Make sure your machine is not in continuous pilot arc or gouging mode. Make sure you are feeding the machine enough air pressure. Is the air pressure LED green?
What height are you setting the torch to?
Why do you not have the Z axis motor plugged into the control box? Does the motor not work? I can understand if you have trouble with the THC voltage, but that doesn’t mean you can’t use the IHS function of the Z axis without the THC. The two things are separate functions.
With the Hypertherm 45XP you are required to initiate the torch by hitting the torch fire button. It’s a Hypertherm thing. The puffs are to make sure the air flow is sufficient before starting the program. No puffs means it’s not working.
Once youu hear puffs, you hit START and the program begins. I’ve been doing it this way for over a year and always worked fine until a week ago when this new problem started. Also, this is all after installing the new Fire Control upgrade. Maybe has something to do with it.
I’ll send you a short vid. but can’t upload it here.
Thanks
DG
My two cents:
Can you reliably recreate the failure?
If so consider disconnecting the torch on/off cable from the plasma cutter.
Try connecting a multimeter to the torch on/off connector or connection going to the table electronics. Measure resistance (ohms). I think you can remove the cover on the table’s electronics and observe a red LED, Torch On/Off, LED turn on and off instead of using a multimeter.
Run the program that causes the failure.
Does resistance drop as commanded or do you observe the delay?
My thoughts: The g code provided does not contain any commands (G4 P?) that are delaying Torch ON/Off relay in the plasma table electronics from firing. Is the Motion Control Board,MCB, delaying the energizing of the Torch On/Off relay in the table electronics? Is the Torch On/Off relay sticking or is the coil too weak to pull and lock in. Or is the start circuit on the plasma cutter hanging or delaying the firing (whether by failing component, switch setting or design) ? If the MCB or Torch On/Off relay is causing an issue you hopefully can observe the issue with the multimeter measuring resistance. If your multimeter beeps at low resistance consider using that setting. The goal here is to eliminate either the plasma table or the plasma cutter as a cause.