Can’t get perfect circles

You are getting close with speed may go a little bit slower. It also looks like like your lead in is outside the hole. Your lead in should start inside the hole in the center on holes .5" and under. Also do a simulation cut in your software and make sure you are cutting holes CCW

1 Like

couple links to read if you haven’t already. I hate to guess at you issue because you might have a few things going on currently…

Troubleshooting plasma cutting system cut quality problems - cut angularity (hypertherm.com)

How to improve your CNC Plasma Cut Quality (tips & tricks) - Westcott Plasma™

2 Likes

My holes were cut with a slow down to 60%, so they were at 24 IPM and I started from center of the hole.

What is your cut height and how much air pressure are you running with the air flowing?

If the bevel moves with the rotation of the torch, the consumables are probably to blame. The nozzle is bad, the electrode is not centered, holes are plugged in the shield or the swirl ring is bad. Try replacing everything with genuine Hypertherm parts.

4 Likes

+1

+1

use a finishing overlap if possible too

2 Likes

Do you have the work clamp on the steel? 45 amps at 40 ipm is way to slow. Consumables good?
At 17 ipm you could cut 3/8 or thicker. What are your height settings? Pierce @ .16 cut @ .06 delay at .7

I had this exact same issue and it turn out for me that the coupler on one of the Y axis motors was slipping. I found it by putting blue tape “flap” on the lead screw and watching it when it spins. It would hesitate momentarily when the motor direction would change. I replaced all of my motor coupler with some that have set screws that engage the motor shaft.

2 Likes

Air pressure at 60psi running, I have THC, thought that keeps the height correct?

I have new nozzles and electrodes but never replaced the swirl ring or shield.


Never replaced these


Nozzles always end up looking like this.

Work clamp on steel and on table, same result.

Replace those for sure…make sure you look at the book to verify all the consumables are correct you’re currently using. Not seeing what shield your running in pics.

Increase air pressure at torch to 70-75 psi, you won’t get good cuts at 60.

1 Like

THC only keeps the height that you set in your CAM setup or the height that is required to achieve the voltage you set, if you don’t use “smart voltage”. You have to tell it what height you want it to keep.

What happened to that retaining cap? Did it catch on fire?

Start with checking your actual torch height during a cut. Make a straight line cut and pause the program after about an inch. Measure the actual height of the torch above the metal and compare that the the height that you set in CAM. Chances are good that it is way higher than you think it is. That nozzle is really blown out and cutting too high can do that.

1 Like

so to sum up the issues and the resolutions…

  • having all that “drying” equipment before the plasma does not mean you have removed the moisture from the air…what does the desiccant medium look like? is it the type that changes color when it get saturated?..have you looked at the desiccant?..take it out dry it or change it.

  • I see a rubber hose…how far away is your compressor and what size of air lines are you using?..3/8" air lines minimum for all hoses and fittings. restricting the air flow means your air will stay warm and warm air carries moisture no matter how much drying you try to do.

  • is your compressor drained regularly?..that is a common problem.
    to extend the life of your consumables and the torch make sure your post flow air is set for at least 30seconds…if that adjustment is available on your plasma. post flow air keeps the torch head cool. yours looked almost burnt.

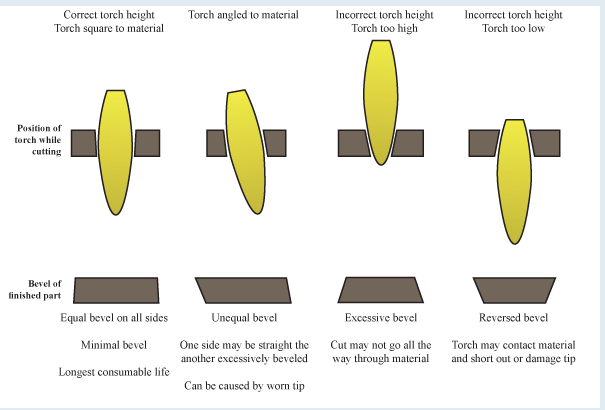
  • torch head height. have you paused a cut to actually measure your height of the torch head? just because you set the torch height in the software at 0.06 does not mean it will be 0.06. I actually have mine set at 0.45 to get the torch to sit at 0.06. an incorrect height will result in tapers like listed below.
    image

  • next is torch direction…when cutting outside of shapes make sure the torch is going clockwise around the part.

  • when doing inside cuts like circles you should be going counterclockwise.

  • then we look at tip size…make sure you are using the right tip size for the right metal thickness. a small tip size will burn out faster when the higher amps are put through it. George posted a great chart to help determine tip size for amps used on the thread below.
    Primeweld Cut 60 Tip Size - #2 by mechanic416
    -then you can look at cut speed…once you have a great cut speed giving you nice even cuts…when cutting circles it is best to drop your speed to 60% of what the rest of the metal is being cut at…and of course go counterclockwise.

  • start in the middle of circles, there is a setting for that in most cam software. if not do a lead in and an overlap then a lead out.

  • cutting circles of 1/4" and smaller does get tricky and the thicker the material the less chance of cutting good circles…you can mark the center with the software then drill them out for better look.

always remember there is going to be a small bevel on all plasma cuts.
The trick is to tune in the machine with dry clean air…proper speeds…proper amps…then everything else will start to come together.

8 Likes


1 Like

All new torch parts

Looks like you have dialed in now, hole looks good.

1 Like

Cant complain about that cut!

1 Like

Thanks to everyone for the great info! Will continue to use this info for better cuts.

Wanting to upgrade to a hypertherm plasma with a machine torch in the future. Any suggestions? Thanks

1 Like

How thick is the plate? what are your settings? I’m fixing to cut 3/8 plate for some off road equipment.