Building a Fixture table

Searched around but didn’t see anyone here with one assembled.

I was looking for a table that was 31-32 X 48. Which just happens to be the size of the pro table. I dont know if this guy is on here or not but AveryFab built one from the pro that was exactly the size I wanted. I bought his DXF but I re-did a lot of it to work for me. I read a lot posts saying a level table couldnt be made on a plasma due to the warping and the holes being too off for the fixtures. I think I got it down. Hopefully someone else doing this will find it useful.

This is 6ft portion of a 4x8ft 1/4 mild sheet. In this picture I have 31.5 x 48in cut off on a separate sheet so it fits in my truck and also that happens to be the perfect size for the 1st cut:

I redid the file so that instead of a 5/8 hole mine was slightly smaller. .633. This allows me to use a reamer, but not so much of the reamer where it was a pain in the ass to make a perfect hole

All the structure made and assembled:

The markings here are my pause points. My compressor is 20gal + 20gal reserve tank. I cant run both my compressor and the plasma at the same time for long. It trips the breaker. So about every 8 holes I pause and let the tank catch up.

Building the feet. I wanted to weld the legs inside of the plates instead of on top:

Checking levels (.2 degree off)

Building the support legs: I wanted a place to put extra clamps so I added these holes on C-channel which when welded together is exactly a 2x2. The plates under it are for the casters

Welding it all together: The reason I like to do this upside on top of aluminum square tube is because it keeps it really flat which is a problem with plasma cut things. Just so happens im building an aluminum gate so I had these pieces around. I plan to use to table to build the gate but I already precut all the pieces.

Here it is painted:

Mounted and flipping it: Cans are there to stop me from getting stabbed… again.

Welding the top tabs: This is the real trick as you have weld it from the inside out and cross weld while also keeping a plate on it to make sure you’re always level. Basically you’re pushing out the warp to the edges which you weld flat at the end:

This is how flat it is if you go slow: its this flat across the whole table at all angles.

Where im at now. Next week I’ll surface prep the top and coat it in Gibbs to prevent rusting:

So is it possible to build flat without laser cut… Yes. Is it a royal pain in the butt… also yes. But the same table on laser was over 1000 without the legs.

This table , Metal sheet 250. Legs were free I had a piece of square tube and some C-channel. 5" casters with levelers were 30 on amazon. I had to buy some thread all , nuts and bolts and misc stuff about 100 worth.

9 Likes

I feel your pain brother as I recently made a 2x4 table in a similar fashion. Definitely smart to put pauses between cuts as that was my major mistake even with an adequate air compressor and power to both machines. How round did your holes come out off the plasma? Was the reamer idea able to produce a round/straight enough hole for fixturing?

Awesome project great execution, fabrication and Show n tell pictures.
Enjoyed the right up, the question is Will or can you share the files?? :thinking: Thanks

Wow! That is quite a project. Well executed and thanks for sharing!

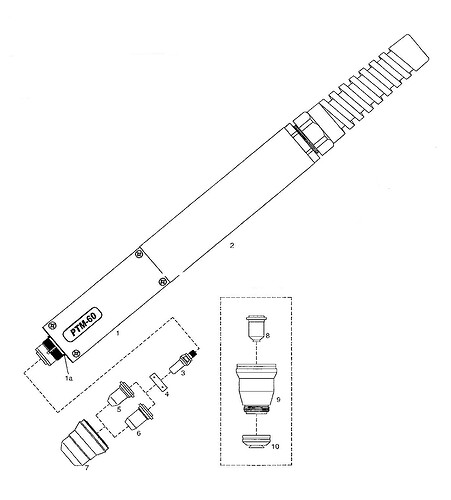
Just to let you know, you have your torch mounted wrong on the table. It should never be clamped by the torch head, that is what the barrel is for.

Great looking table! Where did you buy the clamps for it from?

they actually came out pretty round but the reamer makes it really round. Here’s an example of the fit:

https://api.smugmug.com/services/embed/9905710493_5pwZkrC?width=1107&height=556

Its actually clamped to the black portion which is not part of the torch head. The clamps are designed specifically for this torch and thus the mount on the black part has a slightly large diameter than the clamp for the white grey part. The funnel though is on the grey part near the tip.

1 Like

Yes the black portion is the torch head.


I bought a normal clamp from HF, and a 5/8 shoulder bolt. Cut end off the clamp, the threads off the bolt, and glued them together. It was a lot cheaper haha. Seems to work pretty well

1 Like

I see thanks you’re right, hmm not sure what I can do for that though other than having a new clamp made. What do you think? It does seem to work pretty well am I risking any specific issue?

@eicheid Its really disjointed as I edited 1 piece then made the cut but I probably have 5 version of that one pieces as I was testing portions of it on scrap. but I’ll tell ya what I did as I dont even know what version or layer to pull into a file to share to you.

  1. bought this (5 bucks) https://www.etsy.com/listing/882213059/32-x-48-fixturewelding-table?ref=search_recently_viewed-2

  2. remove all the holes from the file (this part is really based on the settings you have for your particular torch) and cut some holes in 1/4 sheet. Get them to just the point where you cant drop in a 5/8 bolt. But just barely. In my case I redid all the holes to .633. This took some testing but it was just the right size where reaming it didn’t take much effort.

  3. Buy a reamer, I bought a cheap one on amazon but it didnt have a bolt head on the back so I had to also buy a drill adapter. Which was cheaper than buying a reamer with a bolt head to use on my impact. Oh use a electric impact the air ones spin too fast.

Reamer


Drill adapter

1 Like

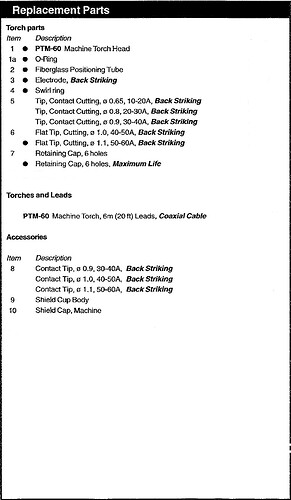
Seriously? All the Machine Torch mounts I’ve seen on this forum grab the #1 section (from your torch drawing) and a section of the upper tube.

1 Like

That’s not the way a CNC torch is made to mount. They are made to mount by the barrel only.

@TomWS I too have not seen a different way here but I think @mechanic416 is probably right that would make sense to only mount on the barrel though I haven’t it seen it for this torch or on this table. I do like how it currently sits though seems really sturdy, I’ve bumped into it a few times on accident.

1 Like

I have no doubt George knows his stuff! The thing is that by grabbing by the Barrel only would require a mounting support that is several inches higher than the current gantries support (or lowering the slats by an equivalent amount), neither of which seem practical. I’m surprised this has only come up now.

1 Like

exactly this. I was looking at it when I first got this table and was thinking the same thing but then after mocking it up I was like… that’s not going to work at all. Then I saw someone making clamps and figured ok this must be how it is. They should offer riser plates tbh. My guess is that this is designed for a hand torch option too hence they didnt make it taller.

I have only seen this on this post. I have had one person that I had to replace the torch head because he mounted it that way.

Hypwertherm, Thermal Dynamics, Miller and Lincoln does not mount the torch’s by the torch head only the barrel on their CNC tables.

All the working parts are in the torch head. So why take a chance of messing them up by clamping to it.

That"s one reason so many people have had trouble when mounting to the retaining cup on a hand torch, its a NO NO.

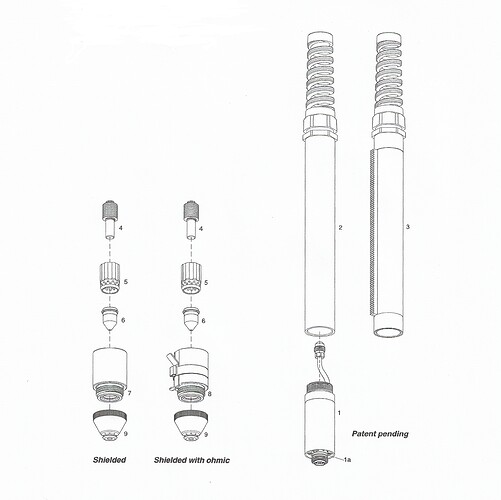
Here is a picture of a Hypertherm machine torch. You ether use the ohmic cup or a gear drive for the THC.

1 Like

Sorry for getting off track on this.

I really like the table your making.

George

I am using the PTM-60 you sold me(thanks). Are you saying the bottom clamp can’t be anywhere on the black portion of the machine torch? It is impossible to mount in the gray portion and position the torch so it has full travel with the CrossFire Pro Z axis mount(?).