They are overhauling one of our heat treat ovens and this is the 1/8” stainless steel liner, which is being replaced with a new and improved design. Not sure how good this is, metallurgically speaking. It has been heated to 1000° and cooled off at least a few times a week for the past 9 years. Probably shouldn’t be building any structural parts out of it, but should be just fine for plasma cutting signs and such.
I also got a small (18” x 30”) stand-alone piece (cover plate of some sort) of the same material and figured I’d test it out before cutting the bigger piece up into usable sections. Made this little bottle opener, which should be a good filler part for small unused areas of plate.
Seeing as how that turned out pretty good, I moved onto my first project of significant size. This has been something I’ve been thinking about for a while - A backlit house number sign for our driveway entrance. Programmed everything in Fusion 360 and post-processed in Sheetcam.
The program errored out twice during cutting, making me sweat a little bit. The first time was a height sensor issue, turned out I didn’t have enough slack in the overhead torch cable and when it traveled to the farthest corner it tugged on the torch. Fed a bit more cable up and continued on. The second time was a “torch movement without firing” error. This happened at the beginning of a long cut at the edge of the sheet. I think I just loaded the piece too close, at a bad angle, or both…and it tried cutting half-off at the edge of the material. Fixed this by butting up another small piece of sheet where the cut was trying to start, which I’m guessing gave it enough voltage feedback to trick it into thinking everything was copasetic. It continued without a problem from there. Lessons learned.
Pieces cleaned up.
Attaching the sides
Pulled out my “anvil” and rounded the corner pieces
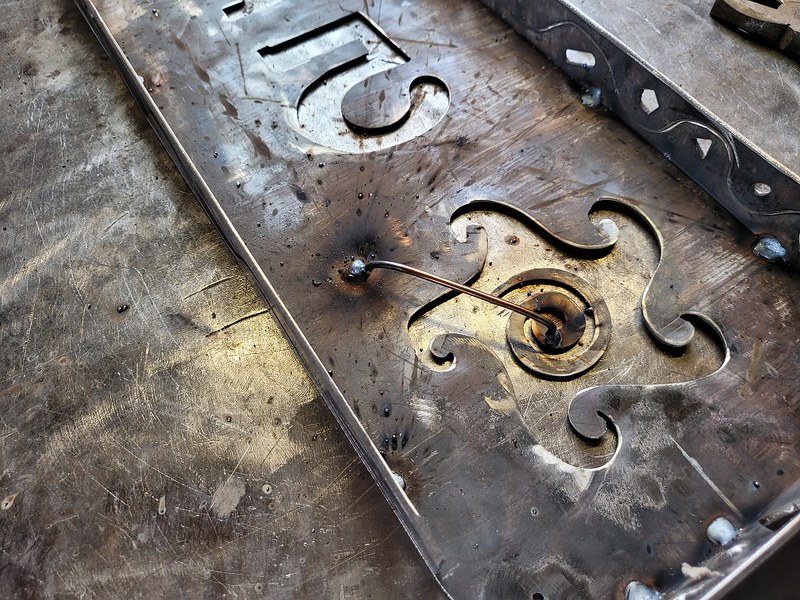
This is how I attached the little swirly inside the petroglyph. Thinking I should have made the wire depth a bit more, maybe less visible from the front. But it turned out not too bad. Probably should have done this a completely different way in programming, but wasn’t really thinking in plasma-terms that the whole piece would fall out. Live and learn.
Cut up some chain links (seen in previous pic) in half and welded the hoops inside for securing the lights to.
And speaking of lights, I’ll be using some solar string lights as I don’t have power out at the driveway entrance. To help maximize effectivity of the string lights, I cut out this backing plate out of some thin aluminum sheet.
Both the backing plate and inside of the sign got painted white.
Went with a matte black for the sign itself
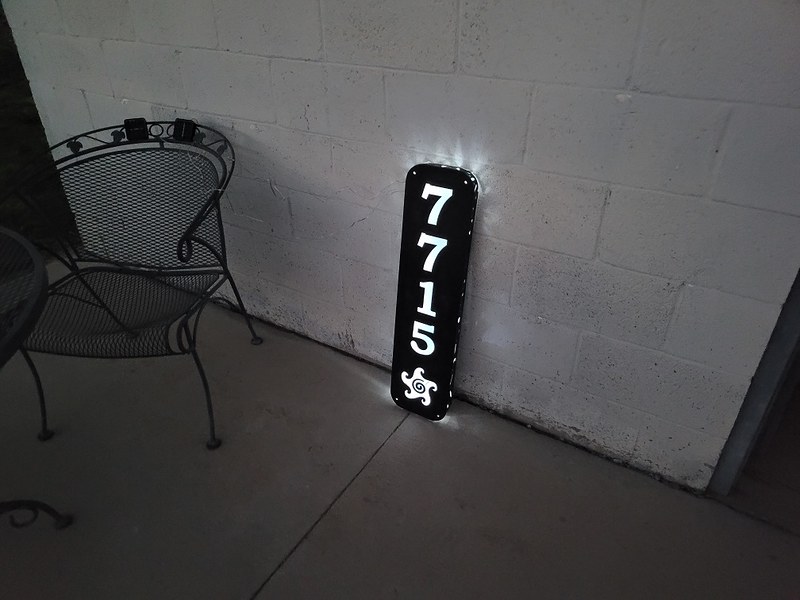
Waited until dusk and wired the lights in for a test run. I got these lights at least a year or so ago, so want to make sure they are still working. Leaned up against the shop for now.
Will give it a couple day/night cycles to make sure everything is charging and working correctly before I mount it out front.
Not the first person to make that mistake. Or likely the last time either - sometimes it’s hard to think of the negative space. But you recovered nicely - better in fact than if you had extended the swirl so it touched and didn’t fall out.
I think you missed a chance for a dash of whimsy. That ‘fix’ is the best part of the sign. I’d have done it on the front. Turn the mistake into a show piece. It’s cool regardless.
Quick follow-up to the house number sign. I looked up my purchase history for the lights and it’s been a lot longer than I originally thought, so ordered a new pair just in case. Here’s how the strings are attached inside. Zip ties keeping them tight and together, didn’t want any loose strands visible from the street.
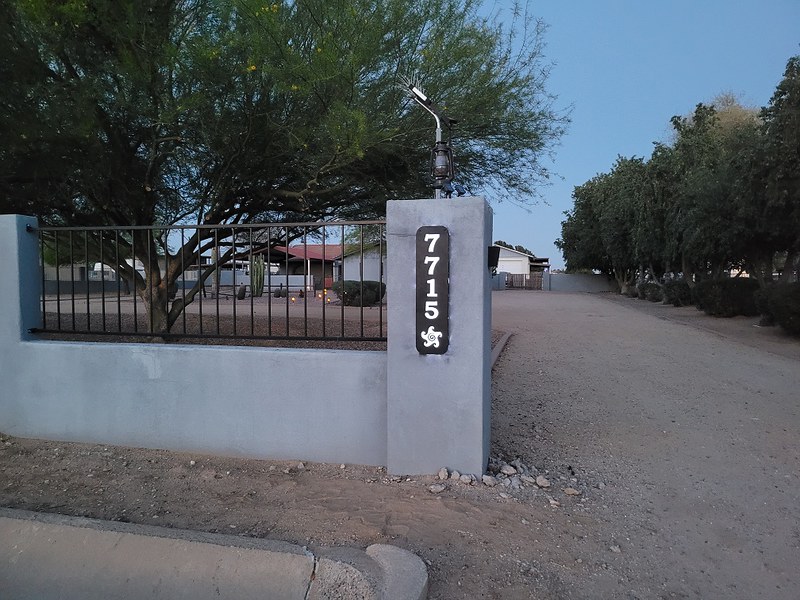
Mounted the white backing plate first. Using tapcons to attach to the pillar.
Also used tapcons to attach the sign itself. Did this separate from the backing plate so I only need to pull the sign off to change out the lights when they give up the ghost.
Here’s the sign lit up at dusk.
I grabbed a piece of half-inch square tube out of the scrap pile for mounting the solar collectors to. Just tapcon’d this to the top of the pillar.
Didn’t realize it until after I was done, but think I have enough wire lead to mount those to the bracket holding up the lantern. Would be less clutter up there and might re-do when I get the chance (and motivation)


 Well done! That looks like thick metal, good score!