Received mine last week and to the point of installing the electronics for the backguage. When I open the box around the press there were a few button head screws on the pallet, obviously looked like something was taken apart and now at the point of finding that whoever pre-installed the wiring they left the hard to get to part just lying in the cabinet. I managed to get one controller bolted in place but still have a board just flopping around in there. Not sure where it attaches but haven’t given up yet just looking if others found this. Also the wire job was done with no care so I’m planning to straighten that out as well then I can continue installing the controller that came in the box with the backguage
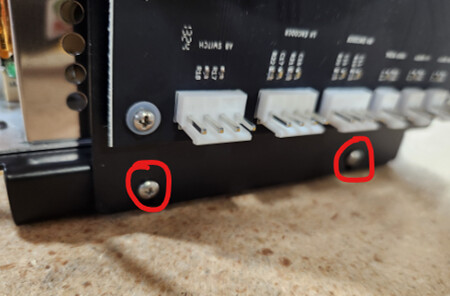
The control board is retightened here:
If you are missing the bolts for that, I can send you new ones - email me at support@langmuirsystems.com.
I can also write you up a more detailed guide on fixing that up if you want.
1 Like
Thanks for your post davidm. We received our machine 1/7/25 (this Tuesday). We noticed the logic board was just set in there, not mounted and that seemed odd. Looking closer we see the small retaining screws all the way at the bottom with no access unless the servo drives, power supply assembly and logic board are removed or lifted to access the mounting screws. Ours appears that the screws were snugged down with no board in place (no gap we can see under the screw head), like the main board was placed in last.
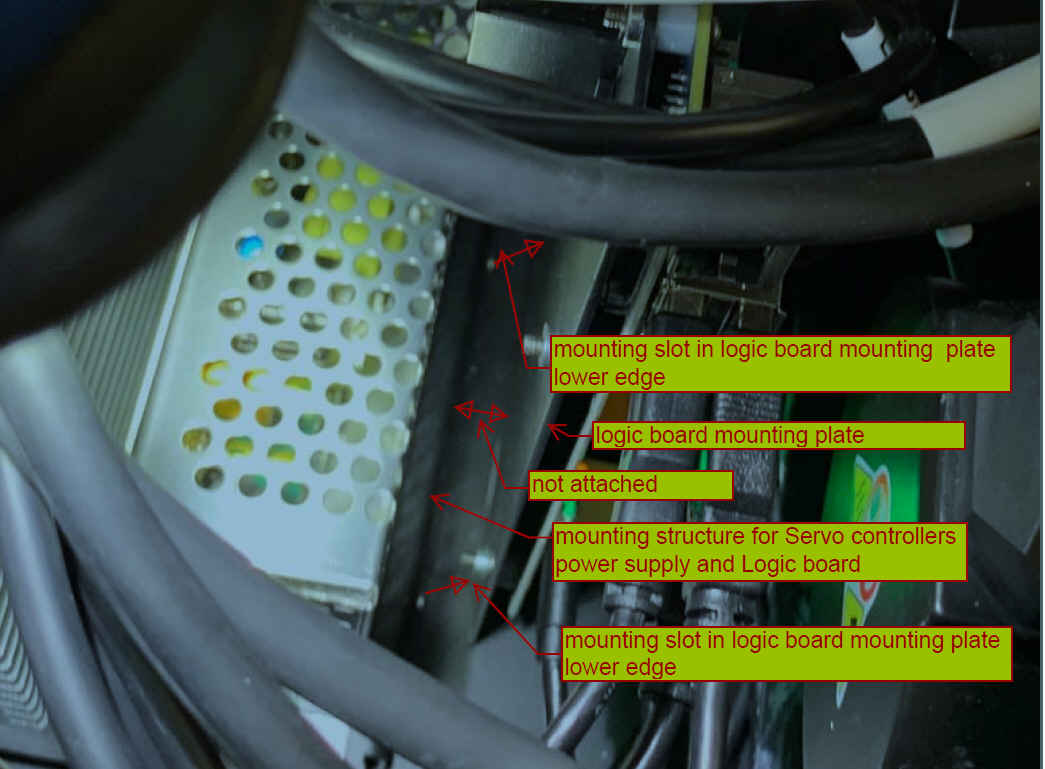
I agree a lot of the cable routing is a mess. Lots to unplug and route cleaner to access things like pulling the main controller assembly and install the back gauge control unit. We will take before and after images if we decide to pull all the controls out to attach the logic board floating around in that space. The mess of cables kind of keep it upright anyway.
Being able to pull the logic board up a bit did help to access an open USB port for a wireless mouse. A different style mount like two vertical slide in slots or a pocketed piece of UHMW or delrin attached through the bottom skin and to act as a nest may be what we do, not sure yet. Ken in NC.
Sam, FYI this is the Xplormor Offroad order Alex’s machine. https://xplormoroffroad.com/
2 Likes
Ken in NC, thanks for responding, looks like we are both in the same boat. You have really done a nice job documenting the issues and observations, the machine came at a somewhat bad time but I’m working little by little as time permits to get it all up and working. I’ll look forward to any help or ideas you come up with.
Thanks again, Dave in AZ
Sam, thanks for the response, I won’t need the screws they were shipped laying on the pallet and I later found the nuts laying on the floor of the cabinet. This is the third machine I’ve purchased from Langmuir, plasma table and gantry mill. I have been totally impressed with the quality and instruction online with the attention to detail but I’m a little concerned with my latest purchase with lack of attention to detail and what appears to be carelessness in assembly. I can only hope and pray this is no indication as to what’s ahead.
1 Like
Thanks Autotech. Here is a guide for you on how to get that re-tightened.
Control Board Mount Re-tightening.pdf (2.1 MB)
Thanks for the feedback.
1 Like