A thread to share assembly questions/issues
3 Likes
Got ours a week or two ago and finally started to assemble yesterday. So I will be sharing info on what I found.
So we will start off with the door. The 4 rivets provided did not fit thru the holes of the door, so I called support and they had me drill them out with a 5/16 bit. That did not totally do it, so we ran it tru a few times (on the door and the bracket) and finally got them to snuggly fit thru.
Then we went to mount the locks on the right hand frame. Instructions say “Secure the latch on the sidewall using the provided pilot holes with the fasteners shown.” Problem. No holes. Has anyone else experienced the missing holds for the locks?
1 Like
Make sure the gasket is mounted to the door first. No, mine did not have holes in the door. After the gasket is installed, you can lay them out.
The latches don’t have much release travel, so make sure before you drill. If you do it before the gasket it will be hard to open the door.
PM me if you have any others.
Hi ssquared14. Thanks for the feedback. I am working with the lead engineer to get some updates to the guide. We already have some of the changes in a draft form - we just need to get them pushed to the website. Keep the feedback coming. Either here or on our other email chain.
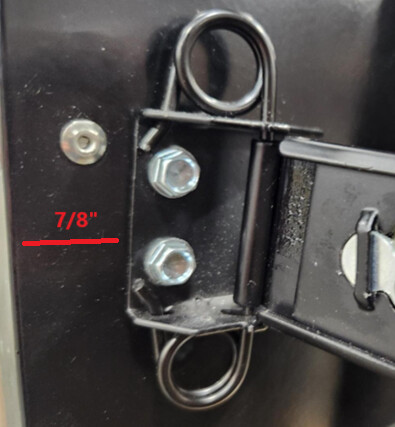
We are aware the holes are not on the side of the walls and are updating the guide to reflect that.
The latch should be located approximately 7/8” from the edge of the side wall.
1 Like
RIVETS
If anyone has ever had any interest in buying one of those cordless rivet guns, now is the time. I’m using the typical hand operated rivet thingies and the stainless rivets can be a pain and I had issues with around 6 of them. The peg does not want to snap off or snaps at the halfway point. There’s around 45 in total I think.
Milwaukee M12 rivet gun. You will never use a manual or air riveter again. Cordless rivet tool from Milwaukee pulls 3/16" rivets, delivers fast, easy riveting with 450 1/8" steel rivets per charge. Check it out on Amazon now! Amazon.com
3 Likes
Yep we used the M12 and it made it easy!
Oh boy, where do I start? I guess from the beginning, because I’m nowhere near finished with this assembly.
Walls:
The panels are just a little too small to slide together smoothly. My guess is the engineers didn’t factor in the powder coating. A couple of large clamps were needed to pull everything into place and rivet it down. There’s some rippling in the metal—kind of like a tin can—but nothing catastrophic. Everything feels solid on the inside, and since I bought the Temperature Sealant Kit, I’m not worried about leaks. It’s mostly cosmetic.
The instructions still read the same, and there are still no holes.
Instructions:
Vague at best. Be ready to spend a lot of time studying the pictures and leaning hard on common sense.
Pro Electronics Kit:
This was frustrating—no hardware included. Screws, bolts, etc. were missing. (I’ve already submitted a ticket.)
Pro Kit + Fan Kit Integration:
If you bought both, prepare yourself for a game of instruction ping-pong. You’ll be jumping back and forth between the Electronic Box guide, the Pro Kit steps, and the Fan Kit directions. I’m about halfway through each and realized you have to stop at certain points, switch over to another set of instructions, work a few steps, then switch back again. Rinse and repeat.
Current Progress / Concerns:
This is where I’m at in the assembly. If I run into more issues, I’ll update here. I will say though, after reading about some electronic problems others are experiencing, I’m a little concerned. Having already purchased and assembled the Crossfire Pro, I had high hopes for the “ease” of assembling the Vulcan 16. Next time Langmuir releases something new I want, I think I’ll give it a year so they can work the kinks out first.
3 Likes
Door doesn’t seal well on top corner. looks too tight on hinge side. pop rivets for hinges is poor design. bottom door attachment already getting loose from trying to close door tight. Need more space on hinge side so other side closes better. Any ideas. Built my last oven from scratch and thought I would save time on this one. Not much. It seems like it is still a pre production oven. not sure what to do with the door seals.
1 Like
Send me some pictures to support@langmuirsystems.com and I might be able to help you.
After waiting for answers to issues as they popped up, we finally got the machine fired up this week. (Honestly we have a company to run, and waiting for answers, and replacement parts really slowed down the process) Relays that control the lights and fans have issues, Lights stay on all the time, fan was running when it was not supposed to, sent them photos, they reviewed and are sending new relays.
as Wintermoon said - touch screen has issues. Contact support they suggested connecting a mouse.
Door Molding would not stay stuck to the door the first time, just fell off after 24 hours. We did do proper prep etc. They sent new molding, and it’s so far so good staying in place.
When door is closed tight and the oven is running you can see smoke coming out the top, and thru the side holes for the light wires as well as the back.
Asked about the fan and they said it’s to help circulate the heat. We have baked twice now as tests with fan not working and it went fine.
Pro Electronics box really flexes the side of the machine. Metal is two thin in on the side wall to properly support this item.
So we found it takes about 30 minutes to get up to 400 degrees with the ambient temp of about 80 degrees in the shop this time of year. Concerned it will take longer in the colder months.
Found that some of the items in the pro electronics kit were upside down compared to the photos in the install guide. Thus causing one of the USB cables to be to short, ordered a longer one on amazon to keep things moving.
The mesh screen setup is just ok. thinking of creating a different mesh setup to make it easier to hang things.
Our internal panels were installed opposite of how they should have been, which lead to me having to flip flop the internal temp sensors. No big deal, other than having to drill new holes.
Did not use any of the stick on zip tie clips they sent, they will not hold up in our environment. Swapped them out for wire camps. Also utilized more metal clips around the fan to ensure they did not wear funny and have not chance of catching on the fan.
If have the time to assemble, it’s a pretty good price, but figure the time you might spend on it and see if it’s worth it or just buying a different one to save the headaches of setup. Just depends on your level of skill. (mine was high, as we work on emergency vehicles, and are used to things like this)
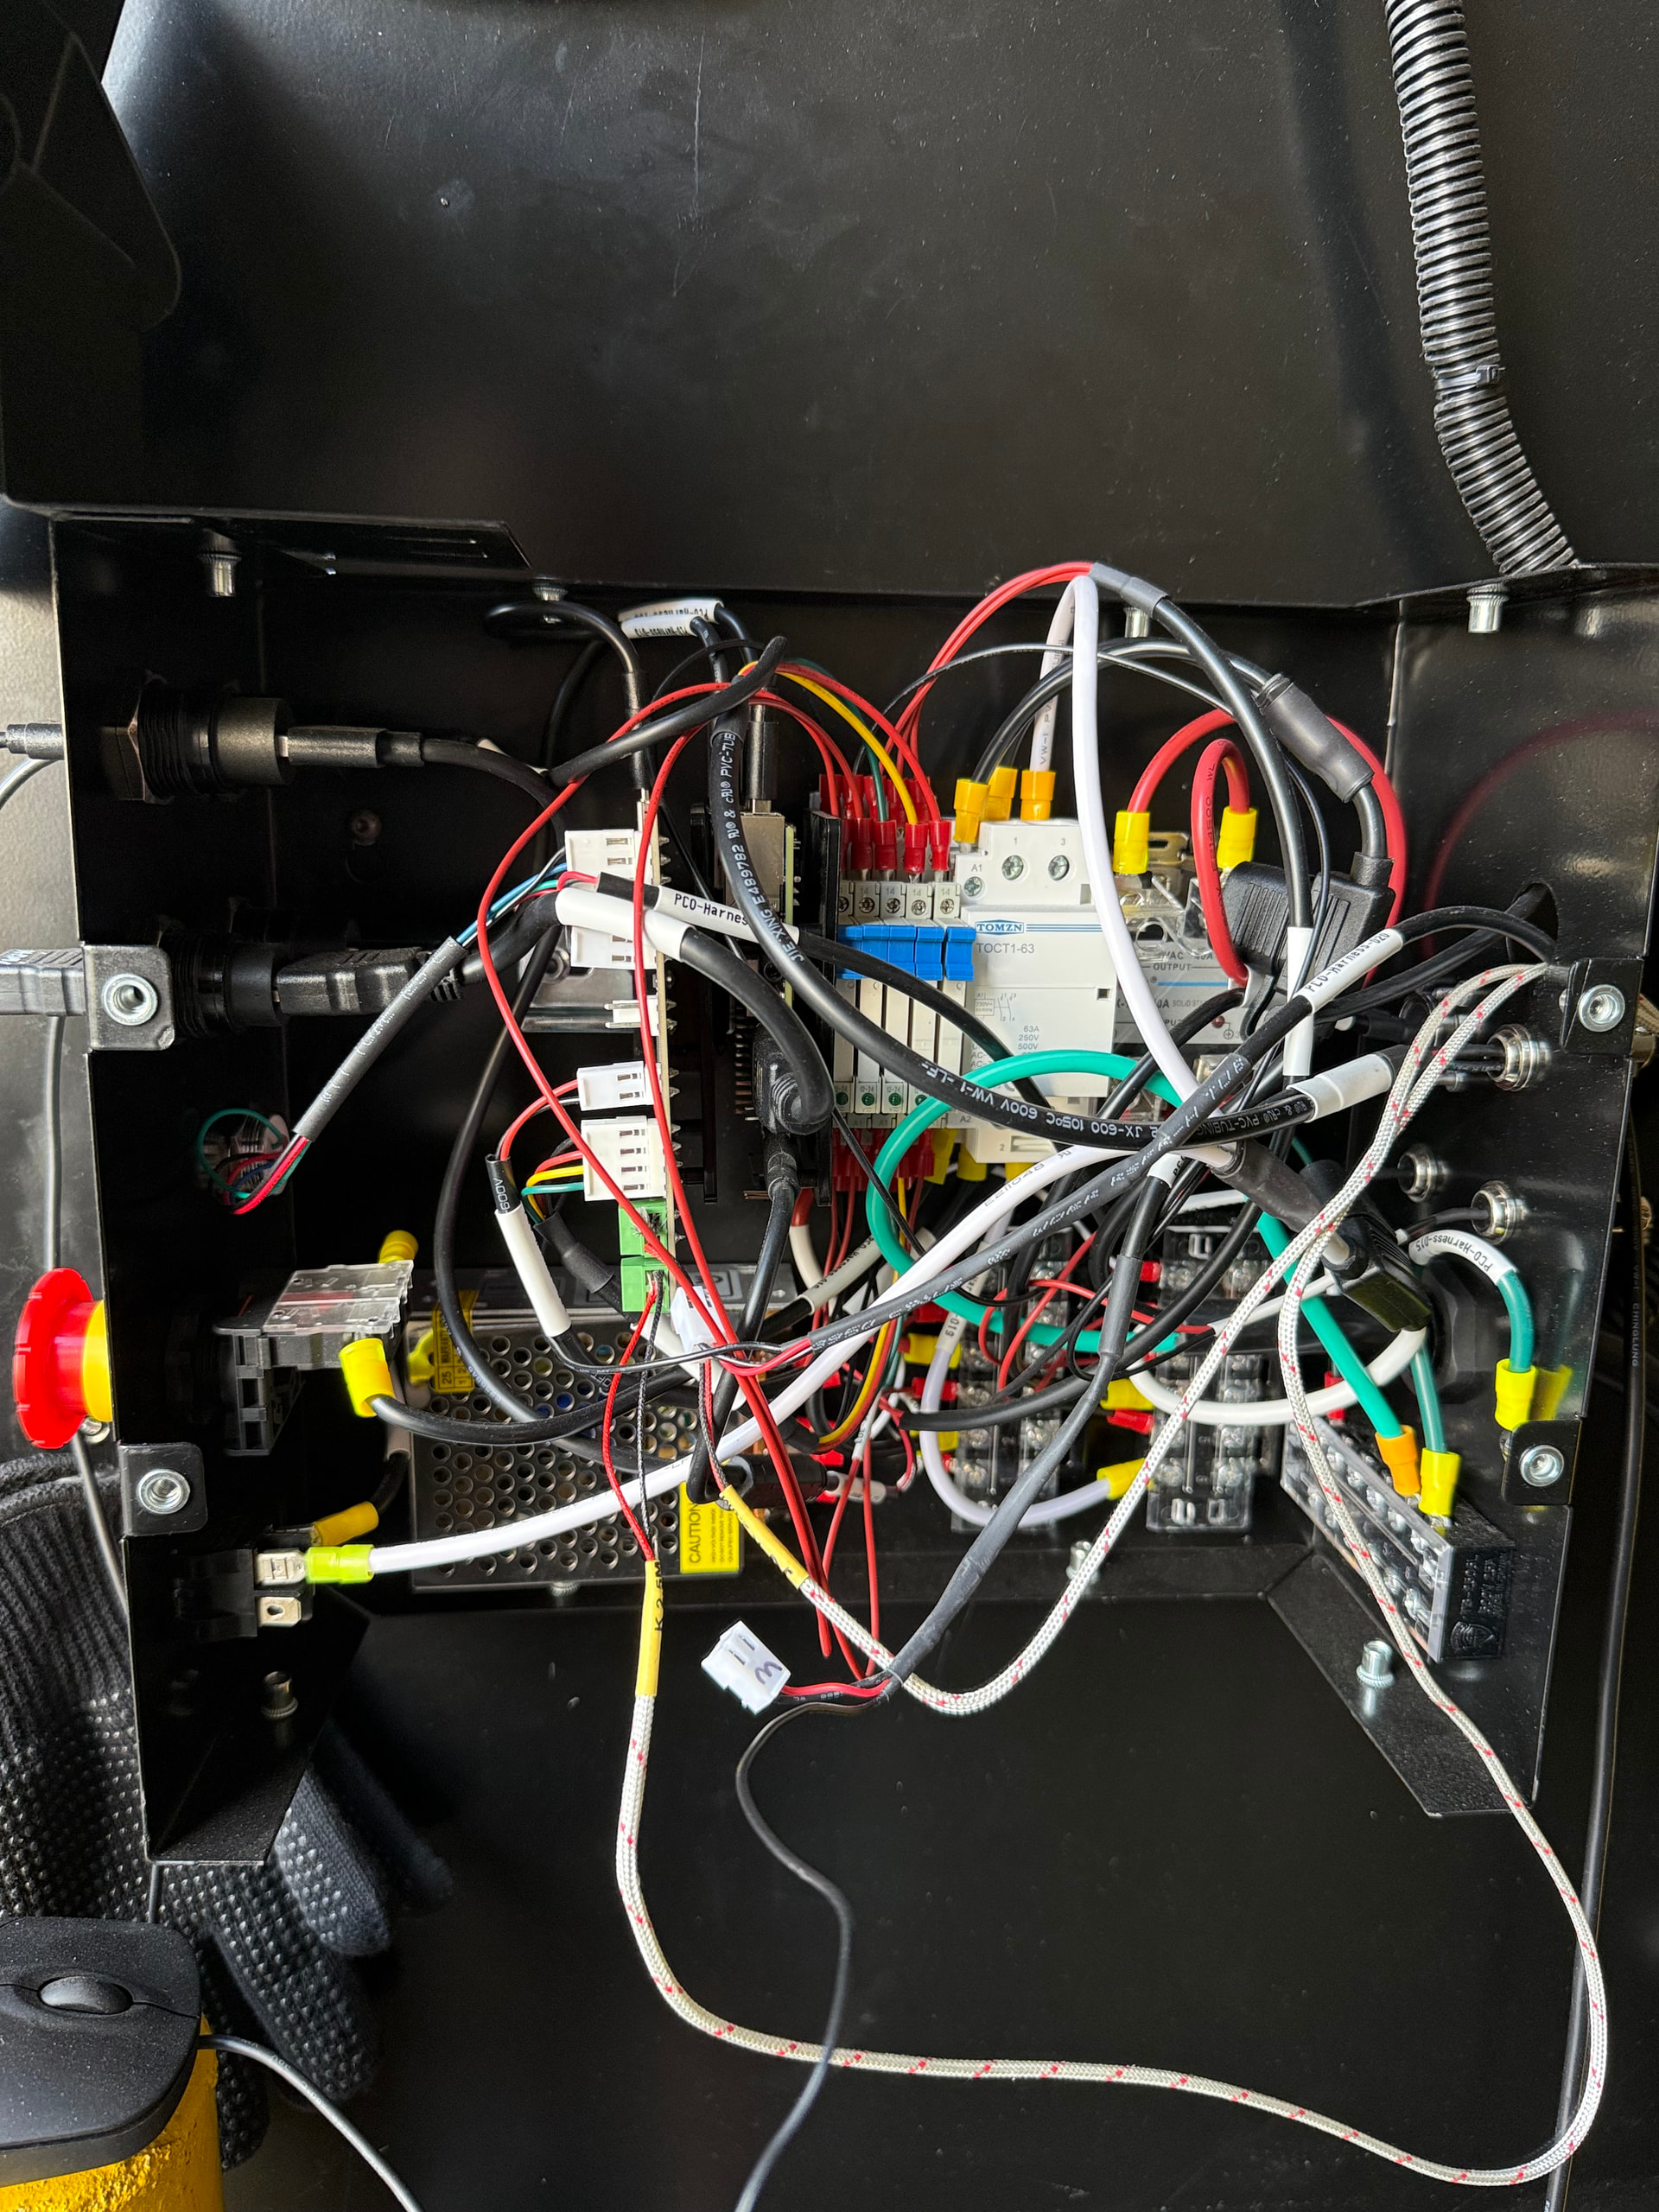
Can anyone send me pictures of the internal
wiring of the pro electronics kit. these instructions on assy
just don’t help me Thanks
Here is in inside of the pre-assembled replacement they sent me. It’s a mess (i know) my first one I had it all nice and organized. Also note my door switch is unplugged on purpose.
1 Like
Thank You Steve