I’m making my first cuts on this table and having some issues. I can’t seem to get rid of the dross on the bottom side of these test parts. The parameters are in the picture and other specs are below. Does anyone have suggestions for better results?
*Using smart voltage
*~70 psi air - using a 60 gallon two stage compressor
*14 ga cold rolled steel
*Parts are 2" in width, .25" slot, and .25" hole
*Razorcut 45 with Razorweld consumables (1 mm nozzle I think)
*.15in pierce height and .4 sec pierce delay
*Included a picture of how the material is grounded in case that was a concern - wire brushed the steel and aluminum flat bar used to attach the clamp
*From top to bottom parameters are cut height, cut speed, and amperage
All in all it looks pretty good. You are almost always going to have some dross.
Put the clamp on the actual sheet. That last picture was really good in my opinion
We run our RazorCut45 at the following for 14ga (.0747")
45A, 145 ipm, .7s pierce delay, .15" Pierce Height, .062" Cut Height, Smart Voltage On.
Note - Springback and backlash adjustment in Fusion have been bypassed.
Minor backside dross - usually will peel off or fall from hammer strike.
To get a great cut on holes and tight turns without a bevel, you will inevitably get some bottom-side dross. The torch generally has to slow down for the plasma stream to catch up to the cut and complete it so there is less bevel.
If you want dross free cuts, you will need to speed up on the turns and holes but will suffer with bevel. It is a game of compromises. With test coupons you are looking for accurate dimensions of inside and outside. To look how the cut is really performing for dross free, you need to do longer straight cuts.
I’ll give these parameters a shot and see how it comes out. I measured the springback and lash, so I’m hoping I am close to the .06" cut height specified in the program.
And I was honestly ignoring the holes and slots for the most part with these cuts. I was attempting to get an understanding of the effect each parameter has on cut quality. Checking dimensional accuracy is something I didn’t think of though. Thanks!
I refined the parameters a bit more and got better quality cuts. Forgot to take pictures, but below are the settings for anyone that finds it helpful:
100 ipm feedrate
Used Feedrate Optimization to reduce feedrate to 90 ipm for the internal features
70 psi compressed air
.04 inch cut height
45 A
.35 sec pierce delay
.12 inch pierce height
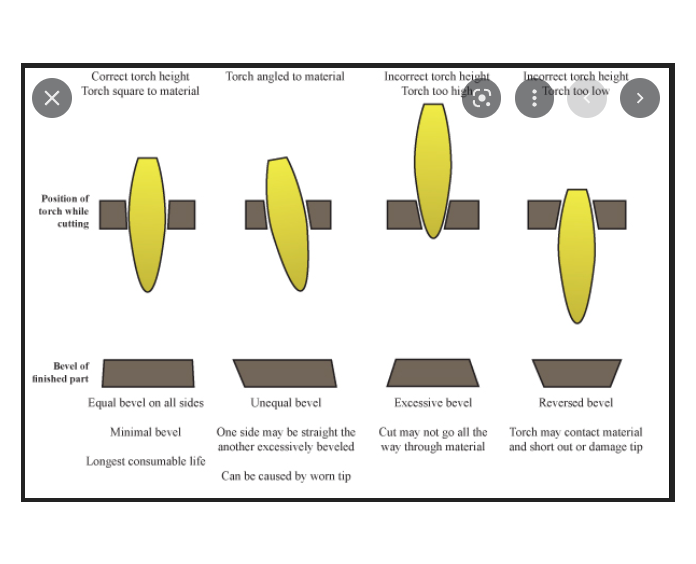
I’m glad you are seeing good results. Your cut height concerns me a little. It might be cutting clean but you might get a bit of a bevel. Here is the famous “bevel” diagram that pops up often:
If you see that the torch may be on the verge of undercutting the metal, you might be a touch too close unless you are using fine-cut consumables. If fine-cut, you would burn them out quickly with the 45 amps.
But you are very diligent with your approach Nice job!
Edit: Is that the CAM cut height or your actual cut height? Because they could be different and you might be right where you should be with your settings.
I noticed a slight bevel, but It’s because the torch is not square to the table. I’m trying to figure out the best way to square it as I don’t have the machine torch and it’s a little tricky.
My table has .006" of backlash and the material has ~.007" of springback. I know LS adds .02" to whatever springback value is input to Fusion. I entered 0" in Fusion, so I am likely .047" (.04+.007).
I’m also using the standard consumables for the Razorcut.
When I raise the cut height to .06, my cut quality drops quite a bit. And notice most people are using much higher cut speeds, near 140 ipm. At 45A and .06" cut height, the parts don’t cut completely out of the sheet. As I’m writing this, I’m realizing I might get complete cuts if I increased my pierce delay. I’ll try some more test cuts and see what I come up with.
I’m attempting to see how close to perfect I can get with this table.
I found that entering “0”, Fusion Post Processor will still enter the 0.02" in the springback. It will accept negative numbers up to and including “-0.020” inches and deduct from its 0.02 inches. If you put in a number larger, such as “-0.021” it will ignore it all together and will add its customary 0.02 inches. That is what I found.
I would imagine, it is. Good luck.
Definitely a good goal. But remember, all along this path of trial and error, the field is changing slightly as the consumables wear. I know it gets expensive but you may need to swap out the consumables a bit more often. As that nozzle wears, there is less focused energy for both a good cut as well as the faster speeds. Once you get it all dialed in, you will realize what was happening. Until then, it can be overwhelming and a bit frustrating. Hang in there.