Fusion 360, geometry selection

File below. I dont want anyone to just fix it. I am here to learn, so please walk me through anything that you find. Thanks
bat holder (v8~recovered).f3d (373.4 KB)

First thing i did was copy both of them and paste them into new design. You can open mine up and see how i selected the profiles. I used center compensation on the thread cutouts and left on other things. Let me know if you want more details after you opened the f3d file

bat holder - donp_ v2.f3d (377.0 KB)

2 Likes

Ok. Didn’t have much problem getting everything to generate a cut. A couple of things to point out:

1 - You have a fully extruded model. I turned off the sketches.
2 - Keeping with your naming, I generated another 2D Cut Profile. Under Geometry, selected Chain, moved the mouse over the stiches until a black outline appeared. Double click to select. Repeat for 2nd stitch.
3 - Feed optimization was at 25% of standard cut speed. 50-60% is better.
4 - (Optional) I will usually select Smoothing and enter a value 0f .001
5 - You have your origin set for bottom, center. Usually when I work with FireControl I’ll set bottom, left.
6 - For the outer profile, I created another 2D cut profile, Chain geometry, selected the outer edge. Note - Watch the arrow. Inner cuts - arrow counter clockwise. Outer cuts - arrow clockwise.
7 - When posting, be aware that the Post processor will add an additional .020" to your cut and pierce heights. (If you have springback set to .020" - it adds .040")

If I jumped over something, please ask - I’ll clarify.

3 Likes

Thank you for that info. I am going to work through everything you did and try to duplicate it myself. I have read opinions on extrude/not extrude…what is the reasoning behind this, other than giving you a better visual? Most of my confusion in the CAM is related to different modes/line colors/purposes…guess I will eventually get the hang of it.

So the first problem for me is when I move around the stitch area, chain selected, the individual stitches only highlight to a dark blue (just one at a time.) I dont see any change to a black outline.

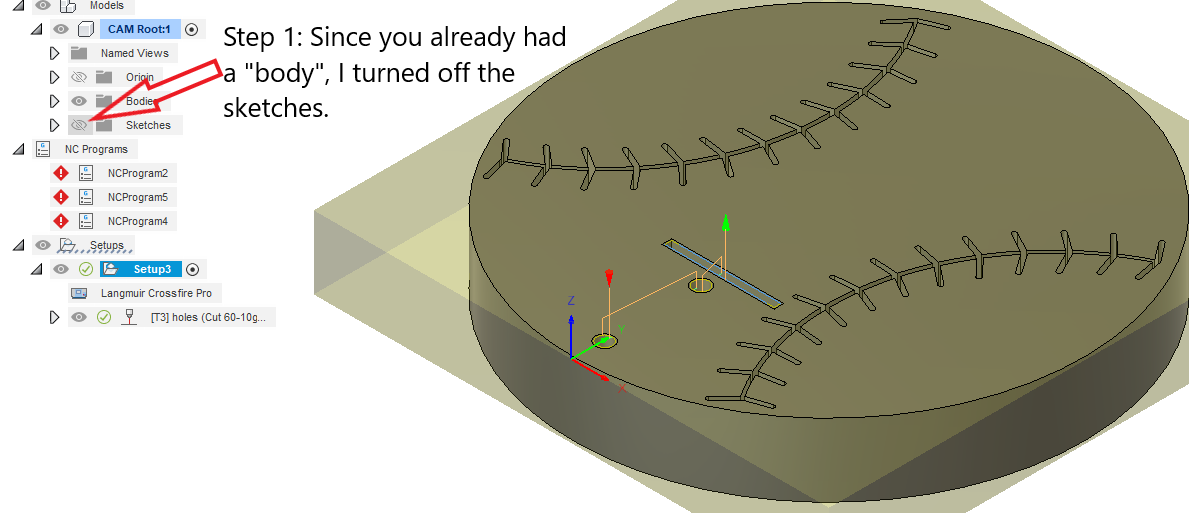
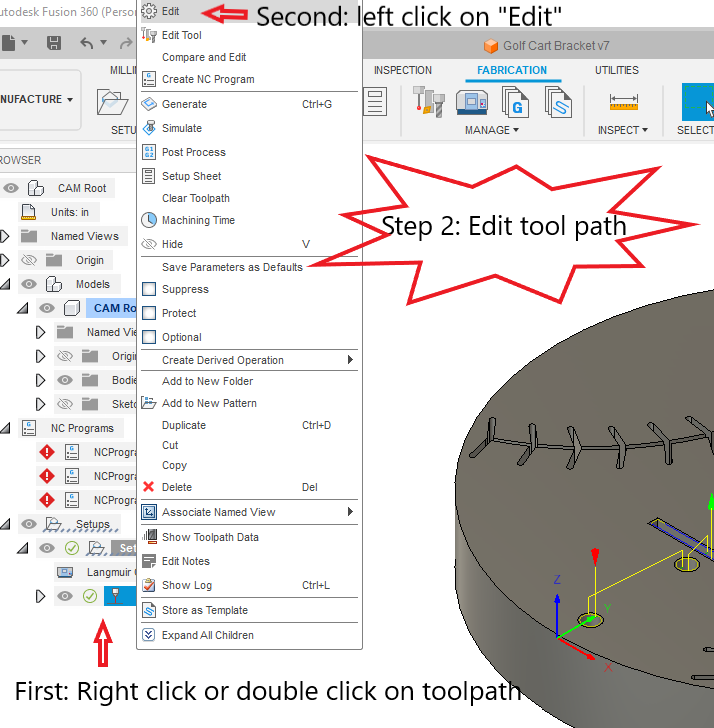
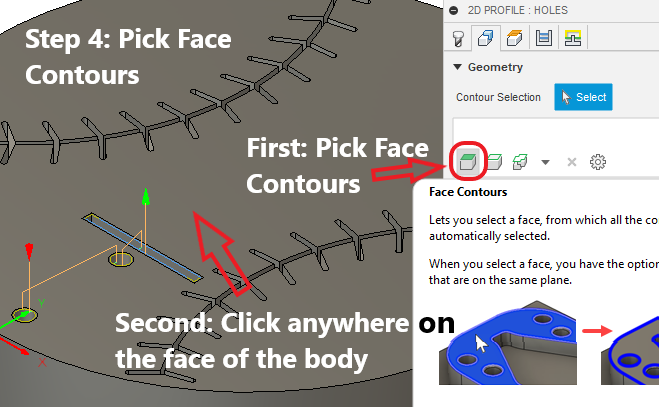
Not to confuse you, just another perspective: Terrance did an excellent job explaining a great way to get the CAM process done. I figured since you had the “body”, why not use the “face”!!!

FixBall3

FixBall4

FixBall7

FixBall8

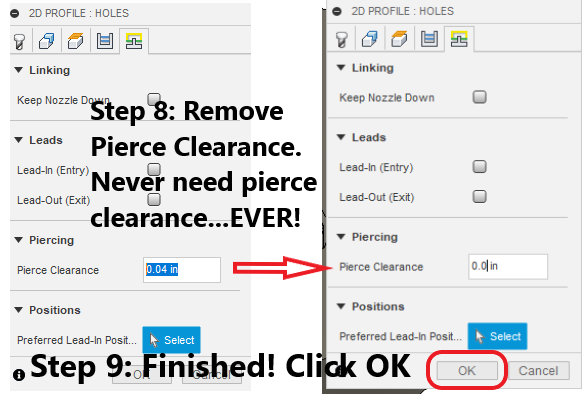
Now a small lead-in could be added. I don’t know if it was a setting in my Fusion profile or if you had lead-in and lead-out removed. It will still cut either way. I made only the changes that are illustrated.

You got three good answers showing you 3 different ways to approach it. Hopefully this adds to your bank of Fusion 360 knowledge.

bat holder (v8~recovered)Chelan.f3d (351.3 KB)

3 Likes

Terrance was directing you to the stitches in the body. Turn off the sketches to try his method (it will be easier to see). It works great. You will move your mouse, like he says, and they will turn black:


Mouse over stitches:

After clicking on black stitches:

After clicking all of the contours (I turned sketches off):

I actually, have never done this before. This is great!

1 Like

Beautiful, thanks for the info. I was able to go into the program and duplicate (while learning as I go). Added the small bracket in as another profile and posted fine. Thank you so much. I am sure this wont be the last you hear of me!

3 Likes

I have a geometry issue I’m trying to figure out. I followed spicer designs utube video of how to make an easy button but when I come to the geometry as he shows on the video I’m not able to duplicate it as he shows. It doesn’t give me the option to click chain it just keeps spinning me in circles and I’ve followed like 10 times over and over making sure I wasn’t missing anything or messing it up but I did it step by step and it doesn’t work for me at all. Sorry my grammar sucks

Did you extrude it and create body prior to going into manufacturing?

If you post your dxf I can do quick video for you of creating cutpath tonight.

Yes sir. I extruded to the exact spec in the video. So I extruded to .1 and then selected the body as he showed in the video but the pop up window that comes up and I select geometry but it doesn’t show up like in the video. I got frustrated and gave up for today since I had tried it over and over and over again. And still won’t work as shown in the video and everytime I get an error sayin lg that there is no something or other. I will post it tomorrow with a screen shot of what error I’m getting. I’m sure it’s user error since I’m new to the program. But followed along to a T step by step and kept going back in the video to make sure I was doing as he showed.

Thanks Don. I don’t need the cut path I was more trying to replicate something just to get use to the controls and functions in fusion. I purchased sheetcam when I bought my CP but I didn’t realize at the time that’s it a 2 step process and sheetcam is just the cam side of it

I just made this for you to see another way of making something from image. Hopefully it helps you with future projects.

2 Likes

Your awesome. Don. Thank you. I will have a look

1 Like

watching your video now and got to say so far, its way easier than how I was trying. I will let you know how it goes.

@Upstategrowguy77, if you are still having issues after watching Don’s video, you might need to click on the “profile” option in the sketch environment. I had a crazy new learning experience last night and discovered that it is easy to get things set up in such a way that it is difficult to replicate what others are doing in Fusion 360. Take a look:

how did you delete the svg image on the bottom right at one time? I’m trying to delete it but having to do it line by line

sorry I figured it out,

its still not working for me I get this every single time I try it


and if I hit ok I get this message and for the life of me I cant seem to figure this out. I followed along to a T and this is what I get every time I try and its starting to frustrate me a great deal

You do not appear to have a “body.” Did you look at my previous message?