Cut quality on new XR


Little marks in the text are from Pierce clearings and lead out and lead in settings

The chatter marks that we’re looking at up above in Orange I think are in the actual drawing

Have you checked the table for any slop? Either on the x axis or y axis? I just gained a ton of quality back myself by adjusting my x axis assembly? The carriage that holds the torch. The bearings had backed off and were allowing atleast 1/8" of movement. Looked good on straight cuts but if it were traversing x and y at the same time i could see chatter like in your pictures. Any rapid change of direction caused issues too. After tightening those up it looks clean again.

I will try and select smoothing. I did have slop in my y axis prior and I tightened it down, I just dont want to over tighten but i wonder if the gantry is jumping a little bit still. I selected all of the lines individually in the 2d profile menu. Let me post the .dxf file so you can see. I greatly appreciate the help.

extruding your sketch into a body before entering the manufacturing space will simplify the selection process.

here is some method of exporting your files


or

Posting a *.F3D file will show me exact how you did everything in fusion360. its all the information including a history of your preferences and work flow history for that particular design.

lageman v1.f3d (483.7 KB)
lageman v1.dxf (291.3 KB)


it is smooth in the drawing

I think it may have to do with how you selected the lines.

extrude your sketch to a body before developing tool paths.

off to work for me I’ll investigate more later.

how do you extrude the sketch to a body?

You can either right click on the part (making sure the whole part lights up when you hover over it signaling a closed contour) and selecting “extrude”. a box will pop up for you to enter your preferred part thickness. Or you can left click on the part (again, as long as it doesn’t have any outer open contours) and hit ‘E’ on your keyboard.

In Fusion When you have selected a Profile to cut. Look under the Passes tab Turn on Smoothing an adjust the tolerance.

Fusion creates arcs out of thousands of short straights lines. Some controllers can have issues with these (even $250,000 milling centers) Smoothing helps cut down the number of line segments. The fun part is to turn smoothing off create a NC file. Turn it on and set you tolerance really loose. Create a new NC file then compare the two. The one with loose tolerances will be smaller and have many less lines of code in it. (assuming it’s on a real part and not a box with rounded corners)

I have been running tolerance at .002 in… What would you suggest the tolerance and smoothing tolerance be at? If I select smoothing?

That really depends on how large your smallest area is. I would keep it to no smaller than 2X your plasma kerf. There’s a point of diminishing returns going too larger like there is going too small.
If that is the output with a smoothing of .002 try and rerun it with the smoothing set to .0002
There’s a chance that your cutting out too many of the line segments. If you want to save metal just make a drawing that has some of the problem areas in it and use it to test your changes.

Let’s not forget that this is a new table and this may be the result of something loose in one or more axis. Don’t get too caught up in trying to find a programming problem, when it may be an assembly/setup problem.

2 Likes

I would think the same thing but the text cut quite smooth? But the text isn’t using x and y at the same time like the scroll work is so maybe some chatter in the machine.

It really looks like what I was getting spoken about above. Mine wasn’t that bad so I would think if it were the exact same issue then it would be noticeable trying to rock the carriage by hand. I could definitely tell instantly it needed tightening.

1 Like

I looked over your fusion file some more and it seems fine . I would adjust some of the parameters though .

here are some screenshots of your parameters

lf lageman 2
lf lageman 3
lf lageman 5
lf lageman 4

I changed a few things in this file. Lead in speed, added Lead in out radius, lead in out length, added smoothing.
lageman LF forum TW.f3d (700.7 KB)
here is a cut file base on those changes
LF lageman.nc (54.7 KB)
lf lageman 6

I think @MrWelder and @ds690 are right about the chatter being mechanical in nature.

I took for granted how small this piece actual is

About 16" in total height

1 Like

So I double checked tightness and had a tiny amount of play in the x-axis, so I snugged it down another 1/4 turn, then used the smoothing and your cut parameters you sent over and I got this. It is alot better but I am still getting pierce marks on the edges, is there a way in 2d profile to select where it starts, I click and sometimes it is in the center and other times it is on the edge. So I delete it and click somewhere else and it moves it but it still is not in the center of the cut out piece…

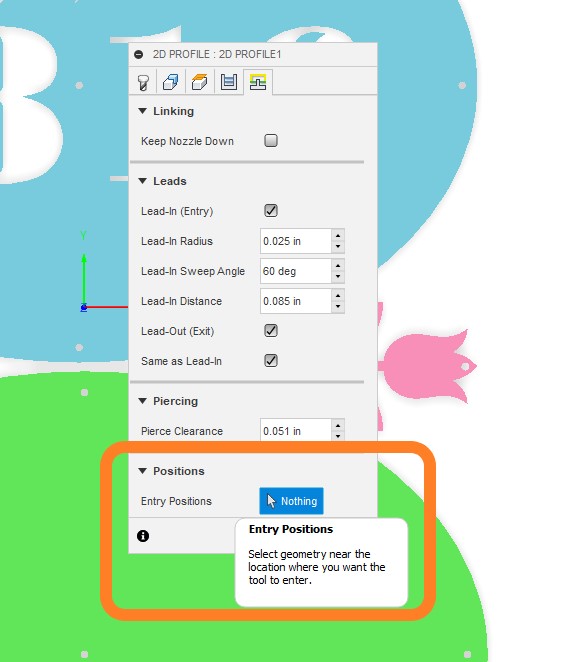
It is looking better. maybe try slight more radius?

And did mess up the file I send too the pierce height should be .15

not .015

1 Like

Could also try a slightly longer lead in and or a shorter pierce delay.

1 Like

That looks a heck of a lot better. Nice Job!