Hey guys, so I found a video which uses the marking application with the hypertherm 45xp. I wanted to share it so owners of this machine know this extra feature that can be used by just picking up a marking tip and nozzle. Basically what this feature does is etch into the base material instead of penetrating and making a cut. Even using regular air your able to make designs or logos into your work. If I was home I would test it out but unfortunately I wont be home for a few weeks so if anyone wanted to pick up the marking tip and nozzle and confirm this process I’m sure it will be a useful tool to use to etch signatures or other details into your artwork.
if you start watching the video at around the 6 minute mark you’ll see where they start talking about using the marking process with their cnc machine.
I am resurrecting this because it has the video which explains it better. - closer to the 8 min mark then jump a couple of minutes to see it work.
I too am on the hunt for an answer on this. It would be nice to be able to mark pieces of a pattern or assembly like “Left”, “Right”, “Top” ," Unit Number ", and so on.
I use this feature on my 45XP all the time, but my penmanship sucks and I would like something more professional looking.
It would probably involve making a second pass over the same material after setting the amperage and gouge settings on the plasma.
Looks like there are a lot of us asking the question but nobody has done it yet.
I may be the first. Just need guidance in the system to make it run the cut path without pierceing. Much like your straight or single line tutorial for cutting out letters in a sign (push and pull I think).
Well I ordered some marking consumables so we’ll see how this works.
@Sticks I agree it will work very similar to the workflow in the push pull video. (My current single line workflow now is slightly different then in this video I hope to make a updated one soon)
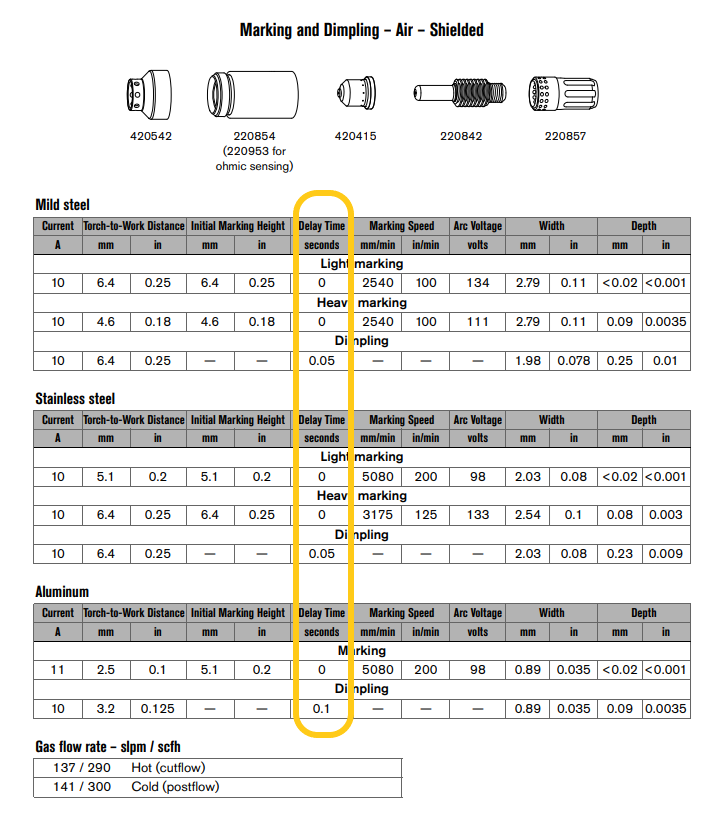
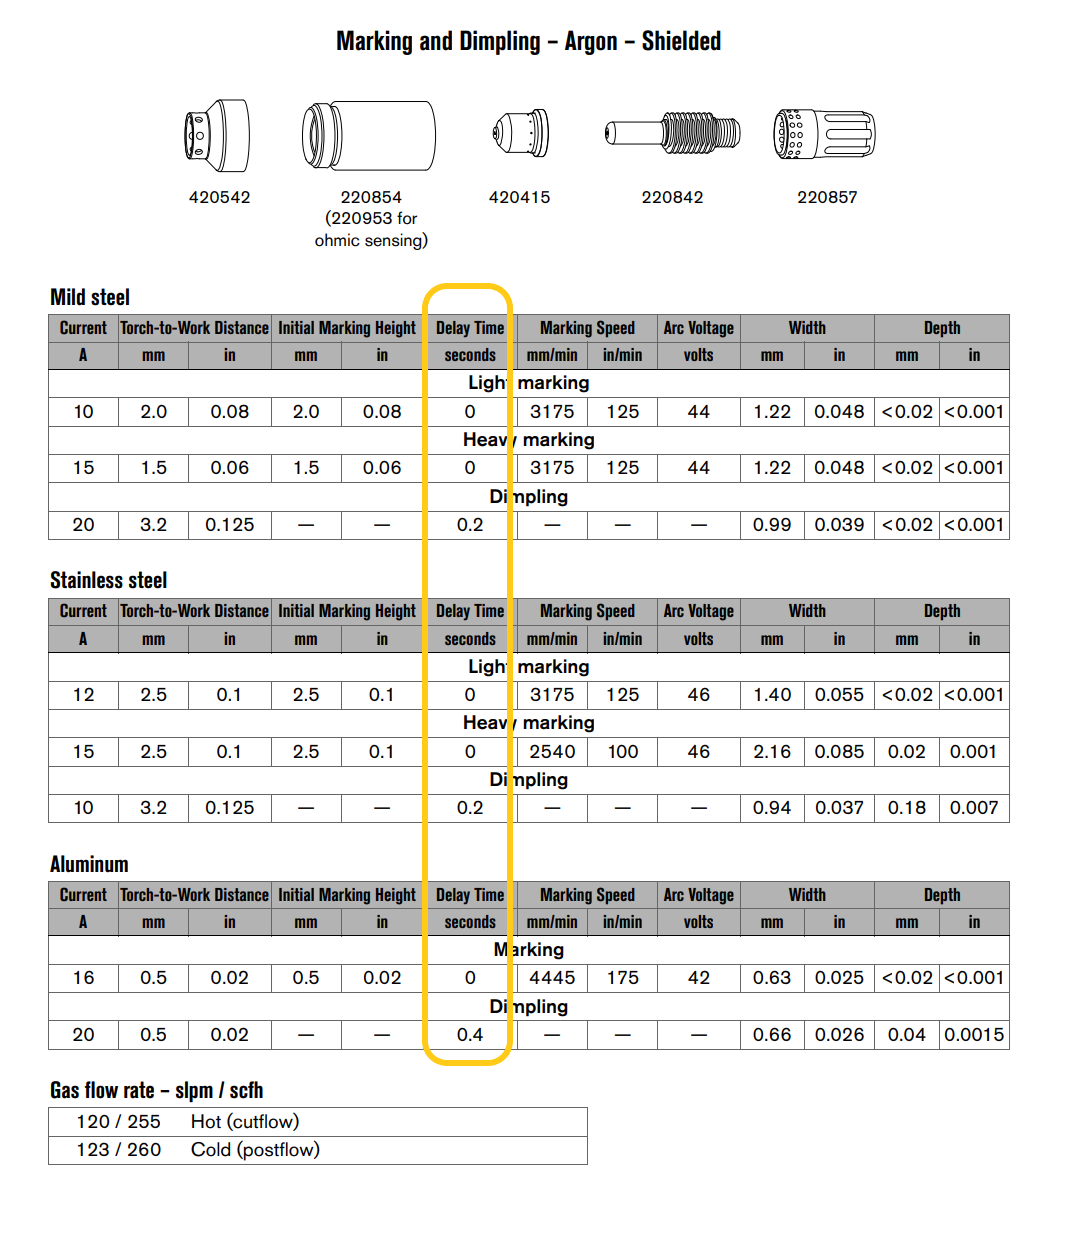
In the manual there is quite a bit of information to start with.
Pages 113 -123 , 132-133
in the charts for marking they substitute some language
The amps are crazy low at 10-20amps Time delays between 0-0.4sec
The shortest delay I can get on my before it miss fires too often is .36sec in post which is basically 0secs in torch on time.
Another thing I do for single line is have a piece of geometry to cut first before moving into the real geometry, so firecontrols artificially long first pierce does not effect the real work. I think this rule would apply well to marking.
Trying out this 45xp is something i should have done a long time ago
I should have run a few more different searches, because yours @TinWhisperer did not come up. Only about 5 that had no definitive answer or like this one that was left hanging.
When I am doing this by hand, 10a for very light marking - can almost sand off pretty quick, 20-25 for a heavy mark .0312 to .0625 deep. Faster or slower at any given amp will change the depth and width and is a PITA to control by hand.
I will need to re watch you vid on how to set this up (single line cuts) , and the others that you found.
My machine torch finally shipped yesterday, so now I am about 3 weeks from even trying out my table (next free weekend - work away from home during the week). I may stick my hand torch on it this weekend. Does not look fun to try to square up.
Make sure to use the machine torch mount and not the hand torch mount with your machine torch. The hand torch mount (supplied with the pro table) will not be able to grab the machine torch in the proper location and could damage the torch. Langmuir sells a machine torch mount and there are others that sell a 3D printer version of it.
If the goal is only marking, seems like swapping in some sort of sharpie pen holder would be ok and cheaper. I only say that because, since I am “swapping” in this tip, I might as well swap in a pen.?
Having said that I am interested in the results here…I have been wrong before
I do see the value with long term marking that is not easy to rub off with time or solvents. This would include pieces of an assembly. And, it could have value of putting your signature/logo of pieces that you make/sell or for identification purposes.
I have seen some of the etching on Hypertherm site and was not happy with the quality. It is definitely not something that would be used on a trophy or keepsake.
Equipment number, owner name (company), part number, weld or bend line, top or bottom…Long list of uses.
Art, not so much unless you could get your “mark” dialed in and make it look good as a torch engraving.
ETA - I have a 3d printer at home. I can get this printed up pretty quick. Was going to machine one out of aluminum, and may still. First things first, get it running, perform the mods, learn how to use the marking feature, put the darn thing to work so it can earn it’s keep.